Twilio is a developer platform for communications, the provided programmable Application Program Interfaces (APIs) are a set of building blocks developers can use according to their requirements. Twilio provides facilities for SMS, WhatsApp, Voice, Video and many more.
This tutorial will walk you through using Twilio's SMS functionality with the help of Java cloud functions provided by Appwrite.
📝 Prerequisites
You will need an running Appwrite instance. If you do not have Appwrite yet, you can this installation step over at appwrite.io (It's super easy and 1 step process, even I followed the same 😉).
You will also need a Twilio account to be able to send SMS. Let's build it in a few steps.
📽 Create Your Project
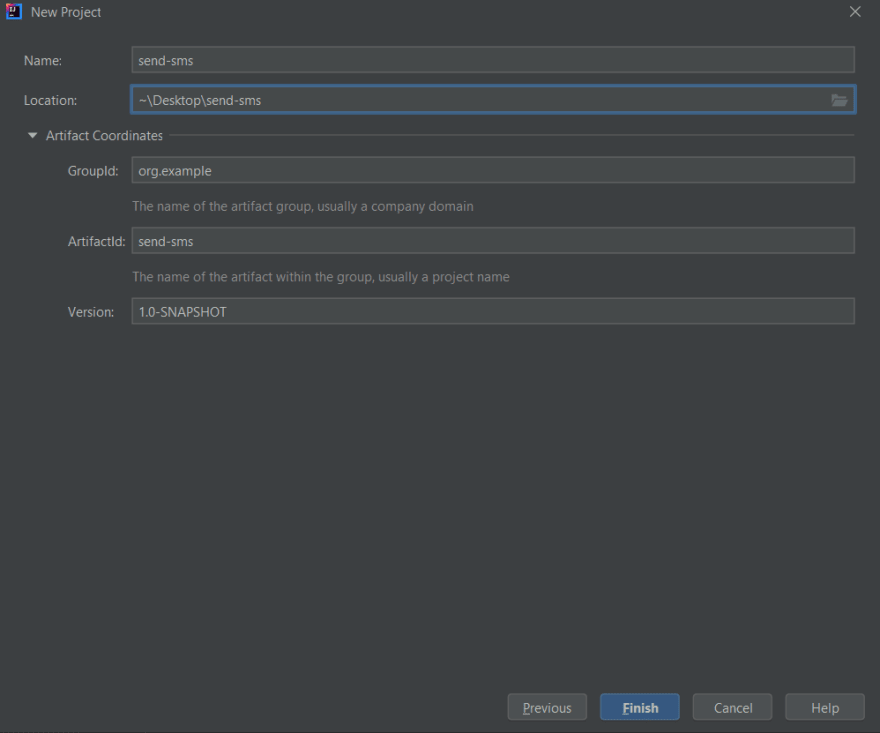
Create a new Maven project using your preferred IDE ( I am using IntelliJ ). Set the name and artifact ID.
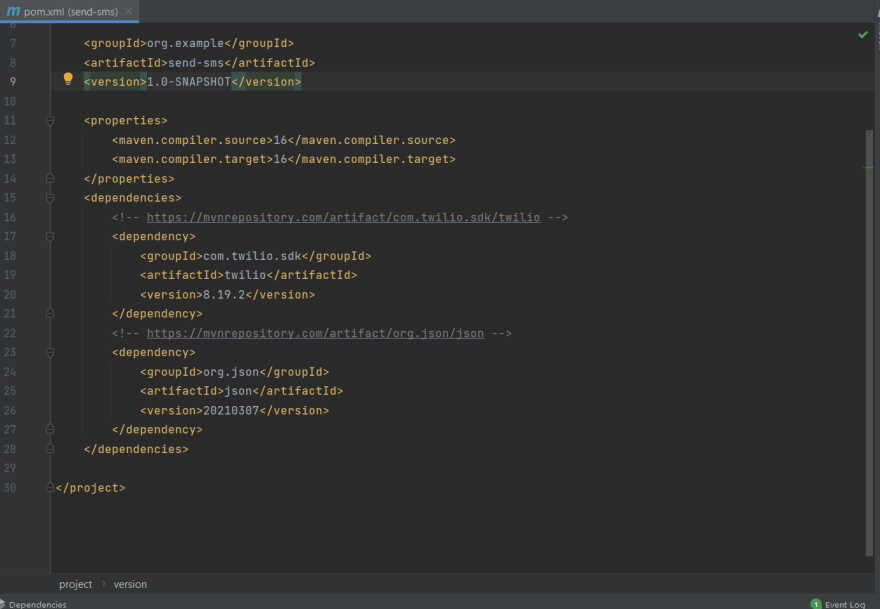
Once the project is created, we need to add the required dependencies. For this implementation we need.
- Twilio Helper Library
- org.json
Add the following lines to <dependencies> section of pom.xml
<dependencies>
        <dependency>
            <groupId>com.twilio.sdk</groupId>
            <artifactId>twilio</artifactId>
            <version>8.19.2</version>
        </dependency>
        <dependency>
            <groupId>org.json</groupId>
            <artifactId>json</artifactId>
            <version>20210307</version>
        </dependency>
    </dependencies>
Update your Maven dependencies from the UI or using Ctrl + Shift + O
👨🏻💻 Time to Code
Create a new Java class under src\main\java and name it SendSms.java.
Next, create a main function that fetches all the environment variables and parses the JSON string stored in the environment variable APPWRITE_FUNCTION_DATA.
APPWRITE_FUNCTION_DATA is a special environment variable that is passed to the Cloud Function.
We are interested in the receiver and Message provided by the user to send our SMS.
import com.twilio.Twilio;
import com.twilio.rest.api.v2010.account.Message;
import com.twilio.type.PhoneNumber;
import org.json.JSONObject;

public class SendSms {
    // Getting the user credentials
    public static final String ACCOUNT_SID = System.getenv("TWILIO_ACCOUNT_SID");
    public static final String AUTH_TOKEN = System.getenv("TWILIO_AUTH_TOKEN");
    public static final String SENDER = System.getenv("TWILIO_PHONE_NUMBER");

    public static void main(String[] args) {
        String payload = System.getenv("APPWRITE_FUNCTION_DATA");

        if (payload != null && !payload.isEmpty()) {
            try {
                JSONObject json = new JSONObject(payload);
                String receiver = json.getString("receiver");
                String msg = json.getString("msg");
            } catch (Exception e) {
                System.out.print("[ERROR] There was an error");
                System.out.println(e.getMessage());
            }
        } else {
            System.out.println("[INFO] APPWRITE_FUNCTION_DATA is empty");
        }
    }
}
Next, let's create a simple function that sends a request to Twilio and send our Message.
public static void sendMessage(String receiver, String msg) {
        Twilio.init(ACCOUNT_SID, AUTH_TOKEN);
        Message message = Message
                .creator(new com.twilio.type.PhoneNumber(receiver), new com.twilio.type.PhoneNumber(SENDER), msg)
                .create();

        System.out.println(message.getSid());
    }
Next, call this function from our main function
// Install the Java helper library from twilio.com/docs/java/install

import com.twilio.Twilio;
import com.twilio.rest.api.v2010.account.Message;
import com.twilio.type.PhoneNumber;
import org.json.JSONObject;

public class SendSms {
    // Getting the user credentials
    public static final String ACCOUNT_SID = System.getenv("TWILIO_ACCOUNT_SID");
    public static final String AUTH_TOKEN = System.getenv("TWILIO_AUTH_TOKEN");
    public static final String SENDER = System.getenv("TWILIO_PHONE_NUMBER");

    public static void main(String[] args) {
        String payload = System.getenv("APPWRITE_FUNCTION_DATA");

        if (payload != null && !payload.isEmpty()) {
            try {
                JSONObject json = new JSONObject(payload);
                String receiver = json.getString("receiver");
                String msg = json.getString("msg");

                sendMessage(receiver, msg);
            } catch (Exception e) {
                System.out.print("[ERROR] There was an error");
                System.out.println(e.getMessage());
            }

        } else {
            System.out.println("[INFO] APPWRITE_FUNCTION_DATA is empty");
        }
    }

    public static void sendMessage(String receiver, String msg) {
        Twilio.init(ACCOUNT_SID, AUTH_TOKEN);
        Message message = Message
                .creator(new com.twilio.type.PhoneNumber(receiver), new com.twilio.type.PhoneNumber(SENDER), msg)
                .create();

        System.out.println(message.getSid());
    }
}
Next, we need to package out function as a .jar file.
⚙ Configure Artifacts
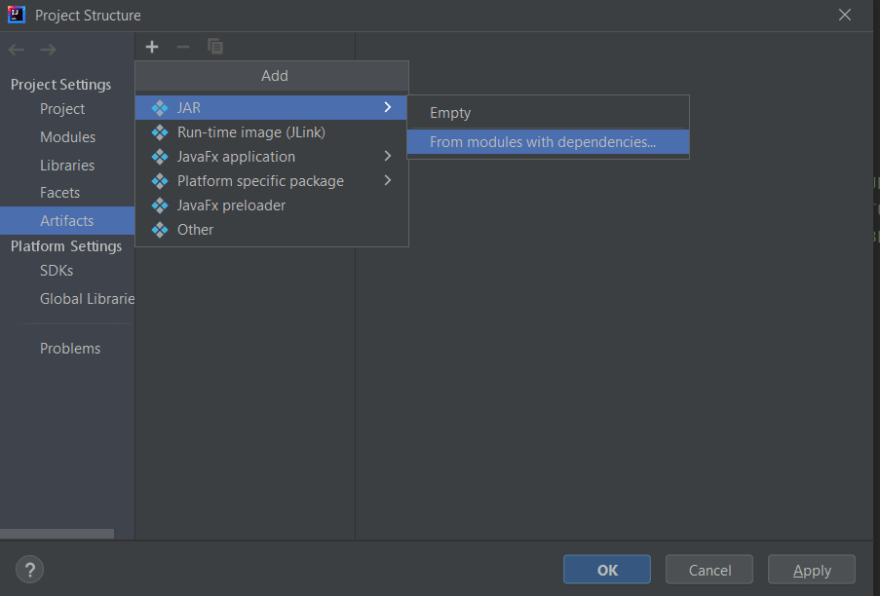
In this step, we create a .jar artifacts required to deploy our cloud function. Select File > Project Structure > Artifacts as seen in screenshot.
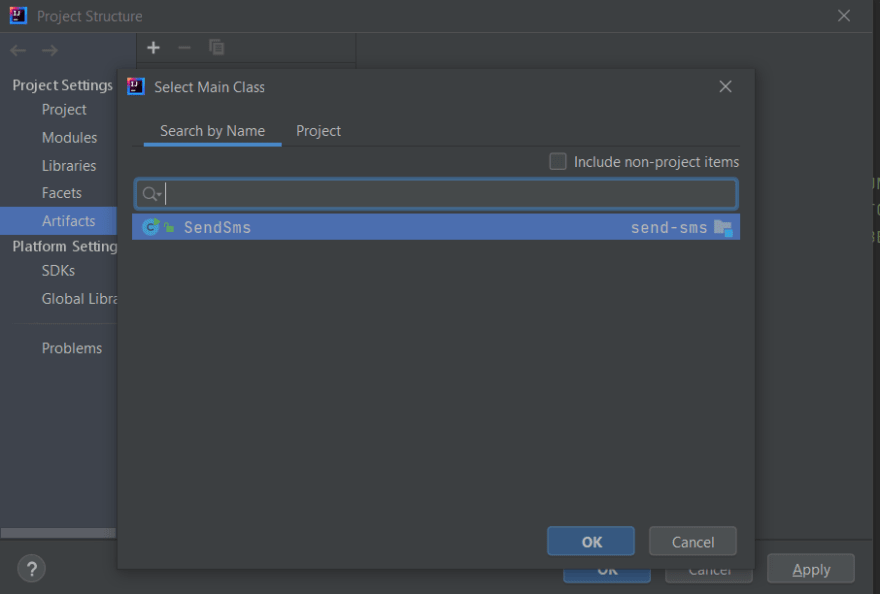
In the following dialog, select the main class (SendSms) as shown.
Next, click Apply and then OK.
Confirm by checking for a new file was created at src\main\java\META-INF\MANIFEST.MF.
Now, build your artifacts using Build > Build Artifacts > Select your artifact from the list > Build. You will find the output in out/artifacts/send_sms_jar/send-sms.jar
🧪 Testing Locally
Now we need to test the function to ensure it works properly and is free from any compilation issues. Run the following command from root directory of your project folder. Replace the placeholders with the appropriate values.
- TWILIO_ACCOUNT_SID
- TWILIO_AUTH_TOKEN
- TWILIO_AUTH_TOKEN
- APPWRITE_FUNCTION_DATA
docker run --rm --volume "%cd$":/usr/local/src:rw ^
  --env TWILIO_ACCOUNT_SID="Your SID" ^
  --env TWILIO_AUTH_TOKEN="Your Auth Token" ^
  --env TWILIO_AUTH_TOKEN="Your Purchased Phone Number" ^
  --env APPWRITE_FUNCTION_DATA="{\"receiver\":\"Phone Number\",\"msg\":\"Your message\"}" ^
  appwrite/runtime-for-java:16.0 \
  java -jar out/artifacts/send_sms_jar/send-sms.jar
Add your Personal Phone Number as the receiver to see the magic happen. If everything goes well you will receive the message on your device and Voila! It works 👍🏻.
☁ Create your Cloud Function
Head over to Appwrite Dashboard and navigate to Function Tab on the sidebar and click on Add Function. Give your function a Name, select an appropriate Java runtime and click Create.
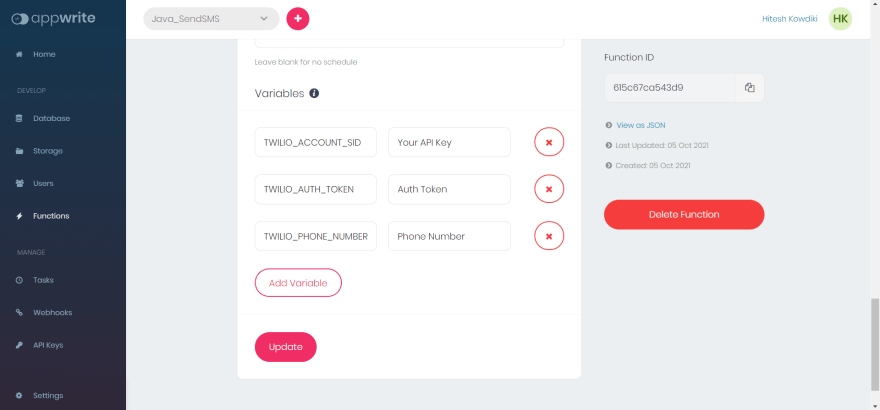
Next, head over to Settings tab in your Cloud Function to setup environment variables.
Click on Update to save your settings.
Deploying & Execute
We're now ready to deploy our function.
Head over to the root directory of your Java project and run the following commands to create a tarfile.
cd out/artifacts

tar -zvcf code.tar.gz send_sms_jar

send_sms_jar/
send_sms_jar/send-sms.jar

dir
code.tar.gz send_sms_jar
This will create a new archive called code.tar.gz.
With this created, head over to your Appwrite Dashboard > Functions > Overview > Deploy Tag. In the dialog that pops up, upload the tarfile and use java -jar send-sms.jar for the entry point command.
Once your function is uploaded, activate it by clicking the Activate Button.
Great, our work is almost done now, Simply add the JSON string with receiver and message to implement your cloud function. If everything goes well, you should be able to see the execution logs under the logs tab and also receive the message on your device.
That's all Folks! Give it a like if you like it. This is my first attempt so feedback is appreciated.




Top comments (2)
Good one! I hope this was helpful ?
dev.to/appwrite/send-welcome-email...
Yes a Lot