
What is the minimum you need to to do get a React SPA set up so that it can log in using Auth0.
There are two parts to this, configuring Auth0 and creating the React application.
The Configuring Auth0 part
The first thing is to get Auth0 set up. For this you'll need an Appication in Auth0.
Log ito the Auth0 Dashboard.
If you haven't signed up to Auth0 now is the time
Create an application
The Auth0 application encapsulates the information and settings for each piece of software that will use Auth0 as it's identity store. All applications for a single tenant share the same set of users and authentication experience.
Side note: I always find it confusing that Auth0 is an application that has applications that represent code that you'd normally call applications.
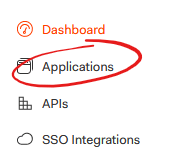
Select the Appications link in the navigation
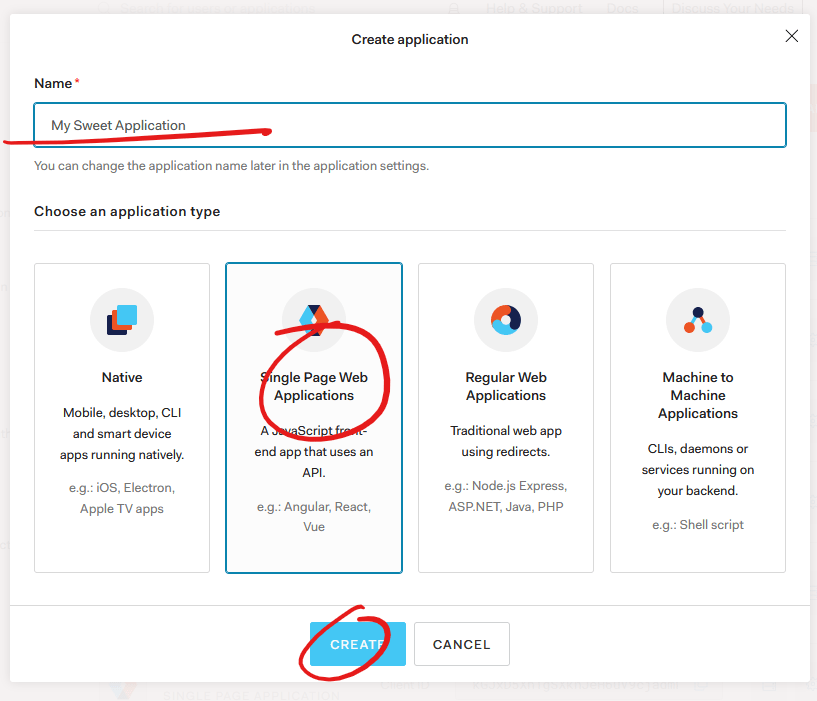
Select Create Application

- Set the name of the application. What ever you want to call it. This can be chnaged later.
- Select Single Page Application. This gives you a set of defaults for the type of appliction you're creating. These can be modified later.
- Click Create.
This will set up the appliation with default configuration for a Single Page Application. All this coniguration can be changed later if you need/want to.
In the settings add http://localhost:3000 to the Allowed Callback URLs, Allowed Logout URLs, Allowed Web Origins and Allowed Origins (CORS) fields. This is because the sample client will be running on http://localhost:3000 you'll need to add the appropriate values if you're running on a server or a different port or on a host that isn't localhost.
The rest of the defaults can be left as is.
Take note of the Domain and Client ID properties. These will need to be copied into the JavaScript code later.
The JavaScript part
Set up the scafold
I'm going to use Create React App and Typescript to build a small client that runs on localhost which can be authed into. To get the scafold set up run:
npx create-react-app my-app --template typescriptcd my-appnpm install --save typescript @types/node @types/react @types/react-dom @types/jest
Add the Auth0 SPA SDK
Run:
npm install --save @auth0/auth0-spa-js
Wire it together
Open the output of the create the react app in your code editor of choice.
Open the App.tsx file and remove the <header> element and it's children along with the logo import to keep the file as small as possible. It should look like this:
import React from 'react';
import './App.css';

function App() {
  return (
    <div className="App">
    </div>
  );
}

export default App;
Import the Auth0Client class and the Auth0ClientOptions type definition from the Auth0 sdk
import {
  Auth0Client,
  Auth0ClientOptions,
} from "@auth0/auth0-spa-js";
Go back to Auth0 and grab the Domain and Client ID properties and add them as configuration passed to the Auth0Client constructor.
This is the Auth0 client that abstracts away the complexities of the OAuth2 and Open Id Connect (OIDC) protocols.
const configureAuth0Client = (): Auth0Client => {
  const auth0Config: Auth0ClientOptions = {
    domain: "klees-test.au.auth0.com",
    client_id: "kGJxD5Xh1gSXknJeH6uV9cjadmkZKP0B",
  };
  return new Auth0Client(auth0Config);
};
Create the custom hook
To make use of Auth in our component lets use a custom hook. Add a new function to the file called useAuth. This hook will provide an object with login related properties and functions to the component its called from. For now lets set the return type to {login:() => Promise<void>; logout:()=> void: isLoggedIn: boolean;}. This means that the output of the hook will give us a way to get the user to log in, log out and a way for our app to know that they're authenticated.
Start by creating a parameterless function called useAuth
function useAuth():{login:() => Promise<void>; logout:()=> Promise<void>: isLoggedIn: boolean;} {}
State
To power this function we are going to need two peices of state. Update the React import to bring in useState import React, { useState } from "react";
We are going to need to know that the user is logged in and we are going to need an instance of Auth0Client.
const [isLoggedIn, setLoggedIn] = useState(false);
const [auth0Client, setAuth0Client] = useState<Auth0Client>();
To avoid creating the Auth0Client over and over lets check if it exists and if it doesnt create it and store it in the state.
if (!auth0Client) {
  setAuth0Client(configureAuth0Client());
}
Log in and Log out functions
We need to set up the login and log out functions. Add these within the useAuth function.
The login function needs to be async since the loginWithPopup Auth0 SDK call is going to be making a few https calls while hiding the OIDC process from us.
The loginWithPopup function opens a new window which the user can log into. When the login in complete the promise will complete and our user is logged in.
async function login(): Promise<void> {
  try {
    // Have Auth0 popup a login window and Wait for Auth0 to do the OIDC work for us.
    await auth0Client?.loginWithPopup();
    // Update the state to represent that the user has logged in.
    setLoggedIn(true);
  } catch (e) {
    // If something goes wrong lets put it out to the console.
    console.error(e);
  }
}
function logout(): void {
  try {
    // Call the client to log the user out.
    auth0Client?.logout();
    // Update the state to represent the user is logged out.
    setLoggedIn(false);
    setUserData("All Logged out");
    setGravatar("");
  } catch (e) {
    // If something goes wrong put it out to the console.
    console.error(e);
  }
}
With these two function in place we have everything we need to complete our hook. Finish it by returning the isLoggedIn state along with the login and logout functions.
return {
  login,
  logout,
  isLoggedIn
}
Set up the display
Back in the app function. Call the custom hook and hang onto the result.
const auth = useAuth0();
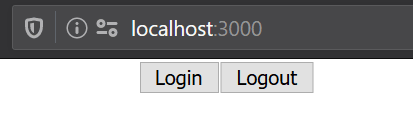
Inside the <div className="App"> add 2 buttons one for logging in and one for logging out. In the onClick handler for each of these call auth.login and auth.logout respectivly.
<button onClick={auth.login}>Login</button>
<button onClick={auth.logout}>Logout</button>
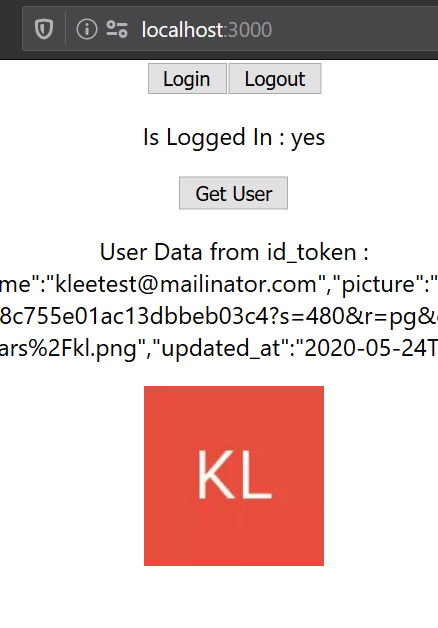
If you stop and test the app at this point a user will be able to log in and log out, but... there is no way to see what state the app isin.
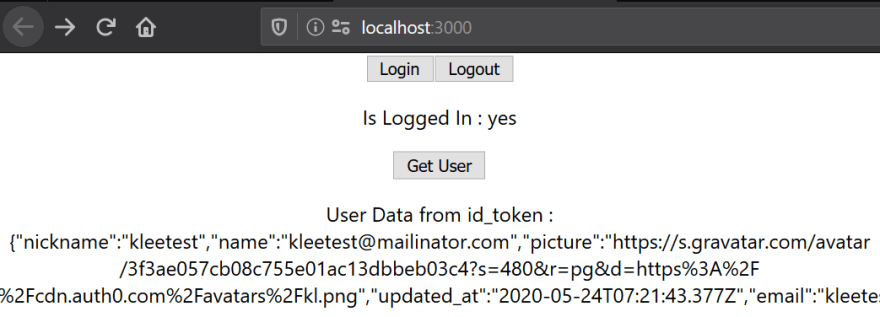
Let's render if the user is logged in or not to the screen. Add a <p> tag below the buttons and use the auth.isLoggedIn state variable to render if yes if they are or no if they're not.
<p>Is Logged In : {auth.isLoggedIn ? "yes" : "no"}</p>
This is great but it would be nice to know at least a little bit about our user.
Getting User Data
Update the hook
The Auth0 SDK allows us to get some information from the id_token that is returned as part of the OIDC flow.
Lets go back to the useAuth hook and add two extra properties to the return value. A getUserData and userData as a function the returns a promise of void and a string respectively.
{
  login: () => Promise<void>;
  logout: () => void;
  isLoggedIn: boolean;
  getUser: () => Promise<void>;
  userData: string;
}
First lets add a new state item to hold the user data. Lets make this a string with a default value so we can see it before the user has logged in.
const [userData, setUserData] = useState("Nothing Yet");
Next we'll add a function to get the user from Auth0 and store it in the userData state.
The data that comes from the auth0Client?.getUser() call is an object with no defined structure. There are some basic properties that are on the object that we can look at. So that we can have a look at the structure lets convert the object into a JSON string before storing it in userData.
async function getUser(): Promise<void> {
  try {
    // Gets the data about the user from the id_token
    const data = await auth0Client?.getUser();
    // Make the user data into a string so we can dump it to the screen.
    setUserData(JSON.stringify(data));

    setGravatar(data.picture);
  } catch (e) {
    // If something goes wrong put it out to the console.
    console.error(e);
  }
}
Add the getUser function and the userData state to the returned value.
return {
  login,
  logout,
  isLoggedIn,
  getUser,
  userData,
};
Update the display
In the display code add two new elements below the is logged in display.
Add a button to call the auth.getuser function and a <p> element to display it.
<button onClick={auth.getUser}>Get User</button>
<p>User Data from id_token: {auth.userData}</p>
Show the user avatar
Looking at the json blob we just dumped to the screen there is a property called picture this has a link to Gravatar that Auth0 has kindly put in there for us. For final bonus points lets display that on the page as well.
To do that we can add another state property and include it as a property to the output of our hook.
Add the state property to the top of the hook code.
const [gravatar, setGravatar] = useState("");
In the getUser function let's store the picture in the gravatar state property by calling setGravatar.
// Gets the data about the user from the id_token
const data = await auth0Client?.getUser();
// Make the user data into a string so we can dump it to the screen.
setUserData(JSON.stringify(data));
// Set the source for the user avatar
setGravatar(data.picture);
Add gravatar to the object returned from the hook.
return {
  login,
  logout,
  isLoggedIn,
  getUser,
  userData,
  gravatar,
};
And add the image onto the page.
<img src={auth.gravatar} alt="Avatar from Gravatar" />
The final output should look a bit like this:

Top comments (1)
Great write up!