
This post was originally published on notion. Click here if you prefer to read in notion page which has better readability.
Introduction
This blog post illustrate development cycle using django app container. I assume readers are already somewhat familar with docker and docker-compose. Although I used django for app development, it is language-agnostic since the post is about containerized application deployment.
Walkthough is devided into three parts consisting three different environemt respectively. First part, describes the architecture of the app(api and async worker) and how they are deployed on local enviroment. Second part is how to deploy the docker containers on cloud using single ec2 instance with on staging environment. Third part, illustrate how to convert traditional ec2 deployment into ECS using fargate with github actions on prod environment.
local - run docker containers on desktop/laptop with sqlite and redis server using docker-compose
stating - run docker containers on single ec2 instance with mysql RDS and ElasticCache
prod - convert stagning setup to ECS Fargate
You can check out previous part here.

ECS fargate primer
ECS provides container management service that makes it easy to run, stop, and manage Docker containers on a cluster. However you still have to manage container instances with container agent running on instances. With AWS Fargate, you no longer have to provision, configure, or scale clusters of virtual machines to run containers. It's a good idea to have some understanding on following components of ECS.

Components

Cluster
Logical grouping of resources that tasks and services are running on. When using the Fargate launch type with tasks within your cluster, ECS manages your cluster resources.
Service
This enables you to run and maintain a specified number of instances of a task definition simultaneously in an Amazon ECS cluster. You need service to run them behind
Task definition
json file that describes one or more containers. Task definition is not cluster dependent. You can understand it functions similar as docker-compose file.
Task
instantiation of a task definition within a cluster. Each task that uses the Fargate launch type has its own isolation boundary and does not share the underlying kernel, CPU resources, memory resources, or elastic network interface with another task.
Task Scheduler
is responsible for placing tasks within your cluster. There are several different scheduling options available. Fargate currently only support REPLICA which places and maintains the desired number of tasks across your cluster. By default, the service scheduler spreads tasks across Availability Zones. You can use task placement strategies and constraints to customize task placement decisions.
Fargate tasks
- Fargate task definitions require that you specify CPU and memory at the task level.
- Fargate task definitions only support the awslogs log driver for the log configuration. This configures your Fargate tasks to send log information to Amazon CloudWatch Logs.
- Put multiple containers in the same task definition if:
- Containers share a common lifecycle.
- Containers are required to be run on the same underlying host.
- You want your containers to share resources.
- Your containers share data volumes.
Walkthrough
We will use the VPC , RDB and Redis we created from part2, refer to the previous post or CF template for the setup.
Container networking is different in fargate
Let's review how container is structued in part 2. Nginx container and app container communictes through 8000 port through birdge network. And worker container will work.
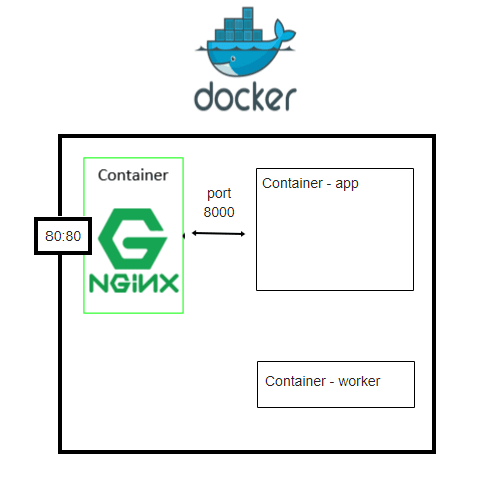
We will configure our task definition like this.

If you are running these two components as two processes on a single EC2 instance, the web tier application process could communicate with the API process on the same machine by using the local loopback interface. The local loopback interface has a special IP address of 127.0.0.1 and hostname of localhost.

By making a networking request to this local interface, it bypasses the network interface hardware and instead the operating system just routes network calls from one process to the other directly. This gives the web tier a fast and efficient way to fetch information from the API tier with almost no networking latency.
We will update nginx image with new conf with above restriction
- new nginx conf
# portal
server {
  listen 80;

  # all requests proxies to app
  location / {
        proxy_pass http://127.0.0.1:8000;
        proxy_set_header  X-Real-IP  $remote_addr;
        proxy_set_header  X-Forwarded-For $proxy_add_x_forwarded_for;
        proxy_set_header Host $host;
        proxy_redirect off;

    }

  # domain localhost
  server_name *;
}
This sends a local network request, which goes directly from one container to the other over the local loopback interface without traversing the network. This deployment strategy allows for fast and efficient communication between two tightly coupled containers.
We will build new nginx image with this new conf and push the new image to ecr repository to include in the task definition.
# make sure you have <aws_account_id>.dkr.ecr.us-east-1.amazonaws.com/nginx ECR created
$ docker build -f config/app/Docker_nginx -t  <aws_account_id>.dkr.ecr.us-east-1.amazonaws.com/nginx:latest .
$ docker push <aws_account_id>.dkr.ecr.us-east-1.amazonaws.com/nginx:latest
Create ECS execution role
create sampleECSTaskExecutionRole with following policies and trust relationships
Policies
- AmazonECSTaskExecutionRolePolicy
-
You need to attach following policies for environment variable setup on task (explained in later step)
- AWS Managed Policy AmazonSSMReadOnlyAccess
- you might want tighter restriction on resources for actual development
-
Inline policy for decryption
{
    "Version": "2012-10-17",
    "Statement": [
        {
            "Sid": "VisualEditor0",
            "Effect": "Allow",
            "Action": [
                "kms:Decrypt"
            ],
            "Resource": "*"
        }
    ]
}
- AWS Managed Policy AmazonSSMReadOnlyAccess
make sure to add trust entities for
ecs-tasks.amazonaws.com
Create Security Group for ecs cluster
Let's create secrity group for ecs cluster named - ecs-sg. I recommend copy ecs-sample-ec2 from previous post which consists inbound rule
- allow 80 port to public
- allow 80 to
ecs-sample-lbsecurity group - allow 6379 to
ecs-sample-redissecurity group - allow 3306 to
ecs-sample-mysqlsecurity group

You also need to allow
ecs-sample-redis and ecs-sample-mysql to allow traffic for each port from ecs-sg
Loadbalancer
Let's craete a new loadbalancer which will be used for the service who manages connection between lb and tasks.
- Select ALB
- name -
ecs-fargate - select VPC created from previous post
- listener and target group will be managed by service so you can create empty listener and target group. we will delete them on following step.


- delete listener and target group you created from previous alb creation


you can also use cli to create ALB instead of using console. This way, you don't need to create empty listener and target group whic will be deleted later
$ aws elbv2 create-load-balancer --name <ecs-fargte>  \
--subnets <subnet-12345678> <subnet-23456789> --security-groups <ecs-sg>
Take a note on DNS name of this load balancer for later use.

Create Cluster
We will create empty cluster first. Goto ECS menu on console. (make sure you are in correct region) Create first cluster template


Cluster is created

Alternatively you can create cluster with following command
aws ecs create-cluster --cluster-name ecs-sample
Create task definition
Parameter store
Part of problem using fargate is that you cannot pass environment variable as we used to because we do not have ec2 access. Therefore we will be using parameter store to inject environment variables to tasks when they start.

Click to AWS Systems Manager on console menu.
Click Paramter Store on left menu. link(make sure you are on correct region)
click createk parameter
Fill in the input as following screenshot.


You will create value for following environment varibales
- SECRET_KEY
- REDIS_HOST
- DB_PASSWORD
- DB_HOST
Alternatively you can use cli to create secure strings
$ aws ssm put-parameter --name "/ecs-sample/prod/<ENV_NAME>" --type "SecureString" --value "<value>" --description "<ENV_NAME>" --region "<region>"
>
{
    "Version": 1,
    "Tier": "Standard"
}
results

Task definition
As I mentioned earlier taks definition works smilar to docker-compose. Just like staging evn, we will have two task definitions and nginx container + api container and worker container
Using task definition template, you can fill in following configurations
$ aws ecs register-task-definition --generate-cli-skeleton
-
sample-task-definition
Parameters
- Task family – the name of the task, and each family can have multiple revisions.
- IAM task role – specifies the permissions that containers in the task should have.
- Network mode – determines how the networking is configured for your containers. (fargate only supports awsvpn currently)
- Container definitions – specify which image to use, how much CPU and memory the container are allocated, and many more options.
refer to following link for each parameters
{
    "family": "",
    "taskRoleArn": "",
    "executionRoleArn": "",
    "networkMode": "awsvpc",
    "containerDefinitions": [
        {
            "name": "",
            "image": "",
            "repositoryCredentials": {
                "credentialsParameter": ""
            },
            "cpu": 0,
            "memory": 0,
            "memoryReservation": 0,
            "links": [
                ""
            ],
            "portMappings": [
                {
                    "containerPort": 0,
                    "hostPort": 0,
                    "protocol": "tcp"
                }
            ],
            "essential": true,
            "entryPoint": [
                ""
            ],
            "command": [
                ""
            ],
            "environment": [
                {
                    "name": "",
                    "value": ""
                }
            ],
            "environmentFiles": [
                {
                    "value": "",
                    "type": "s3"
                }
            ],
            "mountPoints": [
                {
                    "sourceVolume": "",
                    "containerPath": "",
                    "readOnly": true
                }
            ],
            "volumesFrom": [
                {
                    "sourceContainer": "",
                    "readOnly": true
                }
            ],
            "linuxParameters": {
                "capabilities": {
                    "add": [
                        ""
                    ],
                    "drop": [
                        ""
                    ]
                },
                "devices": [
                    {
                        "hostPath": "",
                        "containerPath": "",
                        "permissions": [
                            "read"
                        ]
                    }
                ],
                "initProcessEnabled": true,
                "sharedMemorySize": 0,
                "tmpfs": [
                    {
                        "containerPath": "",
                        "size": 0,
                        "mountOptions": [
                            ""
                        ]
                    }
                ],
                "maxSwap": 0,
                "swappiness": 0
            },
            "secrets": [
                {
                    "name": "",
                    "valueFrom": ""
                }
            ],
            "dependsOn": [
                {
                    "containerName": "",
                    "condition": "HEALTHY"
                }
            ],
            "startTimeout": 0,
            "stopTimeout": 0,
            "hostname": "",
            "user": "",
            "workingDirectory": "",
            "disableNetworking": true,
            "privileged": true,
            "readonlyRootFilesystem": true,
            "dnsServers": [
                ""
            ],
            "dnsSearchDomains": [
                ""
            ],
            "extraHosts": [
                {
                    "hostname": "",
                    "ipAddress": ""
                }
            ],
            "dockerSecurityOptions": [
                ""
            ],
            "interactive": true,
            "pseudoTerminal": true,
            "dockerLabels": {
                "KeyName": ""
            },
            "ulimits": [
                {
                    "name": "msgqueue",
                    "softLimit": 0,
                    "hardLimit": 0
                }
            ],
            "logConfiguration": {
                "logDriver": "awslogs",
                "options": {
                    "KeyName": ""
                },
                "secretOptions": [
                    {
                        "name": "",
                        "valueFrom": ""
                    }
                ]
            },
            "healthCheck": {
                "command": [
                    ""
                ],
                "interval": 0,
                "timeout": 0,
                "retries": 0,
                "startPeriod": 0
            },
            "systemControls": [
                {
                    "namespace": "",
                    "value": ""
                }
            ],
            "resourceRequirements": [
                {
                    "value": "",
                    "type": "GPU"
                }
            ],
            "firelensConfiguration": {
                "type": "fluentd",
                "options": {
                    "KeyName": ""
                }
            }
        }
    ],
    "volumes": [
        {
            "name": "",
            "host": {
                "sourcePath": ""
            },
            "dockerVolumeConfiguration": {
                "scope": "task",
                "autoprovision": true,
                "driver": "",
                "driverOpts": {
                    "KeyName": ""
                },
                "labels": {
                    "KeyName": ""
                }
            },
            "efsVolumeConfiguration": {
                "fileSystemId": "",
                "rootDirectory": "",
                "transitEncryption": "ENABLED",
                "transitEncryptionPort": 0,
                "authorizationConfig": {
                    "accessPointId": "",
                    "iam": "ENABLED"
                }
            }
        }
    ],
    "placementConstraints": [
        {
            "type": "memberOf",
            "expression": ""
        }
    ],
    "requiresCompatibilities": [
        "EC2"
    ],
    "cpu": "",
    "memory": "",
    "tags": [
        {
            "key": "",
            "value": ""
        }
    ],
    "pidMode": "task",
    "ipcMode": "none",
    "proxyConfiguration": {
        "type": "APPMESH",
        "containerName": "",
        "properties": [
            {
                "name": "",
                "value": ""
            }
        ]
    },
    "inferenceAccelerators": [
        {
            "deviceName": "",
            "deviceType": ""
        }
    ]
}
Let's create task definitions
$ aws ecs register-task-definition \
    --cli-input-json file://<path_to_json_file>/task-definition-api.json
$ aws ecs register-task-definition \
    --cli-input-json file://<path_to_json_file>/task-definition-worker.json
you will be able to see 2 task definitions registered in your ECS service. Inspect configuration for each task definitions.

Create services
Now you are ready to create ECS service which will fire up the tasks. Go to cluster and press create button on the services tab.
API task
1) configure service

-
2) configure network
Network
- we will select VPC from part 2 and select security group we created previously
ecs-sg - Choose public subnet for the
ecs-sample-apitask
- we will select VPC from part 2 and select security group we created previously

Load Balancer

- select `Application Load Balancer` for Load blancer type*
    - Production listener port : 80
    - select `ecs-fargate` load balancer we have created in this post
    - once you select the load balance you will be able to choose `container to load blaance`. Service automatically detect ports opened. Choose `nginx:80:80`. Click add to load balancer
    - You will be able to configure the health check path. Update to `/api/healthcheck`/


Service discovery

- click service discovery
- update namespace as you like, I used `api`
- update serive discovery name `ecs-sample-api`

- 3) set auto scaling(optional)
- we will skip this part
- 4) Review


Worker task
For worker task, reapeat above step except
- choose private subnet
- no load balancer
- no service discovery
Service
Once everything is set let's deploy new service and wait for all service status to turn to green.
Go back to service you created and go to tasks tab, if you see all service running you will see following screenshot, however if you don't see any tasks running search tasks with stopped status and inspect logs(you might need to update task definition to configure logs) for any misconfigurations.


Let's check elb and route 53 to make sure everythign work.

Service discovery and healthcheck seems to work fine.
To access the nginx from browser, type in DNS name of the load balancer to see if everything is working as we expected.
Continuous Deployment
Once everything is deployed, there is a problem if I need to update a source image. I need to repeat all steps above include
- Build new docker image
- Push docker image to ECR
- Create new task definition with new docker image
- Update service to run new task definition revision
Github action
We can automate this step with github action.
Take a look at following file in the repo .github/workflows/ecs_api.yml
-
workflow file
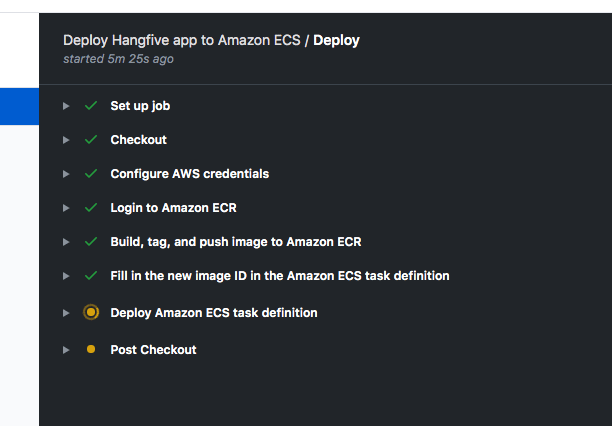
on: push: branches: - master name: Deploy Hangfive app to Amazon ECS jobs: deploy: name: Deploy runs-on: ubuntu-latest steps: - name: Checkout uses: actions/checkout@v2 - name: Configure AWS credentials uses: aws-actions/configure-aws-credentials@v1 with: aws-access-key-id: ${{ secrets.AWS_ACCESS_KEY_ID }} aws-secret-access-key: ${{ secrets.AWS_SECRET_ACCESS_KEY }} aws-region: us-east-1 - name: Login to Amazon ECR id: login-ecr uses: aws-actions/amazon-ecr-login@v1 - name: Build, tag, and push image to Amazon ECR id: build-image env: ECR_REGISTRY: 982947632035.dkr.ecr.us-east-1.amazonaws.com ECR_REPOSITORY: hangfive IMAGE_TAG: ${{ github.sha }} run: | # Build a docker container and # push it to ECR so that it can # be deployed to ECS. docker build -f config/app/Dockerfile_app -t $ECR_REGISTRY/$ECR_REPOSITORY:$IMAGE_TAG . docker push $ECR_REGISTRY/$ECR_REPOSITORY:$IMAGE_TAG echo "::set-output name=image::$ECR_REGISTRY/$ECR_REPOSITORY:$IMAGE_TAG" - name: Fill in the new image ID in the Amazon ECS task definition id: task-def uses: aws-actions/amazon-ecs-render-task-definition@v1 with: task-definition: config/ecs/task-definition.json container-name: app image: ${{ steps.build-image.outputs.image }} - name: Deploy Amazon ECS task definition uses: aws-actions/amazon-ecs-deploy-task-definition@v1 with: task-definition: ${{ steps.task-def.outputs.task-definition }} service: hangfive-prod-ecs-fargate cluster: hangfive-prod wait-for-service-stability: true -
This yaml file describes following actions
-
triggers on every master branch push
checkout the source
-
AWS CLI config ( secret from github)
- AWS_ACCESS_KEY_ID and AWS_SECRET_ACCESS_KEY of user with appropriate permission
log into ECR
build docker image and tag with different hash everytime (for immutability)
update task definition then deploy new task definition
Click
actionstab on your repository for the progress.
-
Teardown
- List of aws resources you need to delete
- EC2 instances, ALB, target group, autoscaling
- ECS Services, cluster, task definitions
- ECR
- SSM parameter store
- Route 53 hosted zone
- RDS
- subnet group, cluster paramter group
- Elastic Cache
- subnet group, parmater group
- VPC
- security group, ncl, subnets, IGW, NAT gateway, EIP
Future todos
- Logging / Monitoring setup with cloudwatch
- CI - pytest integration with github action before merge
Reference
Task Networking in AWS Fargate | Amazon Web Services
Task Networking with the awsvpc Network Mode
AWS ECS의 매니지드 컨테이너 AWS 파게이트(AWS Fargate) 시작하기
Tutorial: Creating a Cluster with a Fargate Task Using the AWS CLI
Pass Secrets or Sensitive Data Securely to Containers in Amazon ECS Tasks
put-parameter - AWS CLI 1.18.89 Command Reference
Amazon ECS "Deploy Task Definition" Action for GitHub Actions - GitHub Marketplace
Pass Secrets or Sensitive Data Securely to Containers in Amazon ECS Tasks

Top comments (1)
Thank you for writing this! I am learning a lot from your examples.