This series intends to show how I build an app to serve content from my WordPress blog by using react-native. Since my blog is talking about react-native, the series and the articles are interconnected. We will learn how to set-up many packages that make our lives comfortable and learn how to deal with WordPress APIs. Here, the most prominent features talked about in the book are the dark theme, offline mode, infinite scroll and many more. You can discover much more in this series.this inspiration to do this tutorial series came from the React Native Mobile Templates
In case of wanting to learn from the beginning, all the previous parts for this tutorial series are available below:
- Build WordPress Client App with React Native #1: Overview
- Build WordPress Client App with React Native #2: Setting Up Your Environment
- Build WordPress Client App with React Native #3: Handle Navigation with React navigation
- Build WordPress Client App with React Native #4: Add Font Icon
- Build WordPress Client App with React Native #5 : Home Screen with React native paper
- Build WordPress Client App with React Native #6 : Using Html renderer and Moment
- Build WordPress Client App with React Native #7: Add pull to refresh and Infinite scroll
- Build WordPress Client App with React Native #8: Implementing SinglePost Screen
- Build WordPress Client App with React Native #9: implement simple share
- Build WordPress Client App with React Native #10: Setup and save bookmark
- Build WordPress Client App with React Native #11: Remove and Render Bookmark
- Build WordPress Client App with React Native #12: Categories screen
- Build WordPress Client App with React Native #13: Configuring firebase in contact screen
- Build WordPress Client App with React Native #14 : Implementing Settings Screen
- Build WordPress Client App with React Native #15 : Forwarding message to inbox with Cloud function
- Build WordPress Client App with React Native #16 : Dark theme
- Build WordPress Client App with React Native #17 : Fix react-native-render-html to change theme
- Build WordPress Client App with React Native #18 : changing Theme
- Build WordPress Client App with React Native #19 : Notify user when offline
- Build WordPress Client App with React Native #20 : Saving data to cache
- Build WordPress Client App with React Native #21 : Splash Screen on iOS
- Build WordPress Client App with React Native #22 : Splash Screen on Android
- Build WordPress Client App with React Native #23 : Setup Firebase Push notification [iOS]
- Build WordPress Client App with React Native #24 : Setup Firebase Push Notification [Android]
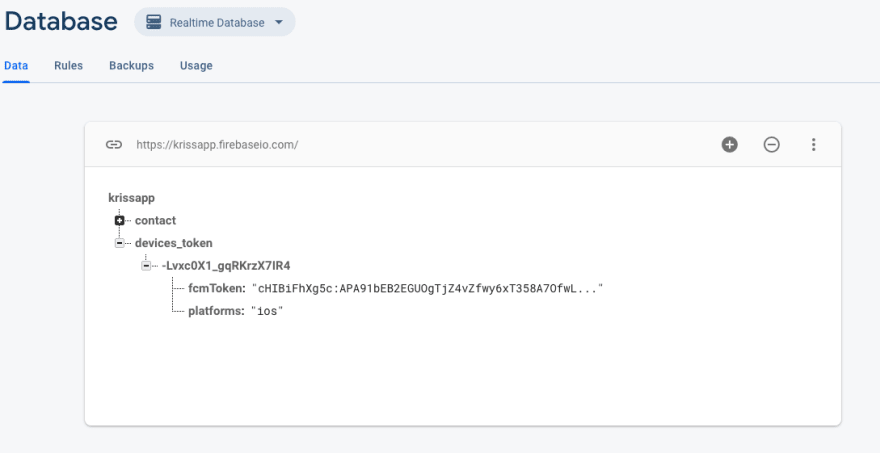
now we will get device token and store on Firebase realtime database for Android side we can get token without asking again but on iOS, we need to do again then we store a token on AsyncStorage that help us didn’t store duplicate token
we do onApp.js start by import two main package Firebase and AsyncStorage
import firebase from 'react-native-firebase';
import AsyncStorage from '@react-native-community/async-storage';
Check device permission
first, we start check permission on a device if they default already accept like on Android we start to get token if we get denied we will request permission again
create new async function name checkPermission
async checkPermission() {
    firebase
      .messaging()
      .hasPermission()
      .then(enabled => {
        if (enabled) {
          // user has permissions
          console.log('permissions accept');
          this.getToken();
        } else {
          // user doesn't have permission
          console.log('permissions reject');
          this.requestPermission();
        }
      });
  }
next, create a function for send request
async requestPermission() {
    firebase
      .messaging()
      .requestPermission()
      .then(() => {
        // User has authorised
        console.log('permissions accept in requestPermission');
        this.getToken();
      })
      .catch(error => {
        // User has rejected permissions
        console.log('permission rejected');
      });
  }
if user authorize we lunch getToken function
next, create getToken function and paste code below
async getToken() {
    let fcmToken = await AsyncStorage.getItem('fcmToken');

    console.log('before fcmToken: ', fcmToken);
    if (!fcmToken) {
      fcmToken = await firebase.messaging().getToken();
      if (fcmToken) {
        try {
          await firebase
            .database()
            .ref('devices_token/')
            .push({fcmToken: fcmToken, platforms: Platform.OS})
            .then(res => res.json())
            .then(res => {
              console.log(res);
            })
            .catch(err => {
              console.log(err);
            });
          await AsyncStorage.setItem('fcmToken');
        } catch (error) {
          // User has rejected permissions
          console.log(error);
        }
        console.log('after fcmToken: ', fcmToken);
        await AsyncStorage.setItem('fcmToken', fcmToken);
      }
    }
  }
this function work pretty simple first check token already in-store on AsyncStorage or ? if not found we get token and save on realtime database
now we hit allow and your will saw token will add to a realtime database
Summary
now we can get and set device token for using in push notification
The post Build WordPress Client App with React Native #26 : Manage device token appeared first on Kriss.


Top comments (0)