
Pretty sure everyone at this point knows what TLS is, but what about mTLS? How is it different from TLS, what’s it used for?
TLS
What is TLS? TLS, or Transport Layer Security, is the successor to SSL; both of which are means of secure communication. There have been several versions of TLS, each subsequent version being more secure, easier to use, or a combination of the two. We’re up to TLS v1.3.
You can read a lot more about TLS here.
The basic idea of TLS is to secure communications between multiple parties, you’re probably very used to “seeing” it when you visit websites like this one.

There’s a lot of “magic” going on when connecting to a website, in the form of back and forth between client and server. The link I posted about goes into greater detail regarding this, but we can also pretty easily see some of it using a cURL command.
We’re going to use a testing web api project for this post, I’ll start it with:
mkdir Kritner.Mtls
cd Kritner.Mtls
dotnet new webapi
Now run the project with dotnet run, and submit a cURL command to the default WeatherForecast controller:
curl --insecure -v https://localhost:5001/weatherForecast

You’ll notice in the above that we’re using the --insecure flag in our cURL command as we’re using a “development” certificate through the web api to establish secure connections.
mTLS
So now that we’ve established a very high level of what TLS is and what it looks like, what is mTLS?
From Wikipedia:
Mutual authentication or two-way authentication refers to two parties authenticating each other at the same time, being a default mode of authentication in some protocols (IKE, SSH) and optional in others (TLS).
By default the TLS protocol only proves the identity of the server to the client using X.509 certificate and the authentication of the client to the server is left to the application layer. TLS also offers client-to-server authentication using client-side X.509 authentication.[1] As it requires provisioning of the certificates to the clients and involves less user-friendly experience, it’s rarely used in end-user applications.
Mutual TLS authentication (mTLS) is much more widespread in business-to-business (B2B) applications, where a limited number of programmatic and homogeneous clients are connecting to specific web services, the operational burden is limited, and security requirements are usually much higher as compared to consumer environments.
There’s a fair amount of information in the above, but the tdlr in my opinion is:
- both parties provide their identity by some means
- often used in business to business applications
What this means is that application access can be controlled to our system through our system generating “passwords” for our users to use, in the form of certificates signed by our CA, that we provide back to them.
Note (I’m going to make it several times throughout the post) that the code is not set up in a way to verify that the client provided cert was signed by our CA, just that it is signed. This is not desired behavior, but I will try to handle the additional auth in another post. Additionally, you will often want to set up another layer of security than just the cert, dual auth of some sort provided by a one time password or something similar. This will help protect your system in an instance where a client’s cert/private key has made it out into the wild; without that “second factor” users won’t be able to get in (also not covered in this post).
mTLS Setup
mTLS, at least in the way we’re going to set it up in this post, has a few steps, many of which are outside the bounds of “coding”. A high level list of steps includes:
- Create a local CA
- Import the CA as a trusted root CA for our “server” (our local machine in this case)
- Create a certificate for use by the “client” which is signed by the CA
- Enable/enforce client certificates in our .net core application
- run a cURL command against our code again, without providing a cert, see our request is denied
- run a cURL command against our code, this time providing our client cert, see our request gets through
Create a local CA
I followed this tutorial: https://deliciousbrains.com/ssl-certificate-authority-for-local-https-development/
# Generate a key
openssl genrsa -aes256 -out myCA.key 2048

# Generate root certificate
openssl req -x509 -new -nodes -key myCA.key -sha256 -days 10240 -out myCA.pem

# Create a .crt file so it can be installed on yucky windows (can *probably* just out in this format from the step above, but i don't know much about openssl)
openssl x509 -ou
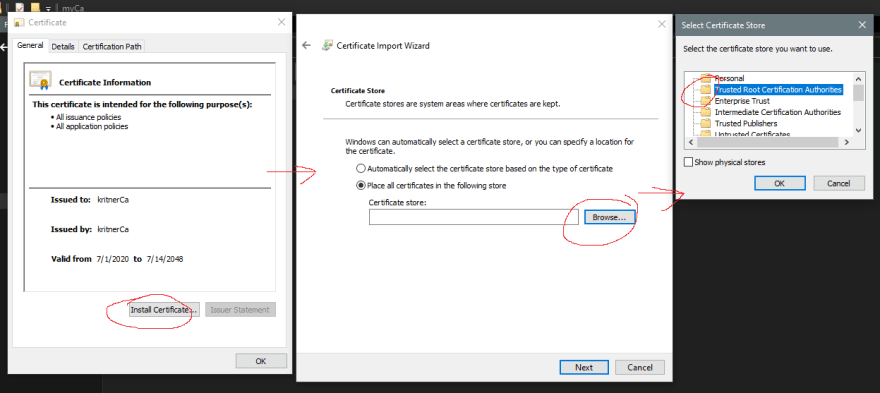
Import the CA cert as a trusted root CA
Now install the crt as a trusted root authority by double clicking it and “install cert”:
Create a certificate signed by the CA to be used by the client
create a file client.ext with the following information:
authorityKeyIdentifier=keyid,issuer
basicConstraints=CA:FALSE
keyUsage = digitalSignature, nonRepudiation, keyEncipherment, dataEncipherment
# Generate a key for the "client" to use
openssl genrsa -out client.key 2048

# Generate a Certificate Signing Request (csr)
openssl req -new -key client.key -out client.csr

# Using the CA, create client cert based on the CSR
openssl x509 -req -in client.csr -CA myCA.pem -CAkey myCA.key -CAcreateserial -out client.crt -days 1024 -sha256 -extfile client.ext
You should now have a client.crt available, and when viewing, you should be able to see the “full certificate chain” in that the certificate was signed by the myCa (kritnerCa in my case):

Enable mTLS from Kestrel/.net core code
It’s pretty straight forward getting mTLS working with Kestrel, a bit more involved with IIS (which I may cover in another post…?)
Add to the project file a NuGet package that allows for client certificate authentication:
<ItemGroup>
    <PackageReference Include="Microsoft.AspNetCore.Authentication.Certificate" Version="3.1.0" />
</ItemGroup>
We’ll be adding “Require Client Certificate” to our application bootstrapping in the Program.cs:
public static IHostBuilder CreateHostBuilder(string[] args) =>
    Host.CreateDefaultBuilder(args)
        .ConfigureWebHostDefaults(webBuilder =>
        {
            webBuilder.UseStartup<Startup>();
            // vvv requires client certificate when connecting vvv
            webBuilder.ConfigureKestrel(options =>
            {
                options.ConfigureHttpsDefaults(configureOptions =>
                {
                    configureOptions.ClientCertificateMode = ClientCertificateMode.RequireCertificate;
                });
            });
            // ^^^ requires client certificate when connecting ^^^
        });
Then in the Startup.cs, we’ll need to update ConfigureServices and Configure to set up the authentication and register the authentication middleware.
ConfigureServices:
public void ConfigureServices(IServiceCollection services)
{
    services
        .AddAuthentication(CertificateAuthenticationDefaults.AuthenticationScheme)
        .AddCertificate(options =>
        {
            // Only allow chained certs, no self signed
            options.AllowedCertificateTypes = CertificateTypes.Chained;
            // Don't perform the check if a certificate has been revoked - requires an "online CA", which was not set up in our case.
            options.RevocationMode = X509RevocationMode.NoCheck;
            options.Events = new CertificateAuthenticationEvents()
            {
                OnAuthenticationFailed = context =>
                {
                    var logger = context.HttpContext.RequestServices.GetService<ILogger<Startup>>();

                    logger.LogError(context.Exception, "Failed auth.");

                    return Task.CompletedTask;
                },
                OnCertificateValidated = context =>
                {
                    var logger = context.HttpContext.RequestServices.GetService<ILogger<Startup>>();

                    // You should implement a service that confirms the certificate passed in
                    // was signed by the root CA.

                    // Otherwise, a certificate that is valid to one of the other trusted CAs on the webserver,
                    // would be valid in this case as well.

                    logger.LogInformation("You did it my dudes!");

                    return Task.CompletedTask;
                }
            };
        });

    services.AddControllers();
}
Please be aware of the comments in the above code block. If you do not implement your own validation to go on top of the normal cert validation, then any valid certificate passed in from the client will be allowed, regardless of whether or not it was signed by the CA we created earlier in the post. I’m not going to cover writing such a validator in this post, but I’ll try to remember to do so in another; this post is taking me more time than I had intended already!
Configure:
app.UseAuthentication();
Note the above app.UseAuthentication should be done after app.UseRouting(); and before app.UseAuthorization();. The whole Configure method now looks like this:
public void Configure(IApplicationBuilder app, IWebHostEnvironment env)
{
    if (env.IsDevelopment())
    {
        app.UseDeveloperExceptionPage();
    }

    app.UseHttpsRedirection();

    app.UseRouting();

    // vvv Order is important vvv
    app.UseAuthentication();
    // ^^^ Order is important ^^^
    app.UseAuthorization();

    app.UseEndpoints(endpoints =>
    {
        endpoints.MapControllers();
    });
}
Testing it out
Now we have mTLS set up in regards to our system, and our code. Let’s give it a run!
First, start the web application.
Next, let’s try our same curl command we used in the beginning of the post:
curl --insecure -v https://localhost:5001/weatherForecast
which looks like:

The above makes sense, we haven’t provided a certificate to the web application, so we are being rejected.
Now let’s make sure we can actually get in with our signed cert, using the following command:
curl --insecure -v --key client.key --cert client.crt https://localhost:5001/weatherForecast
which looks like:
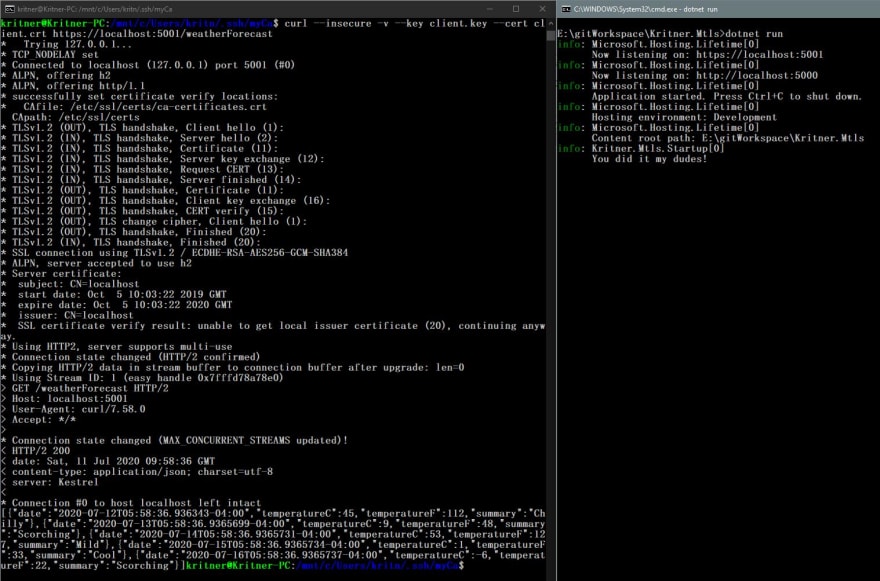
it works!
Self Notes / future posts
- Cover setting up mTLS on IIS - there are registry settings that need to be updated in some cases (yuck!)
- Setting up a custom certificate validator, right now we’re just letting in any cert that is not self signed, rather than checking that the signed cert was signed by our CA.
- Multi factor auth

Top comments (1)
This stuff can be such a nightmare when you don't know what you are doing. Thanks for the great straight-forward write up!