Introduction
In some previous articles, I built a cosy environment to perform machine learning experiments with
- google colaboratory (to perform experiments)
- github (to manage source codes and information of each experiment)
- ngrok (to connect to mlflow window)
It was not bad, but how cosy the environment is small a little bit. There are two reasons:
- The text editor on google colab is not cosy.
- It is troublesome to run some cells when committing and pushing every time.
We can use a terminal if we buy an account of google colab pro [official post on twitter], but I do not need a pro account for now except for those troubles. Then, what should I do? One of the answers is vscode with google colab.
Note that, I usually use windows 10, the following discussion is for windows.
Process
I'll suppose that vs code is installed on the computer.
Downloading cloudflare
1.Download the execution file from [cloudflare zero trust]
2.Rename the file name to cloudflare.exe
Installing remote-ssh extension on vs code
1.Launch vs code
2.Install remote-ssh extension
Pressing Ctrl + Shift + X, the extensions tab is opened. Inputting remote ssh in the search box like below, the extension would appear.
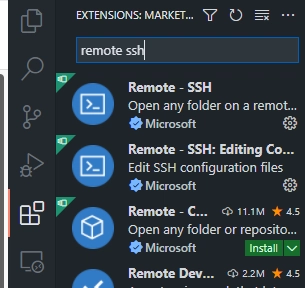
There it is! It is installed when the green Install button is clicked though there is no green Install button on the extension in the picture because I have already got it.
3.Setup ssh config
There is the config file in the home directory, like ~/.ssh/config. The file should be the following one.
Host *.trycloudflare.com
    HostName %h
    User root
    Port 22
    ProxyCommand <absolute path to cloudflare.exe> access ssh --hostname %h
In my case, I put cloudflare.exe in C directory, so my ProxyCommand line is ProxyCommand C:\\cloudflared.exe access ssh --hostname %h.
Preparing config data
1.Create config directory on the google drive
2.Create general_config.yaml and upload it to the config directory
The general_config.yaml must have the following information.
github:
  username: username
  email: email
  token: access token
cloudflare:
  password: password_you_decided
token in github block cloud be got by following [Creating a personal access token].
Creating a new google colab notebook
1.Create a new google colab notebook to access google colab from vs code
2.Run the following codes
# Prepare environment
!pip install colab_ssh --upgrade

# Import necessary modules
import os
from colab_ssh import launch_ssh_cloudflared
from google.colab import drive
import yaml

# Mount my google drive
drive_path = "/content/gdrive"
drive.mount(drive_path)

# Load general config
config_path = os.path.join(drive_path, "MyDrive", "config", "general_config.yaml")
with open(config_path, 'r') as yml:
  config = yaml.safe_load(yml)

# Set git config
config_github = config["github"]
!git config --global user.email {config_github["email"]}
!git config --global user.name {config_github["username"]}

# Create symbolic link
!ln -sfn /content/gdrive/MyDrive/ /root/workspace

# Launch ssh cloudflare
launch_ssh_cloudflared(password=config["cloudflare"]["password"])
The outputted cell has the following information.

3.Copy the url in VSCode Remote SSH block
Accessing to google colab from vs code
1.Open command palette on vs code by pressing Ctrl + Shift + P
2.Input Remote-SSH: Connect to Host... in the box and press enter
3.Input the copied url in the box and press enter
4.Input Continue in the box and press enter
5.Input the password written in general_config.yaml in the box and press enter
There we go! The vs code has already been accessed to google colab. Press Ctrl + Shift + @ and then, input python -V or pip list. We could see the same output as one when we run the same codes on a google colab notebook.
Conclusion
Now, we could edit any file on vs code and also commit and push on the terminal of vs code. It is quite cosy for me. Furthermore, we cloud use mlflow that I introduced a little bit in the previous article. Just run mlflow ui in the terminal and open the outputted url in any browser.
I would appreciate it if someone shares tips in the discussion box below.

Top comments (0)