Let's bring the data to the cloud this time! 💾 ☁.
And what better way to do that than a FREE cloud database!
We'll be using the free cluster of Mongo DB Atlas.
What is Mongo DB Atlas?
Mongo DB Atlas is a fully-managed database-as-a-service available on AWS, Azure, and GCP
Before Atlas, I used mLab. mLab was then acquired by MongoDB last year. Pretty much similar to mLab, MongoDB Atlas is the easiest way to have a cloud MongoDB instance.
Why?
💲 0 dollars: I am not an advertiser for MongoDB, but I love this service and this one won't break the bank ❌🔨🐖, since... well it's no-strings-attached FREE for up to 512MB. Perfect for small side-projects!
🏃♂️ Quick, simple, and fast: no installation and config files. After signing up and creating a cluster (takes 5 minutes), you're all set.
☁ It's in the cloud: Not running in your machine as a Mongo service. Not in a disk file like
diskdb. You can manage it from anywhere through the Atlas web app. For your app, you only need a connection URL to access the db.😎 Very cool UI: Atlas dashboard is very intuitive, and first-time users will find it easy to use with the visual cues and steps.
Cloud setup
There might be some slight screenshot differences to the actual Atlas UI by the time you do this, but the described steps should get you to the same results.
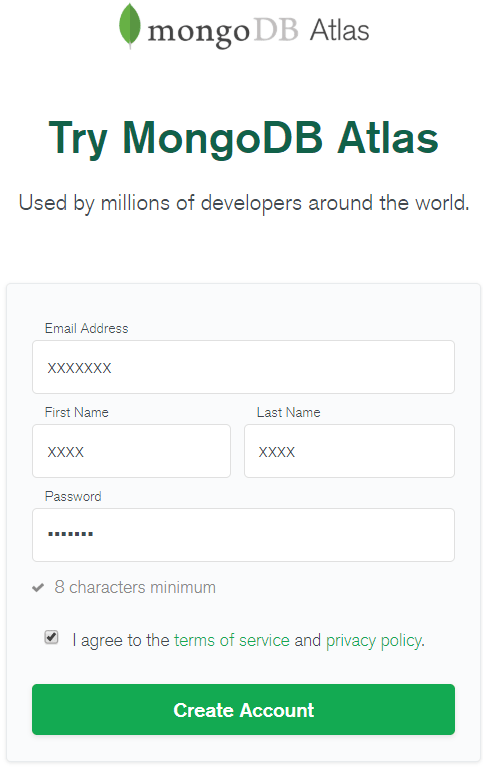
1. First sign up here:
https://www.mongodb.com/cloud/atlas/register
2. Create a free tier Starter Cluster
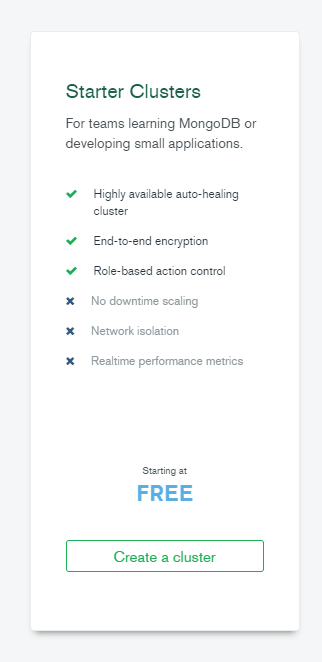
The free Starter Cluster M0 comes with 512 MB Storage, shared RAM and vCPU.
This should be more than enough for our starter Node project.
- Cluster region: you can pick any provider (AWS, Google, Azure) and the region closest to you that has a Free Tier. For me, it was AWS us-east-1.

You can leave the rest at FREE defaults.
Create the cluster.
The creation and provisioning might take a few minutes
- Afterwards, the dashboard appears, with the side panel that contains all the options needed to manage clusters.

3. Connect to the Cluster
Click [Connect] in the Cluster we have just created.
The dialog that appears gives options to:
- Whitelist your IP address
- Create a MongoDB user

3.1 Whitelist IP Address
Whitelisting means only allowing access to selected (thus trusted) entities
-
[Add Your Current IP address], which should automatically get your current public IP address. Optionally add a description such as "My Home IP address"
- ❗ Remember to do this step again when you switch WiFi, e.g. when moving from coffee shop to home WiFi.
- 💡 If you are in a public wi-fi, you can use a service like https://whatismyipaddress.com/ to get your IPv4 public address, since
ipconfigorifconfigmight give you only the internal network address. - 💣You can use
0.0.0.0/0to enable all IP addresses anywhere, which simplifies this process, but makes it VERY INSECURE.
3.2 Create admin user.
Enter your preferred username and password. This will be the first admin ("root") user, then [Create MongoDB User].
Keep these credentials handy, since we'll use them later.
Close the window. We'll connect to the cluster later.
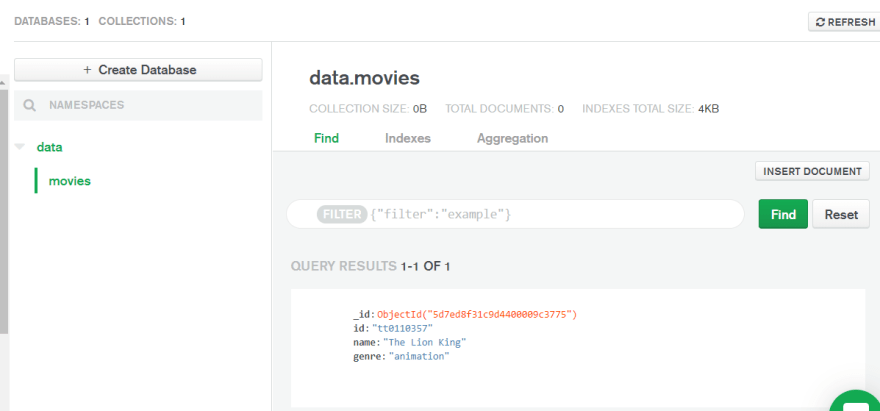
4. 📃 Add sample data
From the cluster view, click [Collections], then [Add my Own Data]

- Same as the last lesson, we use:
- database name:
data - collection name:
movies
- database name:
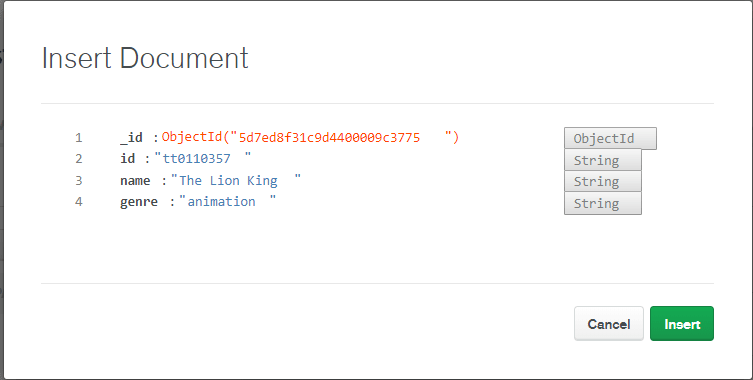
🎥 The movies from this series is from IMDB. You could use the
idfrom any movie page URL. E.g. In "The Lion King" pagehttps://www.imdb.com/title/tt0110357;idistt0110357.
Insert Document
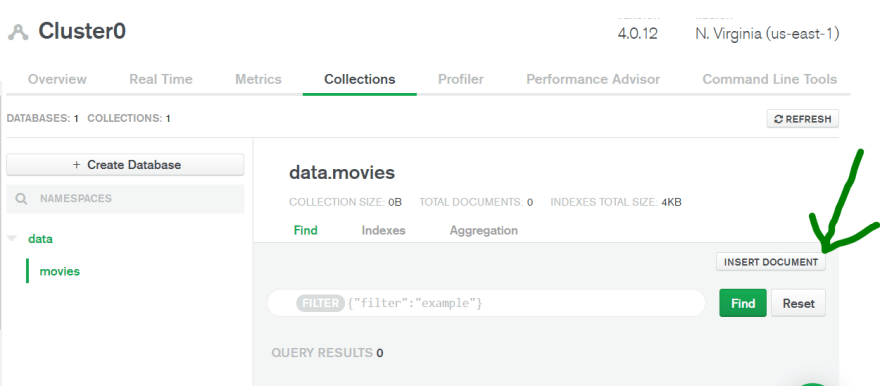
- Insert a movie entry, as before - Leave the given
_idprovided by Atlas since this is internal
- Now we see the inserted data in the dashboard. Add more as you wish
Perfect. Now we got data. Time to connect to the cluster
5. 🔌 Connect to cluster
Go back to the Clusters view, then click Connect in our cluster.

Choose [Connect your Application]

Leave the default Node.js version 3+

Copy the Connection String. We'll use this in the next step.
Now we're ready to dive into code!

Connecting to the db
1. Grab the starter code from last lesson here:
https://github.com/lenmorld/devto_posts/tree/master/quick_node_express_diskdb
- Install
mongodbdriver
$ npm install mongodb
2. Create a new file called db.js in the app root.
Use this snippet, and replace CONNECTION_STRING_FROM_ATLAS with your connection string.
It should look a bit like this
mongodb+srv://myusername:mypassword@cluster0-somelocation.mongodb.net/test?retryWrites=true&w=majority
// db.js

// mongodb driver
const MongoClient = require("mongodb").MongoClient;

const dbConnectionUrl = "CONNECTION_STRING_FROM_ATLAS";

function initialize(
    dbName,
    dbCollectionName,
    successCallback,
    failureCallback
) {
    MongoClient.connect(dbConnectionUrl, function(err, dbInstance) {
        if (err) {
            console.log(`[MongoDB connection] ERROR: ${err}`);
            failureCallback(err); // this should be "caught" by the calling function
        } else {
            const dbObject = dbInstance.db(dbName);
            const dbCollection = dbObject.collection(dbCollectionName);
            console.log("[MongoDB connection] SUCCESS");

            successCallback(dbCollection);
        }
    });
}

module.exports = {
    initialize
};
- The function accepts our cloud db details (db name and collection name) and callbacks.
- It then connects to our cloud db using the driver method
MongoClient. - Upon success, it calls the
successCallbackpassing thedbCollectionobject.- Any failure will be thrown by
failureCallback
- Any failure will be thrown by
- We'll use
dbCollectionto execute mongodb commands.
Back to our server, we'll start server.js from scratch.
We will be using the cloud db connection instead of diskdb.
// server.js

const express = require("express");
const server = express();

const body_parser = require("body-parser");

// parse JSON (application/json content-type)
server.use(body_parser.json());

const port = 4000;

// << db setup >>
const db = require("./db");
const dbName = "data";
const collectionName = "movies";

// << db init >>

server.listen(port, () => {
    console.log(`Server listening at ${port}`);
});
In << db setup >>, we import db.js (to use our initialize method), and define variables for the db's info.
4. Initialize the database connection.
// db.js
...
// << db init >>
db.initialize(dbName, collectionName, function(dbCollection) { // successCallback
    // get all items
    dbCollection.find().toArray(function(err, result) {
        if (err) throw err;
          console.log(result);
    });

    // << db CRUD routes >>

}, function(err) { // failureCallback
    throw (err);
});
...
We initialize the db with the dbName, collectionName, and a successCallback.
Inside the successCallback:
-
GET allusingcollection.find(), which returns a cursor.- A cursor is like an iterator, where you can do
next,hasNext(), etc
- A cursor is like an iterator, where you can do
-
Convert the cursor to an array using async method
toArray(callback)- It's simpler for our use case to return full array, than iterate the cursor.
-
callbackruns after successfully converting the cursor to an array- We log the result for now, but you can imagine the code for returning response to client goes here
Start server
$ npm install
$ npm start
...which should give:
Server listening at 4000
[MongoDB connection] SUCCESS
[ { _id: 5d7ed8f31c9d4400009c3775,
    id: 'tt0110357',
    name: 'The Lion King',
    genre: 'animation' } ]
Yay! It works!

Now let's complete all the CRUD routes!
CRUD routes
Here's a rundown of the CRUD-to-MongoDB operations for our route handlers.
Notice that there are quite some syntax differences between diskdb functions and the official MongoClient.
| CRUD Operation | REST operation | MongoClient Operation |
|---|---|---|
| Create | POST /items
|
dbCollection.insertOne(object, callback) |
| Read One | GET /items/:id
|
dbCollection.findOne(query callback) |
| Read All | GET /items
|
dbCollection.find(query).toArray(callback) |
| Update | PUT /items/:id
|
dbCollection.updateOne(query, { $set: obj }, callback) |
| Delete | DELETE /items/:id
|
dbCollection.deleteOne(query, callback) |
All of these routes go in the << db CRUD routes >> marker in our code.
i. Create ➕
// server.js
...
// << db CRUD routes >>
server.post("/items", (request, response) => {
    const item = request.body;
    dbCollection.insertOne(item, (error, result) => { // callback of insertOne
        if (error) throw error;
        // return updated list
        dbCollection.find().toArray((_error, _result) => { // callback of find
            if (_error) throw _error;
            response.json(_result);
        });
    });
});
For the
POST /itemshandler, useinsertOne(item, callback)to add the movie fromrequest.body(parsed bybody_parsermiddleware)In the
callbackofinsertOne, throw theerrorif any. Theresultis not used here (_which is just a boolean for success and_idof inserted document).Get the updated list using
find(), and return the_resultas the response in itscallback.
Note the two levels of similar callbacks here: outer callback of
insertOne, and inner one offind. This is why I used(_error, _result)in the inner to avoid name collision. But feel free to rename them 😉
Test:
$ curl -X POST -H "Content-Type: application/json" --data '{"id": "tt0109830", "name": "Forrest
Gump", "genre": "drama"}' http://localhost:4000/items

[{"_id":"5de5c9d01c9d440000482ef0","id":"tt0110357","name":"The Lion King","genre":"animation"},{"_id":"5de7009967aec74a90f88d67","id":"tt0109830","name":"Forrest Gump","genre":"drama"}]
ii. Read one 🕵️
server.get("/items/:id", (request, response) => {
    const itemId = request.params.id;

    dbCollection.findOne({ id: itemId }, (error, result) => {
        if (error) throw error;
        // return item
        response.json(result);
    });
});
Get the
iddirectly from the params (e.g.1234for http://localhost/items/1234).Find the item with that
idusingfindOne(query).
queryis just an object so you can use key-value pairs for your queries. We use this query object forfind,deleteand other MongoDB commands.
// query can be:

{ id: 1 }; // find using id

{ name: "The Lion King" }; // find using name

{ id: 1, name: "The Lion King", genre: "action" }; // find using id, name and genre
- Return the item in the
response
Test:
$ curl http://localhost:4000/items/tt0109830

{"_id":"5de7009967aec74a90f88d67","id":"tt0109830","name":"Forrest Gump","genre":"drama"}
iii. Read all 🕵️
server.get("/items", (request, response) => {
    // return updated list
    dbCollection.find().toArray((error, result) => {
        if (error) throw error;
        response.json(result);
    });
});
Return all the items in the collection in the response, same in POST /items
Test:
$ curl http://localhost:4000/items

[{"_id":"5de5c9d01c9d440000482ef0","id":"tt0110357","name":"The Lion King","genre":"animation"},{"_id":"5de7009967aec74a90f88d67","id":"tt0109830","name":"Forrest Gump","genre":"drama"}]
iv. Update ✏️
server.put("/items/:id", (request, response) => {
    const itemId = request.params.id;
    const item = request.body;
    console.log("Editing item: ", itemId, " to be ", item);

    dbCollection.updateOne({ id: itemId }, { $set: item }, (error, result) => {
        if (error) throw error;
        // send back entire updated list, to make sure frontend data is up-to-date
        dbCollection.find().toArray(function(_error, _result) {
            if (_error) throw _error;
            response.json(_result);
        });
    });
});
Get the
idfrom params and theitemfrom body (throughbody-parser).Update item with
idand set it toitem, usingdbCollection.updateOne(query, { $set: item }, callback.
- Note the use of MongoDB-specific
{ $set: item }
- Return the updated list, as in
POST /itemsandGET /items
Test:
Maybe you think "The Lion King" is a drama, since ...well, I won't spoil it. 🤫 🦁
curl -X PUT -H "Content-Type: application/json" --data '{"genre": "drama"}' http://localhost:4000/items/tt0110357

[{"_id":"5de5c9d01c9d440000482ef0","id":"tt0110357","name":"The Lion King","genre":"drama"},{"_id":"5de7009967aec74a90f88d67","id":"tt0109830","name":"Forrest Gump","genre":"drama"}]
v. Delete ❌
server.delete("/items/:id", (request, response) => {
    const itemId = request.params.id;
    console.log("Delete item with id: ", itemId);

    dbCollection.deleteOne({ id: itemId }, function(error, result) {
        if (error) throw error;
        // send back entire updated list after successful request
        dbCollection.find().toArray(function(_error, _result) {
            if (_error) throw _error;
            response.json(_result);
        });
    });
});
Here, only the id is needed from params, which we pass to dbCollection.deleteOne(query).
As before, you can formulate a query easily to your needs, since it's just an object.
🤸♀️ Challenge: modularize the
dbCollection.find()since we're using it in 3 places.
Test:
$ curl -X DELETE http://localhost:4000/items/tt0109830

[{"_id":"5de5c9d01c9d440000482ef0","id":"tt0110357","name":"The Lion King","genre":"drama"}]
Notes
- Callbacks ??!!, why this instead of ES6 Promises, or ES7 async/await...
-
MongoClient.connectonly supports callbacks, but we'll promisify (and aysnc-await-ify) these callbacks on the next lesson, since honestly they are starting to look like callback hell. See this post for a fun rundown on callback hell.

- Why do We return all of the items in the response create, update, delete ?
- There are a lot of options on what to do to synchronize UI and backend after a change, and it is quite a Software Architecture topic for itself.
Article No Longer Available
- Here, we just return the updated items to UI after a create, update and delete. We let the frontend (e.g. React, Vue, Angular, Vanilla JS) update its state and views from that information.
Here's the complete Code
https://github.com/lenmorld/devto_posts/tree/master/quick_node_express_mongodb

"Okay, that was nice. But what can I do with this? "
✅ Serving HTML files
✅ REST API
✅ Cloud Database persistence
Now, this is an actual server for a small project. Add more routes, save some data in the db through API requests. Just add frontend!™
Next up:
(In progress)
- MongoDB callbacks to Promises and Async/Await
This article is part of a Node+Express series I'm working on.
For the meantime, if you can't get enough of Node+Express 🤓,
checkout my Node workshop (Gihub repo and slides):
 lenmorld
/
node_workshop
lenmorld
/
node_workshop
Build a server and API for your next web application, using Node, Express and MongoDB
Node workshop
to follow workshop:
$ git checkout dev
$ node server.js
to dev latest
$ git checkout master
$ npm start
Create a .env file on root
NODE_ENV=development
PORT=4000
MONGO_DB_CONNECTION_STRING=YOUR_CONNECTION_STRING_HERE
# API keys go here
Here we discussed:
- Using Node and Express
- Routing, request and response
- Building a REST API
- Server-rendered templates
- Connecting to a NoSQL (mongo) database
- Using external APIs, such as Spotify
- and much more!
Happy server-ing! 🤓
Now, all this Mongo talk made me hungry.
I'm gonna have some of my favorite "Hopia Mongo" (bean-filled Filipino pastry)🌱.

Photo from FoxyFolksy in article "Hopia Recipe- Munggo And Ube Filling" src: https://www.foxyfolksy.com/hopia-recipe-munggo-ube-filling/

Top comments (6)
Hi Lenmor, great tutorial exactly what I needed as a start for my analytics. Easy and quick to go through. One update you might want to make to the mongo connect invocation is to add a couple options to avoid the deprecation warning about the Server Discovery and Monitoring engine.
// db.js
...
MongoClient.connect(dbConnectionUrl,
{
useNewUrlParser: true,
useUnifiedTopology: true
},
...
Should be easy to figure out for viewers. Again, thanks so much!
Thanks for writing this. Your article led to a breakthrough for me on the project I'm working on, though probably not in the context you imagined when writing this so thought I'd share. I have a client that uses MongoDB Atlas for their enterprise-wide system of record. But their analytics team needs the data in tabular format. Atlas has a "BI Connector" that allows querying the cluster's databases with traditional SQL - I imagine behind the scenes they are mapping any document changes out to a relational structure that mirrors the collections. However the fact that the relational structure is being maintained on a moment by moment basis impacts performance. And the BI tool itself has a technical learning curve that these non-tech folks don't want to deal with. They're familiar with SQL Server. So I proposed to write automation that can pipe the data into any system of record in their organization, using node + loopback.js. loopback provides a way to quickly generate an API (REST or GraphQL) and has connectors for almost any kind of data source. The challenge is that I didn't want to hardcode the Atlas document structures into the application, as they are in flux at the moment. I'm building an auto-mapper that can connect to the specified MongoDB database, get its collections and automatically generate SQL tables from them and populate those SQL tables from them, with in-database configuration params to control the filtering e.g. only get last 5 minutes of data from collection X using its .timestamp property. At first I tried using mongoexport.exe which lets you export to flatfiles and it takes in collections and fields as params. But the problem is it exports large numbers in scientific notation format, which loses some of the number! Like, really Mongo devs?? wtf. Just export it as a string if u have to. But nope. Brick wall. Compass has a great csv export which gets the numbers right and doesn't mess them up using scientific notation, but it's not currently automatable, i.e. you can't call its functions from the command line. I knew there had to be a way around this so I just searched for MongoDB Atlas API which dug up your article by accident (i.e. I was looking for an API I could use but no luck then I found your article. And I was like DUH, use the mongodb driver for node! No more scientific notation on bigints, and fully automatable, So thanks! I will still put the code inside loopback.js because it's a fantastically architected framework for modularizing your code into services and exposing those via API. I'm not here to sell loopback.js but I love it. And I'm always open to other ideas even if you think there's a much better way to do what I'm trying to accomplish here. Have a good one!
I was looking through so many similar tutorials on this exact topic, scratching my head and struggling so much with this, but this tutorial is everything I needed all in one place! Although the other tutorials claimed to be 'beginner' level, even with 3 years studying computer science I couldn't get them to work, but this well-documented guide with images and explanations is by far the best one I've seen for this implementation. Thank you SO much for writing this !! It has saved my project!!!
I'm happy it helped :)
Thanks for taking the time to write a reply. I appreciate it!
Hey Lenmor, thank you for this great article!
I will definitly try this out :)
This is amazing clear, simple and practical. It worked on my first try. Thank you very much.