
Let's assume we want to make an interactive coding tutorial on a blog or a tutorials website. The tutorial should have a playground that helps us guide the students to write code, see the results and complete an assignment task.
We are going to use LiveCodes and its powerful SDK to achieve this. So, here we go.
This article was originally published at LiveCodes blog.
What Are We Building?
We are going to build a playground for a simple interactive coding tutorial.
We will add some HTML, add styles using CSS and dynamically change its content using JavaScript. The student can interact with the playground, add code and see its result. At the end, the student is asked to complete a simple task (e.g. changing the value of a variable), then the task is verified and a feedback is given if the task was completed successfully.
Demo
Check a live demo on LiveCodes blog.
The full source code (in vanilla JavaScript and also in React TSX) can be found here.
What is LiveCodes?
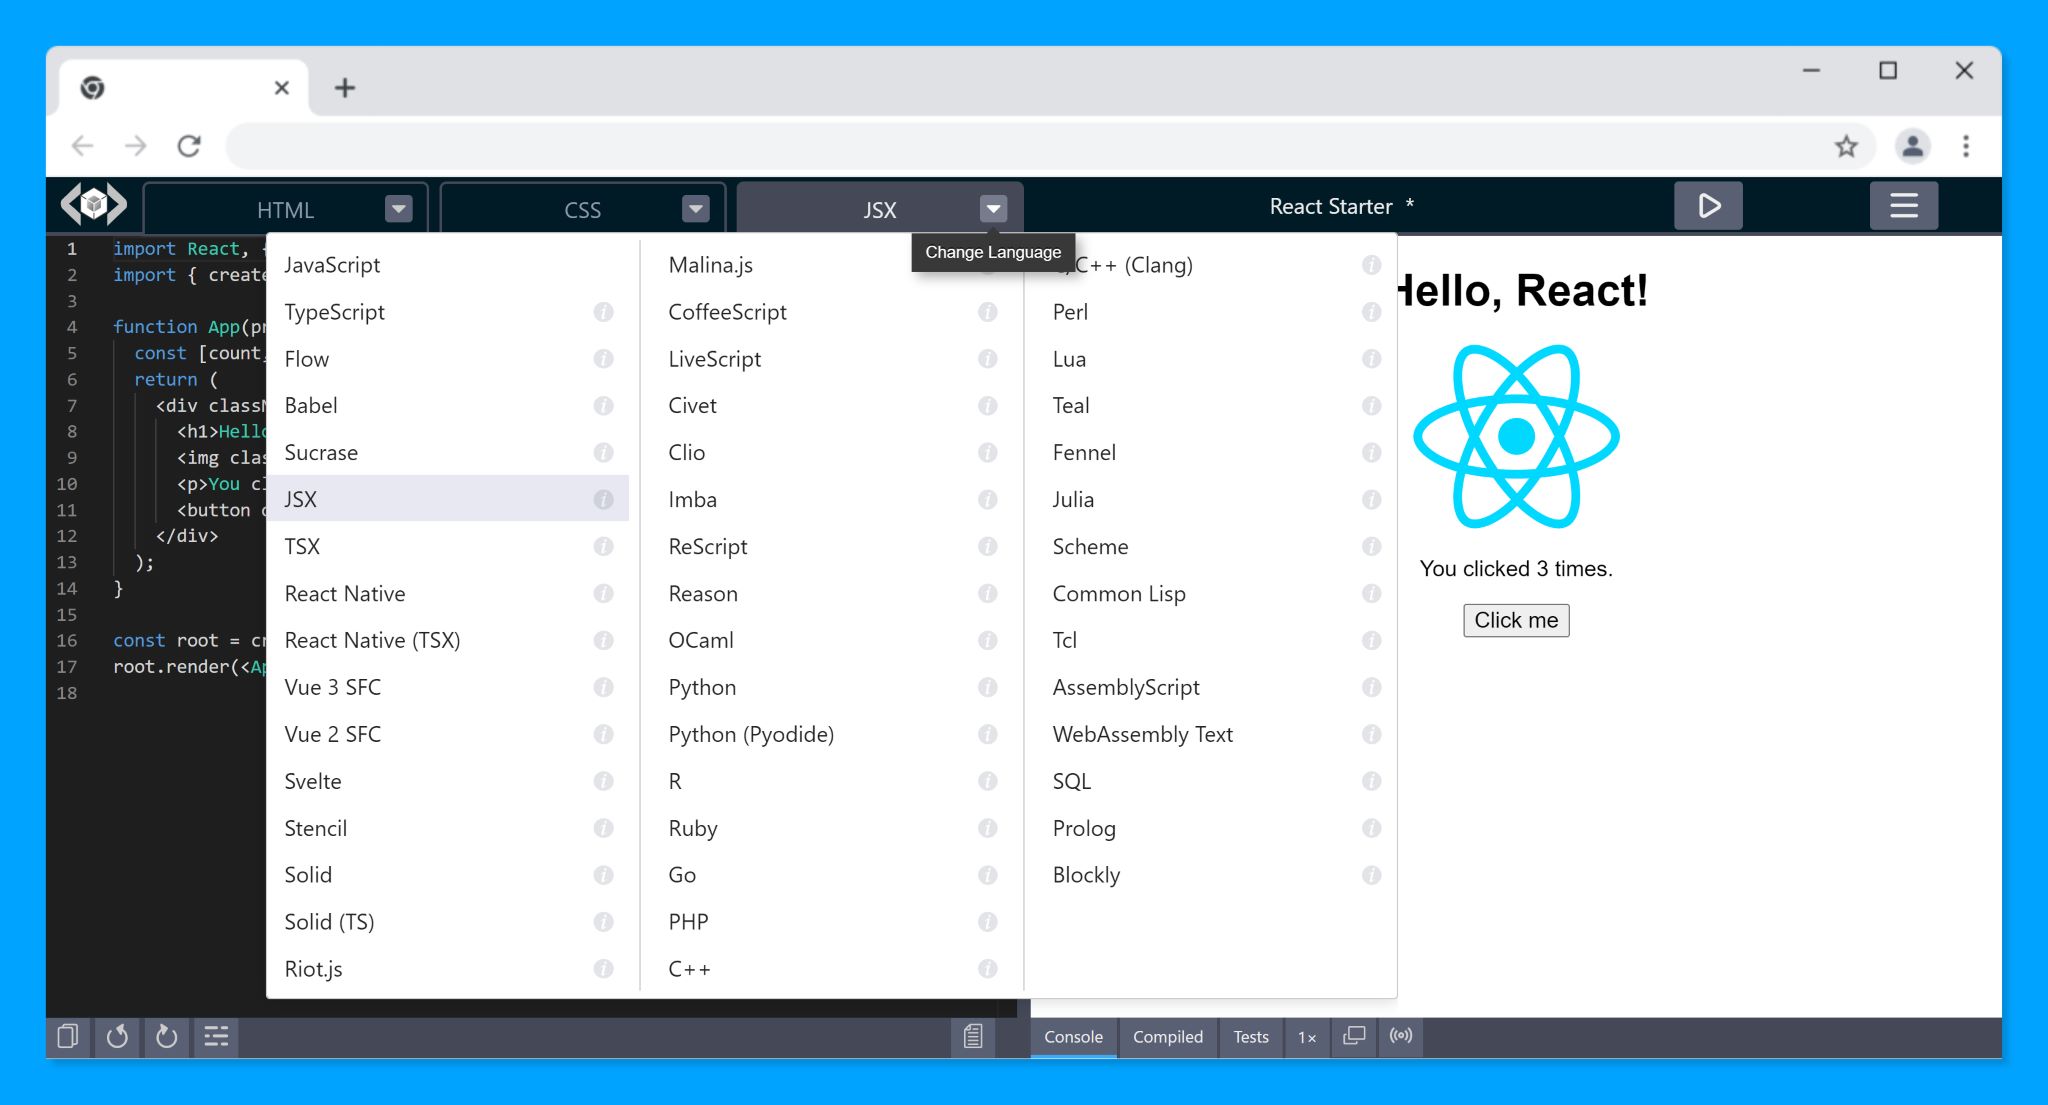
LiveCodes is a feature-rich, open-source, client-side, code playground that supports 80+ languages and frameworks. Playgrounds can be embedded in any web pages. A powerful, yet easy-to-use, SDK allows creating and communicating with playgrounds.
LiveCodes is free with no limits to usage, no ads and no account required. It is MIT-licensed which allows its use, distribution and modification even for commercial projects.
Read more in the announcement.
 live-codes
/
livecodes
live-codes
/
livecodes
Code Playground That Just Works!
LiveCodes
Code Playground That Just Works!
A feature-rich, open-source, client-side code playground for React, Vue, Svelte, Solid, Typescript, Python, Go, Ruby, PHP and 80+ languages/frameworks.


What makes LiveCodes different?
Code Playground That Just Works!
- No servers to configure (or pay for!)
- No databases to maintain (or pay for!)
- No installs
- No configuration files
- No build steps
- No subscription fees (free and open-source)
- No account required *
- No limits for usage (unlimited private projects)
- 80+ languages/frameworks/processors
- Large set of features and integrations
- Import code from a wide variety of sources
- Use modules from npm, deno.land/x, jsr, GitHub, and others
- Easily embed it in your web pages
- It runs in the browser (client-side)
* GitHub account is required only for features that use GitHub Integration.
Quick Start
Standalone App
- Go to livecodes.io
... and enjoy all the features!
Embedded Playground
Add this…
Enough talk, let's get started!
The Playground
The LiveCodes SDK makes it easy to create code playgrounds. The SDK can be loaded from CDN or can be installed from npm. To keep things simple, we will just use the CDN.
The SDK is available for vanilla JavaScript/TypeScript, React, Vue and Svelte. Again, for simplicity, we will use vanilla JavaScript.
A new playground can be created using the createPlayground function. It takes the container HTML element (or its selector) and optionally embed options.
<div id="container"></div>

<script type="module">
  import { createPlayground } from 'https://unpkg.com/livecodes';

  createPlayground('#container', { /* embed options */ });
</script>
This creates a playground that the user can interact with and see the result immediately, without having to install or build anything (not even for any of the supported languages).
It is generally a good practice to specify the SDK version and a permanent URL for the app to avoid later potential breaking changes with updates to the SDK or the app.
<div id="container"></div>

<script type="module">
  import { createPlayground } from 'https://unpkg.com/livecodes@0.4.0';

  const options = {
    // permanent URL avoids later breaking changes
    appUrl: 'https://v25.livecodes.io',
  };
  createPlayground('#container', options);
</script>
We now have an empty playground. Let's fill it with code.
Adding Content
When creating the playground, embed options can be used to add content (e.g. using the options config, params, import or template).
This loads the playground prefilled with the code you specified.
<div id="container"></div>

<script type="module">
  import { createPlayground } from 'https://unpkg.com/livecodes@0.4.0';

  const options = {
    appUrl: 'https://v25.livecodes.io',
    config: {
      markup: {
        language: 'html',
        content: 'Welcome to the tutorial!',
      },
    },
  };
  createPlayground('#container', options);
</script>
Adding Tutorial Steps
Now the student can see the playground, interact with it and see the result. So let's add some tutorial steps, where new code is added to the playground in different editors (HTML, CSS and JavaScript). This can gradually introduce new concepts to the student without losing context or having to move to a new playground.
The createPlayground function returns a promise that resolves to the playground instance. This instance has some useful methods that allows interaction with the already running playground (e.g. run, getConfig, setConfig, getCode, format, show, runTests, onChange, getShareUrl).
<div id="container"></div>
<button id="next">Next</button>

<script type="module">
  import { createPlayground } from "https://unpkg.com/livecodes@0.4.0";

  // add data for tutorial steps
  const steps = [
    {
      config: {
        markup: {
          language: "html",
          content: '<h1>Hello,\n  <span id="title">World</span>!\n</h1>',
        },
      },
    },
  ];

  const options = {
    appUrl: "https://v25.livecodes.io",
    config: {
      markup: {
        language: "html",
        content: "Welcome to the tutorial!",
      },
    },
  };

  createPlayground("#container", options).then((playground) => {
    const nextBtn = document.querySelector("#next");
    nextBtn.addEventListener("click", async () => {
      const currentStep = steps[0];
      // send the config object to the playground
      await playground.setConfig(currentStep.config);
    });
  });
</script>
Now we have defined an array (steps) that will hold the data of each step in the tutorial. The first step has a config object that is to be sent to the playground.
A button with the id "next" controls moving between steps. An event handler for its click event sends the current step config to the playground using the method setConfig.
More Steps
So, let's add some more steps. Clicking the button should move us to the next step.
<div id="container"></div>
<button id="next">Next</button>

<script type="module">
  import { createPlayground } from "https://unpkg.com/livecodes@0.4.0";

  const steps = [
    {
      config: {
        markup: {
          language: "html",
          content: '<h1>Hello,\n  <span id="title">World</span>!\n</h1>',
        },
      },
    },
    // add a new step
    {
      config: {
        markup: {
          language: "html",
          content: '<h1>Hello,\n  <span id="title">World</span>!\n</h1>',
        },
        style: {
          language: 'css',
          content: '#title {\n  color: blue;\n}',
        },
      },
    },
  ];

  const options = {
    appUrl: "https://v25.livecodes.io",
    config: {
      markup: {
        language: "html",
        content: "Welcome to the tutorial!",
      },
    },
  };

  createPlayground("#container", options).then((playground) => {
    let step = 0;
    const nextBtn = document.querySelector("#next");
    nextBtn.addEventListener("click", async () => {
      const lastStep = steps.length - 1;
      const currentStep = steps[step];
      await playground.setConfig(currentStep.config);
      step = step < lastStep ? step + 1 : 0;
    });
  });
</script>
The variable step keeps track of the step index. The corresponding data is read from the steps array and sent to the playground.
However, there is now a lot of duplication in the code of each step. Also, if the student makes some changes to the HTML, the next step will overwrite them.
So, let's read the current config object from the playground (using the method getConfig) and then merge the changes for the new step. Now, we can remove the duplication in steps.
<div id="container"></div>
<button id="next">Next</button>

<script type="module">
  import { createPlayground } from "https://unpkg.com/livecodes@0.4.0";

  const steps = [
    {
      config: {
        markup: {
          language: "html",
          content: '<h1>Hello,\n  <span id="title">World</span>!\n</h1>',
        },
      },
    },
    {
      config: {
        // remove duplication
        style: {
          language: 'css',
          content: '#title {\n  color: blue;\n}',
        },
      },
    },
  ];

  const options = {
    appUrl: "https://v25.livecodes.io",
    config: {
      markup: {
        language: "html",
        content: "Welcome to the tutorial!",
      },
    },
  };

  createPlayground("#container", options).then((playground) => {
    let step = 0;
    const nextBtn = document.querySelector("#next");
    nextBtn.addEventListener("click", async () => {
      const lastStep = steps.length - 1;
      const currentStep = steps[step];
      // get previous config
      const prevConfig = step === 0 ? options.config : await playground.getConfig();
      // merge previous with new config
      await playground.setConfig({ ...prevConfig, ...currentStep.config });
      step = step < lastStep ? step + 1 : 0;
    });
  });
</script>
Changing Layout
We still have a problem!
Although we were able to add CSS code, the style editor was not activated. We can correct this by using the show method.
We can even control the position of the cursor, so that your student is guided where to start typing.
<div id="container"></div>
<button id="next">Next</button>

<script type="module">
  import { createPlayground } from "https://unpkg.com/livecodes@0.4.0";

  const steps = [
    {
      // active editor and cursor position
      panel: 'markup',
      position: { line: 2, column: 20 },
      config: {
        markup: {
          language: "html",
          content: '<h1>Hello,\n  <span id="title">World</span>!\n</h1>',
        },
      },
    },
    {
      panel: 'style',
      position: { line: 2, column: 10 },
      config: {
        style: {
          language: 'css',
          content: '#title {\n  color: blue;\n}',
        },
      },
    },
  ];

  const options = {
    appUrl: "https://v25.livecodes.io",
    config: {
      markup: {
        language: "html",
        content: "Welcome to the tutorial!",
      },
    },
  };

  createPlayground("#container", options).then((playground) => {
    let step = 0;
    const nextBtn = document.querySelector("#next");
    nextBtn.addEventListener("click", async () => {
      const lastStep = steps.length - 1;
      const currentStep = steps[step];
      const prevConfig = step === 0 ? options.config : await playground.getConfig();
      await playground.setConfig({ ...prevConfig, ...currentStep.config });
      // set layout
      await playground.show(currentStep.panel, currentStep.position);
      step = step < lastStep ? step + 1 : 0;
    });
  });
</script>
Now, let's add some steps for JavaScript code. We can even open the integrated console to show logs. Let's also change the text of the "next" button with each step.
<div id="container"></div>
<button id="next">Start Tutorial</button>

<script type="module">
  import { createPlayground } from "https://unpkg.com/livecodes@0.4.0";

  const steps = [
    {
      btnText: 'Next',
      panel: 'markup',
      position: { line: 2, column: 20 },
      config: {
        markup: {
          language: "html",
          content: '<h1>Hello,\n  <span id="title">World</span>!\n</h1>',
        },
      },
    },
    {
      btnText: 'Next',
      panel: 'style',
      position: { line: 2, column: 10 },
      config: {
        style: {
          language: 'css',
          content: '#title {\n  color: blue;\n}',
        },
      },
    },
    // add new steps
    {
      btnText: 'Next',
      panel: 'script',
      position: { line: 2, column: 19 },
      config: {
        script: {
          language: 'javascript',
          content:
            '// change this value to "LiveCodes"\nconst newTitle = "???";\ndocument.querySelector("#title").textContent = newTitle;\nconsole.log(newTitle);',
        },
      },
    },
    {
      btnText: 'Final Result',
      panel: 'console',
    },
    {
      btnText: 'Restart Tutorial',
      panel: 'result',
    },
  ];

  const options = {
    appUrl: "https://v25.livecodes.io",
    config: {
      markup: {
        language: "html",
        content: "Welcome to the tutorial!",
      },
    },
  };

  createPlayground("#container", options).then((playground) => {
    let step = 0;
    const nextBtn = document.querySelector("#next");
    nextBtn.addEventListener("click", async () => {
      const lastStep = steps.length - 1;
      const currentStep = steps[step];
      const prevConfig = step === 0 ? options.config : await playground.getConfig();
      await playground.setConfig({ ...prevConfig, ...currentStep.config });
      await playground.show(currentStep.panel, currentStep.position);
      // change the button text for new steps
      nextBtn.textContent = currentStep.btnText;
      step = step < lastStep ? step + 1 : 0;
    });
  });
</script>
Assignments
So, we are progressing very well!
Now we want our student to complete a task. We then need to validate if the task was completed successfully. This can be achieved by running automated tests.
LiveCodes supports running automated tests using Jest and Testing Library. You may test the page DOM or test the code exported from the script editor.
Let's write some tests for our tutorial.
import { screen } from "@testing-library/dom";
import "@testing-library/jest-dom";

test("Should display title", async () => {
  expect(screen.getByText("Hello", { exact: false })).toHaveTextContent(
    "Hello, LiveCodes!"
  );
});

test("Title should be blue", async () => {
  const style = window.getComputedStyle(document.querySelector("#title"));
  expect(style.color).toBe("rgb(0, 0, 255)");
});
We test that the student was indeed able to complete the task (by changing the value of the variable newTitle to become "LiveCodes"). Also we are testing the color of the title.
These tests can be added to tests property of the config object.
We can then run the tests using the SDK method runTests. This method returns a promise that resolves to the test results, which we can then show to our student.
Final Result
Check the final result after adding tests, styles and some final touches. See it in action on LiveCodes blog.

Full Code
The full code in vanilla JavaScript and also in React TSX can be found here.
Conclusion
That was an interesting project to build!
Using LiveCodes SDK, we have built a very basic tutorial where the student can learn how to add HTML elements, style them with CSS and change the text content with JavaScript. We were even able to check if the assignment was completed successfully.
During our work, we had an idea about the LiveCodes SDK and how to use it. Please refer to the SDK documentations for more details.
What's Next?
You can now make your tutorials a lot more interactive and fun with LiveCodes. These tutorials can use any of the supported languages and frameworks. Tutorials may also cover your own libraries (with full editor IntelliSense).
You may want to create full courses and even sell them. LiveCodes is MIT-licensed.
Your imagination is the limit!
Tell Us What You Think
Please let us know what you think. If you have a case that the SDK does not cover, tell us about it.
If you do use LiveCodes for your tutorials/courses, we would love to know about them (we may even link to them!). And if you find LiveCodes to be useful, please give us a star on GitHub and please consider becoming a sponsor.
What will you learn/build/teach today?

Top comments (0)