
Hello, I'm Maneshwar. I'm building git-lrc, an AI code reviewer that runs on every commit. It is free, unlimited, and source-available on Github. Star Us to help devs discover the project. Do give it a try and share your feedback for improving the product.
*Hello, I'm Maneshwar. I'm working on [git-lrc](https://hexmos.com/livereview/git-lrc/): a Git hook for Checking AI generated code. AI agents write code fast. They also silently remove logic, change behavior, and introduce bugs -- without telling you. You often find out in production. git-lrc fixes this. It hooks into git commit and reviews every diff before it lands. 60-second setup. Completely free.* I was working on integrating **LinkedIn Sign-In** for my product, and let me tell you, it wasn’t all smooth sailing. I spent three hours today troubleshooting 3-4 tricky areas that most people stumble upon during the process. So, to save you from the same pitfalls, I’m writing this article to guide you step by step through the integration. If you’re f ollowing along and hit any snags, feel free to **drop a comment**, and I’ll be happy to help you out. And if you’re planning to integrate LinkedIn later, **bookmark this article now**—future you will thank you! In just **three steps**, your app will be connected to LinkedIn’s OpenID magic. Let’s dive in, shall we?  --- ### **Step 1: Create a LinkedIn App** Before we start coding, we need to create an app in LinkedIn’s Developer Portal. #### 1. **Create Your LinkedIn App** Head over to [LinkedIn Developer Apps](https://www.linkedin.com/developers/apps/new), enter your app name, privacy policy, and upload your logo. Tip: Use a clear privacy policy, like this example: [Privacy Policy](https://hexmos.com/liveapi/privacy/). 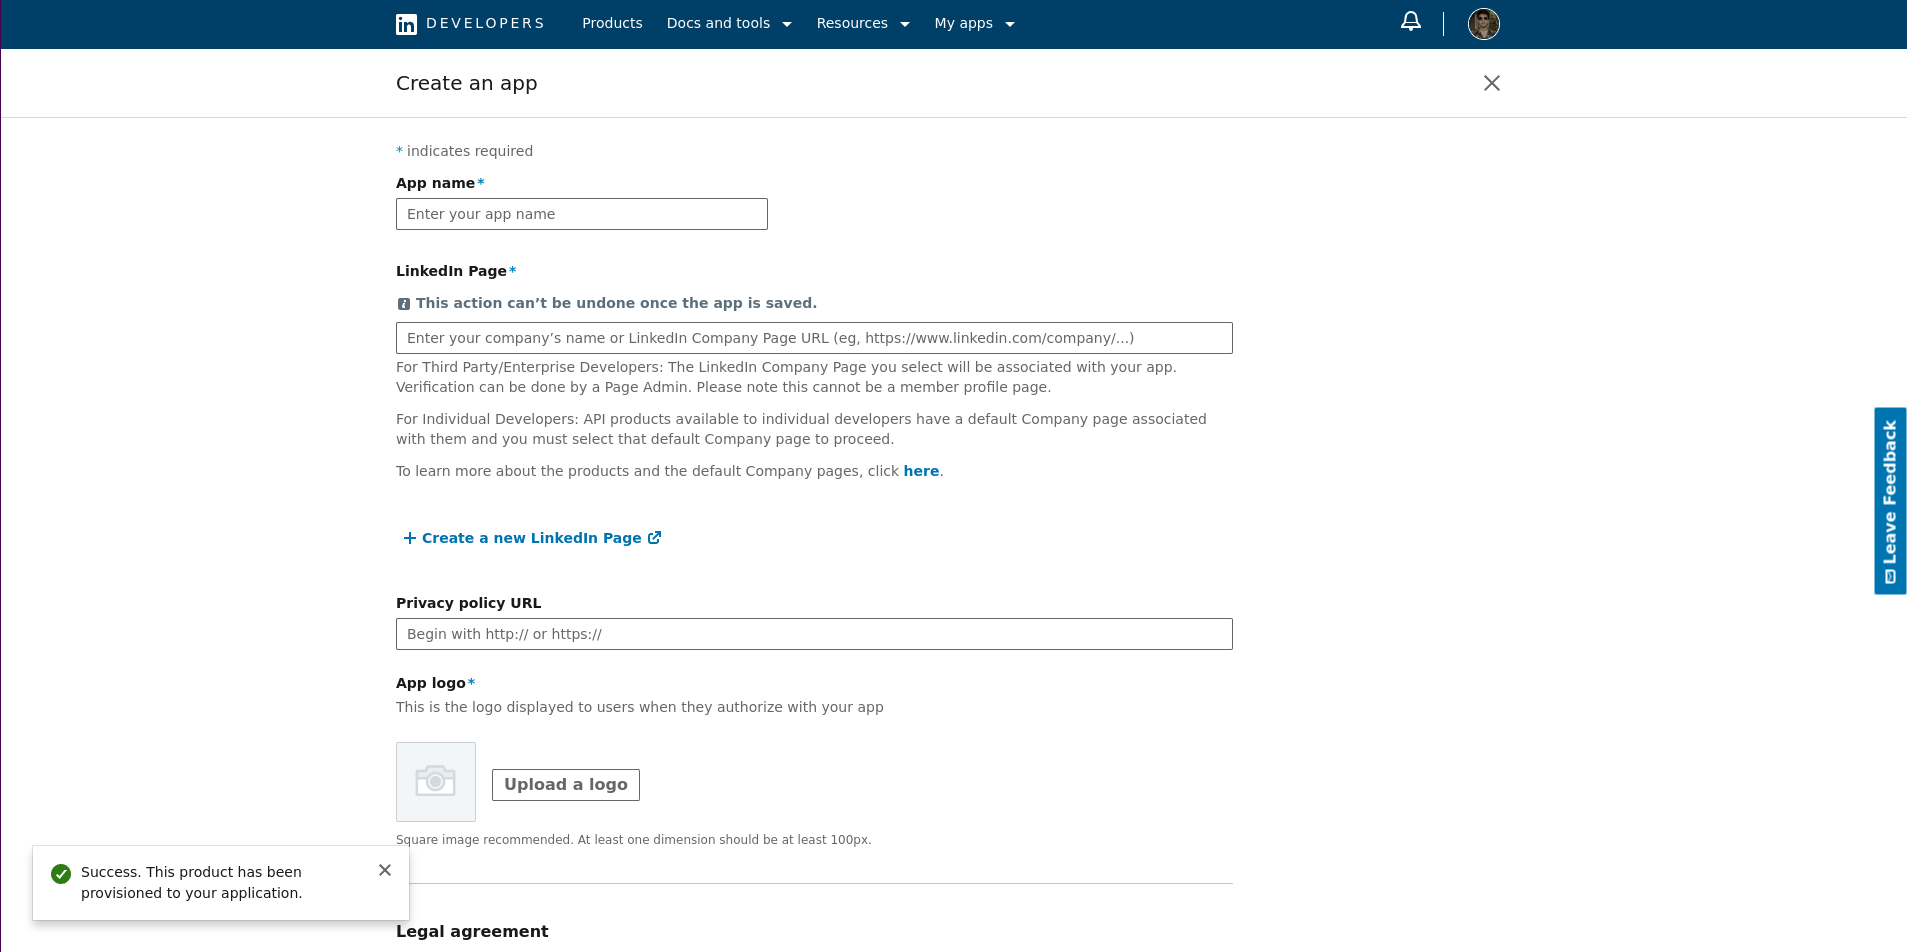 #### 2. **Generate Your Client ID and Secret** - Once your app is created, generate a Client Secret. - Save the **Client ID** in your frontend and backend as an environment variable, but remember—keep the **Secret** *safe* in the backend.  #### 3. **Set Redirect URLs** Add these URLs in the **Redirect URL** section: - Local server: `http://localhost:3000/signin` - Production server: `https://yourdomain.com/signin` 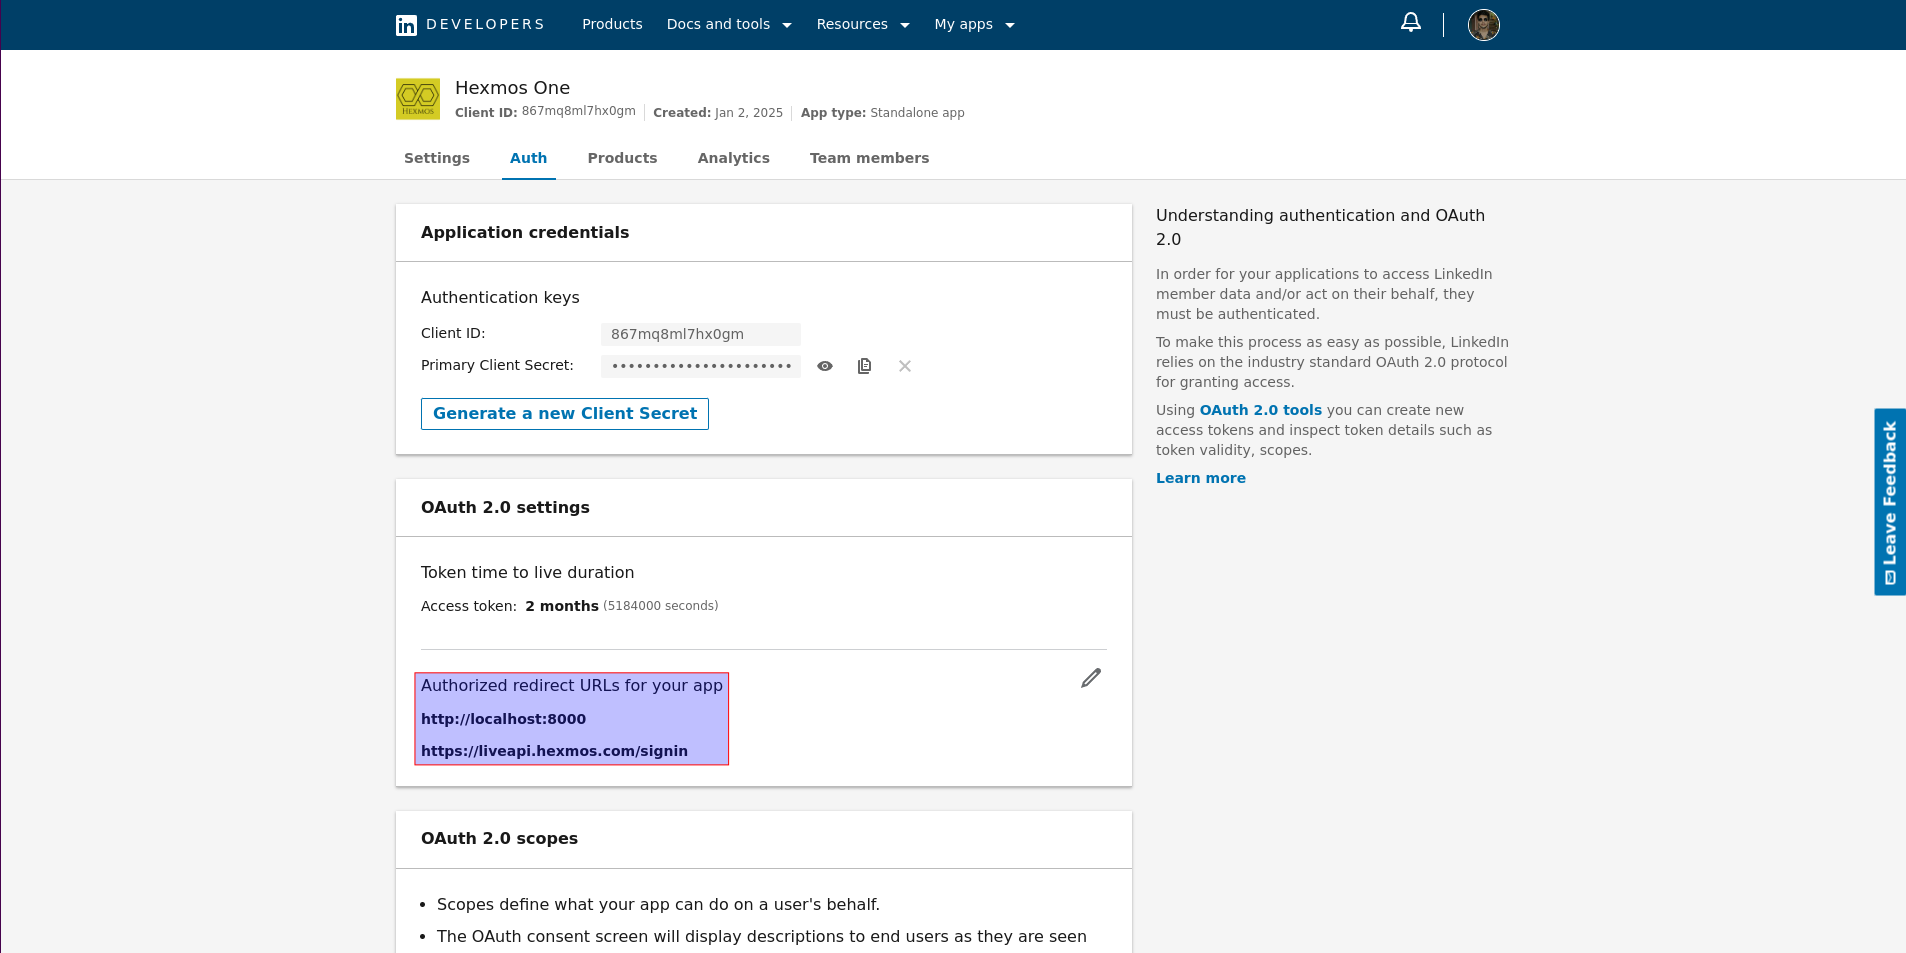 #### 4. **Enable the Magic** - Go to the **Auth Tab** and request access for: - **Sign in with LinkedIn using OpenID Connect** - **Share on LinkedIn** - Check your **Endpoints** to see `GET /v2/userinfo` activated. 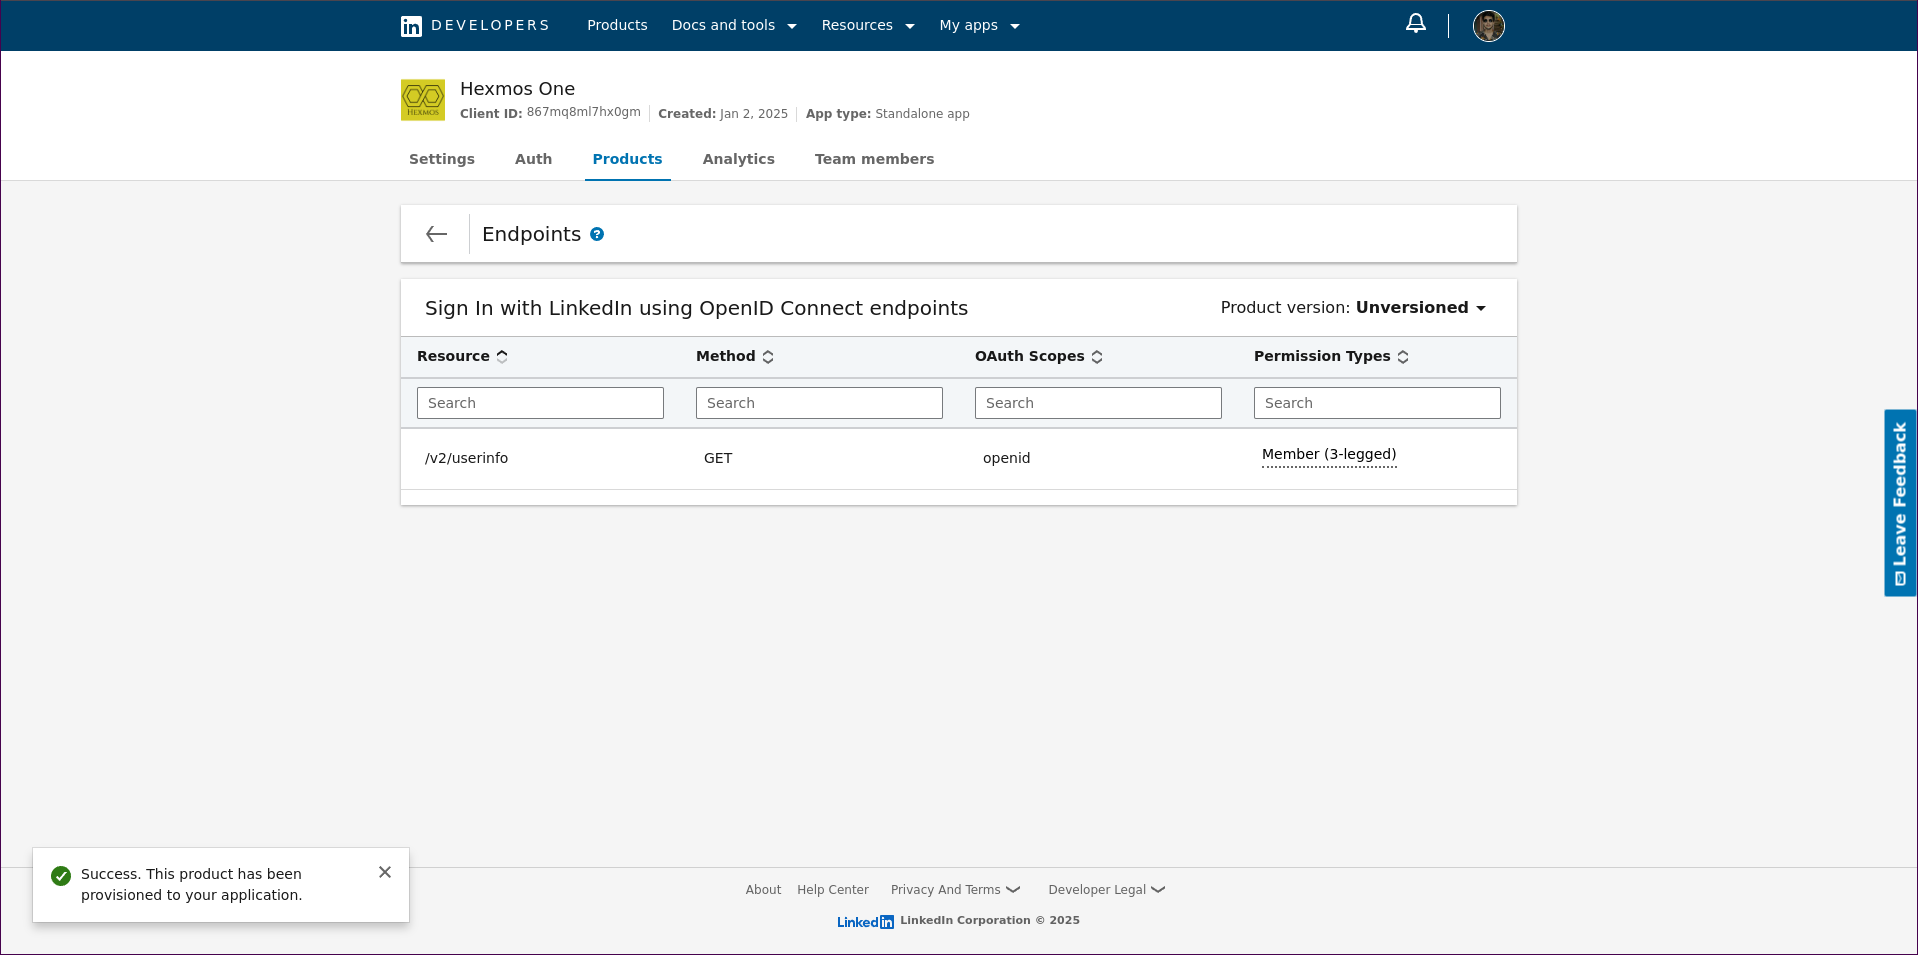 #### 5. **Verify Your App** Go to your app’s **Settings Tab** and verify the button functionality. Without this, your users might be left hanging! 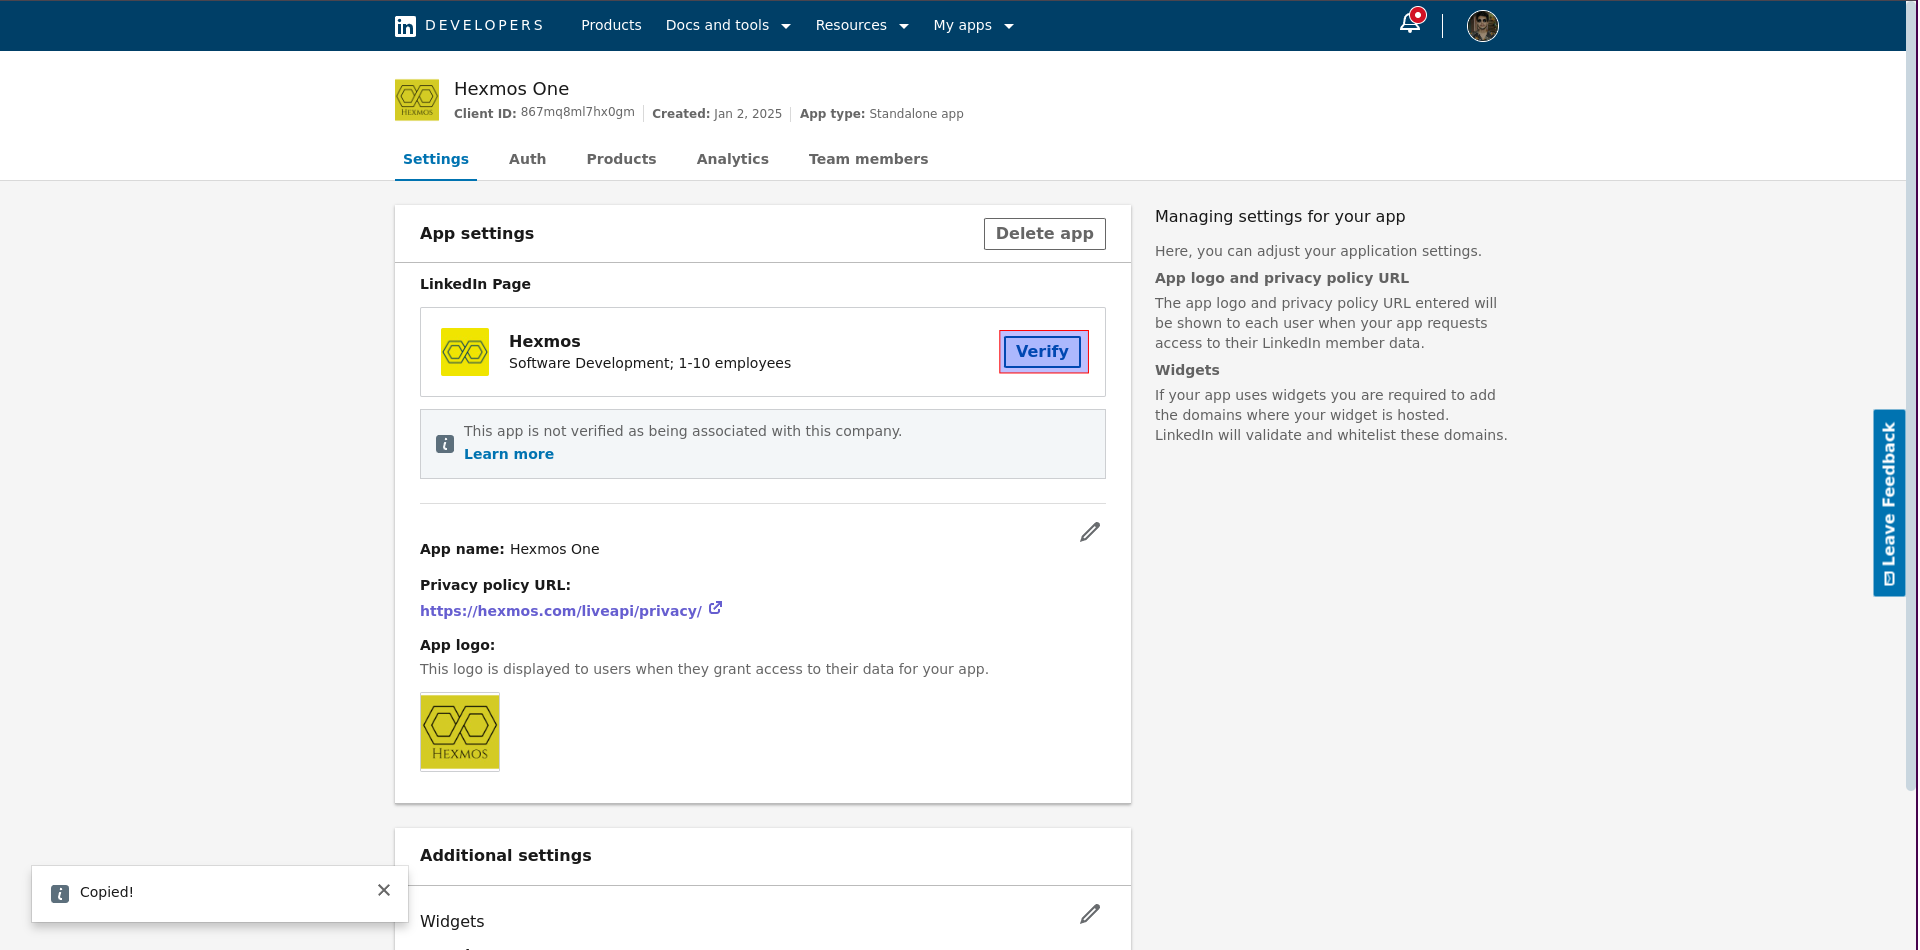 #### 6. **Grab the LinkedIn Button Images** Download official LinkedIn sign-in button assets from [here](https://content.linkedin.com/content/dam/developer/branding/signin_with_linkedin-buttons.zip). --- --- ## Step 2: Build the Frontend Let’s get into the code! You’ll need a dedicated component to handle LinkedIn Sign-In. ### **1. Create `linkedin.jsx`** ```javascript import { Component } from "react"; class LinkedIn extends Component { componentDidMount() { this.handleRedirect(); } handleRedirect = () => { const urlParams = new URLSearchParams(window.location.search); const redirectUri = localStorage.getItem("linkedInRedirectUri"); const savedState = localStorage.getItem("linkedInState"); localStorage.removeItem("linkedInState"); localStorage.removeItem("linkedInRedirectUri"); const state = urlParams.get("state"); const code = urlParams.get("code"); const error = urlParams.get("error"); // Clear URL parameters after handling let newURL = window.location.pathname; urlParams.delete("state"); urlParams.delete("error"); urlParams.delete("error_description"); urlParams.delete("code"); if (urlParams.toString()) { newURL = `${newURL}?${urlParams.toString()}`; } window.history.replaceState(null, null, newURL); if (error) { this.props.callback(error, null, null); } else if (redirectUri && code && savedState === state) { this.props.callback(null, code, redirectUri); } }; startLogin = () => { const { clientId, scope } = this.props; const state = Math.random().toString(36).substring(7); localStorage.setItem("linkedInState", state); localStorage.setItem("linkedInRedirectUri", window.location.href); const loginUrl = getURL(clientId, state, scope); window.location.href = loginUrl; // Redirect to LinkedIn OAuth }; render() { return ( );
}
}
export default LinkedIn;
const getURL = (clientId, state, scope) => {
const redirectUri = encodeURIComponent(window.location.href);
const base =
"https://www.linkedin.com/oauth/v2/authorization?response_type=code&";
const fullScope = scope?.length
? `&scope=${encodeURIComponent(scope.join(" "))}`
: "";
return `${base}client_id=${clientId}&redirect_uri=${redirectUri}&state=${state}${fullScope}`;
};
```
### **2. Add CSS for LinkedIn Button**
```css
.linkedin-button {
border: none;
background: transparent;
padding: 0;
cursor: pointer;
}
.linkedin-icon {
height: auto;
}
.linkedin-button:hover .linkedin-icon {
content: url("/src/assets/images/Sign-In-Small---Hover.png");
}
```
👉 Use the button images you downloaded earlier from the official LinkedIn zip folder.
### **3. Integrate the Sign-In Button**
```javascript
import "./assets/styles/main.scss";
import { useState } from "react";
import LinkedIn from "./linkedin";
const Linkedin_ClientID = "867mq7ml7hx0gm";
function LinkedinPage() {
const [authData, setAuthData] = useState(null);
const handleLinkedInCallback = async (error, code, redirectUri) => {
if (error) {
console.error("LinkedIn login error:", error);
return;
}
setAuthData(code);
console.log("LinkedIn code:", code);
console.log("Redirect URI:", redirectUri);
// Prepare token exchange request
// Send the code to the backend from here
};
return (
);
}
}
export default LinkedIn;
const getURL = (clientId, state, scope) => {
const redirectUri = encodeURIComponent(window.location.href);
const base =
"https://www.linkedin.com/oauth/v2/authorization?response_type=code&";
const fullScope = scope?.length
? `&scope=${encodeURIComponent(scope.join(" "))}`
: "";
return `${base}client_id=${clientId}&redirect_uri=${redirectUri}&state=${state}${fullScope}`;
};
```
### **2. Add CSS for LinkedIn Button**
```css
.linkedin-button {
border: none;
background: transparent;
padding: 0;
cursor: pointer;
}
.linkedin-icon {
height: auto;
}
.linkedin-button:hover .linkedin-icon {
content: url("/src/assets/images/Sign-In-Small---Hover.png");
}
```
👉 Use the button images you downloaded earlier from the official LinkedIn zip folder.
### **3. Integrate the Sign-In Button**
```javascript
import "./assets/styles/main.scss";
import { useState } from "react";
import LinkedIn from "./linkedin";
const Linkedin_ClientID = "867mq7ml7hx0gm";
function LinkedinPage() {
const [authData, setAuthData] = useState(null);
const handleLinkedInCallback = async (error, code, redirectUri) => {
if (error) {
console.error("LinkedIn login error:", error);
return;
}
setAuthData(code);
console.log("LinkedIn code:", code);
console.log("Redirect URI:", redirectUri);
// Prepare token exchange request
// Send the code to the backend from here
};
return (
Credential: {authData}
    </div>
  </div>
);
}
export default LinkedinPage;
⚠️ **Important Notes**:
- Set your `scope={["openid", "profile", "email"]}` to only the scopes your app has been granted access to.
- Don’t trust random scopes you find on the internet—it won't work.
 <image>


---

## Step 3: Coding the Backend
Alright, it’s time to put on your debugging cape and dive into the backend!

But before we get started, let me save you some sleepless nights with these golden nuggets of wisdom:

### **Critical Notes (a.k.a. Debugging Cheat Sheet)**
1. **The Code Has a Lifespan of Just 20 Seconds**
   - Yes, you read that right. The authorization code you get from the frontend UI is valid for only 20 seconds. After that, it won't work. So don’t panic if you hit an error—it’s likely a timing issue.

2. **Redirect URI Consistency is Key**
   - The **Redirect URI** you used on the frontend must match the one in your backend API calls. Any mismatch will result in errors that’ll have you questioning your life choices xD.

---

### Now, Let’s Code!

### **1. Declare Your Constants**
Start by defining all the variables you’ll need for the LinkedIn API:


```javascript
const LINKEDIN_CLIENT_ID = "867mq7ml7hm";
const LINKEDIN_CLIENT_SECRET = "WPL_FAKE_=";
const LINKEDIN_ACCESS_TOKEN_URL = "https://www.linkedin.com/oauth/v2/accessToken";
const LINKEDIN_USERINFO = "https://api.linkedin.com/v2/userinfo";
const LINKEDIN_REDIRECTION_URI = "http://localhost:5173/";
2. Exchange LinkedIn Code for Access Token
The first step in the backend is to exchange the short-lived authorization code for an access token. Here’s the API for that:
async function exchangeLinkedInCodeForToken(code) {
  const myHeaders = new Headers();
  myHeaders.append("Content-Type", "application/x-www-form-urlencoded");

  const urlencoded = new URLSearchParams();
  urlencoded.append("grant_type", "authorization_code");
  urlencoded.append("code", code);
  urlencoded.append("redirect_uri", LINKEDIN_REDIRECTION_URI);
  urlencoded.append("client_id", LINKEDIN_CLIENT_ID);
  urlencoded.append("client_secret", LINKEDIN_CLIENT_SECRET);

  const requestOptions = {
    method: "POST",
    headers: myHeaders,
    body: urlencoded,
    redirect: "follow",
  };

  try {
    const response = await fetch(LINKEDIN_ACCESS_TOKEN_URL, requestOptions);
    const result = await response.text();
    console.log(result);
    const res = JSON.parse(result);
    return res.access_token;
  } catch (error) {
    console.error(error);
    throw error;
  }
}
Tip: If the access token exchange fails, double-check the verified App?, scope requested, code, redirect URI, and whether you’re within the 20-second window.
3. Retrieve LinkedIn Member Details
Once you have the access token, you can call LinkedIn’s userinfo API to fetch the user’s profile information:
async function retrieveMemberDetails(accessToken) {
  const myHeaders = new Headers();
  myHeaders.append("Authorization", `Bearer ${accessToken}`);

  const requestOptions = {
    method: "GET",
    headers: myHeaders,
    redirect: "follow",
  };

  try {
    const response = await fetch(LINKEDIN_USERINFO, requestOptions);
    const result = await response.json();
    console.log(result);
    return {
      name: result.name,
      profile: result.picture,
      email: result.email,
    };
  } catch (error) {
    console.error(error);
    throw error;
  }
}
4. Testing the UserInfo API in Action
Now, connect the dots:
- Grab the authorization code from the frontend.
- Exchange it for an access token using
exchangeLinkedInCodeForToken. - Fetch the user’s profile details using
retrieveMemberDetails.

And voilà, LinkedIn authentication is complete! 🎉

A Little Gift for You
Let me take a moment of your time to introduce a tool that’s been saving me hours of API documentation chaos—LiveAPI.
LiveAPI takes your repository and outputs stunning, secure API documentation.
Bonus: You can execute APIs directly from the documentation and generate request snippets in any language.
Here’s what it looks like in action: If you’re tired of scattered API notes, give it a try.
Happy coding, and may the OAuth gods smile upon your LinkedIn integration!
Stay tuned for the next part as we dive even deeper into LinkedIn API magic.
Any feedback or contributors are welcome! It’s online, source-available, and ready for anyone to use.
⭐ Star it on GitHub:
 HexmosTech
/
git-lrc
HexmosTech
/
git-lrc
Free, Micro AI Code Reviews That Run on Commit
| 🇩🇰 Dansk | 🇪🇸 Español | 🇮🇷 Farsi | 🇫🇮 Suomi | 🇯🇵 日本語 | 🇳🇴 Norsk | 🇵🇹 Português | 🇷🇺 Русский | 🇦🇱 Shqip | 🇨🇳 中文 | 🇮🇳 हिन्दी |
git-lrc
Free, Micro AI Code Reviews That Run on Commit

AI agents write code fast. They also silently remove logic, change behavior, and introduce bugs -- without telling you. You often find out in production.
git-lrc fixes this. It hooks into git commit and reviews every diff before it lands. 60-second setup. Completely free.
See It In Action
See git-lrc catch serious security issues such as leaked credentials, expensive cloud operations, and sensitive material in log statements
git-lrc-intro-60s.mp4
Why
- 🤖 AI agents silently break things. Code removed. Logic changed. Edge cases gone. You won't notice until production.
- 🔍 Catch it before it ships. AI-powered inline comments show you exactly what changed and what looks wrong.
- …

*AI agents write code fast. They also silently remove logic, change behavior, and introduce bugs -- without telling you. You often find out in production.
git-lrc fixes this. It hooks into git commit and reviews every diff before it lands. 60-second setup. Completely free.*
Any feedback or contributors are welcome! It's online, source-available, and ready for anyone to use.
⭐ Star it on GitHub:
HexmosTech
/
git-lrc
Free, Micro AI Code Reviews That Run on Commit
| 🇩🇰 Dansk | 🇪🇸 Español | 🇮🇷 Farsi | 🇫🇮 Suomi | 🇯🇵 日本語 | 🇳🇴 Norsk | 🇵🇹 Português | 🇷🇺 Русский | 🇦🇱 Shqip | 🇨🇳 中文 | 🇮🇳 हिन्दी |
git-lrc
Free, Micro AI Code Reviews That Run on Commit
AI agents write code fast. They also silently remove logic, change behavior, and introduce bugs -- without telling you. You often find out in production.
git-lrc fixes this. It hooks into git commit and reviews every diff before it lands. 60-second setup. Completely free.
See It In Action
See git-lrc catch serious security issues such as leaked credentials, expensive cloud operations, and sensitive material in log statements
git-lrc-intro-60s.mp4
Why
- 🤖 AI agents silently break things. Code removed. Logic changed. Edge cases gone. You won't notice until production.
- 🔍 Catch it before it ships. AI-powered inline comments show you exactly what changed and what looks wrong.
- …

Top comments (0)