
Updated September 2025: Now friendly for Linux/WSL users!
This is my take on making a tutorial on how to install Ruby across Windows, macOS, and Linux all in this one article!
In a pinch, Ruby is an interpreted, dynamically-typed and high-level programming language where everything is an object! While it is a true object-oriented programming language, the paradigms of programming in a procedural and a functional way can also be done.
Outside of the programming scheme, Ruby is popularly used alongside Ruby on Rails which is a full-stack web framework. Others include Bundler which provides a consistent environment for managing gems and versions between independent Ruby projects, Ruby 2D for creating 2D apps, games, and visuals, and Pry as an interactive shell. All of these four are what you refer to as Gems, basically libraries also containing Ruby code!
That's all for the background of Ruby and without further ado, let's get right to installing Ruby on your machine!
Note: In any mention of a version number past this point indicates the version of Ruby that was released at the time of writing this article. If you are looking to install an older version of Ruby, this guide is also for you! Just find the version you're looking for in the downloads page or by listing it in their respective package/version managers. This applies to future Ruby versions as well.
Windows
Using the standalone RubyInstaller setup executable
If you're a novice, GUI-based person, you can install Ruby with a usual setup application:
- Download the latest setup executable here and make sure it's the one with a DevKit. Note that you need the DevKit version in order to build C/C++ extensions for Ruby and is necessary for Ruby on Rails, and hundreds of Ruby gems rely on it, so might as well go with the DevKit version as opposed to none

- You're given an option to let the installation be limited to the current user or system-wide. If you don't know what to select, let the installation be only installed to you, the current user

- Along the installation, you will be asked to add Ruby executables to your PATH environment variable and associate Ruby-related files. Assuming this is your first installation of Ruby, leave these checked. If you have an existing Ruby installation, either uncheck these or wipe your current Ruby installation before proceeding

- After finishing with the setup window, a terminal window will pop up that's the DevKit part! Specfically, MSYS2 concerns with necessary dependencies for building Ruby as well as Ruby gems with C-extensions. Press
ENTERto continue. This will pop up again after installation so hitENTERafterwards
- After installation, you're good to go! There's a Start Menu folder for Ruby where the Interactive Shell and documentation can be found. To verify your installation, you can type
ruby -vin the Terminal (this also verifies if Ruby is in the PATH environment variable as well!). You can also try line-by-line statements in the interactive shell or typerubyin the Terminal followed by a.rbfile to interpret that Ruby file!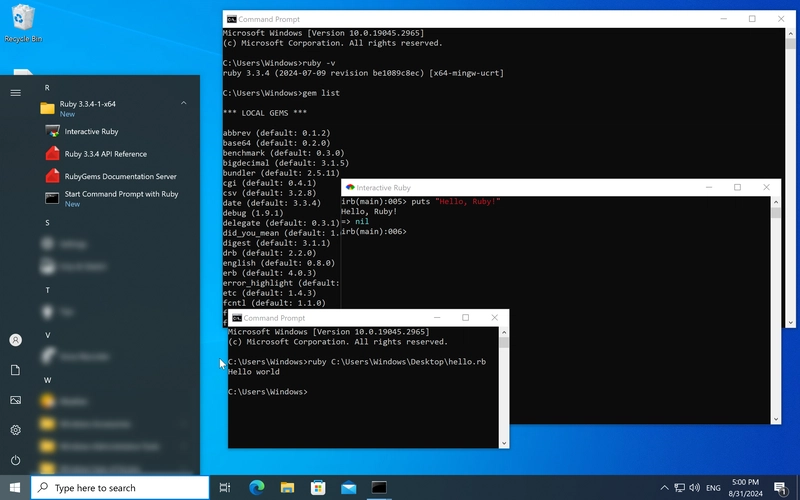
Using the Windows Package Manager winget
If you have an up-to-date version of App Installer (updated from the Microsoft Store), you can use winget from the terminal to install Ruby with the following syntax:
winget install RubyInstallerTeam.Ruby.{MAJOR}.{MINOR}
where {MAJOR} is the major version, while {MINOR} is the minor version.
To list all available versions:
winget search RubyInstallerTeam.Ruby
To install Ruby 3.2.4 with DevKit, the version available from winget at the time of this article:
winget install RubyInstallerTeam.RubyWithDevKit.3.2

Afterwards, you should be able to perform the same little tests mentioned above as if you used the RubyInstaller method!
macOS
Prerequisites:
git,curl, Homebrew,libyaml,asdf
Since OS X 10.11 El Capitan, Ruby is bundled alongside the operating system and the ability to install gems as the operating system came with such.
 This is Ruby 2.6.10 that is bundled with macOS 11 Big Sur. With Homebrew, The built-in Ruby and its dependencies (especially
 libyaml) can be updated with this command:
brew install ruby
However, this is for the system-wide Ruby installation. Most Gems wouldn't be compatible especially if they require Ruby 3 and later (such as Ruby 2D). We ran this command in preparation for the next step with the now-updated dependencies.
Therefore, the use of a version manager like asdf is recommended.
Installing asdf
Asdf is a version manager that not only supports Ruby but also Node.js, Elixir, Erlang and more! Rbenv is usually the main go-to but there's only one con in that it's only a version manager strictly for Ruby, so from a scalability standpoint, I think asdf is the way to go!
Recently, it is recommended that asdf is installed through a package manager, using brew from earlier:
brew install asdf

After installation is finished, normally you wouldn't need to modify your shell profiles as the installation earlier would've taken care of that. Just in case that invoking asdf does not work in the terminal, below are the additional steps to it.
Adding shims directory to path/shell
Edit ~/.zshrc to include this line, which will make asdf be able to switch between versions of tools/plugins across the system
export PATH="${ASDF_DATA_DIR:-$HOME/.asdf}/shims:$PATH"
If you have Oh My Zsh installed
Look for plugins=() then include asdf inside plugins.

Making asdf Take Control of Your Ruby Environment
-
Add Ruby as a plugin in asdf
asdf plugin add ruby -
Search for a version of Ruby you want to download and install
asdf list all ruby
Multiple unrelated plugins may be listed. Scroll up the terminal until you find listings that are just version numbers, those are the available Ruby versions to download. -
Download and install your desired Ruby version, for example, Ruby 3.2.4
asdf install ruby 3.2.4 -
After installation, switch to your newly installed Ruby version after opening a new terminal session
# SWITCH TO THE NEW RUBY
asdf set ruby 3.2.4
# SWITCH BACK TO THE SYSTEM'S RUBY
asdf set ruby system

Take note that when using version managers, a gem installed in one version is independent from another. So for example, installing the rails gem in our 3.2.4 installation will not carry to the operating system's 2.6.10 installation.
What if Ruby failed to install in asdf?
A common problem is with libyaml. It should be resolved by reinstalling it using Homebrew:
brew install libyaml
Afterwards, proceed installing Ruby in asdf with the same syntax above.

Linux (including WSL)
For context, this is being installed on Windows using the Windows Subsystem for Linux (WSL) on an Ubuntu/Bash distribution. Later, this is also being installed on on Linux Mint, an Ubuntu-based distribution, which is also based on Debian.
In case if you didn't catch it, yes, this also applies to Windows Subsystem for Linux (WSL) environments
I know, this heading may be a too much than just specifying what kind of "Linux" it is, but if you're using a different Linux distribution such as Fedora or Arch, you can head here from the official Ruby documentation website exploring these various distributions. The installation should be similar, only differing in the package manager in your Linux distribution.
Like with the previous systems, you have the option of installing Ruby that taps in natively with your system with, for example, on Ubuntu:
sudo apt-get install ruby-full
However in the real world, there's no one Ruby version that everyone's using (fragmentation). From this point on, we'll still use asdf for this, but the steps are different as we don't have the luxury of an available package manager at the time of this writing.
Obtaining a pre-compiled binary
For our Ubuntu/Bash environment, we first make sure to install dependencies needed beforehand:
apt install git bash
In the context that we'll use Ruby as one of the plugins in asdf, it also needs these dependencies to compile successfully and work with gems you will be using:
sudo apt install -y \
git curl wget unzip \
build-essential \
libssl-dev \
libreadline-dev \
zlib1g-dev \
libyaml-dev \
libxml2-dev \
libxslt1-dev \
libcurl4-openssl-dev \
libffi-dev \
libgdbm-dev \
libncurses5-dev \
automake \
libtool \
bison \
pkg-config \
libc6-dev \
libyaml-dev \
We go to the latest releases of pre-compiled asdf binaries from their repository and download the latest version tailored for our architecture (for the vast majority, it is amd64). As of this writing, version 0.18.0 is pre-compiled.
For this, we'll place the downloaded file in our home directory. We now extract the archive using the tar utility:
tar -xzf asdf-v0.18.0-linux-amd64.tar.gz
We then move the now-extracted binary to /usr/local/bin(and make it executable via chmod):
sudo mv asdf /usr/local/bin/
Finally, we can verify if asdf is on our shell's $PATH by running the following:
type -a asdf
# asdf is /usr/local/bin/asdf
Configuring shell for asdf
We add the shims to our PATH using our .bashrc shell config. We can simply echo it to the file without opening any text editor:
echo 'export PATH="${ASDF_DATA_DIR:-$HOME/.asdf}/shims:$PATH"' >> ~/.bashrc
Then we source .bashrc or also completely restart the terminal:
source ~/.bashrc
For
zsh, the steps are the same, only that the above command must be appended to~/.zshrcor addingasdfto the plugins list of your Oh-My-Zsh configuration, then source~/.zshrc.
Similar to the guide above for macOS, we can now install the Ruby plugin for asdf and install the version of Ruby that we want.
Applying Ruby to Shell or Working Directory
We simply set the Ruby version to be used, noting that a .tool-versions file will be created at ~ or wherever working directory you're currently on. At the time of writing, we set it to version 3.4.5:
asdf set ruby 3.4.5


Bonus: Installing Gems! 💎
Think of gems like Python or C/C++ libraries; they're also Ruby code that's also open-source! However, do note that this is applied/installed globally, so if you're working on a Ruby project that has gems (or dependencies) that your global Ruby environment does not necessarily need, it's important that you separate them (like using Bundler).
Importing gems to a Ruby project is similar to the likes of C/C++ and Python save for syntax differences
// C/C++
include <stdio.h>
# PYTHON
import json
# RUBY
require 'rake'
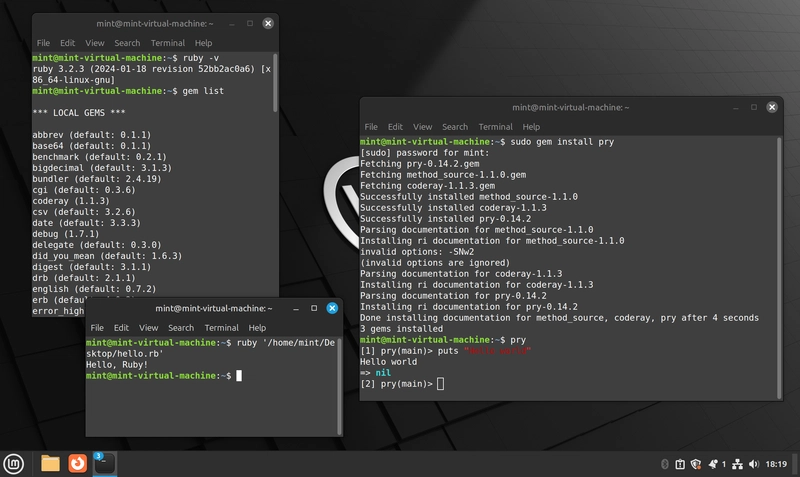
Anyway back to Linux, I'll be installing the gem pry which will allow me to have an interactive shell in the Terminal:
sudo gem install pry
This is how you add these gems or libraries into your Ruby environment. Also notice how we need elevated permissions with the sudo command when installing most gems.
After installation, we can immediately interact with the Ruby interpreter by simply typing pry in the terminal! You can perform the same tests I've done above!
Conclusion
Now that you have reached the end, you have not only installed Ruby as a fresh development environment alongside your system, but also discovered the convenience of version managers and learned the basics on how to install gems on your Ruby environment! You can now use this environment to run Ruby files with the ruby command in the Terminal or interpret Ruby lines real-time with your respective interactive shells. With the power of gems, you can now explore the vastness of there is to offer with the simplicity of Ruby!
For documentation on the Ruby programming language such as manuals, head here!
Hope to do a future article on a deep dive on gems, specifically Ruby on Rails!

Top comments (2)
good tutorial...i like it.
This is absolutely mental! Cheers for the tutorial, Luigi! You’re a proper BSCS (Bachelor of Science in Chad Sigma) student!