
Introduction
After doing some pet projects here and there, learning the basics of git and GitHub, I started to think what I could do as a little pet project to publish on the web, no matter how small.
A friend of mine suggested I should try to create a blog using a static site generator like Jekyll, Hexo, Hugo, Gatsby etc. Then it occurred to me that I should write a blog documenting my learning process.
With that in mind, let us get started.
In the past, I’ve made a couple of WordPress websites and for this project I was leaning towards that, but it felt like overkill for a pet project, and I also wanted to experiment with something that I haven’t touch before.
I wanted a simple site generator that was not dependent of a JavaScript library like React, or a framework like Angular or Vue, my search led me to Hugo.
Hugo

“Hugo is a general-purpose website framework. Technically speaking, Hugo is a static site generator. Unlike systems that dynamically build a page with each visitor request, Hugo builds pages when you create or update your content. Since websites are viewed far more often than they are edited, Hugo is designed to provide an optimal viewing experience for your website’s end users and an ideal writing experience for website authors”.
Features
- Extremely fast build times
- Renders changes on the fly with LiveReload as you develop
- Powerful theming
- Host your site anywhere
- Straightforward organization for your projects, including website sections
- Customizable URLs
- Support for configurable taxonomies, including categories and tags
- Automatic table of contents generation
- Dynamic menu creation
- Pretty URLs support
- Permalink pattern support
For the full list of features, click here.
With that in mind, and my curiosity picked, I installed Hugo following these instructions, after that, I looked up a theme, and choose one called hyde-hyde, then a couple of minutes later and some tinkering, I have this:
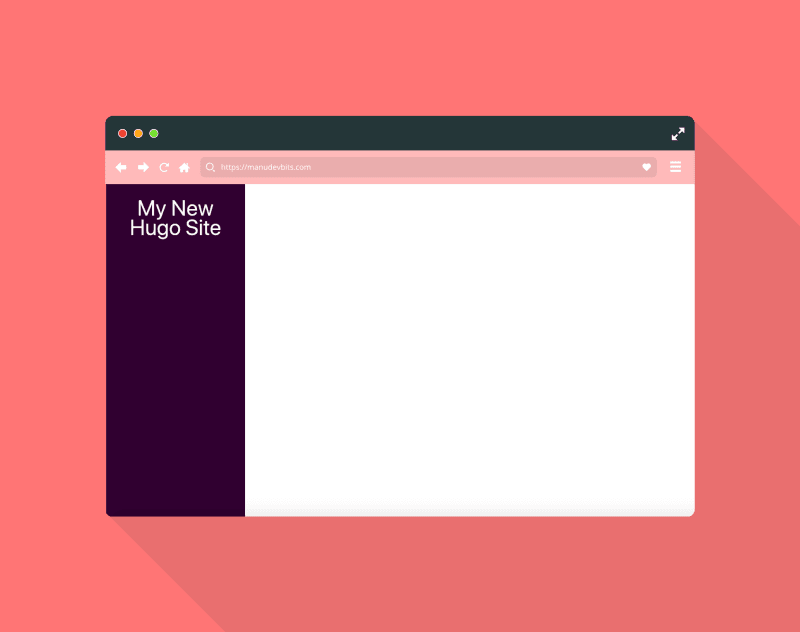
GREAT! I have something working on my machine, I will add some more customization like a profile picture, a little description, social links etc. this looks really promising. Before editing some of the CSS, I decided that I want to deploy the site to the web, my choice for this was Netlify.
Deployment
Before Netlify can do anything, I need to create a Git repository on a Git hosting solution like GitHub. How Git and GitHub works is out of the scope of this post, but if you want to know more about Git you can click the following link, and for GitHub you can go here. With the project now on GitHub, we can go to Netlify and start the deployment process.
Netlify is a web host that offers a simple way to deploy sites on the web with the always loved git workflow. I registered using my GitHub account, in the Netlify console I clicked “new site from git”, I choose GitHub, but it also supports GitLab and Bitbucket, configured some basic deployment settings and hit publish, a couple of minutes later, my very basic site was deployed successfully on Netlify, with Continuous Delivery(CD) already set up, this means that every time I push a change to my master branch on GitHub, Netlify will deploy automatically the changes to the website, this is awesome for a blogging website. For more info on how to deploy on Netlify you can go to the Netlify documentation.
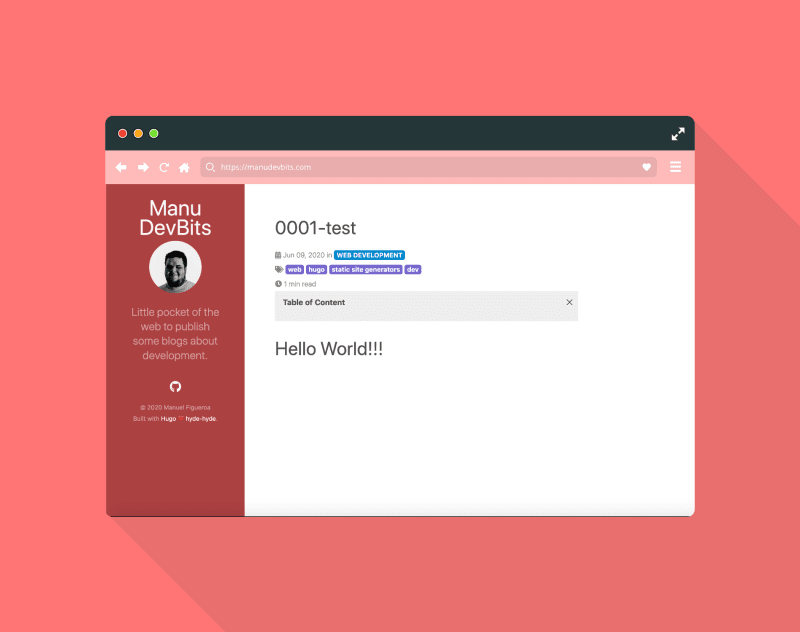
Now, let’s create our first blog post, I will run the following command on my terminal:
hugo new web/0001-test/index.md
We will have the following structure inside our content folder
    .
    └── content
        └── web
        |    └── 0001-test
        |           └── index.md
index.md is the file we will work on. By default, Hugo comes with a default.md in the archetypes folder, this will be use when you create a new file using the command we used previously. Since I did setup some archetype for my content, here is how my index.md looks like.
    ---
    title: "0001 Test"
    slug: "0001 Test"
    date: 2020-06-10T14:20:53-04:00
    tags : [
        "Web"
    ]
    categories : [
        "Web Development"
    ]
    layout: post
    type:  "web"
    highlight: true
    draft: true
    ---
I will type some text and just below the end of the front matter
# Hello World!!!
Now, the moment of truth
Homepage View

Post View
Note: if you check on top of your index.md, you will notice the following
draft: true
this means that the content will not be displayed on the website if you deploy it right now. To change this, just replace
draft: true
with
draft: false
Organization
Before we wrap up, let’s talk about Hugo content organization, Hugo supports content nested at any level, however the top levels (i.e. content/<DIRECTORIES>) are special in Hugo and are considered the content type used to determine layouts etc. Knowing this, I did the following structure:
    .
    └── content
        └── web
        |    └── <PostDirectory>
        |           └── index.md
        └── mobile
        |    └── ...
        |
        └── gamedev
        |    └── ...
        | ...
Why I did it this way?
First of all, I wanted to leverage the power of Hugo archetypes, second, since I’ll be touching different topics about programming, I split the content in broad categories, like web development, mobile development, game development etc. this helps me with my file organization while also giving me room to grow.
Closing thoughts
This journey has been very fun, I created a little blog site in a couple of days, deployed it through Netlify, while I also wrote my first blog post ever documenting my steps and a bit of my struggles, learned a lot about static site generators, deployment experience through Netlify, Markdown file editing, and a bit of wizardry with the terminal, all and all, a cool experience.
Hope to see you around for my next post.

Oldest comments (0)