
A while ago, I did some experiments with Amazon AWS and EC2 instances. Back then, they weren’t very different from a VPS except that you were charged based on the usage and the servers were easier to grow or shrink.
But… much has changed since then and AWS now offers many services and features. One of them particularly caught my attention since it was announced: ARM-based instances.
As you may have read in my previous posts, I have been doing a lot of work with the VA Smalltalk platform together with Docker on ARM, Raspberry Pi and IoT, Machine Learning on the Edge, etc. Therefore, trying an EC2 ARM instance with Docker and running a VA Smalltalk program inside the container was just logical.
In this post, you will read how easy it is to deploy a VA Smalltalk web application into an A1 EC2 instance.
AWS Account Setup
Funnily enough, this is the step that took the most amount of time! Hahaha. If you don’t have an AWS account, you need to set up one with payment information and all the other necessary info.
Once that is done, the next step is to create an ACCESS_KEY and a SECRET_ACCESS_KEY. You can read this guide for details.
Selecting the EC2 Instance
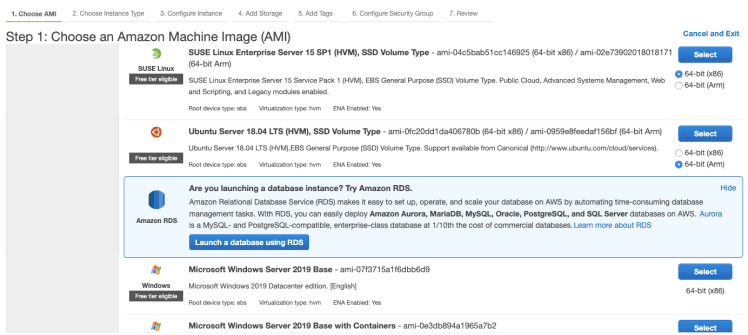
Here you can see the list of all possible EC2 instances. There are both ARM and Intel-based instances (A1, T3, M6g, etc). For each instance there are several possible configurations (numbers of processors, memory, hard disk, GPU, bandwidth, etc) for example: a1.medium, a1.large.
In addition, the type of instances are split in categories such as “General Purpose”, “Accelerated Computing”, etc., so it’s really easy to find an instance and configuration that matches your specific needs and costs.
For this demo, I will use an A1 large, which is a general purpose instance with an AWS Graviton Processor featuring 64-bit ARM Neoverse cores.
Creating the Instance
Once you have selected the type and configuration of instance you want, the obvious next step is to create the instance and start it. There are many ways of doing that. One way, is using the AWS web console. Go to “Services” -> “EC2” and then “Launch Instance”. This will open a wizard dialog which allows you to choose the OS you want, network configuration, etc.
Another way is using docker-machine to create the instance which is described in the next section.
Creating and managing instances with docker-machine
Because I wanted to use Docker containers to run my demo web application, I thought it would also be useful to give Docker Machine a try. Docker Machine is a set of tools to create, delete, start, stop, and manage different kind of machines. It supports different backends like EC2, VirtualBox, etc.
What is great is that, once you get used to the commands, you will likely be able to use that common API across different providers. This tool comes with the “Docker Desktop” app (at least for OSX and Windows).
So, the first thing I did was to create ~/.aws/credentials to avoid having to pass ACCESS_KEY and SECRET_ACCESS_KEYas arguments to docker-machine commands.
[default]
aws_access_key_id = XXX
aws_secret_access_key = YYY
Now, let’s create the machine!
docker-machine create --driver amazonec2 --amazonec2-region us-east-2 --amazonec2-ami ami-0959e8feedaf156bf --amazonec2-instance-type a1.large --amazonec2-open-port 9000 --amazonec2-open-port 7777 --amazonec2-open-port 80 arm-a1-docker
A few details here:
- By specifying
–driver amazonec2you are saying you will use EC2 instances. You can check here all possible arguments for this driver. -
–amazonec2-ami ami-0959e8feedaf156bfis the AMI (Amazon Machine Image) to use. In this case,ami-0959e8feedaf156bfis Ubuntu 18.04 ARM 64 bit. You need to be sure that the selected AMI is supported in the specified–amazonec2-regionas not all AMIs are possible for all regions as far as I understand. -
–amazonec2-instance-type a1.largespecifies the A1 large instance as already stated. -
–amazonec2-open-portopens ports in the VM, in particular I am telling to open 80 and 7777 (for my web app) and 9000 for portainer.io tool. Note that when usingdocker-machineto create the instance, a security group calleddocker-machinewill also be added in AWS with the ports 22 (ssh) and 2376 (docker) already open. You may want to protect the docker port. - Finally,
arm-a1-dockeris the name you give to the instance.
Once the create command is finished, you can check in the web console and confirm the instance is present:

That’s it, now you can use whatever docker-machine command you want, for example:
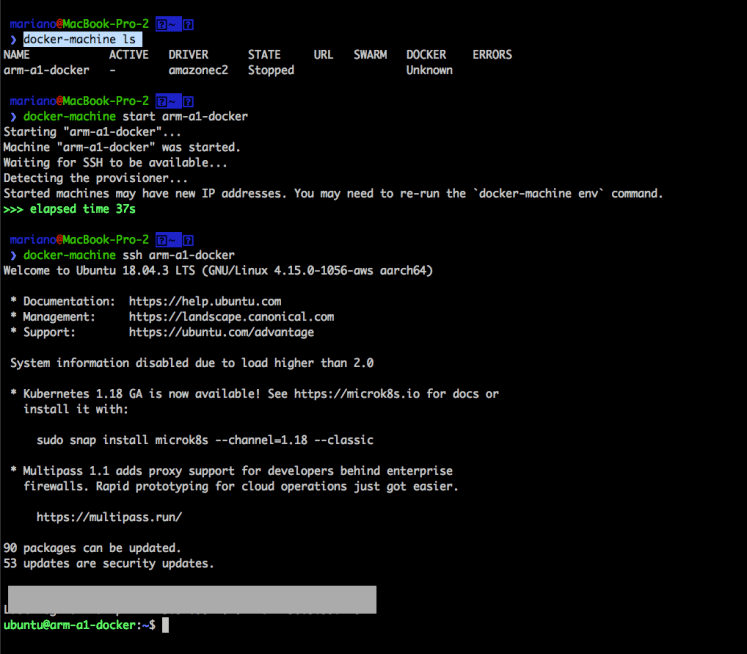
Running Docker in the created instance
When creating the instance with docker-machine and using the AMI I mentioned, docker comes already installed in the VM. The only thing I had to do was to connect via SSH into the server and then:
sudo usermod -aG docker ${USER}
After I did that, I was able to successfully run Docker hello world:

Running VA Smalltalk Web Application with Docker on the A1 Instance
The server and docker are now running. Deploying the real project is the only thing left to do. For that, I will use the same web app example “Seaside Traffic Light” that I have been using in my previous posts. There is even a working ARM docker example for it on Github:
My first #ARM 64 #Docker Swarm "2 nodes cluster" (@picocluster I will get to you sooner or later) with a #RaspberryPi 3 (Ubuntu 18.04) and a #Rock64 (Armbian). @traefik load balancing 10 #VASmalltalk 64 images running a #Seaside webapp. #Smalltalk Code: github.com/vasmalltalk/do…15:15 PM - 08 May 2019
5
11


So all I have to do is to clone that repo, build the docker image, and start the Docker Swarm.
cd $HOME
mkdir Instantiations
cd Instantiations
git clone https://github.com/vasmalltalk/docker-examples.git
cd docker-examples/source/SeasideTrafficLights/Raspberry64/
docker build -f ./debian_slim_Dockerfile -t seaside-debian-slim.
./startSwarm.sh
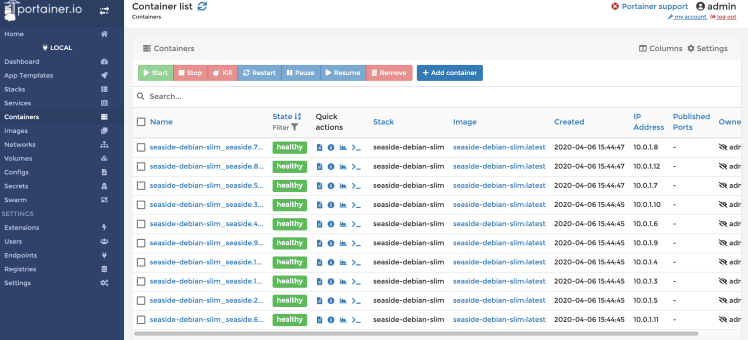
And that’s it. We should now have a Docker Swarm running 10 VA Smalltalk containers (as specified in the docker-compose of that example) and you should be able to enter your web app at: http://YOUR_SERVER_IP/trafficlight. Pro tip: you can use the command docker-machine ip arm-a1-docker to get the external IP of the instance.

Managing Docker containers with Portainer
Portainer is a nice tool for managing and monitoring Docker containers from within a web console. The best thing in my opinion is how easy it is to run. Guess how? Of course, it’s another Docker container! All you need to do is:
docker volume create portainer_datadocker
docker run -d -p 9000:9000 -v /var/run/docker.sock:/var/run/docker.sock -v portainer_data:/data portainer/portainer
And then you can open a web browser on: http://YOUR_SERVER_IP:9000/
Conclusions
This was a very short introduction, but it shows how easy it is to deploy a VA Smalltalk project into AWS instances. Hopefully, there will be more experiments to come… Stay tuned!

Top comments (0)