
A Volume is a directory that is available to use from applications running in our Pods. Applications can use a Volume to read and write data. A Volume is part of a Pod. Containers in a Pod can use the Volume to share data between themselves.
This is the first part of three that will discuss the topic of Volumes. In this first part we will concentrate on regular Volumes that are part of our Pod manifest, and in the next article we will extend our knowledge on Volumes to include PersistentVolumes and PersistentVolumeClaims. In the third part we will discuss something known as Container Storage Interface (CSI) drivers.
Motivation and ephemeral storage
Before we discuss Volumes, let's briefly discuss why we need Volumes in the first place.
All containers have an ephemeral (temporary) filesystem that can be used to store data. The drawback with ephemeral storage is that it is not persisted if the Pod restarts. To demonstrate this behavior we can start a Pod with an Nginx container, create a file in the temporary filesystem, restart the Pod and observe that the file is no longer there.
I create a Deployment using kubectl create deployment:
$ kubectl create deployment nginx-deployment --image nginx:latest

deployment.apps/nginx-deployment created
I verify that my Deployment has created a Pod:
$ kubectl get pods

NAME                               READY   STATUS    RESTARTS   AGE
nginx-deployment-d4ddcd4fb-w6p5w   1/1     Running   0          13s
Next I create an empty file /usr/share/nginx/html/about.html and verify that it was created, using kubectl exec for both operations:
$ kubectl exec -it nginx-deployment-d4ddcd4fb-w6p5w \
    -- touch /usr/share/nginx/html/about.html
$ kubectl exec -it nginx-deployment-d4ddcd4fb-w6p5w \
    -- ls -la /usr/share/nginx/html/about.html

-rw-r--r-- 1 root root 0 Dec 23 19:34 /usr/share/nginx/html/about.html
Now I restart the Pod, which in Kubernetes means we delete the existing Pod, and let the Deployment bring it back up:
$ kubectl delete pod nginx-deployment-d4ddcd4fb-w6p5w

pod "nginx-deployment-d4ddcd4fb-w6p5w" deleted

$ kubectl get pods

NAME                               READY   STATUS    RESTARTS   AGE
nginx-deployment-d4ddcd4fb-g89jf   1/1     Running   0          3s
If I now check for my about.html file I get the following:
$ kubectl exec -it nginx-deployment-d4ddcd4fb-g89jf \
    -- ls -la /usr/share/nginx/html/about.html

ls: cannot access '/usr/share/nginx/html/about.html': No such file or directory
command terminated with exit code 2
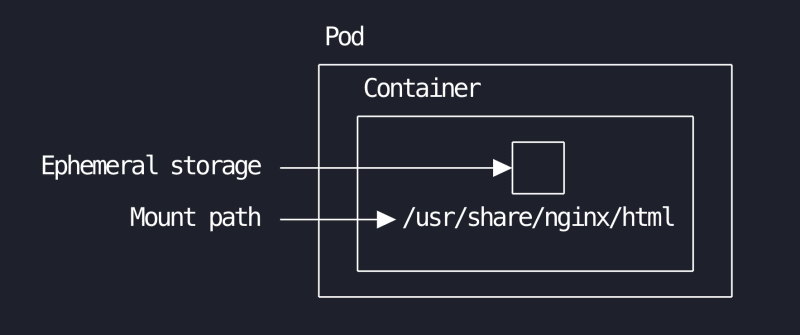
Pods come and go, so if we need to persist data between restarts we need another mechanism of doing this. This is why we need Volumes. A visual of what ephemeral storage looks like is shown in the following image. The ephemeral storage is part of the container, they live and die together.
Volumes
A Volume is part of a Pod specification (the .spec part of the manifest) and it can be used by all containers inside of the Pod. There are many types of Volumes available1. Many of these Volume types require that we have a backing storage media. An example of this is the Volume type named nfs. For this type the backing storage media is a Network File System (NFS) volume. I currently have no NFS volume available, so I will use a different type of Volume that is simpler to get started with: hostPath.
The hostPath Volume type mounts a file or a directory from the host machine into our Pod. Let us see what it looks like to add a Volume of type hostPath to a Deployment manifest2:
# deployment.yaml
apiVersion: apps/v1
kind: Deployment
metadata:
  name: nginx-deployment
  labels:
    app: nginx
spec:
  replicas: 3
  selector:
    matchLabels:
      app: nginx
  template:
    metadata:
      labels:
        app: nginx
    spec:
      containers:
        - name: nginx
          image: nginx:latest
          ports:
            - containerPort: 80
          # define what volumes this container should mount
          volumeMounts:
            - name: html-volume
              mountPath: /usr/share/nginx/html
      # define the volumes that are part of this Pod
      volumes:
        - name: html-volume
          hostPath:
            path: /data
            type: Directory
There are two important pieces in this manifest. The first piece is that we need to define the Volumes that are part of this Pod, this is done in .spec.volumes. The second part is that in each container that needs access to the Volume we must add it in .spec.containers[*].volumeMounts. Each Volume you add to .spec.volumes requires a name property so that we can logically refer to it. To configure the hostPath Volume I provide a path which is the path to the local directory I want to use as my Volume, and a type that I set to Directory3. What we are creating here is illustrated in the following image:

Note that the /data directory I specified as the host-path is in my case on my Minikube virtual machine, i.e. it is not on my physical laptop. For a brand new Minikube installation the /data directory is empty, so when I mount this volume I first expect it to be empty.
Let us create our Deployment and see if the Volume works. I create my Deployment using kubectl apply:
$ kubectl apply -f deployment.yaml

deployment.apps/nginx-deployment created
I list my Pods to verify I have three of them available using kubectl get pods:
$ kubectl get pods

NAME                                READY   STATUS    RESTARTS   AGE
nginx-deployment-686fb446f4-pqf9l   1/1     Running   0          15s
nginx-deployment-686fb446f4-sgp89   1/1     Running   0          15s
nginx-deployment-686fb446f4-t6szn   1/1     Running   0          15s
I can list the contents of /usr/share/nginx/html in one of the Pods using kubectl exec and ls -l:
$ kubectl exec -it nginx-deployment-686fb446f4-pqf9l \
    -- ls -l /usr/share/nginx/html

total 0
The directory is empty, like I expected! Let us create an index.html file in this directory:
$ kubectl exec -it nginx-deployment-686fb446f4-pqf9l \
    -- bash -c  "echo 'Hello world' > /usr/share/nginx/html/index.html"
We can check that this file exists by running a curl command to the Pod (because it is an Nginx webserver and the index.html page we just created is the Nginx landing page), but to do that we first run a port-forward to be able to access the Pod:
$ kubectl port-forward nginx-deployment-686fb446f4-pqf9l 8080:80

Forwarding from 127.0.0.1:8080 -> 80
Forwarding from [::1]:8080 -> 80

$ curl localhost:8080

Hello world
To verify that every Pod has access to this new file (since they have access to the same Volume) you could port-forward to one of the other Pods, and run another curl command and you should get the same response. As an exercise for you, the reader, I also recommend you to run kubectl delete pod <name> to verify that when new Pods are started they too have access to the same Volume content. You can also run a kubectl delete -f deployment.yaml to delete the whole Deployment with all Pods, then re-create it with kubectl apply -f deployment.yaml and you should once again be able to verify that the content (index.html) is still there.
A note on the hostPath type of Volume: I use this for illustration purposes only. It is very unlikely that you will use this type of Volume in a production cluster, then you would rather use the type of Volume available in the cluster environment4.
Mount a ConfigMap as a Volume
The last example in this article is connected to the previous article on ConfigMaps. We can use a ConfigMap as a Volume, and in that way provide configuration settings as files to our Pods. Imagine we are setting up a Minecraft server in our Kubernetes cluster. To configure this Minecraft server we have to provide two files, eula.txt and server.properties. We can use a ConfigMap to specify the contents of both of these files (note that in this example I have shortened the server.properties file substantially):
# configmap.yaml
apiVersion: v1
kind: ConfigMap
metadata:
  name: minecraft-config
data:
  eula.txt: |
    eula=true
  server.properties: |
    max-players=5
    max-world-size=29999984
    allow-flight=true
I briefly mentioned this in the previous article on ConfigMaps, but here we see an example of where I provide file-like keys (eula.txt and server.properties) with nested content which represents the content of each file. Next, I have the following manifest for my Pod:
# pod.yaml
apiVersion: v1
kind: Pod
metadata:
  name: minecraft-server
spec:
  containers:
    - name: minecraft
      image: alpine
      command: ["sleep", "3600"] # hack to make the container stay alive
      volumeMounts:
        - name: configmap-volume
          mountPath: /opt/minecraft/server
  volumes:
    - name: configmap-volume
      configMap:
        name: minecraft-config
        items:
          - key: "eula.txt"
            path: "eula.txt"
          - key: "server.properties"
            path: "server.properties"
In .spec.volumes I have configured one Volume named configmap-volume. This Volume is of type configMap and in the properties I specify the name of the ConfigMap to use (minecraft-config, same as the name in the ConfigMap manifest above) and I specify which items I want to create from my ConfigMap. I say that the key eula.txt in my ConfigMap should be mapped to a file with path eula.txt and similarly for server.properties. Next, I add a volumeMounts section for my container where I provie the name of my Volume (configmap-volume) and I specify that this Volume should be mounted at /opt/minecraft/server.
I add both of my manifests to a directory named minecraft and I run kubectl apply for both manifests in one go:
$ kubectl apply -f ./minecraft

configmap/minecraft-config created
pod/minecraft-server created
I can make sure both of my configuration files have been created:
$ kubectl exec -it minecraft-server -- ls -l /opt/minecraft/server

total 0
lrwxrwxrwx    1 root     root            15 Dec 23 11:31 eula.txt -> ..data/eula.txt
lrwxrwxrwx    1 root     root            24 Dec 23 11:31 server.properties -> ..data/server.properties
Note that this will not be a functioning Minecraft server, because the actual server binary is not included in the image I used. This example was just meant for illustrative purposes!
Summary
This was the first part of a three-part mini-series of articles about Volumes. In this article we saw the basics of how to use Volumes in our Pods. There are two main purposes with Volumes, the first is that we usually need a place to store some sort of state, and a Volume is useful for that, the second purpose is that we can pre-populate a Volume with data (for instance configuration files) and use that data in our Pod. A Volume also allows us to share data between different containers in a Pod.
In the next article we will look at PersistentVolumes and PersistentVolumeClaims.
-
See the current list of available Volumes types in the official Kubernetes documentation https://kubernetes.io/docs/concepts/storage/volumes/#volume-types ↩
-
I use a Deployment manifest and not a Pod manifest, but this is fine since the
.specpart in a Pod manifest is the same as the.spec.templatepart of the Deployment manifest. ↩ -
There are a few different types available, you can read more about them in the documentation on
hostPathat https://kubernetes.io/docs/concepts/storage/volumes/#hostpath ↩ -
What I have purposefully not mentioned yet is that many of the Volume types are being deprecated in favor of something known as CSI drivers. CSI stands for Container Storage Interface, and it is a sort of plugin system where you can install a CSI driver for a given backing storage media (AWS EBS, Azure Disk, etc). We will look closer at CSI driver in the third part of this mini-series on Volumes. ↩

Top comments (0)