
Using the next/image component in your site is a quick and easy way to add responsive images. If you’re using a cloud-based asset management platform, you need to make sure that you configure it properly in order to get the best performance and benefit from the features that maybe be provided.
On a previous project, the responsive image implementation didn’t work as I would’ve expected, so I decided to dig further into how it should work. If you’re able to watch it, I created a video that walks through adding the Image component to a next.js application, configuring it to look at an asset management provider, and adding a custom loader to take advantage of the image capabilities provided rather than having the webserver do all of the work.
If you’re more inclined to read about it, these are the steps I took.
First, in Visual Studio Code’s terminal, we can use yarn create next-app and accept the defaults. This created a new folder called my-app that contains our application. We can then run cd my-app and then code . (or code . -r for the current window).
We then change index.js to remove most of the content and add in a simple image, leaving the following:
<main className={styles.main}>
  <div className={styles.hero}> <img alt="Styled photo of a retro microphone" className={styles.heroImage} src="/retro-mic.jpg" />
    <h1 className={styles.title}> Welcome to <a href="https://nextjs.org">Next.js!</a> </h1>
    <p className={styles.description}> Get started by editing <code className={styles.code}>pages/index.js</code> </p>
  </div>
</main>
Well also add to the CSS to style things up a little:
/* modified to add a position and z-index */
.title, .description {
  position: relative;
  text-align: center;
  z-index: 0; }

/* these two are new to make something look acceptable */ .hero {
  margin: 1rem;
  padding: 1.5rem;
  text-align: left;
  color: inherit;
  text-decoration: none;
  border: 1px solid #eaeaea;
  border-radius: 10px;
  transition: color 0.15s ease, border-color 0.15s ease;
  position: relative;
  display: flex;
  align-items: center;
  justify-content: center;
  flex-wrap: wrap;
  max-width: 800px;
  overflow: hidden; }

.heroImage {
  position: absolute;
  top: 0;
  left: 0;
  min-height:100%;
  width: 100%;
  height:auto;
  object-fit: cover;
  mix-blend-mode:color-burn;
  z-index: -1;
  opacity: 0.25; }
This just gives us something to look at:

Our simple page for this example
If we look in the dev tools when the page load, we see this:
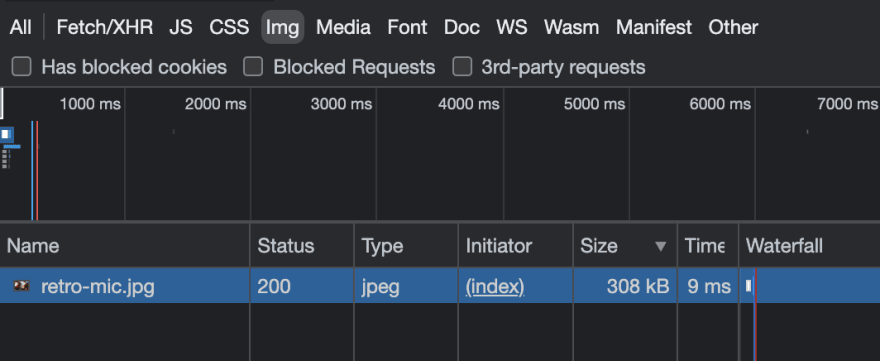
Network traffic for our image in Chrome developer tools
Nice, but even when we go down to mobile, we get the same image at the same size and a little over 300kB :
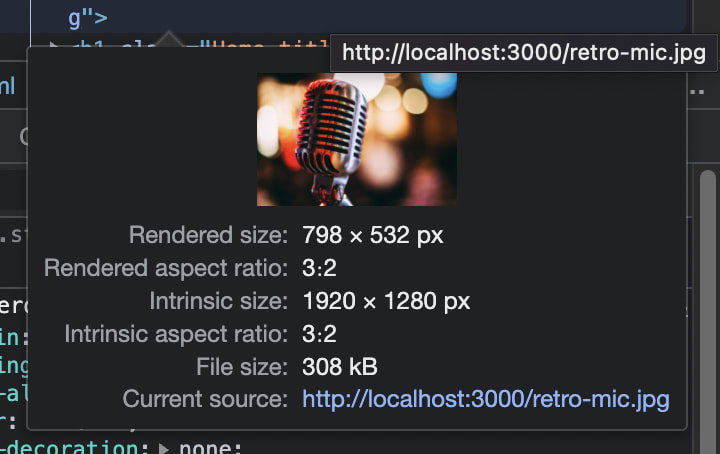
Image size for mobile in Chrome developer tools
Let’s add some basic formatting and the Image component from next/image tag gives us something a bit nicer.
When we’ve done that in index.js, the hero looks as follows:
<div className={styles.hero}>
  <Image layout="fill" alt="Styled photo of a retro microphone" className={styles.heroImage} src="/retro-mic.jpg" />
  <h1 className={styles.title}> Welcome to <a href="https://nextjs.org">Next.js!</a> </h1>
  <p className={styles.description}> Get started by editing <code className={styles.code}>pages/index.js</code> </p> </div>
Then, in next.config.js we add the images element in order to add our default configuration:
const nextConfig = {
  reactStrictMode: true,
  images: {
    loader: 'default',
    deviceSizes: [640, 750, 828, 1080, 1200, 1920, 2048, 3840],
    formats: ['image/webp'],
  },
}
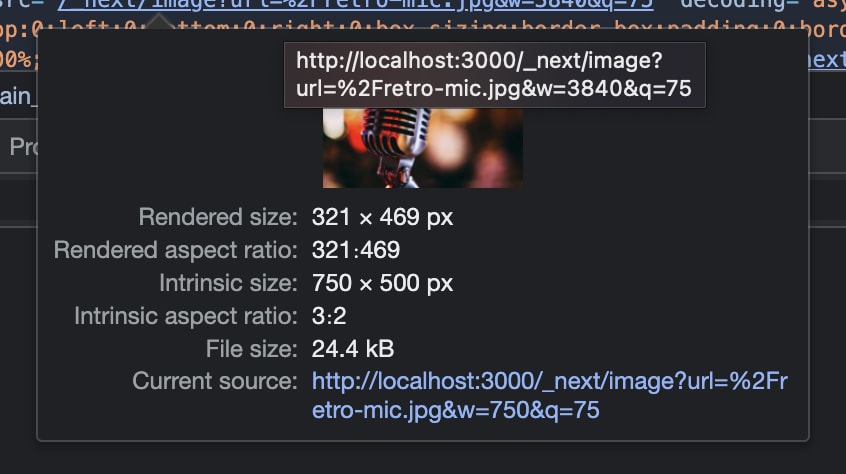
If we restart the app, we can see now, as we resize, new images are created and they’re webp format:

In our dev tools, we can see that images sizes are more reasonable as well:
If we look in .next/cache/images we can also see the images that have been created:

This is great, but we want to pull these images from our CMS or DAM. To do that, we need to tell next/image where we can get images from using the domains setting.
const nextConfig = {
  reactStrictMode: true,
  images: {
    loader: 'default',
    domains: ['assets-us-01.kc-usercontent.com'],
    deviceSizes: [640, 750, 828, 1080, 1200, 1920, 2048, 3840],
    formats: ['image/webp'],
  },
}
Now we can update our image source for our remote image (in this case, coming from the assets in Kontent by Kentico).
<div className={styles.hero}>
  <Image layout="fill" alt="Styled photo of a retro microphone" className={styles.heroImage} src="https://assets-eu-01.kc-usercontent.com/36a6ba89-afdc-013f-dda5-806bb0d472c1/f125b960-fd12-42fb-8656-124600d6d61f/retro-mic.jpg" />
  <h1 className={styles.title}> Welcome to <a href="https://nextjs.org">Next.js!</a> </h1>
  <p className={styles.description}> Get started by editing <code className={styles.code}>pages/index.js</code> </p>
</div>
When we reload the application and look in the cache directory, we’ll see that images are yet again created with resized and optimised versions of our files. Given our CMS or DAM might already have the ability to resize images and may also have a globally distributed CDN, we can reduce the requests to our server and let the CDN do its works by adding a custom loader to the mix.
Out of the box, the Image components default loaders support includes Vercel, Squoosh (default), Imgix, Cloudinary, and Akamai. Creating our own can be a simple task depending on what we need.
We can add a really simple loader for Kontent by adding the following to index.js:
const kontentLoader = ({ src, width, quality }) => {
  return `${src}?w=${width}&q=${quality || 75}&auto=format` }
and then make a small change to the image by adding loader={kontentLoader}:
<div className={styles.hero}>
  <Image loader={kontentLoader} layout="fill" alt="Styled photo of a retro microphone" className={styles.heroImage} src="https://assets-eu-01.kc-usercontent.com/36a6ba89-afdc-013f-dda5-806bb0d472c1/f125b960-fd12-42fb-8656-124600d6d61f/retro-mic.jpg" />
  <h1 className={styles.title}> Welcome to <a href="https://nextjs.org">Next.js!</a> </h1>
  <p className={styles.description}> Get started by editing{' '} <code className={styles.code}>pages/index.js</code> </p>
</div>
Now, if we restart our app, we still see the images loading in the network tab of our dev tools, but nothing is being added to the cache folder, as the images are being requested directly from the source. 💪

Top comments (0)