
Today one of my user teams won their bid for a new project with one of our best customers (yay!). Our projects always start with purchase orders and when the customers don't have EDI or an API available (most of them), our project expediters have to download the customer's purchase orders and manually enter them into our system (boo!). All the reasons why this is so are a topic for another day. Today's problem is that our new project already has 242 purchase orders that need to be downloaded and entered into our project management app, so at the very least I can help retrieve the PDF's from which they'll do the data entry.
First, a little background - this particular customer is using a new system called Modern PO to track their PO's. The site is nice - a simple and straightforward user interface and basically what you'd expect from a modern form-based website.

Each PO has the PO ID field linked to its details page and each details page contains a set of tabs along the top. The only tab we're concerned with is "View", as this tab contains a "Download" button which will give us a PDF version of the purchase order.

I thought perhaps there would be a site API that would allow me to easily request the PO's I needed, but no such luck. So the task today is to write a script that can access the PO list page and for each PO, access its details page, "View" tab, and save the file linked to the "Download" button. Not super simple but not rocket science either. For tasks like this, my GOTO language (ha!) is Python - https://python.org, specifically Python 3 as there's no sense writing new code in Python 2 at this point.
In this article I want to walk through the process that I use to actually develop a script like this, for anyone who hasn't done a whole lot of scripting and/or may be intimidated by this type of project. Rather than just giving you something you can copy-paste (although you will have that also), I want to show the steps that it takes to build up your own scripts. Before you know it you'll have your own script library to draw from. I go through basically the same process regardless of the language.
NOTE: The remainder of the article assumes at least a working knowledge of Python. If you've never written anything in Python before, the learnpython.org site is a great place to start.
So first off, go ahead and download the finished script so you can follow along: batch_downloader.py
If you're on Windows, go ahead and open up your preferred Linux distro in WSL (for this post, I'm using Debian) and make sure you have Python 3 installed with the command python3 --version

If you get a "command not found", you'll need to install Python. In Debian/Ubuntu, a simple apt-get install python3 should do the trick.
Starting with a blank slate when scripting, it's good practice to include the interpreter as the first line in your script. This allows you to run it from the command line without needing to specify the path to Python each time. Just to make sure, I use the which command to verify the path to my executable, in this case:
(debian) mpogue@darkstar [~]$ which python3
/usr/bin/python3
(debian) mpogue@darkstar [~]$
Now that we have Python 3's path, the first line of our script should read:
#!/usr/bin/python3
For those of you who don't know, the "#!" symbol at the beginning of the line is called the "shebang" or "hashbang" symbol. An excellent explanation of the symbol and why you should include the interpreter line can be found at linuxhandbook.com - https://linuxhandbook.com/shebang/.
Next up in your Python scripts, we need to import all the required modules we need (details of the Python import system here):
from bs4 import BeautifulSoup
import urllib3.request
import re
- BeautifulSoup is a FANTASTIC Python library for parsing and dissecting HTML documents. If not for its abilities, this project would no longer have been classified as "little".
- urllib3 is pretty much the defacto HTTP client library for Python 3 and is used throughout much of Python's core, including pip.
- re is Python's built-in regular expression library. My guilty admission? I've struggled with regular expressions since the day I wrote my first line of code and will continue to struggle with them until I keel over at the keyboard.
Now let's start diving into the script itself. First up, I declared a variable for the site's base URL. Not only does it save me from having to type it multiple times, it also makes it easier to change in the future if/when I end up reusing the script. I also created a variable to hold the "SessionId" cookie that needs to be submitted with each request. Finally, I instantiated a new PoolManager() object; according to the urllib3 docs, the PoolManager object "handles all of the details of connection pooling and thread safety so that you don’t have to".
# The site's base URL
base_url = 'https://www.whateverwhatever.com'

# Session Cookie, retrieved from the browser after authenticating successfully. We'll need to submit this with each request.
session_cookie = '_SessionId=cmKMxrYDzpULXcMbwtuYDNjzdRCWdGS9xgOPUQtbyAdjyu4LvlPylF3ICxVj3V7NSs%2BliTKtRCRNbEc8BhzCdMGeHWJyyT8n0NEaJ7DKU20TzsuD9FZtMbH5od4xhKrE96vlqDvuPEYegbPtL14Of%2BZZsCI4jXCRRcSk%2FojgBYg%2Bwf%2FICDk3MM5STbkkLvWFXR8PK0Xvg6DBy0mnzR2t2jBh7mPijOLFiFRiVriwze8Xkci2QDmziMrclTxHCMWCqjERGFs4wxwJ9f%2BiWq1Y7CEZx5W5GmEyrwRRUJwVGu2dk%2Bfr82Jr3L09GKB1--y9bG00G4CVBMovga--3DplyhIxzHXKYRswjnQfBw%3D%3D'

# New instance of the PoolManager()
http = urllib3.PoolManager()
Before we go any further, now is a good time to fire up an interactive Python shell in your WSL terminal. From the command line, simply run python3 and you'll be dropped into an interactive shell where you can run Python code. The interactive shell is yet another reason why Python is a fantastic language to work with. After entering the shell and executing the lines from the script so far, you should see something like this:

As an aside, I've been using Visual Studio Code to write my Python scripts for the last year or 2. It's really hard to be the syntax highlighting/code completion it provides, but with Python, you can code in anything from Notepad (no idea why you would) to any of the wonderful IDE's out there. Support for the language is pretty much universal across all operating systems, which is another reason why it's great for this type of task.
If you're looking at what we've done so far with the script, and you're not overly familiar with web-related programming you might be asking "where did the session_cookie variable come from"? Here's how I determined the value to pass for my session variable.
In Firefox, I installed the Cookie Manager extension which allows me to quickly and easily view all cookies for a given website. Typically, most sites are going to set a cookie containing session details and the modernpo.com site is no different. After going to the site and logging in, click the Cookie Manager button and choose "Open Cookie Manager for the Current Page". The displayed "Name" and "Value" boxes give you the values you need to use.

Next up in our script, we're going to create a new request variable using our PoolManager instance, along with a new instance of the BeautifulSoup html.parser:
# Create the request
req = http.request('GET', base_url + '/my-company/purchase_orders?page=1', headers={'Cookie':session_cookie})

# Create the HTML parser
soup = BeautifulSoup(req.data, 'html.parser')
Notice that we're sending the HTTP header "Cookie:" containing the session_cookie variable we defined previously.
This is the point where - if you're running the script line-by-line in the Python shell - you can start to do some troubleshooting. For instance, after you create the req variable, it will hold an HTTPResponse object containing the full HTML document that you can view by printing the .data property of the object like so:
>>> print(req.data)
b'<!DOCTYPE html>\n<html>\n  <head>\n    <title>Modern Purchase Order</title>\n    <meta name="csrf-param" content="authenticity_token" />\n<meta name="csrf-token" content="LKF1mX644f7yJTN0z8w6fjjnTsLxtCyThmUxHtpdSFnJASB6nEzkU7cP/Sz2mAZ4CwBEcMDBep/PZSeZeL5UuQ==" />\n    \n\n    <link rel="stylesheet" media="all" href="/assets/application-a06c283f2b5a0769586f9c825ae0bfea58088976154154d8e6014a3726819503.css" data-turbolinks-track="reload" />\n    <script src="/packs/js/application-7e37f964ea2fd972be1b.js" data-turbolinks-track="reload"></script>\n    <link rel="icon" type="image/png" href="/assets/favicon-16afc7069a527b6ad197481a92db4986127fb92d8de89131ff3088a5821997c1.png" />\n\n    <link rel="preconnect" href="https://fonts.googleapis.com">\n    <link rel="preconnect" href="https://fonts.gstatic.com" crossorigin>\n    <link href="https://fonts.googleapis.com/css2?family=Roboto&display=swap" rel="stylesheet">\n\n  </head>\n\n  <body class="">\n      \t<nav class="navbar sticky-top navbar-expand-md navbar-light bg-white mb-sm-3 p-2 border-bottom" id="mainnav">\n\t\t<div class="container-fluid">\n\t    <a class="navbar-brand mr-2" href="/">\n\t      <img class="img-fluid" style="width:30px" alt="Modern PO" src="/assets/po_logo-58ec7e8bff....
<snip>
If you get a similar response, you know you're on the right track. If not, you know that you need to step back and see what was missed. Moving forward, after we initialize the soup variable, it now also holds a parsed version of the HTML document which can be viewed also:
>>> print(soup)
<!DOCTYPE html>

<html>
<head>
<title>Modern Purchase Order</title>
<meta content="authenticity_token" name="csrf-param"/>
<meta content="LKF1mX644f7yJTN0z8w6fjjnTsLxtCyThmUxHtpdSFnJASB6nEzkU7cP/Sz2mAZ4CwBEcMDBep/PZSeZeL5UuQ==" name="csrf-token"/>...
<snip>
Now that we know we have a valid HTML document in the soup variable, we need to parse it. Going back to Firefox and the page containing the list of purchase orders, I used Firefox's Web Developer Tools (activated with the key combo "ctrl+shift+i"; see here for details on how to use these tools) to determine that the purchase order detail links were in the format "/purchase_orders//edit".
Using BeautifulSoup's find_all method (see here), we'll first get all the "a" elements on the page:
for link in soup.find_all('a', string=True):
In our Python shell, we can test this step with the following:
>>> for link in soup.find_all('a', string=True):
...     print(link)
...
The output from the previous lines should be all the "a" elements on the page. This is also handy to validate the format of the purchase order detail links. However, we now need to search the returned elements and get only the ones we need. This is where the regular expression library comes in.
Inside our for loop, we use the re library to search the href property of each link. For each match, we'll split the link at the "/" character, with the next-to-last element of the array containing the purchase order's unique ID. Again using the Firefox Developer Tools, I was able to determine that the page containing the download link I'm looking for was in the format "/purchase_orders/". Therefore, we need to chop off the final "/edit" portion of the URL, leaving the rest intact. In Python, the line link.get('href').split('/')[:-1] says to split the href property of each link at the character "/", and include all elements in the array except the last one (the "/edit" portion). We're then joining the array back together and creating the link we need by combining the base_url with the array elements:
if re.search('\/purchase_orders\/\d*\/edit$', link.get('href')):
    link_parts = link.get('href').split('/')[:-1]
    details_link_after_base = '/'.join(link_parts)
    details_page_link = base_url + details_link_after_base
Note: As you've probably determined from the previous examples, our basic troubleshooting is to use the print command in the Python shell to confirm the format of our variables and to get a better view of each object in general. From here on, I will leave it as an exercise for the reader. However, be aware that any assigned variable in Python can be printed. If you get back an object reference, you most likely are looking for one of the object's properties. This can also be helpful in determining which property you need to reference.
Next up, I loaded the Details page link for the purchase order in Firefox. Ah ha! The bottom of the page has the "Download" button that links to a PDF of the purchase order. We're almost home!
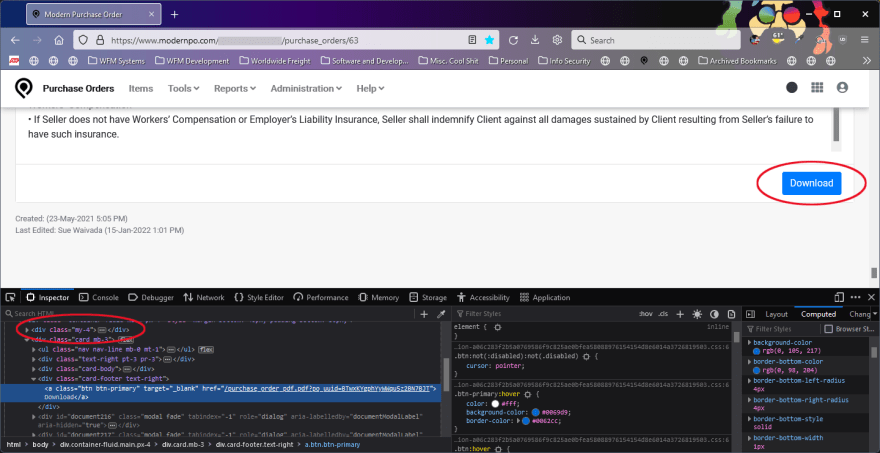
The parent element's contents - <div class="my-4"> - contain the purchase order number which we'll use as part of the file name. So we need to get the details page, parse it to find the appropriate div by its CSS class, get the purchase order number from the contents, get the download link, create a filename variable, and download and save the PDF:
# Get the Details page and assign to a BeautifulSoup variable
        details_page = http.request('GET', details_page_link, headers={'Cookie':session_cookie})
        po_details_html = BeautifulSoup(details_page.data, 'html.parser')

        # Look for the CSS class "my-4" - this is the parent element for our download link
        po_number_div = po_details_html.find('div', class_='my-4')

        # Assign a filename variable using the purchase order number, located in the div's contents
        filename = 'purchase_order_' + po_number_div.contents[0].contents[0] + '.pdf'

        # Locate the download link
        file_url_part = po_details_html.find('a', class_='btn-primary').get('href')
        full_download_link = base_url + file_url_part

        # Print a status message, download the PDF, and save to disk
        print("Downloading PO from link " + full_download_link)
        file_req = http.request('get', full_download_link)
        with open(filename, 'wb') as f:
            f.write(file_req.data)
Again, I would encourage you to use the Python shell to print each variable as you work your way through the script.
As a solo admin, learning to write scripts in multiple languages is crucial to your overall success. It will save you and/or your users time in different situations and is a critical tool in your toolbox. It also never hurts to be able to list multiple programming languages on your resume!
If your adopting this script for your personal use and you run into problems, feel free to leave a comment or send me an email (matt@thesoloadmin.com) and I'd be happy to help anyway that I can. Thanks for reading!

Top comments (0)