
Every application needs testing and most of them need End-to-End (E2E) testing. The quickest way to have E2E tests is to do them manually, but repetitive manual work costs far too much for a company. Automation can help reduce the costs of running End-to-End tests and increase the confidence of a team at the same time. It’s true that configuring an E2E test runner and including it into our development workflow isn't an easy task, but once you're done, you never look back. We benefit from more confidence in our code with every single test written, and ensure that the combined pieces of an application, or system, work in perfect harmony.
End-to-end tests are must-have
When you develop for one of the leading real estate websites in Spain, you need to be sure you’re ready to handle huge traffic and make your site ready for various devices and browsers. That's a real challenge at Kyero.com and because of that we decided to automate E2E testing. There are a few good reasons why.
First of all, End-to-End tests give you the best guarantee that your application works well from a user perspective. They verify the complete system flow.
Next, going automated takes off a tedious burden of manual testing. It's more consistent and much faster than doing it manually.
Finally, using automated testing in a development workflow, allows a team to be more confident in their work. Creating an E2E testing process can be time consuming, so we need to use an easy and ready to use tool, like TestCafe.
What is TestCafe
As you may guess, TestCafe is a tool for writing and running End-to-End tests using JavaScript and TypeScript. It's quite an advanced environment for testing in JS and even has a dedicated IDE called TestCafe Studio. This tool also allows you to write tests according to the PageObject pattern, which encapsulates UI specific structure and makes creating tests easier and more convenient for a developer.
Like many other tools on the market, TestCafe supports testing in a browser environment out of the box. However, unlike some tools, TestCafe allows you to run your tests against different browsers like Chrome, Firefox and even Opera. When you need to support older browsers, for example IE11, you can use one of the providers offering automated testing services like BrowserStack or SauceLabs. Another cool feature is a dedicated CLI, that helps adding this test runner to your CI/CD pipeline. Finally, if you are a fan of containerization you can use an image to run TestCafe in a Docker container.
Customisation gives flexibility
It looks like TestCafe has all we need to use it in a Dockerized environment, right? Unfortunately, it's not that simple. Like any other tool, it requires some customisation before you can get the best out of it. At Kyero, all development environments are fully dockerized. Yet we need to run the E2E test both in Docker and locally on a software developer’s machine, in order to easily debug any problems. To fulfil these requirements, we need to customise how TestCafe runs.
First of all, TestCafe's default CLI gives you the minimum required options to run tests against different browsers (Chrome and Firefox in this case). Running tests in a Docker container and in local OSes requires different kinds of browsers. In Docker you need headless browsers or external testing services to run tests, because Docker doesn't support a GUI out of the box. Locally, on your machine, you can use any browser you have installed. Then, we want to add an option to run tests in live mode for debugging purposes. Finally, we need to create our own Docker image to support automated testing services, because the default images doesn't support them.
Creating Docker image
As we're dealing with launching browsers in a Docker container, it's configuration isn't that trivial. We need to install and then compile a few libraries to run browsers in headless mode. If you are familiar with creating a Docker image, you may know that we need to specify what image we're going to use as a base. Here we want to use alpine:edge, because Alpine is a secure and lightweight Linux distribution, and we need an edge version to make the image work.
FROM alpine:edge
Next let's create a user and directory where our CLI will run (copy-paste from official docker-node image). It's a good practice to create a user, because default Docker's user has root privileges, which can be very risky in case of security breach.
RUN addgroup -g 1000 node \
    && adduser -u 1000 -G node -s /bin/sh -D node

RUN mkdir -p /app
Now, we need to install all required packages - browsers (Chromium and Firefox), Node.js with NPM and Yarn and others.
# Install required dependencies (with Chromium and Firefox)
RUN apk update && \
    echo "http://dl-cdn.alpinelinux.org/alpine/edge/main" >> /etc/apk/repositories && \
    echo "http://dl-cdn.alpinelinux.org/alpine/edge/community" >> /etc/apk/repositories && \
    echo "http://dl-cdn.alpinelinux.org/alpine/edge/testing" >> /etc/apk/repositories &&  \
    apk add --no-cache --purge -u \
    nodejs nodejs-npm yarn \
    chromium firefox \
    xwininfo xvfb dbus eudev ttf-freefont fluxbox procps xvfb-run \
    nss freetype freetype-dev harfbuzz \
    ca-certificates wget
We're using BrowserStack to run tests on various other browsers. We need to allow this service to access our local server by using BrowserStack Local Testing. There are a few steps to do, before we are ready to install this package. First we need to install glibc, because Alpine distribution lacks this package.
# Get glibc
RUN wget -q -O /etc/apk/keys/sgerrand.rsa.pub https://alpine-pkgs.sgerrand.com/sgerrand.rsa.pub
RUN wget https://github.com/sgerrand/alpine-pkg-glibc/releases/download/2.29-r0/glibc-2.29-r0.apk
RUN apk add glibc-2.29-r0.apk

# Get glibc-bin and glibc-i18n (required by BrowserStack Local)
RUN wget https://github.com/sgerrand/alpine-pkg-glibc/releases/download/2.29-r0/glibc-bin-2.29-r0.apk
RUN wget https://github.com/sgerrand/alpine-pkg-glibc/releases/download/2.29-r0/glibc-i18n-2.29-r0.apk
RUN apk --update add glibc-bin-2.29-r0.apk glibc-i18n-2.29-r0.apk
RUN /usr/glibc-compat/bin/localedef -i en_US -f UTF-8 en_US.UTF-8

# Required by Chromium and Firefox
RUN apk add libstdc++
Now we're ready to install BrowserStack Local Testing package.
# Get BrowserStack Local
RUN wget https://www.browserstack.com/browserstack-local/BrowserStackLocal-linux-x64.zip \
    && unzip BrowserStackLocal-linux-x64.zip \
    && chmod +x BrowserStackLocal \
    && mv BrowserStackLocal /usr/local/bin \
    && rm BrowserStackLocal-linux-x64.zip
Next step is to set proper environment variables to make Chromium visible to TestCafe.
ENV CHROME_BIN=/usr/bin/chromium-browser \
    CHROME_PATH=/usr/lib/chromium/
After that we need to copy an entrypoint script and make it executable. Then we clear apk's cache.
# Copy install-deps script that installs Node.js dependecies
# Practically `yarn install` command
COPY install-deps /usr/local/bin/
RUN chmod +x /usr/local/bin/install-deps

# Clear cache
RUN rm -rf /var/cache/apk/*
Finally, we can launch testing tool. Here we're using xvfb-run to run test command in virtual framebuffer, which is required to run browsers in headless mode.
WORKDIR /app

# Switching to non-root user
USER node

# Required for TestCafe
EXPOSE 1337 1338

# Install Node.js dependecies
ENTRYPOINT [ "install-deps" ]

CMD xvfb-run --server-num=99 --server-args='-ac -screen 0 1024x768x16' yarn test
If it's more convenient for you here's a gist with full Dockerfile of described image. Now, let's move to creating a custom CLI for our test runner.
Custom CLI for TestCafe
Launching tests in TestCafe programmatically is super simple, thanks to its nice API. Apart from builtin CLI, this tool provides a Node.js package that you can use to create your own test runner. It gives you the same options as CLI, but embedded into a useful interface. In my example I'm going to use TypeScript, but don't worry if you're not familiar with its syntax. It's basically the same as JavaScript's syntax, plus type definitions.
First of all, we need to define what browsers we want to test against. As I mentioned earlier, TestCafe allows us to perform fully automated tests on BrowserStack. This feature can be very useful, when you need to support any browser that cannot be easily installed in a Docker image. In this case, we want to test our app in Internet Explorer 11 🤭.
import isDocker from 'is-docker';

const runsInContainer = isDocker();

// In Docker we can use only headless browsers
const firefox = (runsInContainer) ? 'firefox:headless' : 'firefox';
const chrome = (runsInContainer) ? 'chromium:headless' : 'chrome';

const localBrowsers = [firefox, chrome];
const remoteBrowsers = ['browserstack:ie@11.0:Windows 10'];

const browsers = [...localBrowsers, ...remoteBrowsers];
Next, let's define a basic test runner, with some default options. Here we want to skip all JS runtime errors, because we don't need to stop tests when any error occurs (from the external service's script). When creating a test runner, we should define ports to which it will respond (remember the ports that we exposed in Dockerfile?). Then we run tests asynchronously (here with async/await syntax for simplicity). After all tests are done, we should end the runner's process.
import createTestCafe from 'testcafe';

const RUNNER_OPTIONS = {
  skipJsErrors: true,
  skipUncaughtErrors: true,
};

const runTests = async (browsers: string[] | string) => {
  const testcafe = await createTestCafe('localhost', 1337, 1338);
  const runnerFactory = testcafe.createRunner.bind(testcafe);
  const runner = runnerFactory();

  await runner.src('test.ts')
    .browsers(browsers)
    .run(RUNNER_OPTIONS);

  return testcafe.close();
};

runTests(browsers); // run our tests!
Our CLI works fine with local browsers, even with those used in a Docker's image. Unfortunately, it's not enough. Let's say that our app needs to be compatible with IE11. For our convenience, TestCafe supports several automated test providers. The only thing we need to do is to install the specific provider addon - testcafe-browser-provider-browserstack in this case. Then TestCafe knows that when we provide a specific browser name with the browserstack prefix, it should connect to BrowserStack and run our tests remotely.
Running in watch mode
Sometimes it's comfortable to run tests in watch mode, especially when you want to work in a TDD manner. Guess what, TestCafe has that too. At this point, we're adding another feature to our custom CLI and it gets less flexible. As you may know, any good CLI supports using options and I think that ours should too.
There are plenty of libraries for parsing commands arguments, but I decided to go with yargs. It has a simple and declarative API, so let's give it a try. We would like to allow people to run tests in watch mode, pass a directory name where tests are placed and maybe pass a browser's name directly.
import yargs from 'yargs';

const argvConfig = yargs.strict().options({
  watch: {
    alias: 'w',
    describe: 'Runs tests in live mode (only for local browsers)',
    type: 'boolean',
  },
  path: {
    alias: 'p',
    describe: 'Path or glob pointing to test files',
    default: 'spec/**/*.ts',
    type: 'string',
  },
  browser: {
    alias: 'b',
    describe: 'Runs test for specific browser',
    type: 'string',
  },
});

const argv = argvConfig.parse();
Now, we need to alter our test runner to support the new options.
/**
 * Beginning of the file
 */

const browsers = (() => {
    // Passed browser takes precedence over others
    if (argv.browser) {
        return argv.browser;
    }

    // We use only local browsers in watch mode
    if (argv.watch) {
        return localBrowsers;
    }

    return [...localBrowsers, ...remoteBrowsers];
})();

// Missing exported TestCafe type from 'testcafe' 😢
// @ts-ignore
const getRunner = (testcafe) => (
  (argv.watch) ? testcafe.createLiveModeRunner.bind(testcafe) : testcafe.createRunner.bind(testcafe)
);

const runTests = async (browsers: string[] | string) => {
  const testcafe = await createTestCafe('localhost', 1337, 1338);
  const runnerFactory = getRunner(testcafe);
  const runner = runnerFactory();

  await runner.src([argv.path])
    .browsers(browsers)
    .run(RUNNER_OPTIONS);

  return testcafe.close();
};

runTests(browsers); // run our tests!
Thanks to these small amends we can launch our CLI with different options. We're using TypeScript, so we should compile the code with tsnode before running.
# watch mode
tsnode cli.ts -w

# custom path
tsnode cli.ts -p "somewhere_else/*.ts"

# other browser
tsnode cli.ts -b "opera"
Now we're ready to launch our first test.
import { Selector } from 'testcafe';

fixture('Kyero Page')
  .page('https://www.kyero.com/');

test('Has page title', async (t) => {
  const title = Selector('title');

  await t.expect(title.textContent).eql('Property for sale and rent in Spain - Kyero.com');
});
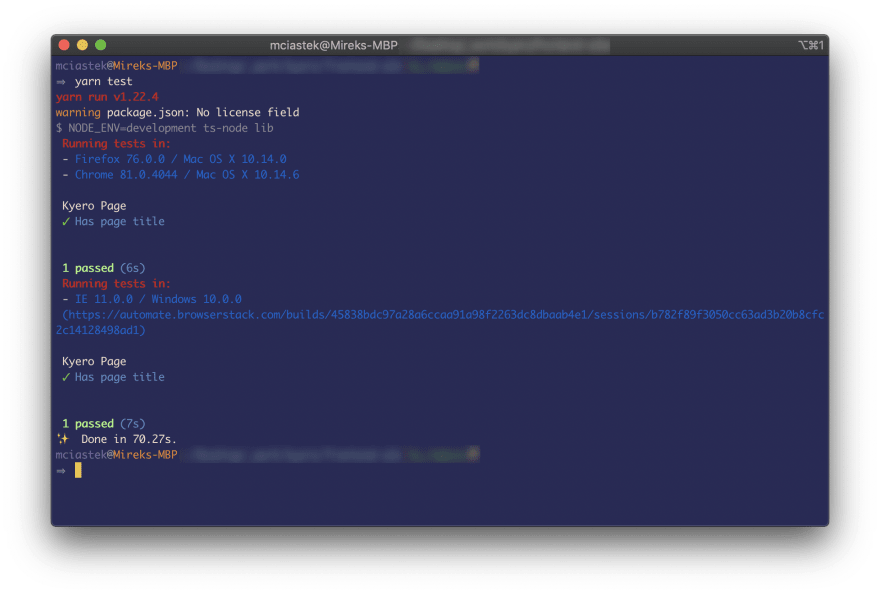
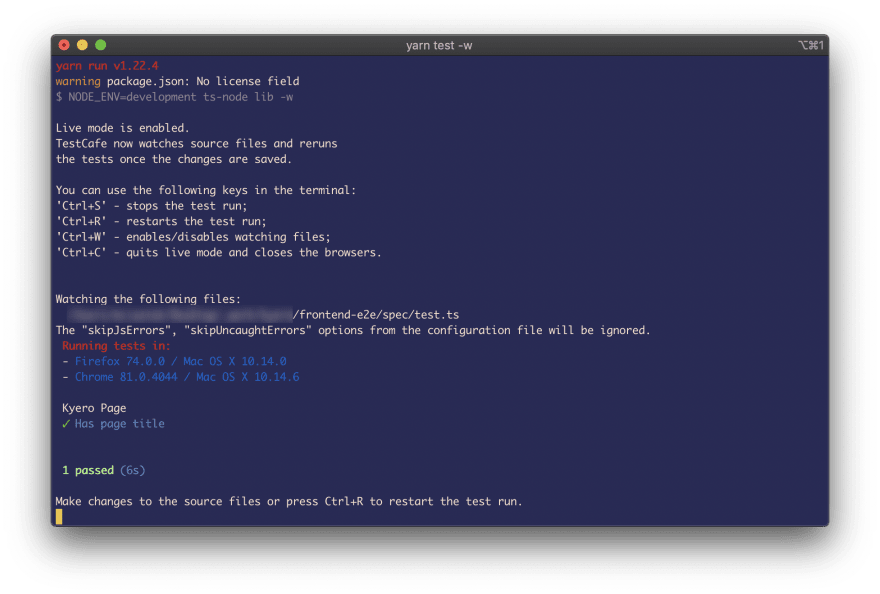
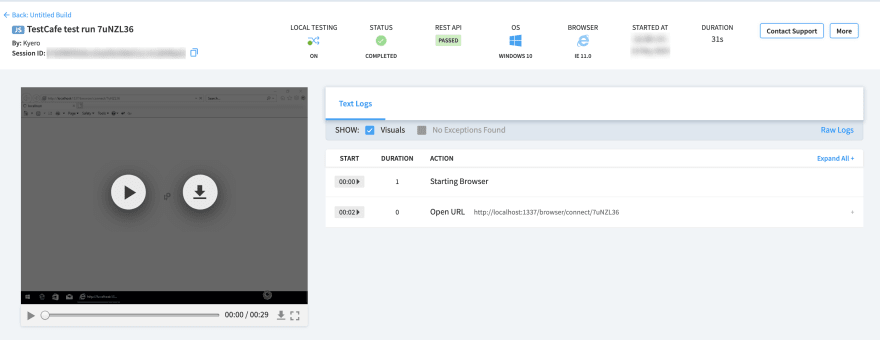
Here are previews of our test running locally, in Docker container and using BrowserStack automated tests.


And there it is, our custom TestCafe CLI that supports running tests both locally and on BrowserStack. If you need a recap, you can visit the Github gist where I’ve placed all the code presented in this article.
Further reading
Configuring TestCafe to run in a Docker image is a bit of a complex task, but it's definitely worth it. Once you're done with configuration, you can use this container in your development pipeline and be sure that your app works well on several browsers and devices. Frankly, I'm really happy with how flexible TestCafe is in configuration and what possibilities you get. Given the proper amount of work, this tool will fit nicely into any automated deployment process.
I hope that you've found this article useful and interesting. I'd like to encourage you to take a look at this list of articles, which will help you gain a deeper understanding of End-to-End tests and using them in TestCafe and Docker environments.
- https://medium.com/carousell-insider/automated-end-to-end-tests-and-how-they-fit-into-our-testing-culture-54c3fcc5ff26
- https://www.guru99.com/end-to-end-testing.html
- https://www.rubrik.com/blog/automated-end-to-end-testing-quality-is-important/
- https://www.freecodecamp.org/news/why-end-to-end-testing-is-important-for-your-team-cb7eb0ec1504/
- https://www.katalon.com/resources-center/blog/end-to-end-e2e-testing/
- https://devexpress.github.io/testcafe/documentation/getting-started/
- https://www.browserstack.com/local-testing/automate

Top comments (0)