This is the second post in a series where we will explore how PromptOps makes managing AWS infrastructure easier and faster. We will also look at some new features we've added to enhance the experience of creating and remembering commonly used prompts.
A Real Example: Setting Up a Docker Host on an AWS EC2 Virtual Machine
While Part 1 focused on AWS Lightsail, this post focuses on AWS EC2. Here, we will set up an EC2 VM and prepare it as a Docker host.
Mandatory Parameters
In order to provision an AWS EC2 VM, one need to pass two mandatory parameters as follows -
AMI (Amazon Machine Image) / OS
Instance type
To obtain these values, you can execute the following prompt after selecting a region in MechCloud AWS Agent where you want to provision the VM -
list images
list instance types which are free tier eligible
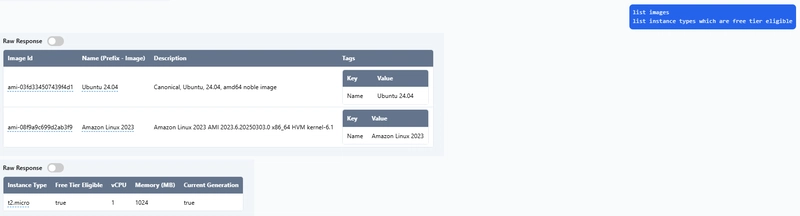
Please note that the AWS API for listing AMIs does not offer a filter to show only free tier eligible AMIs. Therefore, we have limited the list images prompt to return AMIs with the Name tag value in the Ubuntu 24.04, Amazon Linux 2023 list. Querying by the Name tag is required for AMIs, so if you don't specify a Name tag when querying, it will be automatically added during the prompt execution. Also, before querying AMIs, ensure you have updated the Name tag for all AMIs you want to use for provisioning EC2 VMs. This is particularly helpful for identifying free tier eligible AMIs using human-readable names assigned to Name tags, allowing you to make the most of the free tier while learning AWS.
If you want to query a different set of AMIs, you can use the following prompt:
list images with following tag(s) -
Name|Ubuntu 22.04
You can specify any tag in addition to the Name tag.
Now you can use the following prompt to provision an EC2 VM -
provision an ec2 vm with following details -
image - '<ami_id>'
instance type - t2.micro
t2.micro may not be available in all AWS regions. If it's not, replace it with one of the instance types you see in the output of the list instance types which are free tier eligible prompt mentioned earlier.
While you can get the AMI ID from the list images prompt, it's hard to know which OS an AMI ID refers to when looking at past prompts in the AWS agent history. To make this easier, we have introduced resource ID aliases, allowing you to refer to an AWS resource using a human-readable name instead of its unique ID in a prompt. Here is the simplified prompt for provisioning an EC2 VM using the 'Ubuntu 24.04' AMI -
provision an ec2 vm with following details -
image - '@Image|Ubuntu 24.04'
instance type - t2.micro
However, this will only work if you have listed AMIs at least once for the selected region in the AWS agent, and if the Ubuntu AMI for version 24.04 has a Name tag with the value Ubuntu 24.04. You will need to run the prompt for all associated resources (like the image in this case) after switching to a different region in the AWS agent, as this will clear all the aliases created for the previous AWS region.
In general, if you list resources of a particular type (e.g., VPC, subnet, etc.) and see a column in the result table with a Prefix next to it, it means the values in that column can be used as aliases wherever you need to use the IDs of those resources. An alias should be in the @<resource_type>|<resource_name> format.
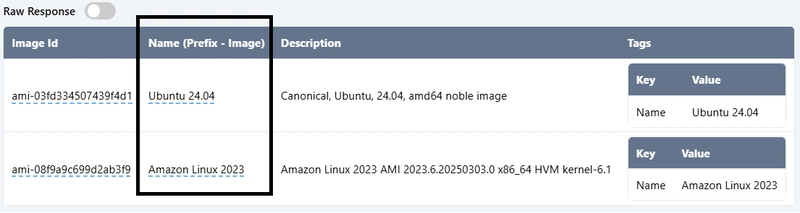
Any underlined text in a table like the one above can be copied to the clipboard with a click, making it quicker to copy values from such tables.
While this is useful for testing, we can't SSH into the newly created VM because we didn't specify an SSH key pair name when creating the VM. Also, we need to open the SSH port (22) before we can connect to this VM using its public IP.
Now, let's import our SSH public key and create a security group that we will attach to the VM during provisioning.
To import the SSH public key, you can use the following prompt -
import an ec2 key pair with following details -
name - testKey1
key - base64_encode(<ssh_public_key>)
The base64_encode() function is not supported in AWS agent prompts at this time. The prompt above means that we should base64 encode the SSH public key before using it in the prompt. This differs from the similar prompt for AWS Lightsail, where base64 encoding of the SSH public key is not needed when importing an SSH key pair.
To create a security group, you can use the following prompt, which will also open the SSH port (22) for inbound traffic:
create a security group with following details -
name - securitygroup-ssh
description - Allow access on ssh port
-----
  add following ingress rules -
  22|tcp|@CURRENT_IP
Initialize aliases for key pairs and security groups by executing the following prompts:
list ec2 key pairs
list security groups
Now you can set up an AWS VM using the following prompt with the SSH key pair and security group you created earlier:
provision an ec2 vm with following details -
image - '@Image|Ubuntu 24.04'
instance type - t2.micro
key pair - testKey1
security group - '@SecurityGroup|securitygroup-ssh'
tags -
Name|vm2
We also specified the Name tag in the prompt above so the newly created VM can be easily identified.
List the VMs using the list ec2 vms prompt and note the public IP of the new VM. Now you can connect to this VM using its public IP and the SSH private key associated with the SSH public key you used when importing an SSH key pair.
Finally, let's move to the next step and create a new VM with Docker installed in it during bootstrapping phase. To do this, we will use the same script we used to set up a Lightsail VM as a Docker host in part 1 of this series. Here is the prompt for provisioning and setting up a VM as a Docker host:
provision an ec2 vm with following details -
image - '@Image|Ubuntu 24.04'
instance type - t2.micro
key pair - testKey1
security group - '@SecurityGroup|securitygroup-ssh'
user data - base64_encode("#!/bin/bash\ncurl -fsSL https://raw.githubusercontent.com/mechcloud/sample-scripts/refs/heads/main/install-docker.sh | bash")
tags -
Name|vm3
Again, base64_encode() is still not supported in the AWS agent prompts. This means you need to base64 encode the value you pass as an argument to this function and then use it as the value of the user data field, unlike in Lightsail where this is not required. Another difference is that the script must start with a shebang line (#!/bin/bash), or it will not work.
Now, if you SSH into the newly created VM and run the docker version command, you will see that Docker is already installed.
Universal/Portable prompts
With the latest release of MechCloud, you can use resource ID aliases anywhere you need to use the IDs of resources generated by AWS. This works for any supported resource type, such as VPC or subnet, and is not limited to VM provisioning. For example, you can use the following prompt to provision an Ubuntu 24.04 VM in any AWS region, as long as you have tagged the AMIs for this OS in different AWS regions with a Name tag set to Ubuntu 24.04 -
provision an ec2 vm with following details -
image - '@Imge|Ubuntu 24.04'
instance type - t2.micro
key - testKey1
This removes the need to find and specify the IDs of various parent or associated resources in a prompt. It also makes the prompts portable across AWS regions, making them easy to remember.
Future Improvements
Currently, it is not possible to create a resource and reference its ID in the same prompt. Therefore, you will need to use two prompts to create a VM with an SSH key pair and a security group -
list images
-----
create a security group with following details -
name - securitygroup-ssh
description - Allow access on ssh port
-----
  add following ingress rules -
  22|tcp|@CURRENT_IP
-----
list security groups
import an ec2 key pair with following details -
name - testKey1
key - base64_encode(<ssh_public_key>)
-----
provision an ec2 vm with following details -
image - '@Image|Ubuntu 24.04'
instance type - t2.micro
key pair - testKey1
security group - '@SecurityGroup|securitygroup-ssh'
tags -
Name|vm4
In future releases, we will improve it so that you can create a resource and reference its ID in the same prompt. This means you will be able to combine the two prompts above into one.
Conclusion
In this post, we explored how to set up a Docker host on an AWS EC2 VM using PromptOps, with a focus on simplifying AWS resource management through human-readable aliases and universal/portable prompts. Key steps include selecting AMIs and instance types, importing SSH keys, creating security groups, and utilizing user data for automated Docker installation. This guide highlights the flexibility and efficiency of using resource ID aliases across AWS regions for seamless VM provisioning and management.

Top comments (0)