
Medusa is an open source ecommerce platform that provides developers with customizability and extendability within all of its 3 components - the headless server, the admin, and the storefront.
Whether you want to add third-party integrations or custom functionalities, you have full freedom with how you implement them. Medusa also comes packed with important ecommerce features out-of-the-box and ready-made plugins that you can install with a plug-and-play style.
In this tutorial, you’ll learn how to add product reviews to your Medusa server. You’ll also customize both the Medusa admin and Next.js storefront to show the reviews, and allow customers to add their reviews to products on the storefront.
You can find the code for this tutorial in this GitHub repository.
Prerequisites
Before you follow along with this tutorial, you must have the following requirements installed:
- Node.js v14 or greater
- PostgreSQL
Server Setup
To install the Medusa server, you need to install the CLI tool first:
npm install -g @medusajs/medusa-cli
Then, run the following command to install the Medusa server:
medusa new medusa-reviews
This installs your Medusa server into a newly-created directory medusa-reviews.
Configure PostgreSQL Database
Create an empty PostgreSQL database. Then, in .env in the root of your Medusa server directory, add the following environment variable:
DATABASE_URL=<YOUR_DATABASE_URL>
Where <YOUR_DATABASE_URL> is the URL to the database schema you just created in PostgreSQL. The URL should be of the format postgres://<USERNAME>:<PASSWORD>@<HOST>/<DB_NAME>. For example, postgres://postgres:postgres@localhost/medusa-reviews.
Then, change the database configuration in the exported object in medusa-config.js to use PostgreSQL instead of SQLite:
module.exports = {
  projectConfig: {
    //...
    database_url: DATABASE_URL,
    database_type: "postgres",
        //comment out or remove the following lines:
    // database_database: "./medusa-db.sql",
    // database_type: "sqlite",
  },
  plugins,
};
Seed and Migrate the Database
Finally, run the following command to migrate Medusa’s database schema and seed it with demo data:
npm run seed
Add Product Reviews
In this section, you’ll add the ProductReview model, its associated repository, the migration to create it in the database, and the service to facilitate accessing and manipulating product reviews in the database from endpoints.
Create the ProductReview model
Before you create the model, install the class-validator library to add validation to some of the columns in the new model:
npm install class-validator
Then, create the file src/models/product-review.ts with the following content:
import { BaseEntity, Product } from "@medusajs/medusa"
import { BeforeInsert, Column, Entity, Index, JoinColumn, ManyToOne } from "typeorm"
import { Max, Min } from "class-validator"

import { generateEntityId } from "@medusajs/medusa/dist/utils"

@Entity()
export class ProductReview extends BaseEntity {

  @Index()
  @Column({ type: "varchar", nullable: true })
  product_id: string

  @ManyToOne(() => Product)
  @JoinColumn({ name: "product_id" })
  product: Product

  @Column({ type: "varchar", nullable: false })
  title: string

  @Column({ type: "varchar", nullable: false })
  user_name: string

  @Column({ type: "int" })
  @Min(1)
  @Max(5)
  rating: number

  @Column({ nullable: false })
  content: string

  @BeforeInsert()
  private beforeInsert(): void {
    this.id = generateEntityId(this.id, "prev")
  }
}
You create a new model ProductReview that extends BaseEntity . BaseEntity adds 3 common columns id, created_at and updated_at.
You additionally add the columns id, product_id, title, user_name, rating, and content.
You also add a method to be run before inserting a new record in the database for this model which uses a utility function from Medusa. If the record doesn’t have an ID, a random and unique ID is generated for it.
Create the Repository
The next step is to create the Typeorm repository for this model. Typeorm repositories provide you an API to perform a variety of actions on tables in the database
Create the file src/repositories/product-review.ts with the following content:
import { EntityRepository, Repository } from "typeorm"

import { ProductReview } from "../models/product-review"

@EntityRepository(ProductReview)
 export class ProductReviewRepository extends Repository<ProductReview> { }
Create the Migration
Migrations are used to add or modify a database schema before running the server. It eliminates the need to do it manually on your RDBS each time you want to install your server.
Typeorm migration filenames are prefixed with a timestamp, so you have to create your own using this command:
npx typeorm migration:create -n ProductReview --dir src/migrations
This will create the migration ProductReview in the directory src/migrations. You should find a file inside src/migrations that has a file name of the format <TIMESTAMP>-ProductReview.ts.
Inside the migration, there’s an up method and a down method. The up method is executed when you run the migration, and the down method is executed when you revert the migration.
Replace the up method with the following:
public async up(queryRunner: QueryRunner): Promise<void> {
    await queryRunner.query(
        `CREATE TABLE IF NOT EXISTS "product_review" ("id" character varying NOT NULL, "product_id" character varying NOT NULL,
        "title" character varying NOT NULL, "user_name" character varying NOT NULL,
        "rating" integer NOT NULL, "content" character varying NOT NULL,
        "created_at" TIMESTAMP WITH TIME ZONE NOT NULL DEFAULT now(), "updated_at" TIMESTAMP WITH TIME ZONE NOT NULL DEFAULT now())`
    )
    await queryRunner.createPrimaryKey("product_review", ["id"])
    await queryRunner.createForeignKey("product_review", new TableForeignKey({
        columnNames: ["product_id"],
        referencedColumnNames: ["id"],
        referencedTableName: "product",
        onDelete: "CASCADE",
        onUpdate: "CASCADE"
    }))
}
This creates the table with its columns, makes the column id the primary key, and adds a foreign key on the column product_id.
Then, replace the down method with the following:
public async down(queryRunner: QueryRunner): Promise<void> {
    await queryRunner.dropTable("product_review", true)
}
This drops the table product_review if you revert the migration.
Before you can run migrations with Medusa, you need to run the build command to transpile the Typescript files into JavaScript files:
npm run build
Then, run the following command to run the migrations:
medusa migrations run
This runs the migration you created which creates a new table product_review in the database for your Medusa server.
Create the Service
In this section, you’ll create the service that you’ll use in endpoints to access or add product reviews.
Create the file src/services/product-review.js with the following content:
import { BaseService } from "medusa-interfaces";

class ProductReviewService extends BaseService {
  constructor({ productReviewRepository, manager }) {
    super();

    this.productReviewRepository = productReviewRepository
    this.manager = manager
  }

  async getProductReviews (product_id) {
    const productReviewRepository = this.manager.getCustomRepository(this.productReviewRepository);
    return await productReviewRepository.find({
      product_id
    });
  }

  async addProductReview (product_id, data) {
    if (!data.title || !data.user_name || !data.content || !data.rating) {
      throw new Error("product review requires title, user_name, content, and rating")
    }

    const productReviewRepository = this.manager.getCustomRepository(this.productReviewRepository);
    const createdReview = productReviewRepository.create({
      product_id: product_id,
      title: data.title,
      user_name: data.user_name,
      content: data.content,
      rating: data.rating
    })
    const productReview = await productReviewRepository.save(createdReview);

    return productReview
  }
}

export default ProductReviewService;
This creates the service ProductReviewService. This service has 2 methods. getProductReviews gets all reviews for a product ID, and addProductReview creates a new product review for a product ID using data passed to it as a second parameter.
Create Endpoints
Finally, you’ll create 3 new endpoints on your Medusa server:
- A
GETroute/store/products/:id/reviewsto get reviews for a product on the storefront. - A
POSTroute/store/products/:id/reviewsto add a new review for a product on the storefront. - A
GETroute/admin/products/:id/reviewsto get reviews on the Medusa admin.
Create the file src/api/index.js with the following content:
import { Router } from "express"
import bodyParser from "body-parser"
import cors from "cors"
import { projectConfig } from "../../medusa-config"

export default () => {
  const router = Router()
  const storeCorsOptions = {
    origin: projectConfig.store_cors.split(","),
    credentials: true,
  }

  router.get("/store/products/:id/reviews", cors(storeCorsOptions), (req, res) => {
    const productReviewService = req.scope.resolve("productReviewService")
    productReviewService.getProductReviews(req.params.id).then((product_reviews) => {
      return res.json({
        product_reviews
      })
    })
  })

  router.use(bodyParser.json())
  router.options("/store/products/:id/reviews", cors(storeCorsOptions))
  router.post("/store/products/:id/reviews", cors(storeCorsOptions), (req, res) => {
    const productReviewService = req.scope.resolve("productReviewService")
    productReviewService.addProductReview(req.params.id, req.body.data).then((product_review) => {
      return res.json({
        product_review
      })
    })
  })

  const corsOptions = {
    origin: projectConfig.admin_cors.split(","),
    credentials: true,
  }
  router.options("/admin/products/:id/reviews", cors(corsOptions))
  router.get("/admin/products/:id/reviews", cors(corsOptions), async (req, res) => {
    const productReviewService = req.scope.resolve("productReviewService")
    productReviewService.getProductReviews(req.params.id).then((product_reviews) => {
      return res.json({
        product_reviews
      })
    })
  })

  return router;
}
Notice that you have to use the cors middleware with the configuration imported from medusa-config.js for each route. If you don’t use the cors middleware for the routes then you will not be able to access them from the storefront or from the admin.
In the GET route /store/products/:id/reviews, you retrieve the productReviewService that is registered in the scope by the Medusa server when you run it. You then use the service to retrieve the reviews using the method getProductReviews.
The GET route /admin/products/:id/reviews is similar to the GET route /store/products/:id/reviews, but it uses the cors options for admin requests.
In the POST route /store/products/:id/reviews , you retrieve the productReviewService and use the addProductReview method to add a review for the product, then return the created product review.
Run the Server
To run the server, run the following command:
npm start
This runs the server on localhost:9000. Make sure the server is running throughout the tutorial.
You can test out the endpoints you just added through a tool like Postman, but you’ll be testing them out throughout the rest of the tutorial.
Medusa Admin Setup
The next step is to install and set up the Medusa Admin.
In your terminal and in a different directory than the Medusa server, run the following command to install the Medusa admin:
git clone https://github.com/medusajs/admin medusa-reviews-admin
Then, change to the newly-created directory medusa-reviews-admin and install the necessary dependencies:
cd medusa-reviews-admin
npm install
Create Reviews Component
You’ll show the reviews on the details page of each product.
So, create the file src/domain/products/product-form/sections/reviews.js with the following content:
import { Box, Flex, Text } from "rebass"
import React, { useEffect, useState } from "react"

import BodyCard from "../../../../components/organisms/body-card"
import { ReactComponent as Star } from "../../../../assets/svg-2.0/star.svg"
import medusaRequest from "../../../../services/request"

const Reviews = ({ id }) => {
  const [reviews, setReviews] = useState([])

  useEffect(() => {
    medusaRequest("get", `/admin/products/${id}/reviews`)
      .then((response) => setReviews(response.data.product_reviews))
      .catch((e) => console.error(e))
  }, [])

  return (
    <BodyCard title="Product Reviews">
            {reviews.length === 0 && (
        <span>There are no reviews for this product</span>
      )}
      {reviews.length > 0 &&
        reviews.map((review) => (
          <Box key={review.id} bg="light" padding="2" mb="2">
            <Flex justifyContent="space-between">
              <Box mr={4}>
                <Text fontWeight="700" mb={3}>
                  {review.title}
                </Text>
              </Box>
              <Flex mr={4}>
                {Array(review.rating)
                  .fill(0)
                  .map(() => (
                    <Star fill="yellow" />
                  ))}
              </Flex>
            </Flex>
            <Text color="gray">By {review.user_name}</Text>
            <br />
            <Text>{review.content}</Text>
            <br />
            <Text color="gray">{review.created_at}</Text>
          </Box>
        ))}
    </BodyCard>
  )
}

export default Reviews
In this code snippet, you retrieve the reviews from the server using the endpoint you created earlier, then you display the reviews if there are any.
Then, in src/domain/products/product-form/index.tsx import the Reviews component at the top of the file:
import Reviews from "./sections/reviews"
And in the returned JSX in the component, add the following before the div wrapping RawJSON:
//add this
<div className="mt-large">
  <Reviews id={product.id} />
</div>
//before this
<div className="mt-large">
  <RawJSON data={product} title="Raw product" />
</div>
Test it Out
If you run your medusa admin with the following command:
npm run develop
You’ll first be asked to log in to the admin. You can use the demo email “admin@medusa-test.com” and password “supersecret”.
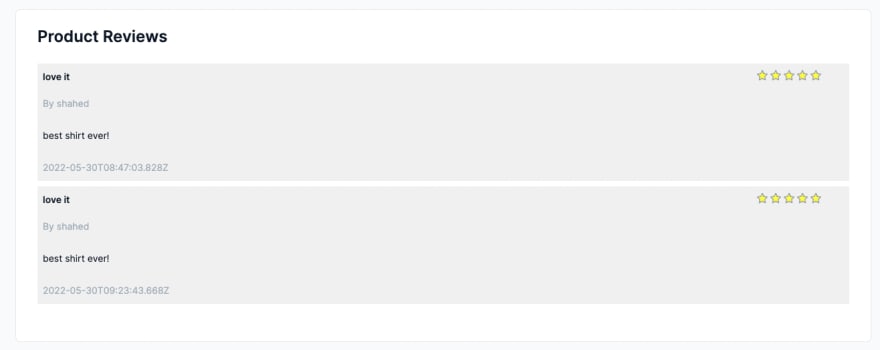
After you log in, go to the Products page from the sidebar, then choose one of the existing products.

Scroll down and you should find “Product Reviews” but there are currently no reviews to view.

You’ll come back to this page after adding the “Add Review” functionality on the storefront.
Setup Next.js Storefront
This section covers how to show product reviews on the Next.js storefront and allow users to add their reviews.
If you’re alternatively using the Gatsby storefront or your custom storefront, you can still follow along to see the general approach of how to implement it in your storefront.
In your terminal and in a different directory than the directories holding the Medusa server and Medusa admin, run the following command to install the Next.js storefront:
npx create-next-app -e https://github.com/medusajs/nextjs-starter-medusa medusa-reviews-storefront
Then, change to the newly created directory medusa-reviews-storefront and rename the .env file:
cd medusa-reviews-storefront
mv .env.template .env.local
You need to install a few libraries that are useful for this tutorial:
npm install --save @heroicons/react react-hyper-modal yup
Where @heroicons/react is used to show a star icon for the rating, react-hyper-modal is used to easily create a modal for the product review form, and yup is used for the form validation.
Implement Product Reviews
In this section, you’ll show the product reviews under the description on every product page. You’ll also show a button to add a new review. This button opens a modal with a form to add the review.
In pages/product/[id].js add the following imports at the beginning of the file:
import * as Yup from 'yup';
import { useFormik } from "formik";
import HyperModal from 'react-hyper-modal';
import { StarIcon } from "@heroicons/react/solid";
import axios from "axios";
Then, at the beginning of the Product component, add the following state variables:
const [reviews, setReviews] = useState([]);
const [isModalOpen, setModalOpen] = useState(false);
The reviews state variable is used to store the reviews retrieved from the server. The isModalOpen state variable is used to control whether the modal holding the product review form is opened or closed.
Also, add a variable that uses Formik and Yup to easily create a form with validation functionalities:
const reviewFormik = useFormik({
  initialValues: {
    title: "",
    user_name: "",
    rating: 1,
    content: ""
  },
  validationSchema: Yup.object().shape({
    title: Yup.string().required(),
    user_name: Yup.string().required(),
    rating: Yup.number().min(1).max(5),
    content: Yup.string().required()
  }),
  onSubmit: (values) => {
    axios.post(`${BACKEND_URL}/store/products/${product.id}/reviews`, {
      data: {
        title: values.title,
        user_name: values.user_name,
        rating: values.rating,
        content: values.content
      }
    })
    .then(() => {
      getReviews()
      setModalOpen(false)
    })
  }
})
This form has 4 fields: title, user_name, rating, and content. All fields are required, and the value of the rating field must be at least 1 and at most 5
On submit, a POST request is sent to the endpoint you created earlier, and you pass the review data in the body. Then, the reviews are retrieved from the server using the getReviews function and the modal is closed.
Next, add the getReviews function and a useEffect that gets the reviews whenever the product changes:
useEffect(() => {
  if (product) {
    getReviews()
  }
// eslint-disable-next-line react-hooks/exhaustive-deps
}, [product])

function getReviews () {
  axios.get(`${BACKEND_URL}/store/products/${product.id}/reviews`)
    .then((response) => setReviews(response.data.product_reviews))
}
This retrieves the reviews from the server using the endpoint you created earlier on the server.
Finally, add the following before the last 3 closing div elements in the returned JSX:
//add this
            <div style={{marginTop: "30px"}}>
        <p>Product Reviews</p>
        <HyperModal
          isOpen={isModalOpen}
          requestClose={() => setModalOpen(false)}
          renderOpenButton={() => {
            return (
              <button className={styles.addbtn} onClick={() => setModalOpen(true)}>Add Review</button>
            );
          }}
        >
          <form onSubmit={reviewFormik.handleSubmit} style={{padding: "20px"}}>
            <h2>Add Review</h2>
            <div style={{marginBottom: "10px"}}>
              <label htmlFor="title">Title</label>
              <input type="text" name="title" id="title" onChange={reviewFormik.handleChange}
                value={reviewFormik.values.title} style={{display: "block", width: "100%"}} />
              {reviewFormik.touched.title && reviewFormik.errors.title && <span style={{color: "red"}}>{reviewFormik.errors.title}</span>}
            </div>
            <div style={{marginBottom: "10px"}}>
              <label htmlFor="user_name">User Name</label>
              <input type="text" name="user_name" id="user_name" onChange={reviewFormik.handleChange}
                value={reviewFormik.values.user_name} style={{display: "block", width: "100%"}} />
              {reviewFormik.touched.user_name && reviewFormik.errors.user_name && <span style={{color: "red"}}>{reviewFormik.errors.user_name}</span>}
            </div>
            <div style={{marginBottom: "10px"}}>
              <label htmlFor="rating">Rating</label>
              <input type="number" name="rating" id="rating" onChange={reviewFormik.handleChange}
                value={reviewFormik.values.rating} min="1" max="5" style={{display: "block", width: "100%"}} />
              {reviewFormik.touched.rating && reviewFormik.errors.rating && <span style={{color: "red"}}>{reviewFormik.errors.rating}</span>}
            </div>
            <div style={{marginBottom: "10px"}}>
              <label htmlFor="content">Content</label>
              <textarea name="content" id="content" onChange={reviewFormik.handleChange}
                value={reviewFormik.values.content} style={{display: "block", width: "100%"}} rows={5}></textarea>
              {reviewFormik.touched.content && reviewFormik.errors.content && <span style={{color: "red"}}>{reviewFormik.errors.content}</span>}
            </div>
            <button className={styles.addbtn}>Add</button>
          </form>
        </HyperModal>
        {reviews.length === 0 && <div style={{marginTop: "10px"}}>There are no product reviews</div>}
        {reviews.length > 0 && reviews.map((review, index) => (
          <div key={review.id} style={{marginTop: "10px", marginBottom: "10px"}}>
            <div style={{display: "flex", justifyContent: "space-between", alignItems: "center"}}>
              <h3>{review.title}</h3>
              <div style={{display: "flex"}}>
                {Array(review.rating).fill(0).map((_, index) => <StarIcon key={index} style={{color: "#FFDF00", height: "24px", width: "24px"}} />)}
              </div>
            </div>
            <small style={{color: "grey"}}>By {review.user_name}</small>
            <div style={{marginTop: "10px", marginBottom: "10px"}}>{review.content}</div>
            <small style={{color: "grey"}}>{review.created_at}</small>
            {index !== reviews.length - 1 && <hr />}
          </div>
        ))}
      </div>
//before this
        </div>
    </div>
</div>
You first create the modal using HyperModal. This modal is opened by the “Add Review” button. When it’s opened, a form with 3 input fields and a textarea is shown to add the review. When the form is submitted, the function passed to onSubmit in the options object of useFormik is executed.
Then, if there are any reviews, you render them one by one.
Test it Out
To run the server for the storefront, run the following command:
npm run dev
This runs the storefront on localhost:8000. Open it in your browser and choose one of the products. You can see that it has no reviews.

Click on Add Review to add a review. A modal opens with the form to add a product review.

Fill out the form and click Add. You should be able to see the reviews you add now. Add as many as you want.
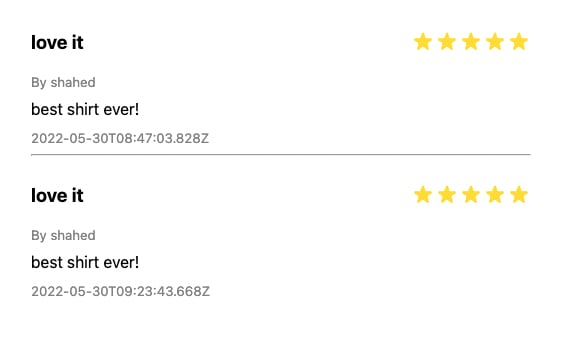
Go back to the admin panel and open the page of the product you just added reviews to. You should see the same reviews now on the admin panel.
What’s Next
There’s still much more that you can do in your Medusa server to customize it with all the services and ecommerce features that you need:
- Use Stripe as a Payment Provider
- Integrate your server with Slack for automated notifications whenever a new order is placed.
- Deploy your server on Heroku and your Medusa admin on Netlify.
Should you have any issues or questions related to Medusa, then feel free to reach out to the Medusa team via Discord.

Top comments (0)