Compute Savings Plans are a flexible approach to lowering your AWS bill by committing to an hourly spending. Finding the right commitment can however be tricky when we consider free tiers, varying workloads, available budgets and your plans for the next years. This article describes the available options for serverless workloads, how to pick the right plan and how to improve on existing plans.
Prerequisites
This article applies to you, if you will spend at least $30 per month on AWS Lambda or Fargate for at least 1 year. Below this amount it is likely that you will overpay. AWS starts to give recommendations only once you exceed $0.10 per hour or $72 per month.
To use this guide effectively, you should have enabled the Cost Explorer for at least 2 months.
This article focuses on a single account. If you use AWS Organizations you can still apply what you learn here, but check the docs regarding multi account setups:
The Savings Plans will first apply to usage in the account that owns the plan, and then apply to usage in other accounts in the AWS Organization.
To simplify this article, I will ignore EC2 and DynamoDB. Have a look at DynamoDB Reserved Capacity and AWS’s Guide to Savings Plans if you’re curious about lower prices for DynamoDB and EC2.
Disclaimer
Numbers in this article might be wrong, as they are based on my understanding of public documentation. Start with a small savings plan and later add additional ones to avoid overpay.
How do Savings Plans save money?
With a Savings Plan you pay for compute before you use it, and in exchange your rates for that purchase are lowered by up to 17% for Lambda and up to 52% for Fargate. In this chapter we will refer to hourly commitment as prepaid compute.
Once purchased, a Savings Plan gives you hourly packages of prepaid compute that compute services such as Lambda and Fargate can use. Any additional compute above the prepaid amount is priced at regular On-Demand rates.
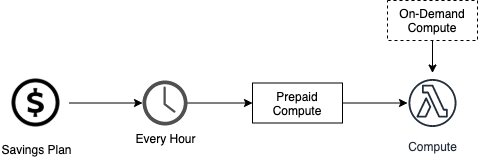
When the compute usage matches the prepaid amount, you don’t generate any additional spending beyond what you already paid for. Achieving this perfect fit is difficult as compute usage tends to vary in serverless environments.

When your services use more compute than what you already prepaid for, additional compute will be charged at On-Demand rates. This happens automatically and there’s nothing more you need to do.

When your services use less compute than what you prepaid for, the remaining amount is not transferred into the next hour, but discarded. You pay the commitment no matter if you use it or not. This may be the case if you have irregular workloads (e.g. nightly jobs) or the free tier covers a lot of your spending.

The Savings Plan will show up as a reduction of compute spending on your AWS bill.

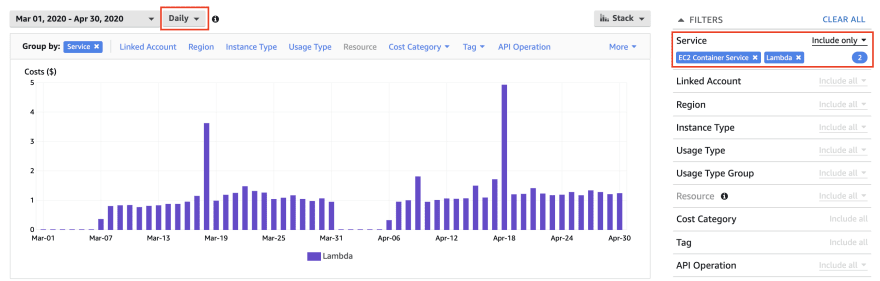
Below you see a picture of my recent compute spending (filtered to Lambda). While the first few days don’t incur any spending due to the free tier, the following days show spending and also savings (red bar in the negatives). My Savings Plan covers roughly $0.6 each day.

Note that this does not mean that I save $0.6 each day. Instead I’ve bought the compute in advance and back then got a 17% discount compared to On-Demand. Now that prepaid compute lowers my daily spending.
What options are there?
When picking a savings plan, there are two major questions to answer: For how long do you commit and when do you want to pay?
You can pick a term length of 1 or 3 years. The longer, the better your rates for Fargate. For Lambda the term length doesn’t seem to matter in terms of pricing. As for the payment options, you can choose between “No upfront”, “Partial upfront” and “All upfront”. The more upfront, the better your rates.
What do these upfront terms mean?
- No upfront: Monthly charges
- Partial upfront: 50% when you buy the savings plan, the rest as monthly charges
- All upfront: One payment when you buy the plan
Here is an overview of the possible savings rates for us-east-1 as of 2020-06-28. Please check the rates for your region before making any purchase.
Lambda
| Payment Option | Term Length | Savings over On-Demand |
|---|---|---|
| No upfront | 1/3 year(s) | 12% |
| Partial upfront | 1/3 year(s) | 15% |
| All upfront | 1/3 year(s) | 17% |
Fargate
| Payment Option | Term Length | Savings over On-Demand |
|---|---|---|
| No upfront | 1 year | 20% |
| Partial upfront | 1 year | 25% |
| All upfront | 1 year | 27% |
| No upfront | 3 years | 45% |
| Partial upfront | 3 years | 50% |
| All upfront | 3 years | 52% |
How do I pick the right plan?
If your compute spending is above $0.10 per hour AWS will give you recommendations for Savings Plans which also account for variable usage patterns. Have a look at those numbers before doing your own calculations. My spending was too low for any recommendations.
The key to picking the right savings plan is to understand your recent and future spending. Once you know how much you regularly spend, I suggest that you pick a small amount to start with. As a rule of thumb you can pick 50% of your hourly spending. Only once you have data on how well the small savings plan works should you consider committing to more.
Understand your current spending
Start by opening the AWS Cost Explorer. If you haven’t used it before, enable the Cost Explorer now.
In the top of the graph select Daily as the granularity, and filter the services to only show “Lambda” and “EC2 Container Service” (= Fargate). If you can select Hourly that’s even better, but be aware that Hourly granularity incurs additional charges.
“The Hourly commitment is the Savings Plans rate, and not the On-demand spend. (AWS Docs)”. This means that when you see an hourly spending of $1, the according hourly commitment with a savings rate of 17% is $1 * (1-17%) = $0.83.
Let’s assume a minimum Lambda spending of $1 per hour or $720 per month. We’re looking for a 1 year commitment. All Upfront gives us the best rate of 17% for Lambda. With an hourly commitment of $0.83 this brings us to a single payment of $0.83 x 24 x 30 x 12 = $7,171. As a result we save $1,469 compared to On-Demand rates ($8,640).
When picking Partial Upfront, we will commit to $1 * (1-15%) = $0.85, pay $3,672 upfront and then pay another $612 every month. With 15% savings on compute, we save $1,296 compared to On-Demand rates.
As you can see in the picture above, my spending for compute was roughly $1 per day (not hour), but I had 6 days that were covered by the free tier. A savings plan barely made sense.
Savings Planner
The savings planner helps you find the right savings rate. You upload your recent cost reports, enter your savings rates as well as an hourly commitment. The website then tells you how much it expects you to save.
I bought a savings plan and when I compared the utilization report on AWS, the numbers were even better than expected by the savings planner.
The website is frontend only (no data sent to any server) and is open source on GitHub.
Free tier consideration
If the free tier doesn’t last a single day of your cost, then you can skip this section.
With a compute spending of $30 per month or $0.04 per hour we could think that a savings plan of $0.04 per hour makes sense. If we have days covered by the free tier however, we will overcommit by $0.04 per hour or $0.96 on each of those days. From my understanding this means that on the first 6 days, I would pay $0.04 x 24 x 6 = $5.76 more than with On-Demand pricing and on the remaining 24 days I would save 24 x 24 x $0.04 x 12% = $2.76. In total that would put me at an overpay of $3.
You can use the following formula to determine if a certain commitment makes sense for you:
hourly_commitment * 24 * days_not_covered_by_free_tier * savings_rate - hourly_commitment * 24 * days_covered_by_free_tier = total_savings
Start small and iterate
Do not just average your spending onto an hourly level and pick that as your hourly commitment. If you’re not spending the same on every single hour, then I suggest you rather start with a smaller savings plan and purchase another one when you see that there’s still room for improvement.
While we pick an hourly commitment based on our previous spending, we will commit on future spending. If you’re not sure that you’ll be spending that amount for the next 1 or 3 years, then please take caution when considering a savings plan.
Assume you have the following spending for every month:

Based on the overly simplistic formula hourly_commitment * 24 * days_with_spending_above_commitment * savings_rate - hourly_commitment * 24 * days_with_spending_below_commitment we could save $5 by committing to $0.04 per hour ($0.96 per day) with an All Upfront payment.
Once we apply that savings plan, our remaining spending looks like this:

Adding another $0.04 savings plan would now put us at an additional -$0.72 of savings. Tha’s not savings but overcommitment! Therefore we should either not buy a second savings plan or consider a lower hourly commitment.
The savings planner can help you finding the right amount based on cost exports.
Keep in mind that you can always buy additional savings plans, but revoking existing ones is not possible. Start small and iterate!
How do I buy a savings plan?
You understood how savings plans work and what hourly commitment makes sense for you? Good! Now go to the cost management in the AWS Console. In the lefthand navbar click on Purchase Savings Plan. Here you can pick a term length of 1 or 3 years, specify your hourly commitment and decide if you want to pay all upfront, partial upfront or no upfront.
Add the savings plan to your cart and carefully review the order:
- Did I pick the right term length?
- Will I use up the hourly commitment or will I overpay?
- Am I comfortable with an upfront payment?
Once you’re ready to purchase, click on Submit order.
That’s it. You will now get reduced rates for your compute usage. Make sure to check the utilization report over the next days.
If you selected All or Partial Upfront, you will soon see a big spike in the Cost Explorer. Don’t worry, that’s just the upfront payment for the savings plan.
So how much am I actually saving?
After a couple days you can visit the Utilization report. This page will show you how much you save with your savings plan and if there is any overcommitment.
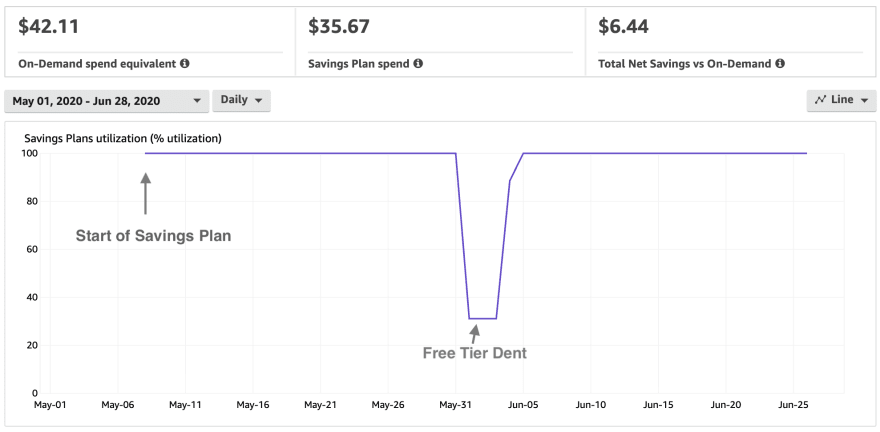
In the example above, we’re at always at 100% utilization, except for a few days in the beginning of each month where the free tier applies. At the end we’re still saving about 15% on our compute bill.
Over the next days you should also notice a little drop in the Cost Explorer for spending related to Lambda and Fargate as prepaid compute is automatically applied. I suggest that you wait for a couple weeks before you consider purchasing another savings plan. Use the same approach that we followed above, but keep in mind that your spending has now lowered and you should only factor in spending since the date of the most recent savings plan purchase in the analysis for your next savings plan.
Have a look at what the official documentation says about monitoring savings plans.

Top comments (0)