Recently I built a React Redux application with a Rails API backend called Root (you can see blog here). I thought it would be fun exercise to deploy my app on Kubernetes. I decided to use EKS to run Kubernetes on AWS as I've been wanting to learn more about AWS services as well.
1. Setup Pre-Requisites
Make sure to install the following:
The Amazon EKS docs have a good overview of installing the AWS CLI, eksctl, kubectl, and the AWS IAM authenticator.
2. Update database.yml
In the Rails API code, the database.yml file needs to be updated to allow for the environment variables we need to pass to connect to the production database. Running off of a centralized database is probably the biggest difference between running the app locally in development mode on my laptop and in production mode in the cloud.
production:
  <<: *default
  database: <%= ENV['DB_NAME'] %>
  username: <%= ENV['DB_USERNAME'] %>
  password: <%= ENV['DB_PASSWORD'] %>
  host: <%= ENV['DB_URL'] %>
  port: 5432
~~~


### 3. Write the Dockerfile

To containerize the application, we need to create a Dockerfile in the root directory of the rails application. This defines how our container is built by the docker runtime.


DOCKERFILE for backend:
FROM ruby:2.6.1
Create a local folder for the app assets
RUN mkdir /backend
WORKDIR /backend
Install required tooling
RUN apt-get update && apt-get install -qq -y build-essential nodejs libpq-dev postgresql-client --fix-missing --no-install-recommends
Set our environment variables
ENV RAILS_ENV production #run the app in production mode
ENV RAILS_SERVE_STATIC_FILES true #serves static files (better performance)
ENV RAILS_LOG_TO_STDOUT true #ensures our rails logs will be exposed from the container (useful for debugging!)
Copy and install Gems from our Gemfile
COPY Gemfile /backend/Gemfile
COPY Gemfile.lock /backend/Gemfile.lock
RUN gem install bundler -v 2.0.2
RUN bundle install --deployment
COPY . ./
EXPOSE 3000
Start the puma server
CMD bundle exec puma -p 3000
Now, we'll use the Dockerfile to build a container image we can run on the Kubernetes cluster. Navigate to the root directory of the backend app and build the Dockerfile:

{% raw %}`docker image build -t backend:1.0 .`

**Note: the '.' at the end of that command means build in the current directory. A super helpful resource I used was: [Docker Deep Dive](https://www.amazon.com/Docker-Deep-Dive-Nigel-Poulton/dp/1521822808/ref=tmm_pap_swatch_0?_encoding=UTF8&qid=1578946525&sr=8-1)**


Lastly, you can run the container to see if the image build worked.

`docker container run -d --name backend -p 3000:3000 backend:1.0`

You can test it by running `docker ps`. You should see something like this:
CONTAINER ID IMAGE COMMAND CREATED STATUS PORTS NAMES
ebbf78152a56 backend:1.0 "/bin/sh -c 'bundle …" 4 seconds ago Up 2 seconds 0.0.0.0:3000->3000/tcp backend
Note that this will expose the container on http://localhost:3000, but will not render any data as we have not connected the container to our database!
### 4. Push Docker images to cloud
In order to run our container on the Kubernetes cluster, we need it stored somewhere the cluster can access. I used [Amazon Elastic Container Registry](https://aws.amazon.com/ecr/) to host the container image, it was super simple to setup!
1. Create the ECR repository (I called mine 'backend')

2. Push images to ECR. ECR gives you a really nice set of instructions on how to do this right from the console!
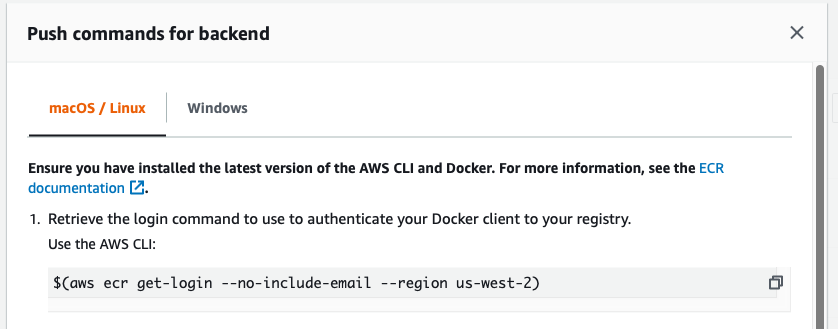
a. Retrieve our ECR credentials:
{% raw %}`$(aws ecr get-login --no-include-email --region us-west-2)`
b. Tag the image for ECR
`docker tag backend:1.0 <account ID>.dkr.ecr.us-west-2.amazonaws.com/backend:1.0`
c. Push the image to ECR:
`docker push <account ID>.dkr.ecr.us-west-2.amazonaws.com/backend:1.0`
3. See your image and get the URI. Once your image is pushed to ECR, you can see it in the console (or using the AWS CLI). You'll need to get the URI for the image in order to run it on your cluster.

### 5. Create EKS cluster
It turns out there are a lot of ways to create an EKS cluster! I used eksctl as it was simple and easy. The [eksctl docs](https://eksctl.io/introduction/getting-started/) have a great overview of how to use eksctl to create a Kubernetes cluster on AWS.
To create my EKS cluster, I ran:
`eksctl create cluster --region us-west-2 --name root --managed`
This command creates an EKS cluster in Oregon named 'Root' (the name of my App) with an EKS managed node group.
The cluster takes a few minutes to create, when its done, you can see it in the AWS console:
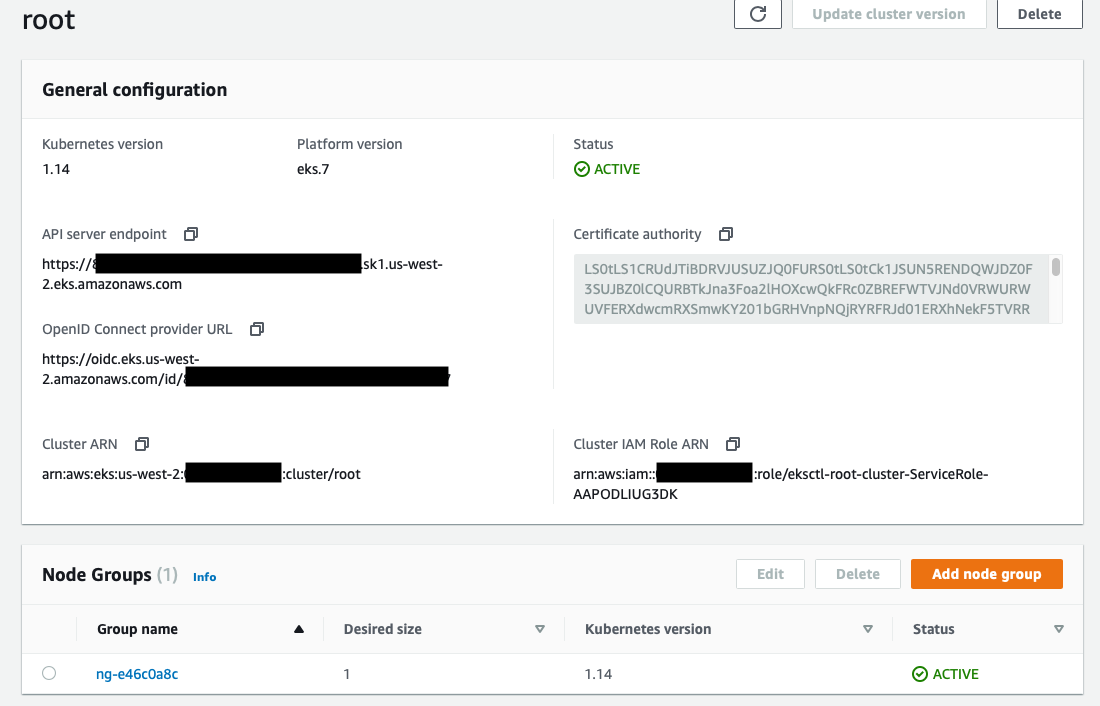
You can also see that the cluster is running by seeing the running nodes with kubectl – `kubectl get nodes`
NAME STATUS ROLES AGE VERSION
ip-192-168-66-201.us-west-2.compute.internal Ready 25h v1.14.7-eks-1861c5
### 6. Create RDS Postgres instance
The biggest difference between running the app locally and in Kubernetes is that instead of a single instance of the app using a database running on my laptop, lots of copies of my app (potentially) need to share a single database.
I read a few examples of people running Postgres in Kubernetes, but since my goal was to run this on AWS, I wanted to use [Amazon Relational Database Service](https://aws.amazon.com/rds/) to set up my Postgres database in the cloud.
Again, using Amazon RDS was extremely easy to use. There are a lot of options, I selected 'free tier' as a pre-configured setup as I'm not going to be scaling this app beyond a few tests. In production, you can select much larger instances to host the database.
You can even have RDS create the database for you when you provision the instance. This lets you skip the {% raw %}`db:create` step when configuring the database later. I opted to have RDS create my database 'backend'.
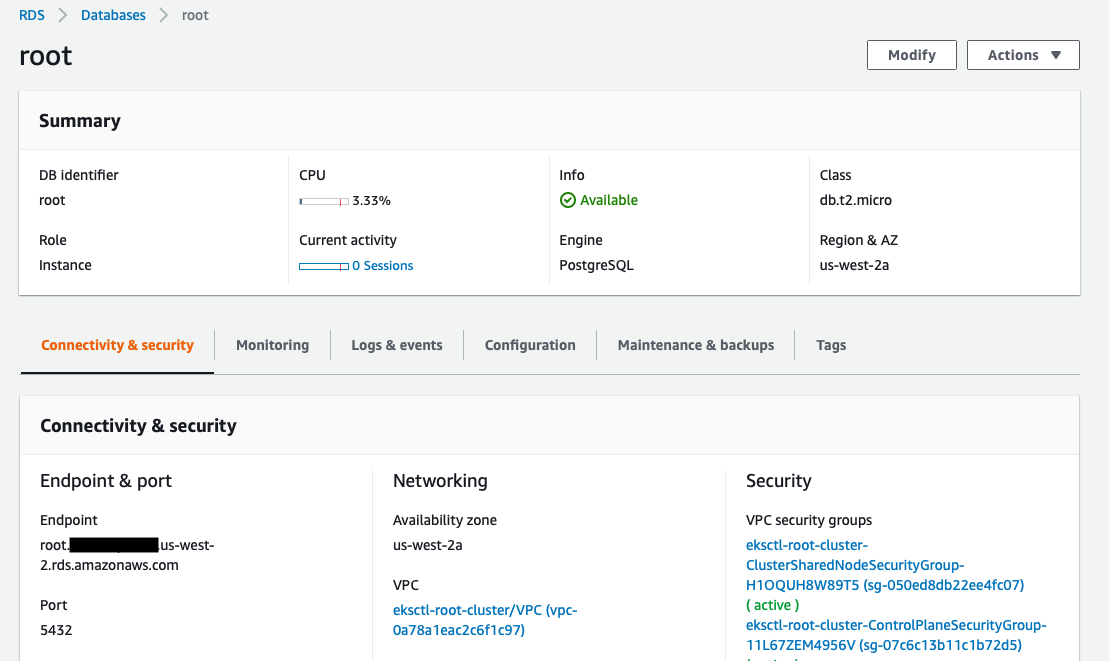
When creating the database, it's important to setup the username, password, and port correctly. I used the default username, had RDS auto-generate a secure password, and set the port to 5432 - which is the default postgres port and **the port I had configured way back in my database.yml file**!
Some additional things to remember when setting this up are to ensure you allow for network connections between the database and the Kubernetes cluster. It is important that you create the DB in the same VPC as your K8s cluster. This ensures easy connectivity with the running API server. I also added the [security groups](https://docs.aws.amazon.com/vpc/latest/userguide/VPC_SecurityGroups.html) used by the cluster to the database ensure that my API containers are not blocked from communicating with the RDS database.

Because we're not running a highly-available database, RDS lets you select which Availability Zone (AZ) to run your database instance in. I left this to 'none' which seems to mean "run anywhere". In production I would probably run this as highly-available (across multiple AZs) or select an AZ that matches the AZs where we run the backend API server containers/nodes to minimize cross-AZ traffic ($$).
### 7. Setup our database credentials
When we run our backend container, we need to securely pass the login credentials to our container as environment variables. We'll do this with a K8s secret. I used [this blog](https://www.engineyard.com/blog/kubernetes-tutorial-running-a-rails-app-in-kubernetes) as a guide to set up the secret.
#### Steps:
a. Encrypt your username and password for the RDS database using base64 encryption `echo -n "<username>" | base64` and `echo -n "<password>" | base64`. Keep track of the output!
b. Create a yaml file for the secret:
db-creds.yaml
  apiVersion: v1
  kind: Secret
  metadata:
    name: db-creds
  type: Opaque
  data:
    username: <base64 encoded username>
    password: <base64 encoded password>
c. Create the secret on the cluster: {% raw %}`kubectl create -f db-secret.yaml`


### 7. Create the K8s deployment

We're finally ready to run our app! To do this, we need to write a k8s deployment yaml file that specifies the container we want to run and passes all the correct environment variables for connecting to the RDS database. Note, when writing these files, _spaces matter_. I use atom to make sure everything lines up!

backend.yaml
apiVersion: extensions/v1beta1
kind: Deployment
metadata:
name: backend # name of the deployment
labels: # these labels apply to the deployment
app: root
component: backend
spec:
strategy:
type: Recreate
template:
metadata:
labels: # these labels apply to our container
app: root
component: backend
spec:
containers:
- name: backend # name of our container
image: .dkr.ecr.us-west-2.amazonaws.com/backend:1.0 # the URI that we got from ECR
env:
- name: DB_URL
value: root..us-west-2.rds.amazonaws.com # URL of our database endpoint
- name: DB_USERNAME
valueFrom:
secretKeyRef:
name: db-creds
key: username # use the encoded username from the K8s secret db-creds
- name: DB_PASSWORD
valueFrom:
secretKeyRef:
name: db-creds
key: password # use the encoded password from the K8s secret db-creds
- name: DB_NAME
value: backend # our DB is named backend
ports:
- containerPort: 3000 # expose the running contianer on port 3000
name: backend
Run this deployment with {% raw %}`kubectl create -f backend.yaml`. You should see:
```
$ kubectl create -f backend.yaml
deployment.extensions/backend created
```
You can check that the pods are running via `kubectl get pods`:
```
$ kubectl get pods
NAME READY STATUS RESTARTS AGE
backend-68469b6dd4-8lcxl 1/1 Running 0 11m
```
You can describe the deployment and pods to get all sorts of interesting information - `kubectl describe pod/<pod ID>`
Remember way back in the Dockerfile when we set rails to log to STDOUT? Now this comes in handy because we can run `kubectl logs <pod ID>` to see the logs for our rails app. This can be very helpful in troubleshooting!
### 8. Configure the database
Now that our rails app is successfully running, we need to configure our database. You only have to do this once, the first time you set up the app. Future containers that run will automatically connect and find the configured database and data.
#### Steps
a. Exec (open a shell) into the running pod with `kubectl exec -it <pod ID> -- /bin/bash`. You're now executing commands inside of the running container!
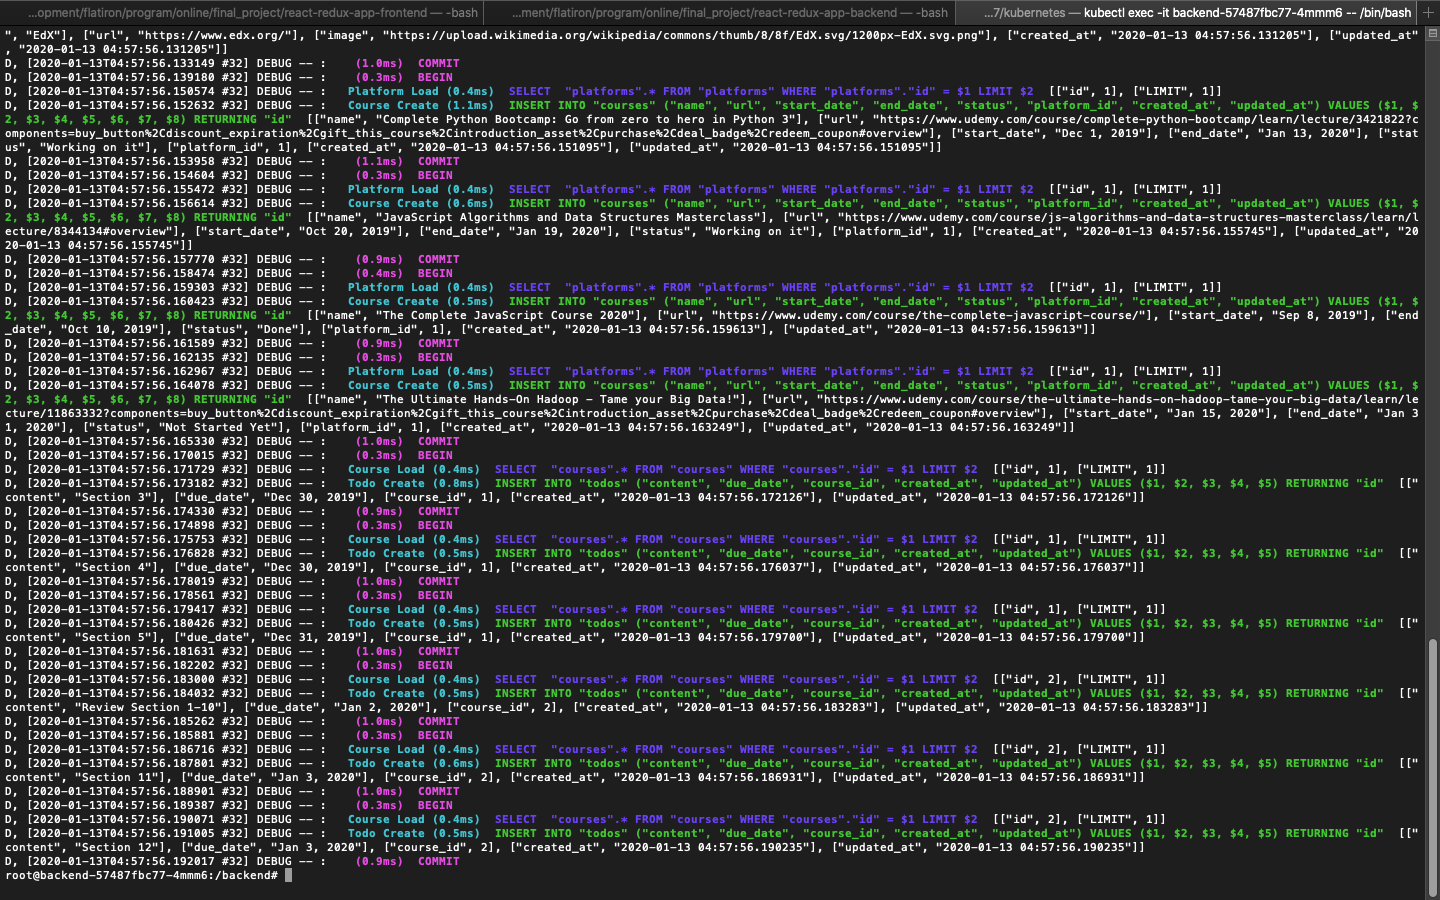
b. Run `bundle exec rake db:migrate` to configure the database.
c. If you have seed data, you can add it to the database by running `bundle exec rake db:seed`
You'll see a ton of output as the database is setup by rails.
### 9. Test your running API server!
We now have our backend rails API running on Kubernetes! You can test this out by setting up port forwarding to expose the deployment as a URL in our browser.
Run `kubectl port-forward deployment/backend 3000`. The 3000 means that the port forward will both listen and serve traffic on port 3000.
```
$ kubectl port-forward deployment/backend 3000
Forwarding from 127.0.0.1:3000 -> 3000
Forwarding from [::1]:3000 -> 3000
Handling connection for 3000
```
Visit the URL for our API in the browser: http://127.0.0.1:3000/api/v1/platforms
Congratulations, the backend API is up and running!
### Next steps
The first half of my app is now running in a container on Kubernetes with an RDS Postgres database on AWS. In the second part of this blog, I will share how I containerizing my frontend and connected it to the backend. Stay tuned!

Top comments (4)
Thanks for the post, I'm a little new to K8s.
I think the backend.yaml file needs to be updated to
You're right! That's an API change starting with Kubernetes version 1.16.
Great post!
Do you need to pass RAILS_SERVE_STATIC_FILES true if you're building an API?
So helpful 🙏