I recently published a blog post discussing the introduction of both authentication and data storage to App Center, which takes it from a DevOps focus to a fully-fledged Mobile Backend as a Service (MBaaS) solution. The first post was a little light on technical details as it was written on an iPad whilst on vacation, so I wanted to follow up with a little more meat. In this blog post, I’ll be showing how I’ve built a no-code backend to power a mobile app built with Xamarin.Forms 4.0.
App Center Data
App Center data allows us to quickly add data functionality to our mobile apps, providing us to ability to manage, persist and sync data across app installations. It’s backed by the incredible Azure Cosmos DB, which is Microsoft’s globally distributed, low latency, highly-available cloud born database.
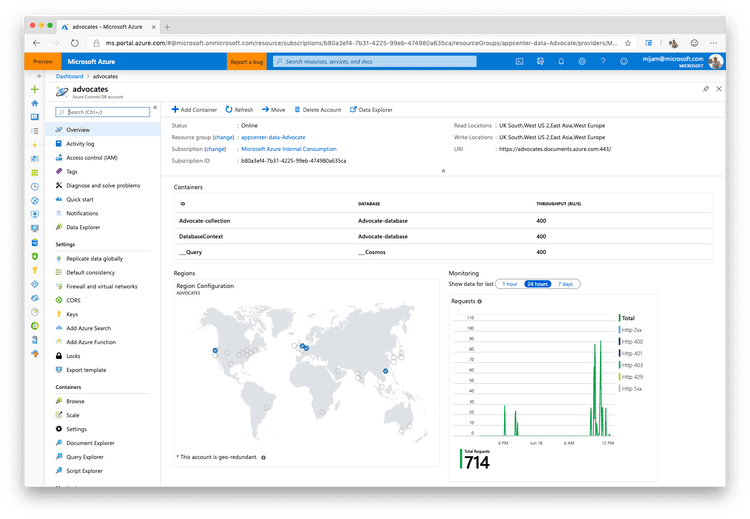
Through using Cosmos DB as the underlying technology powering App Center Data, it opens up a world of opportunity to integrate our app into other services in Azure, as well as offering us a clear path to migration, should we find App Center doesn’t fit our growing needs.
Collections and Partitions
In order for Cosmos DB to meet our performance needs, we must partition our data into distinct subsets, called _logical partitions. _Logical partitions are formed based on the value of the _partition key _associated with each item found within the a collection. By default, App Center provides two partition keys within the SDK named AppDocuments and UserDocuments. These are defined in a Static Class named DefaultPartitions which can be found within the AppCenter.Data namespace. Though we’re provided with two partitions to get started with, its not a requirement for us to use the built-in partition keys for all of our data. Instead, we are able to provide a string value for creating our own partition keys.
Check out the official Cosmos DB docs to learn more about data partitions.
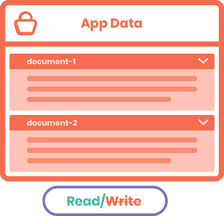
AppDocuments – Read Only
 The
The AppDocuments partition is a read-only partition for storing data which can share the data across all users. Trying to write to the AppDocuments partition will cause an exception to be thrown, so its best avoided! Instead, consider building auxiliary services to manage your AppDocuments.
UserDocuments – Read & Write
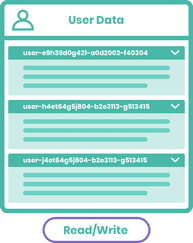
UserDocuments are documents that are owned by an individual user and thus can only be read, updated and deleted by the owner . In order to enable UserDocuments, you must have first configured App Center Authentication. With Authentication enabled, calling the CreateAsync method and providing the UserDocumentspartition key will set the partition key to currently signed in users Id. This will look something like:
“PartitionKey” : “user-e831f9de-c35c-4139-ae9c-8b59b3fefc02”
Advocates App Data
I wanted the demo app to demonstrate both AppDocuments and UserDocumentsbut initially couldn’t think of what data to show that should be read-only. After some consideration, I decided to utilise existing data from our Cloud Advocate Directory.
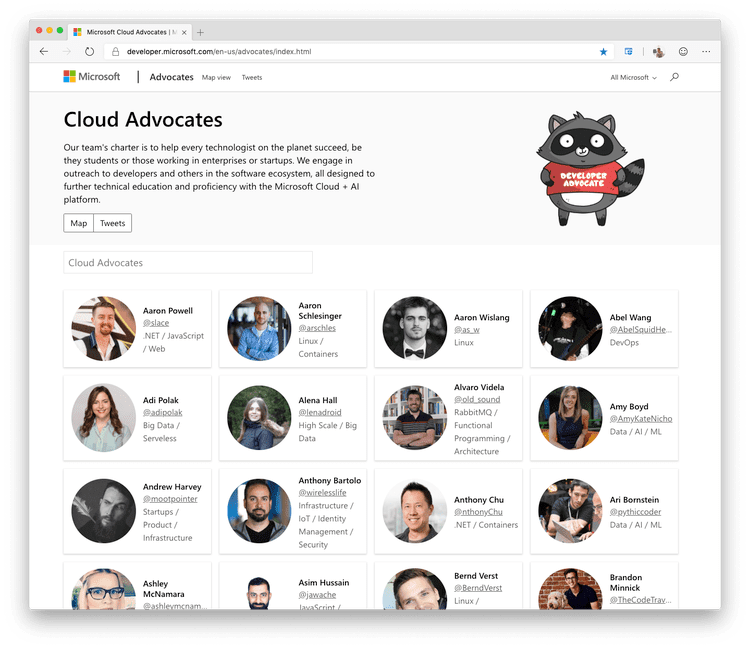
This directory is a little like a right-of-passage for us Cloud Advocates, for every single one of us has had to write about ourselves when we joined the team. Most of the advocates have followed roughly the same format for their pages, which meant it was fairly easy (it not time consuming) to manually add my colleagues to the database.
Defining a Data Model
Below I’ve defined the Advocate model which inherits from a BaseModel. The BaseModel class in extremely simple, with only 1 public property for the ID. The App Center SDK requires that all objects contain an ID of type string, so inheriting from the BaseModel ensures that every model is compatible.
public class Advocate : BaseModel
{
public string Name { get; set; }
public string GithubHandle { get; set; }
    public string TwitterHandle { get; set; }
    public string AvatarUrl { get; set; }
    public string Bio { get; set; }
    public List\<string\> Skills { get; set; }
    //Used for location & timezone lookup
public double Latitude { get; set; }
public double Longitude { get; set; }
 public List\<IgniteStop\> IgniteStops { get; set; }

public Advocate()
{
Skills = new List\<string\>();
 IgniteStops = new List\<IgniteStop\>();
}
 public string ClassType { get; set; }}

public class IgniteStop
{
public string Name { get; set; }
public string Image { get; set; }
}

//Base Model must have an ID Property of type string
public class BaseModel
{
public BaseModel()
    {
     Id = Guid.NewGuid().ToString();
    }

public string Id { get; set; }
}
You’ll note that I’ve added a ClassType property, which I later set when saving the object. I added this to make my life easier when attempting to read all data from a partition, which is not of the same type.
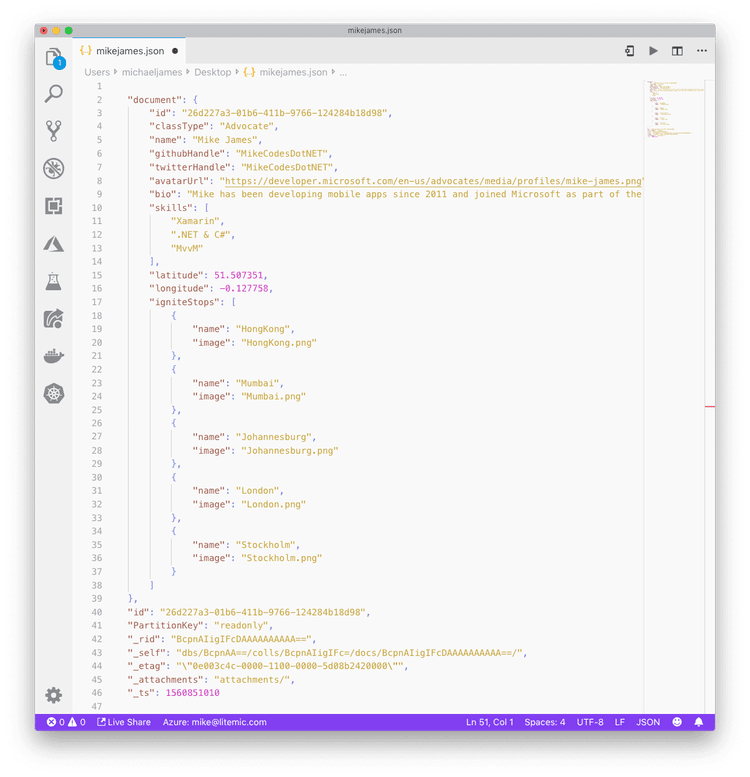
As previously mentioned, it’s not possible to create documents with the AppDocuments partition key, so that rules out creating these documents using the Xamarin SDK. Instead, I created dummy data manually and uploaded these manually to Cosmos DB using the Azure Portal. The first piece of dummy data was my own info, as shown below:
Reading App Data with the Xamarin SDK
Before we jump into looking at the App Center Xamarin SDK, its worth noting that this sample uses an extremely popular Mvvm framework called Prism. Prism is a rather opinionated framework which dictates that we should register services within the App.cs of our Xamarin.Forms Application for later use throughout our app. Normally for a demo, I’d put my data access code directly in the ViewModel, but given I’m trying embrace Prism, I thought I’d follow the recommended architecture and move this functionality into a separate service classes. Below is the incredibly simple ‘AdvocatesDataService‘ class, which contains just one Method.
public class AdvocatesDataService
{
public async Task\<IEnumerable\<Advocate\>\> GetAdvcoates()
{
try
{
var result = await Data.ListAsync\<Advocate\>(DefaultPartitions.AppDocuments);
var unsorted = result.CurrentPage.Items.Select(a =\> a.DeserializedValue).Where(x =\> x.ClassType == "Advocate");
 return new List\<Advocate\>(unsorted.OrderBy(x =\> x.Name));
 }
catch(Exception ex)
{
Crashes.TrackError(ex, null);
return new List\<Advocate\>();
}     }}
Pagination
As you may have seen, the above response is actually paginated, though I only handle the first page right now. This works at the moment because I’ve not added all of my colleagues to the database! As I get around to adding more of my colleagues, I’ll likely want to handle pagination properly. PaginatedDocuments have the following methods and properties:
-
HasNextPage: Boolean property indicating wether an extra page is available or not. -
CurrentPage: Property that returns the current page with type beingPage<T>. -
GetNextPageAsync(): Method that asynchronously fetches the next page (the method returns an object of typeTask<Page<T>>). - IEnumerator<DocumentWrapper>
GetEnumerator(): This is an enumerator for the paginated docs, which can traverse them
App Center doesn’t currently support offline persistence when listing documents.
Service Registration with Prism
I register this service within the App.cs RegisterTypes method so that it can be used throughout my App.
<tabbedpage><span style="font-family: Menlo;"><span style="color: #222222;"><span style="color: #009695;">protected</span> <span style="color: #009695;">override</span> <span style="color: #009695;">void</span> RegisterTypes(<span style="color: #3363a4;">IContainerRegistry</span> containerRegistry)<br>{<br> containerRegistry</span><span style="color: #222222;">.</span><span style="color: #222222;">Register</span><span style="color: #222222;">(</span><span style="color: #009695;">typeof</span><span style="color: #222222;">(</span><span style="color: #3363a4;">AdvocatesDataService</span><span style="color: #222222;">));<br><br> //And a whole lot more...<br></span></span>}</tabbedpage>
Below shows how to consume the now registered AdvocateDataService from within your ViewModels.
//ViewModel Constructor
public AdvocatesPageViewModel(INavigationService navigationService,
AdvocatesDataService advocatesDataService)
{
this.navigationService = navigationService;
this.advoatesDataService = advocatesDataService;
}
Calling the GetAdvocates Method of the AdvocatesDataService class allows us to bind the results to a Xamarin.Forms TableView as seen below:

Creating & Reading User Data
Now we’ve seen how we can use the Xamarin SDK to read lists of AppDocuments, let’s take a look at how we can create, update, delete and read UserDocuments.
To demonstrate UserDocuments, I decided to add the ability to record what links we’ve shared with the community. The reason for recording this is because we (Microsoft Cloud Advocates) are measured on the number of users we direct to the Azure documentation. We measure this using Tracking Links which look a little like this:
"https://docs.microsoft.com/appcenter?WT.mc_id=app-center-mbaas-personalblog-mijam"
The tracking element has been bolded to make it easier to see.
Defining a Data Model
public class TrackingLink : BaseModel
{
public string Url { get; set; }
public string Event { get; set; }
    public string Channel { get; set; }
    public string Alias { get; set; }
    public DateTime CreatedAt { get; set; }
    public string ShareableLink { get; set; }
}
The TrackingLink data model like the Advocate model inherits from BaseModel in order to ensure that it has a Id property string.
Tracking Link Data Service
Having defined the data model, I set about implementing a TrackingLinkDataService class, which like our AdvocateDataService class would be responsible for interacting with App Center.
Read All
public async Task\<IEnumerable\<TrackingLink\>\> GetTrackingLinks()
{
try
{
var result = await Data.ListAsync\<TrackingLink\>(DefaultPartitions.UserDocuments);
var unsorted = result.CurrentPage.Items.Select(a =\> a.DeserializedValue).Where(x =\> x.ClassType == "TrackingLink");

 return new List\<TrackingLink\>(unsorted.OrderBy(x =\> x.CreatedAt));
}
catch (Exception ex)
{
Crashes.TrackError(ex, null);
return new List\<TrackingLink\>();     }
}
Starting with GetTrackingLinks, this method fetches all the tracking links owned by the currently signed in user. Thankfully the App Center SDK deals with ensuring the correct data is returned so we don’t even need to specify the User ID in our method call.
Create Link
public async Task\<bool\> SaveTrackingLink(TrackingLink trackingLink)
{
trackingLink.CreatedAt = DateTime.Now;    trackingLink.ClassType = "TrackingLink";
 trackingLink.Alias = Xamarin.Essentials.Preferences.Get("Alias", "");

 try
{
await Data.CreateAsync(trackingLink.Id.ToString(), trackingLink, DefaultPartitions.UserDocuments, new WriteOptions(TimeToLive.Infinite));
return true;
}
catch(Exception ex)
{
Crashes.TrackError(ex, null);
return false;
}
}
When saving a tracking link, I add a few extra properties such as the current DateTime, set the ClassType and then fetch the Alias using Xamarin.Essentials. Adding the optional WriteOptions means that our document will be stored locally if the user is offline, then will be persisted to the cloud as soon as the device regain connectivity. TimeToLive.Infinite causes our tracking links object to be cached indefinitely rather than the default one day if not online.
Cosmos DB Document
Creating a Tracking Link with the SDK creates a JSON document in Cosmos DB that looks like the following:
{ "document": { "CreatedAt": "2019-06-10T15:42:34.739151+01:00", "Id": "9a0f4e0e-545f-473e-ac6c-f44c2581c93a", "ClassType": "TrackingLink", "Alias": "Mijam", "Url": "https://test.co.uk", "Event": "Event", "Channel": "Channel", "ShareableLink": "https://test.co.uk?WT.mc\_id=Event-Channel-" }, "PartitionKey": "user-e831f9de-c35c-4039-ae9c-8b59b0fefc02", "id": "9a0f4e0e-545f-473e-ac6c-f44c2581c93a", "\_rid": "BcpnAIigIFdsAAAAAAAAAA==", "\_self": "dbs/BcpnAA==/colls/BcpnAIigIFc=/docs/BcpnAIigIFdsAAAAAAAAAA==/", "\_etag": "\"0000584b-0000-1100-0000-5cfe6c970000\"", "\_attachments": "attachments/", "\_ts": 1560177815 }
The important thing to note is the PartitionKey as this relates to the UserId which is returned as part of the authentication process.
Deleting Links
public async Task\<bool\> DeleteTrackingLink(TrackingLink trackingLink)
{
try
{
await Data.DeleteAsync\<TrackingLink\>(trackingLink.Id, DefaultPartitions.UserDocuments);
return true;
 }
 catch (Exception ex)
 {
Crashes.TrackError(ex, null);
return false;
}
}
Deleting data is very straight forward using the DeleteAsync method, which covers the basics of CRUD operations using the App Center SDK.
Wrapping Up
In this post I’ve explained how I’ve used the new preview features of Visual Studio App Center to build a Xamarin.Forms 4.0 app that also uses Prism. You can grab the entire project from my Github!
Hopefully by this point you’ve seen just how easy it is to get started with App Center Data. Its a very un-opinionated SDK, with no requirements on how you define your schema, which makes it a perfect fit for developers who find traditional SQL database too rigid and inflexible.
If you want to learn more about App Center Data then check out the rich documentation on over at the Microsoft Docs Portal.

Top comments (0)