
Istio : An open source service mesh that helps you run a distributed microservice architecture.
Now! You must be wondering why is everyone talking about service mesh ?
What exactly is a service mesh ?
Well! In layman's term, A Service mesh is a dedicated infrastructure layer that eases communication between microservices. It manages how different parts of an application interact with each another and share data.
What functionalities does Istio service mesh provides ?
- Traffic monitoring.
- Access control.
- Circuit breakers.
- Load balancing
- Security.
- Resiliency.
- Routing.
- Timeouts.
- Retries.
- Reporting.
Istio Architecture :
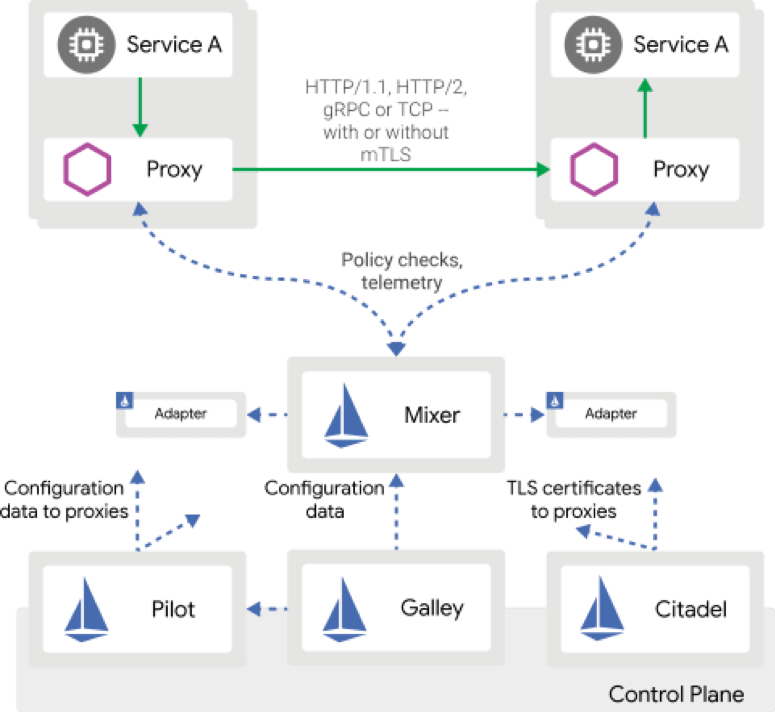
Pilot : It provides routing, development, deployment, testing, timeouts, retries, circuit breakers, load balancing, fault injection support.
Mixer : It provides logging, Tracing, Telemetry, Policy enforcement support.
Citadel/Istio CA : It provides secure communication between micro services over TLS
Envoy/Proxy - It is a service proxy(sidecar proxy) designed for cloud-native applications. It's added to each microservice and handles ingress/egress traffic between services in the cluster and from a service to external services.
Control Plane API - Primary Orchestrator like : Kubernetes/Hashicorp Nomad.
Why do you need Istio ?
Service-to-service communication is what makes microservices work.
And for communication to happen, developers implements the code logic into each service. Let's say I have 5-10 services running. So it's kind of easy for me to get the code for microservice communication implemented for each of the services.
Now, As my application grows big and communication gets more complex, it gets difficult to implemented code logic for service communication.
That's where you need Istio.
Best thing about Istio : No code level change is needed.
How does the magic happens ?
Istio deploys something called sidecar(proxy) next to each service which uses policy based routing to determine when/how/if traffic should be routed to respective services.
Istio also supports :
- Canary deployment.
- Circuit breaker.
- Fault tolerance etc.
How can you run Istio in Kubernetes ?
Via leveraging the sidecar model, We can run Istio in a linux container in our Kubernetes pods.
Just few configuration changes and you can onboard Istio to your Kubernetes cluster.
Let's get started with the setup.
Install Docker Desktop with built-in Kubernetes.
Set memory = 8.0 GB and CPUs = 4 under the advanced pane of Docker Desktop’s preferences.
Run following command to download and extract the latest release automatically : $ curl -L https://istio.io/downloadIstio | sh -
Navigate to the Istio package directory.
Add the istioctl client from bin/ directory. to your path, on a macOS/Linux system : $ export PATH=$PWD/bin:$PATH
Install the demo profile : $ istioctl manifest apply --set profile=demo
Verify the installation : $ kubectl get svc -n istio-system
Ensure that all the corresponding Kubernetes pods are deployed and are running : $ kubectl get pods -n istio-system
Istio is successfully installed.
Label the default namespace with istio-injection=enabled : $ kubectl label namespace default istio-injection=enabled
Deploy your application : $ kubectl apply -f
Confirm that all the services and pods are running via : $ kubectl get services and $ kubectl get pods
Make sure that your application is running by sending a request to it using curl command from any of the pods.
Congratulations! You have got the the basic about what Istio is and why do we need it.

Latest comments (0)