
This is the story of how we separated the simulation logic from the presentation in our game Storyngton Hall to make code execution predictable, to test the functionality as much as possible, and to free the core base from custom logic.
Hello, I’m Pavel Schevaev, CTO at BIT.GAMES, MY.GAMES. Our focus today is Storyngton Hall, a Match-3 game with elements of home and garden design and renovation, with a plot perfect for romance-lovers filled with exciting tales of lords and ladies.
A little backstory
While we had already developed games with Match-3 elements before Storyngton Hall, a lot of time had passed, and none of those titles had a codebase which fit our new project. So, we faced the following problems:
- A lack of determinism and replay possibility: there was no way to track bugs in a player session, nor to understand what happened
- The model is tightly intertwined with the presentation: for instance, you cannot turn off visual elements and “rewind” the simulation
- The core code contains highly customized gameplay logic: like classes such as Honey, Ferret, or Rose
We set out with a plan in mind to create a small function core base using C# and a compact API. We would then conduct development through testing, isolate the simulation from the presentation as much as possible, and introduce the concept of determinism. Finally, we’d make sure all custom gameplay logic was implemented using scripts, in our case, with BHL.
And that last point brings us to our next topic of discussion, BHL itself.
BHL uncovered
We actually wrote BHL some time ago, and this is the language our gameplay programmers actively use today. BHL is an interpreted scripting language that contains convenient primitives for code pseudo-parallelism, hot reload support, and support for downloading bytecode from the server, which enables implementation of various patches and fixes without having to download the application to the store.
Conceptual separation

As we had decided to separate simulation from presentation, it creates an analogy with client-server programming. The server is a deterministic simulation with its own “ticks”, while the simulation provides an opportunity to subscribe to all significant events: the client is the presentational element that affects the server using input from the player, and both presentation and the server live separately with their own ticks.
What is determinism?
Let’s take a moment to talk about determinism itself, with regards to gaming engines. We’ll highlight two points to consider when an engine is deterministic. First, we gain the ability to replay a player’s session. Second, you can control the difficulty of the Match-3 elements. For example, game designers can choose various seeds with either simplified or normal gameplay in order to aid players depending on certain conditions.
One of the most popular ways to implement determinism is to use the “random seed” technique.
A random seed is a number used as a randomizer parameter. During a player’s session, all queries to the randomizer will return some pseudo-random sequence of numbers, and, in subsequent game sessions, queries to the randomizer using the same random seed will return an identical sequence of numbers.

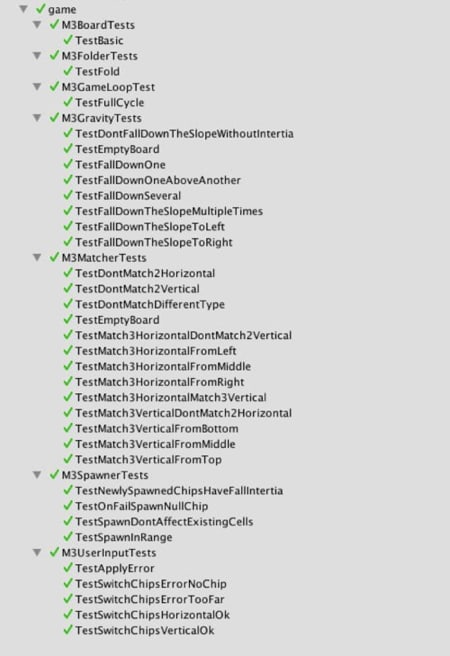
Test-driven development
We had a mandatory requirement: any functionality implemented in the core code should have test coverage. Here’s an example of a simple test case that tests the effect of gravity on chips:
public void TestSimpleGravityFall() {
    var sim = new M3Sim(4, 2);

    sim.SpawnAt(new M3Pos(0,1), new M3Chip(2));
    sim.SpawnAt(new M3Pos(1,1), new M3Chip(2));
    sim.SpawnAt(new M3Pos(2,0), new M3Chip(2));
    sim.SpawnAt(new M3Pos(3,1), new M3Chip(2));

    Assert.AreEqual(
@"
--2-
22-2
",
    sim.ToString());

    sim.TickUntilIdle();

    Assert.AreEqual(
@"
----
2222
",
    sim.ToString());
}
Let’s break down what’s going on there:
- We create a simulation object
- Chips are placed
- We make sure they are in certain positions
- Our simulation is “ticked” until it goes idle — TickUntilIdle
- We make sure that a chip placed above other chips falls and lies in the same row with them
We have already conducted several thousand tests like these.
Simulation as a plugin model
We planned to organize the simulation as a plug-in model where any component can be replaced with a different implementation; using interfaces is a proven way to accomplish this. (We could have tried ECS, but we decided to be careful this time and to follow “the well-beaten path”.)
The simulation receives external input in two ways: input from the player and an interval request for an update (in other words, a “tick”), and it allows for subscriptions to all significant events; and there are quite a few of those.

What happens in a simulation tick
Let’s go through all components of the simulation in a strict order, so we have a clear understanding of what is being addressed, and when. Below you can see how we “tick” cell objects, spawners, matching, gravity, and more:
public void Tick() {
    TickCellObjects();
    TickMatches();
    TickReplaces();
    TickSpawner();
    TickGravity();
    TickGoals();
    TickTurnsLeft();
    TickShuffle();
    TickCombo();
    TickFieldZone();
    ...
  }
The simulation model provides us with many events that can be subscribed to: spawns, new chips, landing, destruction, or the fact that a chip has destroyed a wall, and so on.
public void AttachToModel() {
       m3.OnSpawnNew += OnSpawnNewChip;
       m3.OnSpawnNewMat += OnSpawnNewMat;
       m3.OnSpawnNewBlocker += OnSpawnNewBlocker;
       m3.OnChangeGoal += OnChangeGoal;
       m3.OnLanded += OnLandedChip;
       m3.OnMoveOnBelt += OnMoveOnBelt;
       m3.OnDamage += OnDamageChip;
       m3.OnMatch += OnMatchChips;
       m3.OnReplace += OnReplaceChips;
       m3.OnDestroy += OnDestroyChip;
       m3.OnShuffle += OnShuffleChips;
       m3.OnDestroyWall += OnDestroyWall;
       m3.OnDamageBlocker += OnDamageBlocker;
       m3.OnDestroyBlocker += OnDestroyBlocker;
       m3.OnDestroyBlocked += OnDestroyBlocked;
       m3.OnNextZoneSwitch += OnNextZoneSwitch;
       m3.OnNextFieldSwitch += OnNextFieldSwitch;
       m3.OnComboEnd += OnComboEnd;
       ...
     }
First UI debugging
At first, it was just one person involved in development: we had neither an artist nor a layout designer. But we had a debugging UI in Unity. It was still primitive but it worked.
These were the preliminary results:
- The simulation worked with the discrete movement of chips. All calculations were integer-based: chips moved between cells in one tick and they had no intermediate position in space. Because of this, there were no non-deterministic floating-point calculations to worry about
- The debugging UI was playable, the tests worked fine, and they validated the model. It seemed we just needed to add a beautiful visualization to this model.
But… problems started as soon as the first real UI appeared.
This video shows each “chip” slowing down when passing over cells (under the influence of gravity). The reason for this turned out to be simple: the absence of an intermediate position for the chips in space and discrete movement. Trying to fix it using only visualization methods seemed extremely time-consuming, so we decided to deal with it differently:
- We introduced an intermediate position of the chips in the space between the cells.
- The simulation began to tick more often per unit of time. We empirically selected a value of 20 Hz.
- We made the presentation interpolate the model at the maximum frame rate.
The problem was that we decided to implement the intermediate position of the chips in space using a float, and, as you probably know, floating-point math is not good at dealing with determinism, since it returns varying results on different hardware.
We ultimately settled on a standard solution: fixed-point math based on integer calculations.
But, there were certain drawbacks with the fixed-point math implementation: accuracy suffered; it was not as fast as a float-based implementation; it had limited functionality: add, mul, sqrt, abs, cos, sin, atan.
But, given that we were not working on some kind of shooter, we knew we could deal with it.
We found an implementation on Stack Overflow, made some small changes, and were generally happy with everything:
public struct FInt
{
   // Create a fixed-int number from parts.
   // For example, to create 1.5 pass in 1 and 500.
   // For 1.005 this would 1 and 5.
   public static FInt FromParts( int PreDecimal, int PostDecimal = 0)
   ...
}
This implementation was also convenient because it implicitly overrode the basic arithmetic operators, so the previous computation code was practically untouched.
For example, below you can see code that calculates how the gravity works and it looks just like math using Unity vectors:
var fall_dir = chip.fall_target - chip.fpos;
  var fall_dirn = fall_dir.Normalized();

  var new_fpos = chip.fpos + (fall_dirn * chip.fall_velocity * fixed_dt);
  var new_fall_dir = chip.fall_target - new_fpos;

  chip.fall_velocity += FALL_ACCEL * fixed_dt;
  if(chip.fall_velocity > MAX_FALL_VELOCITY)
    chip.fall_velocity = MAX_FALL_VELOCITY;

  chip.fpos = new_fpos;
Fixed ticks and interpolation
Due to the fact that the simulation “ticks” a fixed number of times per unit of time, we needed to introduce interpolation on the presentation side. The video below clearly shows how this works.
No interpolation:
Interpolated:
Interpolated
Fixed ticks and buffering
We also found another interesting detail: although the simulation logic lives separately and knows nothing about the visual elements, it must set aside some time for various interactions to be conducted on the presentation side.
For example, our chip cannot visually disappear instantly after being damaged, so the simulation allocates a certain number of fixed ticks for the chip to “die”. During this interval, the presentation is free to visualize the process of chip disappearance as it pleases:
void DoDamage(M3Chip c, M3DamageType damage_type) {
    Error.Assert(c.life > 0);
    c.SetLife(c.life - 1);

    c.damage_sequence_ticks = (int)(EXPLODE_TIME / FIXED_DT);

    OnDamage(c, damage_type);
  }


 void TickChip(M3Chip c) {
    ...
    if(c.damage_sequence_ticks > 0) {
      --c.damage_sequence_ticks;
      if(c.damage_sequence_ticks == 0) {
        if(c.life == 0)
          c.is_dead = true;
      }
     ...
    }
Event forwarding
Moving on to scripting, we use BHL for scripting, and all the main events from the simulation are forwarded to scripts. Various custom effects, eye candy, voiceovers, and so on are carried out exclusively within the scripts.
For example, in the script code below, a beautiful “twitch” begins where the tile moves, as if on a spring, and a sound effect is played for a chip landing event:

Implementing various types of chips
To implement various types of chips — for example, bombs — we could have introduced various types of classes. However, this solution was rather rigid and not very extensible.

We took a different approach and introduced the concept of “activation” — a functionality that could be associated with any type of chip.
In the example below, activation is associated with chip type 14; there is destruction around it when the chip is tapped.

When we implemented this, it became possible to create various types of “activations” in BHL scripts.
In the example below, you can see the same code as before, but with BHL: upon activation, a function starts which destroys the surrounding chips following a given pattern:

Complex functionality demonstrated: Beetle chips
Now, let’s review a logic more complex compared with that of ordinary chips. For example, let’s say we have a Beetle chip (a unique chip resembling an insect which has both a special gameplay function and corresponding animation).
If we disassemble the logic of the “beetle” execution into its building blocks, we can highlight the following stages.
In the logic: the target chip is marked as inaccessible, and after an interval of time, the marked chip is destroyed.

At the same time, a visual is displayed showing all the “beauty”: we see the effect of the beetle taking off, then the beetle flying along the trajectory, and finally, an explosion effect.
This is how it looks in the BHL script:

The green section of the code is responsible for simulation, the red section — for presentation.
Here we start two tasks for the simulation and presentation, respectively. With both, these tasks tick at different frequencies and are synchronized using a special synchronization channel; this particular pattern was borrowed from Go.
You can see how the logic and presentation are processed in the editor:
In the debug area at the bottom of the screen, we see the chip is simply marked and then destroyed, while the visual part and all the effects are visible in the upper presentation area.
You’ve probably already noticed that the entire Beetle logic was scripted using BHL. This was implemented by the gameplay developers and was completely isolated from the Match-3 core.
Complex functionality demonstrated 2: Big Bomb chips
Another example is the implementation of the Big Bomb chip.
This implementation is similar to the Beetle:

Here, the explosion wave begins, following a certain “pattern”. The necessary presentation logic is played out in the red-highlighted section. All of this is consistent with the already familiar pattern of the synchronization channel.
Pleasant Bonuses: playable replays
Simply put, player replay works as follows: we record the random seed, and then for each player input we set:
- The simulation tick number
- Input type and parameters
- The checksum for the field state to make sure there are no discrepancies
And that’s all — this is enough for replay. Below you can see an example of this in action:
The game session starts and we find the player has been actively interacting with the game for some time. We stop the game and turn on the replay session, which was recorded automatically. A special debugging UI starts where you can walk through the steps and see what happened at each stage. Very convenient.

A replay can be saved both in text and in visual form. We usually use text (binary data in the base64 format), which is especially convenient for sending via mail and messengers. The last screenshot of the field is saved in PNG format with embedded replay code.
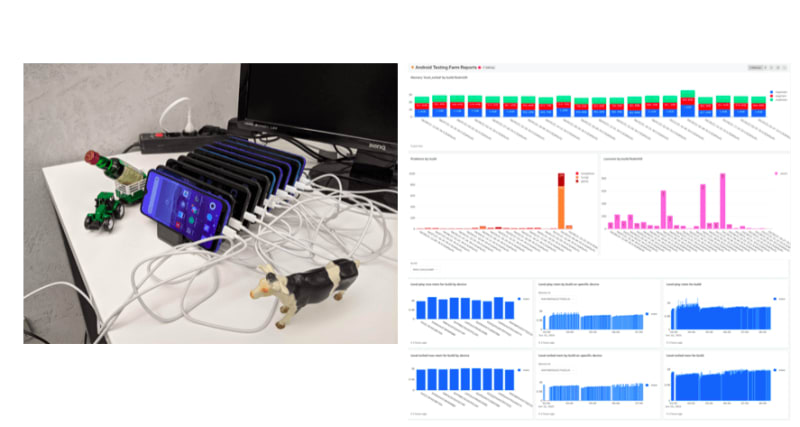
Replays allowed us to predictably repeat errors from the Android test farm. In short, every night we start all our levels on ten devices, and bug reports come into Slack. We can:
- Watch replays with errors
- Understand what happened
- Fix everything quickly
Disconnecting visuals from the simulation logic
As soon as we managed to separate everything correctly, we were able to do a fair rewind of the simulation to receive rewards at the end of the level and introduce a quick check of the levels by a bot.
All Match-3 players know there is a certain sequence of actions that happens after passing a level, which you want to skip: bombs explode, rewards are obtained, points are awarded, and so on.
public void SkipM3Rewarding(UIM3 ui) {
    DetachUIFromModel(ui);

    while(!m3.IsIdle())
      m3.Tick();

    AttachUIToModel(ui);
  }
Here, we disconnect from the UI, tick until the simulation becomes idle, and then reconnect to it.
Please note: after our main character, Jane, appears, all the “fireworks” are skipped, but at the same time everything is legitimately played out in the simulation, all coins are accurately counted, and then awarded. Instantly.
Checking levels using a bot
Our changes allowed us to make a quick bot for conducting basic reviews of the game designers’ work. This is how it looks in the editor:
Let’s say a game designer is creating a new level and wants to test how it runs. To do this, they run a special bot which checks, using several dozen various seeds, if the level is beatable based on its heuristics. At the end of the bot’s execution, they can see the run’s statistics with various graphs.
Conclusion
Implementing a deterministic simulation, custom logic scripting, and separating the simulation from the visuals carries with it great benefits. The bad part of the process was that we had to get used to it all — doing this requires a certain level of “breaking patterns” as well as discipline, but it all pays off in the end.
In the future, we plan to use this scheme in new titles where rather complex interactions are required. But for small projects like hyper-casual games, such labor costs would be redundant.

Top comments (0)