After that small talk, in this post let's use some git commands.
Additional Info:-
For complete list of commands, refer this.
Refer this Visual Git Cheat Sheet.
Refer this for some detailed information.
Refer this for commonly used commands.
Git Client that i really like are Fork and Tower. Free are SourceTree and Github Desktop
I have git setup already on my station.
When we work with git, files will be moved into 4 different steps on your laptop/PC before moving to 5th step which is upstream repo on the cloud.
-
Stash
this is like files will be moved as draft copy, which is on stand by with
git stash push -
Workspace
this is the actual place where you add/update your files, and these are not yet tracked by git
-
Staged area or Index area
this is the place where all your files reside when they are ready for version control after you say
git add . -
Local repository
once committed with
git commit -m "<msg>", this is the place where your files reside and have a version name and control. From here they can be moved to Upstream Repository (github account in the cloud)
So, i have this fresh directory(0 bytes), and when you enter
git status
gives the status of files
you get an error saying This is not a git repo.
So you need to setup every working directory to maintain different versions.
Initialization
After git init,
the directory gets initialized, and
git status Now says there are no commits made yet.
Though the directory looks empty, its size has increased from 0 to X bytes. So what changed ? git init will create a hidden folder .git, which tracks all the changes to this directory. It looks like this, if you see the hidden folder.
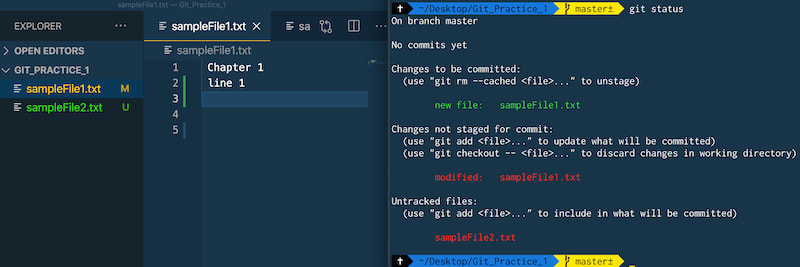
Now i have added 1 text file and added 1 statement to it. When i say git status it will still say No commits yet, but is tracking the files.
Moving to Staging area
git add .
this will move all the files to the staging area
If you have more than 1 file, but you want to add only 1 file to the staging area, then use
git add <file/folder name>
this will move specific file/folder name to the staging area (also called Index area)
Moving to Local repo
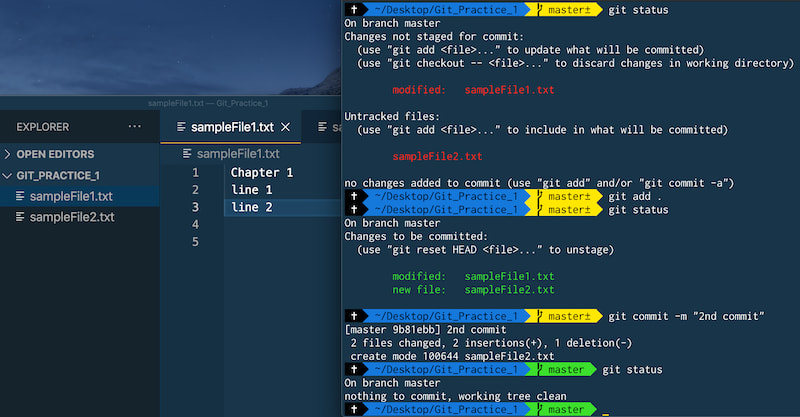
git commit -m <commit message>
this will commit all the files from staging area to the local repository. Your saving point in the history, which you can comeback to at a later point. In previous post , its like going to be version history, like Earth.
update, stage, commit
Updating both the files and adding to the staging area and then committing to local repo
Moving to Upstream repo
To move the files from your local PC to your github account, there should be a link established between the two. Create a repository in your github account.
If you have cloned the repository, there is git already initialized and already a link established. Check by git remote -v
To establish link between Local PC and Github repo
git remote add origin <https://github.com/username/repo-name.git>
It will now add your github repo as the origin from which you can push your changes and pull updates to your local PC.
to Push updates to your Upstream repo
git push -u origin <branch name>
originis your upstream repo from where you can fetch/push
branch namehere it is master
Head, Branch and Merge
Till now you have a stable code.
Now you want to build a new feature, but do not want to disturb your stable code, and work from a different copy.
So for that, You can create a branch, which will have all the old code and you can start creating the new feature on top of it. Once you think your feature is working properly, you can merge your new code with old code. Suppose if your new code is not working properly or at a later point you think it will not be useful, you can delete the branch without having to worry about loosing your old code.
Just like a Tree having a Trunk which is the main/master branch, and there are side branches which are coming out of the Master branch at different places,
in git, you can create new side branches from existing code (from Master/any branch), make updates, the only difference from actual tree is that, you can merge your new updates to master/any branch.
Head is how the git knows on which branch you are on currently.
Detached Head is like if you move from current state to a older commit like Commit 1, you are in detached head state. This can be done by git checkout <commitCode>. commit code can be found using git logging commands.
To view the list of branches, run
git branch
it will list all the branches on your local repo
git branch -a
this will list all the branches from local repo and remote repo
To create a new branch, git branch <branch-name>
At this point, your Head will still be at master branch, as you have only created but not moved.
to move, git checkout <branch-name>
Creating and moving your Head to new branch can be done with single command
git checkout -b <branch-name>
Let us create a new branch named feature-1

Lets update few lines, add to stage and commit.
All the updates are commited in your new feature-1 branch.
Now, if you switch to your Master branch, you will not see any of the updates made in your feature-1 branch. So both branches are being maintained separately.
Now you feel that feature-1 updates working properly and you want to include in to your Master branch, so for that you need to merge.
git merge <branch-name>
merges all updates from your branch-name into your Head
Lets say you now at feature-1 branch (and there are no changes to your Master branch since your new branch creation)
when you say git merge master - tool says Already up to date. because your Head is at feature-1, and all the updates from your master branch are already in your feature-1 branch
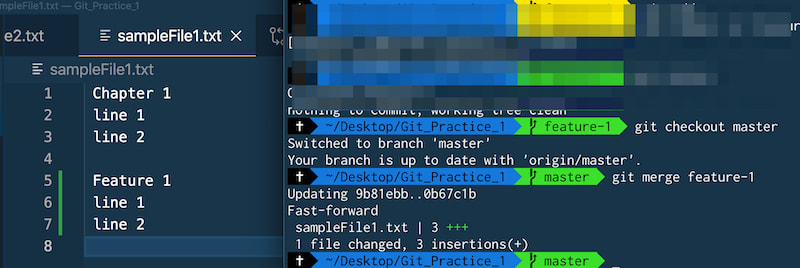
change your head to master by git checkout master and say git merge feature-1
Push to upstream
Now you can push your main branch updates to upstream
git push origin
You can even push your new branch to upstream
git push -u origin <branch-name>
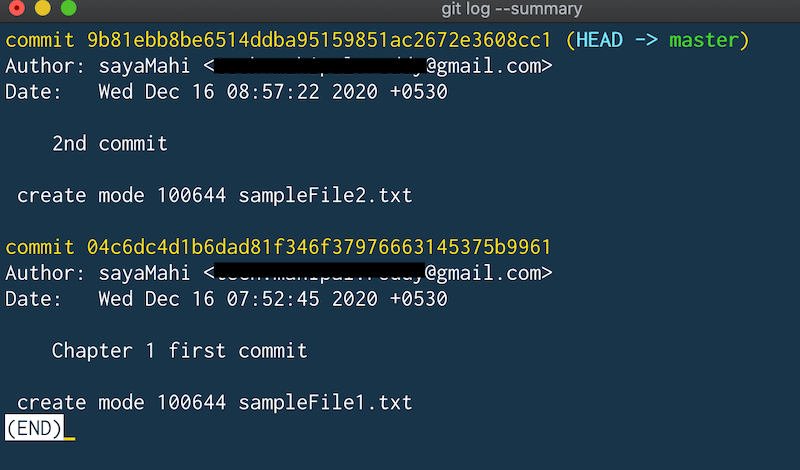
Log
To view changes
git log
git log --summary
git log --oneline
Conflicts
When you are merging 2 files with same filenames, and if there is code/text on the same line numbers on both the files, then there will be conflict and merge will not happen right away.
We can discuss on conflicts and others commands in a different post.


Top comments (0)