Since I'm building a hybrid systems/networking lab, one of the key features I'll need is a serial console server to administer the lab switches. There are a few options here:
- Find an old Cisco Router and some async octal cables (Rare, takes up rack space)
- Purchase a serial console server like MRV, Perle, Internetwatchdogs, etc ($$$)
- Build a RPi as the console server (current solution, consumes 1 outlet)
- Build a VM, and connect the USB-to-Serial Adapter
The last one is interesting, here's why. I have an ansible server that I intend to use for most patching/administration tasks, and to trial out certain aspects of network automation, and ansible lists a very interesting feature, proxies:
https://docs.ansible.com/ansible/latest/user_guide/playbooks_environment.html
I could plausibly list the ansible VM's loopback address as a proxy, allowing me to use it to automate early-stage network provisioning without network connectivity. I know it's a petty thing to want to automate, but that particular aspect of network devices provisioning is pretty tedious, you have to:
- Upgrade to your baselined code revision
- Configure basic networking
- Download baseline config, and then customize it
- Restart to new config
1 is a pretty slow task, and I'd like to automate it - it'd be great to let ansible babysit switches while they provision instead of having to be right there building on it the entire time. These are pretty simple tasks for most route-switch platforms - typically only requiring a binary copy and a reboot or two.
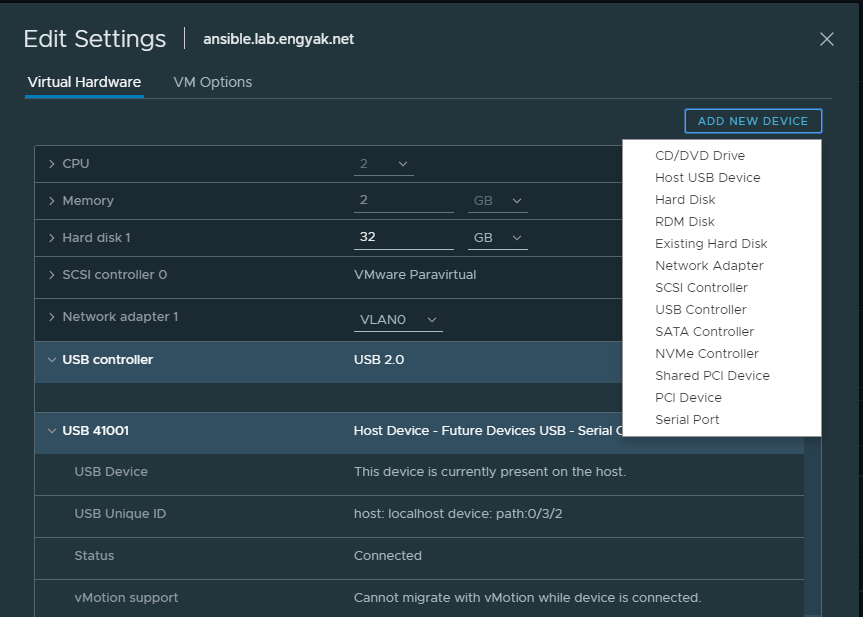
Anyhow, let's get down to configuring the basics. I'm performing this from the vCenter 6.7 GUI, so YMMV on user interfaces. All you have to do is plug in your USB-to-Serial adapter, and then add it to the VM as a "Host USB Device." I'd recommend FTDI-type adapters, they don't typically require any driver install to work on either ESXi or Linux.
Now, let's see if they show up:
ansible:~ # ls /dev/ttyU*/dev/ttyUSB0 /dev/ttyUSB1 /dev/ttyUSB2 /dev/ttyUSB3
We're all set! I typically use screen as a direct console emulator, but they all more or less do the same thing. At this point we're really just trying to test the console ports to see if they work:
ansible:~ # screen /dev/ttyUSB0 --- System Configuration Dialog ---Would you like to enter the initial configuration dialog? [yes/no]:ansible:~ # screen /dev/ttyUSB1User Access VerificationUsername:ansible:~ # screen /dev/ttyUSB2Would you like to terminate autoinstall? [yes]: yesansible:~ # screen /dev/ttyUSB3Switch>ansible:~ # killall screen
Looks like we're fully functional on all serial ports - I have 3 unprovisioned WS-C3560-24-TS-E for future lab use. The last commmand was to ensure that the proxy software wouldn't have to compete with screen for ownership of a serial device.
We'll be installing ser2net next - it only supports telnet, but you can tunnel SSH in a prod environment. Honestly, if you want this in your work environment it'd be much better to use a dedicated console server - 48 ports will net you less than a Dell R430, and can connect to phone lines. They're worth it.
ansible:~ # zypper in ser2netLoading repository data...Reading installed packages...Resolving package dependencies...The following NEW package is going to be installed: ser2net1 new package to install.Overall download size: 92.3 KiB. Already cached: 0 B. After the operation, additional 200.1 KiB will be used.Continue? [y/n/...? shows all options] (y): yRetrieving package ser2net-3.5-2.2.x86_64 (1/1), 92.3 KiB (200.1 KiB unpacked)Retrieving: ser2net-3.5-2.2.x86_64.rpm ...........................................................................[done]Checking for file conflicts: ----------------------------------------------------------------------------------------[done](1/1) Installing: ser2net-3.5-2.2.x86_64 ----------------------------------------------------------------------------[done]
Then we create a config file:
# ::::10000:telnet:3600:/dev/ttyUSB0:960010001:telnet:3600:/dev/ttyUSB1:960010002:telnet:3600:/dev/ttyUSB2:960010003:telnet:3600:/dev/ttyUSB3:9600BANNER:banner:SERIAL EMULATED PORT \p\r\nBANNER:banner1:TCP port \p device \d\r\nBANNER:banner2:TCP port \p device \d\r\nBANNER:banner3:TCP port \p device \d serial parms \s\r\nTRACEFILE:tw1:/tmp/tw-\p-\Y-\M-\D-\H:\i:\s.\UTRACEFILE:tr1:/tmp/tr-\p-\Y-\M-\D-\H:\i:\s.\UOPENSTR:open1:Open str\r\nCLOSEON:closehtml:
Default value settings. The given values are the defaults. For non
boolean values the possible values are given above.
** serial device and SOL **
speed: standard speeds shown above
DEFAULT:speed:9600
databits: 5,6,7,8
DEFAULT:nobreak:false
** serial device only **
DEFAULT:databits:8
stopbits: 1,2
DEFAULT:stopbits:1
parity: none, even, odd
DEFAULT:parity:none
DEFAULT:xonxoff:false
DEFAULT:local:false
DEFAULT:hangup_when_done:false
DEFAULT:kickolduser:false
And we're set! Systemd will automatically start ser2net with the VM.

Latest comments (0)