
As banking technology advances, secure real-time communication is becoming increasingly crucial to any modern banking application. It's essential to provide the technology experiences customers expect while protecting their privacy and data.
In this tutorial, we will walk through how to create a full, end-to-end encrypted chatbot solution using Stream Chat combined with Dialogflow using Virgil Security for encryption. Combining these services allows developers to create a modern chatbot experience while keeping sensitive information encrypted. The application embeds Virgil Security's eThree Kit with Stream Chat React's components The react app communicates with a backend that uses Stream's webhook integration and Dialogflow to respond to the user. All source code for this application is available on GitHub.
Stream Chat, Virgil, and Dialogflow make it easy to build a solution with excellent security with all the features you expect.
Note: The original GitHub repo can be found here.
What Is End-To-End Encryption?
End-to-end encryption means that they can only read messages sent between two people. To do this, the message is encrypted before it leaves a user's device and can only be decrypted by the intended recipient.
Virgil Security is a vendor that will enable us to create end-to-end encryption via public/private key technology. Virgil provides a platform and JavaScript SDK that will enable us to create, store, and offer robust end-to-end secure encryption.
During this tutorial, we will create a Stream Chat app that uses Virgil's encryption to prevent anyone except the intended parties from reading messages. No one in your company, nor any cloud provider you use, can read these messages. Even if a malicious person gained access to the database containing the messages, all they would see is encrypted text, called ciphertext.
Building the Chatbot
To build this application, we're going to rely on a few libraries, Stream React Chat, Virgil SDK, Virgil Crypto, and Google Dialogflow. Our final product will encrypt text in the browser before sending a message to Stream Chat. The encrypted message will be relayed to our backend via Stream's webhooks. Decryption and verification will happen on the backend before passing it to Dialogflow for interpretation. Once an intent has been determined, the backend performs any necessary actions, encrypts the response, and relays it via a Stream channel.
Our chatbot will have 3 intents a user can perform, with 1 fallback in case we don't understand what is said. These are a greeting, check balances, and transfer money between accounts. Once we're done we'll have a chatbot that's capable of this:

To accomplish this, the app performs the following process:
- A user authenticates with your backend.
- The user's app requests a Stream auth token and api key from the backend. The browser creates a Stream Chat Client for that user.
- The user's app requests a Virgil auth token from the backend and registers with Virgil. This generates their private and public key. The private key is stored locally, and the public key is stored in Virgil.
- The user joins a Stream Chat Channel with the chatbot.
- The browser app asks Virgil for chatbot's public key.
- The user types a message and sends it to stream. Before sending, the app passes the chatbot's public key to Virgil to encrypt the message. The message is relayed through Stream Chat to the backend via a webhook. Stream receives ciphertext, meaning they can never see the original message.
- When the backend receives the message, the app decrypts the message using the Virgil. Virgil verifies the message is authentic by using the sender's public key.
- The backend passes the decrypted text to Dialogflow to determine the user's intent. Dialogflow returns a result that contains the information necessary for the backend to decide how to respond.
- The backend receives the Diagflow response, decides what action to take, and creates the response text.
- Using Virgil, the backend encrypts the response text and responds to the user via the Stream Chat Channel. The client decrypts the message.
This looks intimidating, but luckily Stream, Virgil, and Dialogflow do the heavy lifting for us. As a developer using these services, our responsibility is to wire them together correctly.
The code is split between the React frontend contained in the frontend folder, and the Express (Node.js) backend is found in the backend folder. See the README.md in each folder to see installing and running instructions. If you'd like to follow along with running code, make sure you get both the backend and frontend running before continuing.
Let's walk through and look at the necessary code needed for each step.
Prerequisites
Basic knowledge of React and Node.js is required to follow this tutorial. This code is intended to run locally on your machine.
You will need an account with Stream, Virgil, and Google Dialogflow. Dialogflow is a little tricky, so follow the instructions found in their nodejs library and how to authenticate with Google's cloud APIs Once you've created your accounts, place your credentials in backend/.env. You can use backend/.env.example as a reference for what credentials are required.
This tutorial uses the following package versions:
- Node 11.14.0
- Yarn 1.17.0
- Stream Chat 0.13.3
- Stream Chat React 0.6.26
- Virgil Crypto 3.2.0
- Virgil SDK 5.3.0
- Virgil e3Kit 0.5.3
- Dialogflow 0.12.2
- Express 4.17.1
Except for node and yarn, all of these dependencies are declared in backend/package.json and frontend/package.json.
Step 1.1 Set up Dialogflow
For our chatbot to respond correctly, we need to set up a few intents and one entity in our Dialogflow:
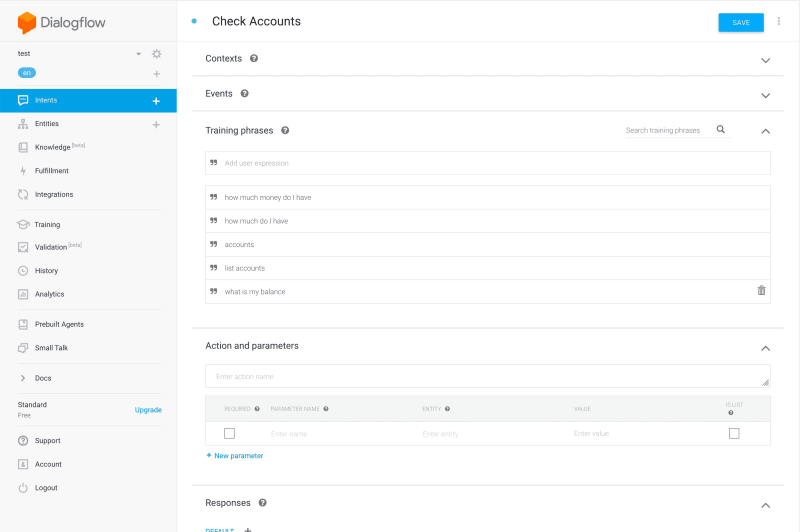
- Add a "Check Accounts" intent. Click on "Intents" in the nav, and click "Create Intent". For this intent, all we need is a few training phrases that indicate what sort of phrase means the user wants to check their account balances. Make sure to add some responses in the "Responses" section. This intent should look something like this:
- Add a "Transfer" entity. Click on "Entities" in the nav, and click "Create Entity". Name it "transfer" and create two synonyms, "checking to savings" and "savings to checking". This is a straightforward intent used for demonstration purposes only. Be sure to read up on how to create more sophisticated entities:
![]()
- Now add a "Transfer Money" intent. This one is a bit more complex, as it'll need some parameters identified to work correctly. Add two training phrases, "transfer 300 dollars from savings to checking" and "transfer 300 dollars from checking to savings". Dialogflow should automatically detect the currency entity "300 dollars" and add that parameter. Highlight the transfer words in each phrase (for example, "savings to checking") and set the entity type to "transfer". Make sure to add whatever response you'd like. Your final result should look like this:
![]()
If you're set up correctly you should see these four intents in your Dialogflow console:

Step 1.2 Set up Stream Webhooks
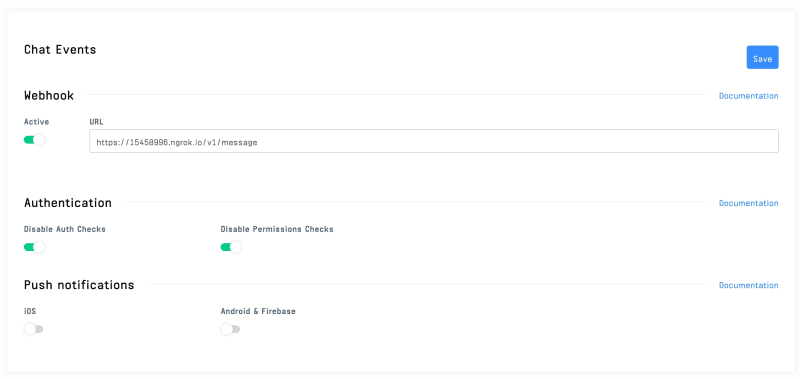
For us to monitor and respond to a user's chat message, we need to hook into Stream via webhooks. From your Stream dashboard, navigate to Chat -> Chat overview and look for the "Chat events" section. Switch the webhook to active and add the URL for your server. For local development, you can use a service like ngrok to make your localhost routable online. The path we'll use is /v1/message to handle all Stream events. For convenience, we'll turn off auth/permission checks. In a production environment, make sure you don't bypass these and implement the necessary code to secure your Stream account. Your webhook should look like this with your, ngrok, or otherwise, URL instead of the ngrok URL.
We'll look at the implementation of /v1/message in Step 9.
Step 2. Set up the Backend to Allow User to Get Credentials
For our React frontend to interact with Stream and Virgil, the application provides three endpoints:
-
POST /v1/authenticate: This endpoint generates an auth token that allows the React frontend to communicate with/v1/stream-credentialsand/v1/virgil-credentials. To keep things simple, this endpoint allows the client to be any user. The frontend tells the backend whom it wants to authenticate as. In your application, this should be replaced with your API's authentication endpoint. -
POST /v1/stream-credentials: This returns the data required for the React app to establish a session with Stream. In order return this info we need to tell Stream this user exists and ask them to create a valid auth token:
https://gist.github.com/nparsons08/df626bf0470abf25ba1d55ef303fcda7
The response payload has this shape:
https://gist.github.com/nparsons08/e0a6523072375ab997787626b3f997dd
-
apiKeyis the stream account identifier for your Stream instance. Needed to identify what account your frontend is trying to connect with. -
tokenJWT token to authorize the frontend with Stream. -
user: This object contains the data that the frontend needs to connect and render the user's view.-
POST /v1/virgil-credentials: This returns the authentication token used to connect the frontend to Virgil. We use the Virgil Crypto SDK to generate a valid auth token for us:
-
https://gist.github.com/nparsons08/ac995c3549a844790f602cc4ab7d538b
In this case, the frontend only needs the auth token.
Step 3. User Authenticates with the Backend
Now that we have our backend set up and running, it is time to authenticate with the backend. If you're running the application, you'll be presented with a screen like so:

This is a pure React form that takes the provided input, stores it in the state as sender, and uses that information to authenticate against the backend:
https://gist.github.com/nparsons08/651334cf1c904cd197b453fb8f7def1b
Once we have created a sender identity with an auth token, we can connect to Stream and Virgil.
Step 4. User Connects to Stream
Using the credentials from Step 3, we can request Stream credentials from the backend. Using those we connect our frontend client to Stream:
https://gist.github.com/nparsons08/a08e905186ae4ed8e41c02a00992c312
This initializes the StreamChat object from the Stream Chat React library and authenticates a user using the token generated in the backend.
Step 5. User Connects to Virgil
Once again, using the credentials acquired in Step 3 we ask the backend to generate a Virgil auth token. Using this token, we initialize the EThree object from Virgil's e3kit library:
https://gist.github.com/nparsons08/cf840234e69a09483345e1695edbe34a
Step 6. Create Stream Chat Channel
Once we're connected to both Stream and Virgil, we're ready to start chatting with our chatbot. To do this, the client creates a channel between them and the chatbot.
https://gist.github.com/nparsons08/ea1e2524d22053ee791a206ac4939f89
The client we're accessing in the state is the one created in Step 4. Calling .channel will create or join a unique channel based on the identities of the members. Only the user and the chatbot will be allowed in. However, this is not enough to protect Stream or others from viewing those users' messages. Next, we'll use Virgil to encrypt the messages.
Step 7. Lookup Virgil Public Keys
To encrypt a message before sending it through a Stream channel, we need to look up the receiver's public key:
https://gist.github.com/nparsons08/3b7e6c5980f6d43fdcdcbb3cb5eb69f9
The eThree instance in our state is from Step 5. Assuming that the sender's identity is will, this returns an object that looks like:
https://gist.github.com/nparsons08/a7ace3b8843ffb86f659f9de63794068
Since we need to decrypt received our messages for display, and convenience, we ask for both public keys at the same time.
Step 8. Sender Encrypts Message and Sends It via Stream
We have everything we need to send a secure, end-to-end encrypted message via Stream. Time to chat! First, we need to show the user the chat room:
https://gist.github.com/nparsons08/bbd4e6d31986c184aafa0d92677ba622
This renders the Stream React Chat component that creates a great out-of-the-box experience for our users. If you're following along you'll see this:
![]()
Notice the line where we include our custom class MessageInputEncrypted. This component uses the sender's public key from Virgil to encrypt, then wrap, a Stream React MessageInput component before sending the message over the Stream channel:
https://gist.github.com/nparsons08/37f6e50f395954890658e7cc6ba2f402
Now all Stream will see is the ciphertext!
Step 9. The Backend Receives a Webhook from Stream, Sends It to Dialogflow and Responds
Now we can react to the sender's message on the backend, figure out the user's intent via Dialogflow, perform an action if any, and respond. Since Stream sends us every even that happens for our account, we need first to decide if we should take action. We only want to do something when we have a message.new event from any user except for chatbot:
https://gist.github.com/nparsons08/3576a4cdebcd4addc1c46f5202cc54be
Once we have decided this a message to respond to, we need to decrypt the message, interpret it, decide how to respond, encrypt the response, and send it via the chat channel.
https://gist.github.com/nparsons08/b66c9f92acb802b0786be9c223fc7290
To interpret the message, we use the Dialogflow setup configured in Step 1.1. We decrypt the user's message and send the decrypted message to Dialogflow:
https://gist.github.com/nparsons08/5f195789c6fbe62d15e0f1d4530b0a55
Once we've interpreted the message, we can decide how to respond and what actions to take. In this simple app, we have two explicit actions we care about, "Check Accounts" and "Transfer Money". Otherwise, we fallback to the fullfillmentText configured in Dialogflow. This will either be from the Default Welcome Intent or Default Fallback Intent intents.
In the case of "Check Accounts", we look up the user's account balances and respond. For "Transfer Money", we determine the direction, perform the balance transfer then respond:
https://gist.github.com/nparsons08/5a2f354c1a016906f514cf41ee74b5a8
That's it for the server. Even in this constrained example, you can see the power that Stream, Virgil, and Dialogflow give you when building a secure chatbot.
Step 10. Decrypt the response message on the client
Finally, we can display the servers. To decrypt the message, we follow a similar pattern to Step 8. If you look at how we create the MessageList you'll see a custom Message component called MessageEncrypted:
https://gist.github.com/nparsons08/5b50700074d26dbc68e876ba275f7c8a
Since we need to provide decryption props to add props for decryption to our custom Message component, we add them to the props passed by the Stream React:
https://gist.github.com/nparsons08/388c7e73ad50244a91d8adf79d03b538
Once we have the props we need, we can decrypt each message:
https://gist.github.com/nparsons08/34aa50705e8eea9d862e8dcbe77c1007
This class decrypts the message before rendering the MessageSimple component from Stream Chat React. To do this, we first determine if the message is our message with Stream's .isMyMessage. We then find the correct public key and ask Virgil to decrypt it. Once that's done, we can pass the key along with the rest of the props to the Stream's MessageSimple component.
The _isMounted flag prevents updating the component after the message has been decrypted. This can occur if you're scrolling quickly, or upon page load when there are lots of messages.
Where to Go from Here
This tutorial is intended to get you up and running as fast as possible. Because of this, some critical functionality may be missing from your application. Here are some tips for what to do next with your app.
- Configure a more in-depth chatbot experience. Dialogflow has a ton of functionality, such as context, to build robust chatbot experiences.
- Build real user registration and protect identity registration. This tutorial simplified registration and retrieving valid tokens to interact with Stream and Virgil.
- Backup user's private keys to restore sessions and for multiple devices. Using Virgil's
eThree.backupPrivateKey(pwd)will securely store the private key for restoration on any device.

Latest comments (0)