If you are a software engineer I bet you have already read or heard someone talking about containerization, docker, how it’s beneficial, and why you should start using it for your app.
In this blog, we are going to do an introduction to containerization by defining what a container is and then we will explore Docker with its concepts.
Virtual machine

A VM is the action of relying on software to simulate hardware capacity and create a virtual computer system. This enables running more than one virtual system, multiple OS, and applications on the same server with its OS.
Containers

A container is a lightweight unit that includes all the processes to run an application. It’s similar to a VM with one exception the container doesn’t need its guest OS it relates to the Host OS which makes it lightweight and easy to run. A container is isolated from all the processes running on the host machine, meaning it can’t communicate with anything if you don’t authorize it explicitly.
How to create a container?

- Manifest: define the libs your app needs and all the steps to create your image.
- Image: It represents your app with all the dependencies and the libs it needs to run.
- Container: it’s your app running.
Even though we will focus on Docker for this article, I wanted to mention that there are more container creation and management tools such as Podman, Rkt, and so on.
Introduction to Docker
It’s an open platform that enables the creation and deployment of apps using containerization, in the short term it’s a container runtime. According to your OS, you can check the docker documentation to know how to install it, since I’m using Windows I have to download docker desktop.
In the first part, we have mentioned that to create a container we need a manifest that will describe the steps and libs, in the docker world that manifest is called a DockerFile.
Dockerfile
It’s a text document that contains all the commands a user could call to assemble an image. Let’s check an example of a Dockerfile for a nodejs app in this case it will be a NestJS app and then explain each part.
FROM node:17.4.0-alpine3.14

ENV NODE_ENV=production
ENV PORT=3000

WORKDIR /user/src/app

COPY package*.json ./

RUN npm install --production

COPY . .

RUN npm run build

EXPOSE $PORT

CMD ["node", "dist/main.js"]
- FROM: is used to specify the image base
- ENV: is used to specify environment variables that can be used by instructions or inside the container.
- WORKDIR: specifies the working directory which means all the following instructions will take place inside that directory.
- COPY: is used to copy files from a source to the destination here we copy the package.json and lock files to the working directory.
- RUN: is used to run commands inside the container, here we install all the dependencies for the project.
- COPY: another copy, here we copy the source code of the app to the container working directory. The .dockerignore file comes to play since we don’t wank to copy some files (node_modules, Dockerfile) to the container.
- EXPOSE: is used to specify to docker that the container is listening on a specific PORT which is 3000.
- CMD: specifies the default command to be executed when a container based on that image is run.
As part of the process, we have to create a .dockerignore file, it works like the files you are already familiar with like the .gitignore for git or the .npmignore. Create a new file at the root of the project and put the content below:
node_modules

.gitignore
.vscode

Dockerfile

package-lock.json
yarn.lock
The content is similar to what you might add to your .gitignore file. In the next part of the article, we will learn when this file comes into play.
Docker image
Once your Dockerfile is ready, you can create an image using the command below.
docker image build -t docker-example .
- t: represents the tag for your image. You can check the list of your images by using the command below:
docker image ls

Container
Since we have a Dockerfile that has been used to build an image we can now use the image to run a container by using the command below:
docker run --rm -p 3002:3000 --name dockerexamplecontainer docker-example
- docker run: This command runs a Docker container based on a Docker image.
- --rm: This flag tells Docker to automatically remove the container once it stops running. This is useful for temporary containers that are only needed for a single run, as it helps avoid cluttering your system with unused containers.
- -p 3002:3000: This flag maps port 3000 inside the container to port 3002 on the host machine. It allows you to access services running inside the container via port 3002 on your localhost.
- --name dockerexamplecontainer: This flag assigns a name (dockerexamplecontainer) to the container. Naming containers can make them easier to manage and reference in other Docker commands. The last parameter is the image name.
You can check the list of all containers even those stopped with the command:
docker ps -a
check only containers currently running:
![]()
and access your app through localhost:3002

It’s possible to do some action to a container such as:
Stop
docker container stop dockerexamplecontainer
Pause
docker container pause dockerexamplecontainer
Remove
docker container rm dockerexamplecontainer
A container should be stopped before trying to remove it but you can also force the action by adding a flag:
docker container rm -f dockerexamplecontainer
Registry
So far we have learned how to create a Dockerfile, build an image, and then run a container based on that image. Images can also be shared you can build your image and share it with your teammates or anyone else so they don’t have to do the whole process on their own, you can also use images built by other people. Imagine you want to run a MySQL database inside a docker container you are not going to create a Dockerfile and then build the image by yourself instead you will have an image provided by the official MySQL Team.
That’s where the notion of registry comes into play, a registry is a place on the internet where you can store your images to make them accessible to everyone or a place where you can get images from other people.
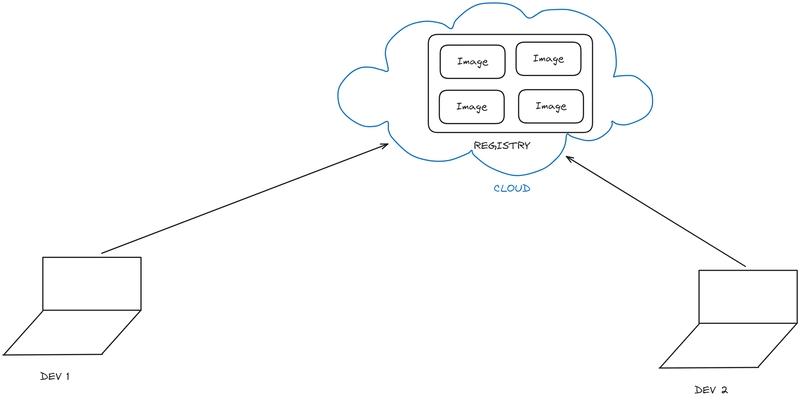
There are a lot of docker-compatible registries almost every cloud provider has its registry but for this article, we will use the docker registry called docker hub. Go to the website create a new account and sign in then you can push or pull images.
- How to pull an image from docker-hub?
docker login
You will be asked to enter your credentials
docker pull MySQL

The command above will pull the latest version of the image but you can also specify if you want a specific version
docker pull mysql:8.0
Then you can run MySQL inside a container by using:
docker run --name mysql-container -e MYSQL_ROOT_PASSWORD=my-secret-pw -d MySQL
Now you have a MySQL container and didn’t build the image alone.
- How to push my image to the registry? For each image, you have to create a repository, and inside a repository, you can store multiple versions of your images you have to change the tag (version).
A repository can be private or public.
docker tag dockerexample mariusniemet/dockerexample:1
We have three params, your docker hub username, the repository name, and the version.
docker push mariusniemet/dockerexample:1

Now your image is available on docker-hub.

Network
From now we have a NestJS app running inside a container, and a MySQL database running inside another container and we want to connect the app to the database. We will face an issue, remember we mentioned earlier in this article that containers are isolated processes they can’t communicate with each other and to do that we have to create a network.
Container networking refers to the ability of containers to connect to and communicate with each other.

Each container has a DNS resolver, each time they want to communicate a container will first check if it knows which IP address is linked to that given container name if it already knows it will communicate with the container if it doesn’t know it will ask the docker DNS then communicate with the container.
- How to create a network?
Docker allows you to create different types of networks for this article we will create the bridge which is the type by default.
docker network create networkexample
Check your docker network list with
docker network ls
![]()
- Remove a network
docker network rm networexample
- Run a container by specifying the network
docker run --name mysql-container -e MYSQL_ROOT_PASSWORD=my-secret-pw -d --network=networkexample MySQL
or connect a running container to the network
docker network connect networkexample 1cd04c0cbfc9
The last parameter is the containerId you want to connect to the network.
With these commands, you can connect the NestJS app with the Mysql database since they now belong to the same network.
Run the command below to display containers that are connected to the network.
docker network inspect networkexample

Volume
From now we have the NestJS app connected to the database, we can perform our basic CRUD operations and data will be stored in the database. Still, there is a last issue cause if we stop the database container and then run it we will notice that all the data have been lost that’s because containers and their data are volatile if you want to persist them you have to create something called volume.
Docker allows you to create bin mounts or managed volume, in this article we will use managed volume.
Volumes are the preferred mechanism for persisting data generated by and used by Docker containers. While bind mounts are dependent on the directory structure and OS of the host machine, volumes are completely managed by Docker.

- How to create a volume?
docker volume create mysql-data
The last parameter is the volume name
- How to check the volume list?
docker volume ls
- How to remove a volume?
docker volume rm mysql-data
- How to link a container to the volume?
docker run --name mysql-container-v mysql-data:/var/lib/mysql mysql
The params are:
- the container name
- the volume name
- the path in the container
- the image name
Now if you stop and run the container your data will be persisted.
Conclusion
This article wanted to be a brief and gentle introduction to the container and docker world, there is a lot more to learn so don’t hesitate to check the docker documentation.
I hope you enjoy this article as much as I enjoyed writing it.

Top comments (0)