
In this tutorial, we will learn how to integrate payment gateway in Spring Boot using Stripe in our demo e-commerce app
Introduction
Checkout is an important feature for an e-commerce app that allows user to make the payment for an order. We will be using the Stripe payment gateway for our app.
We will first develop the back-end API using Java & Spring Boot (in this tutorial). After the API has been created, we will use that API in our Vue.Js front-end(in future tutorials).
Live Demo
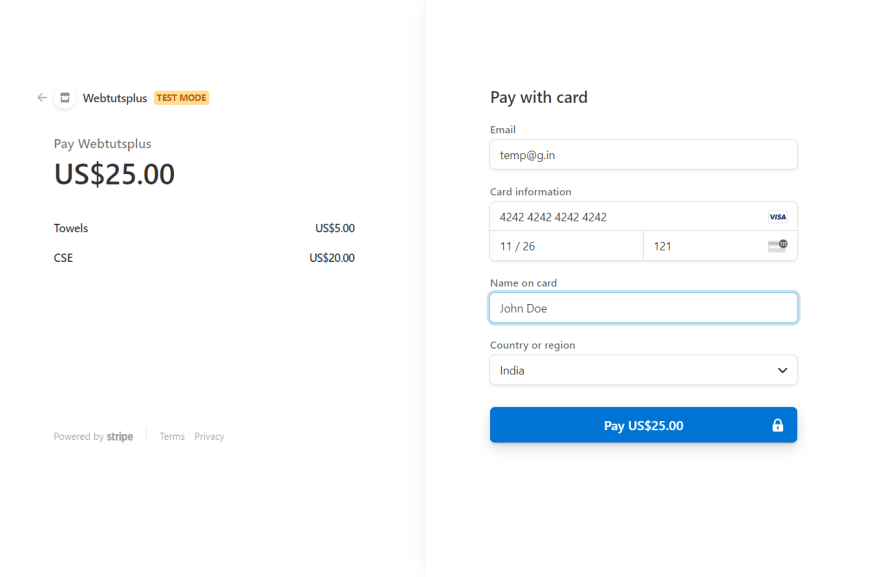
You can use this link to check out the frontend of the payment gateway.
Use dummy card number 4242 4242 4242 4242 to checkout stripe and you can use anything else for other fields
You can test the API at the following link. Run the code in your local first and then navigate to this link and there in the order-controller you will find the POST method /order/create-checkout-session/.
You can find the complete code at Github.
End Result of What We Are Building

Pre-requisites:
Knowledge of Java & Spring Boot framework
Java Development Kit (JDK)
IntelliJ IDEA Ultimate — open-source (Recommended)
A good browser (Chrome — recommended)
Project Structure

API Design

Creating checkout session (POST)
In the body of the POST method, we will have to send an array of items in the cart. Each item will have price, productId, productName, quantity, userId.
Hence the post body should look like this:


Stripe
In this tutorial, we will be using Stripe.js for creating payment gateway.
First of all, we need our own Stripe test API key. So go ahead and create an account on stripe and then from the dashboard get the API key for testing purposes. Store that key in application.properties file as
STRIPE_SECRET_KEY= YOUR_KEY
Also in the same file store the baseURL (frontend URL) we will be using to let Stripe know that the cart items will be received from this URL.
baseURL=http://localhost:8081/
The flow of the tutorial
Building the DTO
Implementing the controller class
Implementing the service class
Let’s Code
Now we will begin to code.
DTO (Data Transfer Object)
Now, let’s discuss the DTO design. So, refer to the project structure and to create a dto, create a Java class named CheckoutItemDto. We will use this dto for providing the products to Stripe. In this class we will have five fields:
productName : stores name of a product
quantity: stores the quantity
price: stores the price
productId: stores the id of the product
userId : stores the id of the user
Create a parameterized constructor which accepts these five fields.
Create getter and setter methods for all fields and hence we have a dto ready to be used. Following is the complete code of CheckoutItemDto.java
Controller
In the controller, the package, create an Order controller named OrderController.java . This controller will be used for building the backend API for the payment gateway. Also, we need an instance of OrderService class from the service package.
In the OrderService class, we will define the business logic for integrating the payment gateway. This controller class is used for handling the POST request and accepting the request body (i.e. the items from the cart). So the request body will be a list of the type CheckoutItemDto Here is the implementation of the POST method.
We call the createSession method in OrderService class which will take the CheckoutItemDto list as a parameter. Then we store the session object created, through which we get the sessionId using the inbuilt getId() method. The sessionId received we store in StripeResponse class.
And finally, we return this response which we will receive in our frontend part.
Service
Now let’s implement the OrderService we used in our order controller.
We annotate this class with Service and Transactional annotation.
@Service
@Transactional
public class OrderService {

}
We mark beans with @Serviceto indicate that it’s holding the business logic. By using Transactional annotation transaction propagation is handled automatically.
We will create methods
createSession : for creating the session id
createSessionLineItem : for setting the quantity of a particular product
createPriceData : for setting the currency and the individual product name
We need to provide details as product name, quantity, and price to Stripe API, hence we need these functions.
createPriceData
This function will return a SessionCreateParams.LineItem.PriceData object containing the currency and name of the product. This function will receive an object of CheckoutBodyDto which contains the details of the product.
It ensures the minimum quantity the customer must purchase for the Checkout Session. Using setCurrency we set the required currency which should three-letter ISO currency code, in lowercase and must be a supported currency. Then we set the UnitAmount by passing a non-negative integer representing how much to charge. Now since Stripe sets the default price of the product in cents and we know that cent is 1/100th of a basic monetary unit, that’ why need to multiply the product price by 100 to get the price in USD.
Using the setProductData the method we help to know Stripe the name of the product we want to purchase. The product’s name is meant to be displayable to the customer. Whenever this product is sold via a subscription, the name will show up on associated invoice line item descriptions.
createSessionLineItem
This function will return an object containing the quantity and price of a particular product. It will receive an object of CheckoutItemDto which contains the details of the product.
Now using setPriceData which will call the createPriceData we implemented earlier we set the price of the product in the provided currency. We set the quantity using setQuantity a method that requires a value of Long datatype.
createSession
This is the function wherein we create the session id for a particular payment session. Now this method is called in OrderController as we saw above and it receives the List of all cart items to be purchased.
First of all, we set up a few required variables we will require in this function.
So in the OrderService the class which we are working in create two variables baseURL and apiKey which we will be obtained from the application.properties we created in the beginning.@Value annotation is used to assign values from Spring boot environment variables i.e.from application.properties to the variables, we want to use.
@Value("${baseURL}")
private String baseURL;

@Value("${STRIPE_SECRET_KEY}")
private String apiKey;
Now since we used earlier above two methods for setting the price and quantity of only one product.
You may be wondering that what if we have more than one item in the cart.
That is why we will loop in the CheckoutItemDto list and each time we iterate we call the createSessionLineItem method to which we will pass the current checkout item from the list.
Since the createSessionLineItem method returns a SessionCreateParams.LineItem object we will store each object received from the createSessionLineItem function in a list of called sessionItemsList of type SessionCreateParams.LineItem.
For example, we have added three products in the checkout which you can see below.

Till here we have let Stripe know the price and quantity of each product the user wants to order. Now comes the part of creating a session_id for the payment. So for this, we require few basic things.
we will set the payment mode as Cart Payment
We will set the success URL .i.e if the payment is successful then we will redirect the user to the payment/success page which we will implement in the Vuejs frontend tutorial.
If the payment is not successful then we will redirect the user to the payment/failed page.
Then using the addAllLineItem method we pass the list of the details of all the products we store in the list named sessionItemsList
Finally, we return a Session object using the create method which accepts the SessionCreateParams object we defined above.
Congratulations!!!
You have successfully created the backend part of the payment gateway using Stripe and Java. Now in the next tutorial, we will create the frontend part for the same, and then we will accomplish integrating the payment gateway for our e-commerce app.
Next steps
We will publish the Vue.js frontend tutorial for the checkout and show order history for users in future.

Top comments (0)