When collaborating on a Git repository, one common challenge is the unintentional presence of multiple lock files, like yarn.lock and package-lock.json, leading to inconsistencies in dependency management. Developers may unknowingly generate these files when adding new packages, and occasionally, we might copy an installation command that utilizes a package manager different from the one used in our project. While we will spot these issues later when opening a pull request or during code review, I believe it would be more beneficial to catch them earlier, right in our local repositories. Detecting these discrepancies earlier would save the team's time and effort. And above all that if we can make use of a tool that can remind us about this thing on every commit, then why not?
To address this issue and ensure a seamless development experience, we can utilize Husky, a powerful tool for managing Git hooks. In this article, we will walk you through setting up Husky to automatically prevent multiple lock files from being pushed to your Git repository.
What is Husky?
Husky enables us to manage Git hooks effortlessly. Git hooks are scripts that run automatically at specific points in the Git workflow, such as pre-commit or pre-push. By leveraging Husky, we can enforce actions before committing or pushing code, promoting code quality and preventing potential issues.
Step 1: Install Husky and lint-staged
To begin, install Husky and lint-staged as dev dependencies in your project. lint-staged is another tool that works hand-in-hand with Husky to make sure that the git hooks are run only on the staged files. Actually we don't need lint-staged for our purpose because checking the existence of multiple lock files usually cannot be done by running checks on staged files only as most of the time one of the lock file(old one) never gets staged. But since, we generally use husky to check ESLint and Prettier issues too, I recommend installing lint-staged if you already have ESLint or Prettier configured in your project or if you are thinking of doing it in the future. Please follow this article for more info regarding the standard integration of Husky and lint-staged.
Run the following command in your terminal to install Husky and lint-staged:
yarn install husky lint-staged - save-dev
And to initialize the husky in the project, run:
npx husky install
Step 2: Configure Husky and lint-staged
After Husky installation and initialization, you should have a .husky folder automatically created in your root folder. Next, set up the Git pre-commit hook using Husky and lint-staged. Open the .husky folder and create a file named pre-commit with the following content :
#!/usr/bin/env sh
. "$(dirname -- "$0")/_/husky.sh"

node check-lock-files
npx lint-staged
In this configuration:
- We're setting up a Git pre-commit hook that runs the custom script check-lock-files.js. The script will be responsible for checking the presence of
yarn.lockandpackage-lock.jsonfiles and throwing an error if both are present. - Second command, npx lint-staged looks for lint-staged config file( lint-staged.config.js , which we will talk about later) in root folder and will run on every staged files. For my use case, I've used the following rules (you can use this if you already have typescript, eslint and prettier configured):
module.exports = {
  // This will check Typescript files
  "**/*.(ts|tsx)": () => "yarn tsc --noEmit",

  // This will lint and format TypeScript and JavaScript files
  "**/*.(ts|tsx|js)": (filenames) => [
    `yarn eslint --fix ${filenames.join(" ")}`,
    `yarn prettier --write ${filenames.join(" ")}`,
  ],

  // This will format MarkDown and JSON
  "**/*.(md|json)": (filenames) =>
    `yarn prettier --write ${filenames.join(" ")}`,
};
but as I said earlier, you can configure it as your need and you can take this article as a reference.
Step 3: Create the Custom Script
Now, let's create the custom script check-lock-files. This script will examine the presence of both yarn.lock and package-lock.json files and prevent the commit if both are found. Create a new file named check-lock-files.js in your project's root directory with the following content:
const fs = require("fs");
const lockFiles = ["yarn.lock", "package-lock.json"];
const foundLockFiles = lockFiles.filter((lockFile) => {
  return fs.existsSync(lockFile);
});
if (foundLockFiles.length === 2) {
  console.error(
    "Error: Both yarn.lock and package-lock.json found in the repository.
     Please include only one lock file and try again."
  );
  process.exit(1);
}
Step 4: Make the Script Executable
Ensure the custom script is executable by running the following command:
chmod +x check-lock-files.js
Step 5: Test the Implementation
Create a second lock file - I already have a yarn.lock file so I'm creating an empty package-lock.json file in the root directory of the project. Stage the change using git add package-lock.json or git add . command.
Try committing the change with a test message:
git commit -m "test husky config"
Terminal should now show the following error:
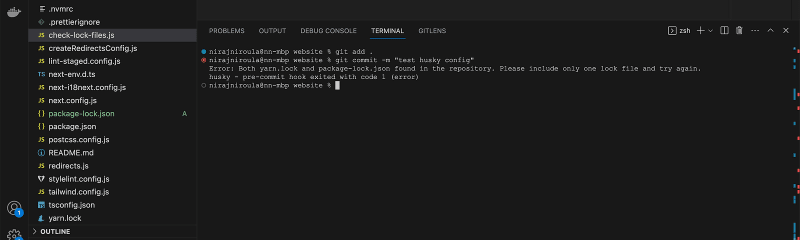
Note: Communicate this Husky configuration with your team, ensuring the configuration is merged and available in the main branch and it propagates to other developers' local repositories when they update their code base, making it consistent across the team.
🎉 Happy coding!

Top comments (0)