Ever since I first mucked around with Istio — a smart service mesh that runs on top of k8s — I was fascinated by its auto-injection feature. Flick the on-switch and Istio gets sprinkled across your existing deployment, giving you fantastic service-mesh powers, without modifying, repackaging or redeploying any of your existing apps in any way.
Demystifying the process a bit, Istio uses a feature of Kubernetes named “Mutating Admission Webhooks”. These are a lot simpler than they may sound. On deployment of a resource, k8s will send any active webhooks a YAML representation of the action being performed. These services can edit the deployment however they require — adding volumes, tweaking environment variables, checking parameters, etc.
Why care? — Because open tracing, that’s why!
What’s OpenTracing?
OpenTracing is an initiative to enable reusable, open source, vendor neutral instrumentation for distributed tracing. In fact OpenTracing itself has become part of a larger project, OpenTelemetry, but that’s for another time.
What’s a trace? A single trace represents the vapour trail left behind by a request after it has hopped around the services in your application. It gives you details about any HTTP requests, database calls, or other spans you may have set up. It can be a useful tool for understanding the shape of your traffic and to spot / debug any bottlenecks across a suite of microservices.
How does this concern webhooks? Well, there’s some small amount of development required to get tracing hooked up in the first place. As the value is somewhat limited unless you instrument all apps in your platform, if you have 10+ microservices this effort can add up quite quickly. Wouldn’t it be great if you could try before you buy by just flicking that switch as you can with Istio.
The rest of the article explains just this feature — for Java apps at least — and how it all hangs together.
Special agents
Amongst the treasures found within the opentracing-contrib project is a Java special agent. By plugging this into our app via the -javaagent JVM flag we can fully enable tracing across any commonly used 3rd party libraries without changing any code or rebuilding the project. The list of instrumented libraries is pretty comprehensive — Jersey, Cassandra drivers, MongoDB drivers to name but a few.
What we’ll do here is automatically plug-in this agent at deployment time using a combination of webhook, init container and tweaking of environment variables to insert the agent.
Auto tracing webhook
The full source is available here, but at it’s simplest the webhook will:
- Check the incoming deployment descriptor for the correct tags (autotrace: enabled). If present it’ll apply steps 2 onward, otherwise it’ll leave everything untouched.
- Add a volume mount into which the opentracing special agent jar will be dropped.
- Add an init container to copy the jar into the shared mount before the application boots.
- Tweak the JAVA_TOOL_OPTIONS environment variable to add the javaagent line for the agent.
Deploying it all
First make sure you have Jaeger running in your default namespace — as simple as:
kubectl apply -f https://raw.githubusercontent.com/jaegertracing/jaeger-kubernetes/master/all-in-one/jaeger-all-in-one-template.yml
[edit]
If you’re using Kubernetes 1.16+ the api changed enough to break the jaeger deployment descriptor above. If you hit an issue try this fixed version instead:
kubectl apply -f https://raw.githubusercontent.com/jaegertracing/jaeger-kubernetes/cc2e03335d8fe88eeef46648cff39151215ca97f/all-in-one/jaeger-all-in-one-template.yml
Next, the webhook itself. The source for which is available here: webhook.yml.
kubectl apply -f https://raw.githubusercontent.com/lucas-matt/auto-tracing-webhook/master/webhook.yml
Lastly make sure you label the target namespace so that the webhook gets activated for any deployment within.
kubectl label namespace default autotrace=enabled
As far as this stage goes, we’re done.
Trying it out
Let’s give the solution a quick run through. We’ll need to demonstrate a request across multiple services to show the tracing working well, end-to-end.
kubectl apply -n <your-namespace> -f https://raw.githubusercontent.com/lucas-matt/pass-the-buck/master/deployment.yml
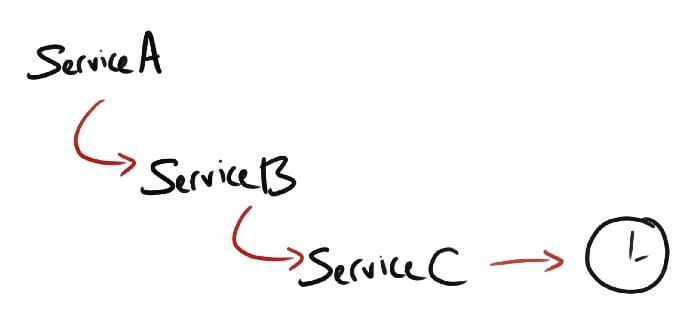
Deployment.yml creates a chain of services A, B and C. A calls B, B calls C and C calls upstream to the world clock API. Each of the services is, by default, a completely trace unaware Spring Boot application.
Each of these services is tagged with the _autotrace: enabled _ label so that our webhook knows to inject instrumentation into the application at deploy time.
spec:
  replicas: 1
  selector:
    matchLabels:
      app: service-a
  template:
    metadata:
      name: service-a
      labels:
        app: service-a
        autotrace: enabled
After port forwarding service-a, all that remains is to make that request.
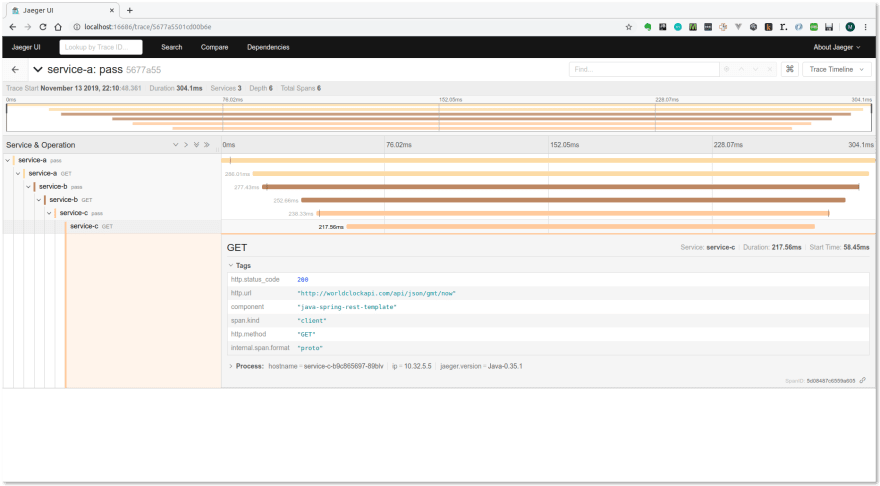
So far so good — we got the time — but the main question, was it traced? Time to check Jaeger:
Success! We can see how the request moves along each service and out onto the open web.
Conclusion
Not a solution I’d use in production in its current state — for one, the untuned startup of an app is degraded whilst the agent scans the classpath for the complete set of libraries into which it can slot itself — but an interesting experiment nonetheless.
If you’re interested in checking out OpenTracing, or even in how to create your own Kubernetes webhook, please take a look at the source repositories for a few examples:


Latest comments (0)