
Hello, In the first article of the series, where I examined the data science software that I decided to be a series and I will support it with applications, the installation of the KNIME application, which is written in Java and built on Eclipse, and which can prepare data science and artificial intelligence applications with workflow-style visual programming, its configuration on widely used GNU/linux systems. and I will review its usage with a machine learning application. I plan to save the application I prepared and share it in a github repo.
KNIME
KNIME Analytics is a data science environment written in Java. This software allows visual programming in the form of a workflow using various nodes and is an application that allows to develop a data mining application even without knowing advanced coding. It has a very diverse and rich plugin center and is used quite often in academia as well. It is an extensible data science platform where user-created scripts and codes can be used as well as visual programming. KNIME is cross-platform software that supports installation on many operating systems. You can click link to download. In this article, I will review KNIME for GNU/Linux distributions only.
Configuration
You can extract the tar.gz archive of the KNIME application to the desired location.
~$ tar xvf knime-analytic-?.?.?.tar.gz -C /opt/knime
All libraries and plugins of KNIME are available in the directory. There is a binary file named Knime and you can start the application using it. But it needs java to work.
JAVA 11
KNIME Analytics works with Java 11 and higher. For this reason, you can install one of the openjdk-11 or openjdk-latest packages for KNIME. Depending on the distribution you use, you can easily download and install these jdks from the main repository.
For example, for RHEL based ones;
~$ sudo dnf/yum install java-11-openjdk # or java-latest-openjdk
Or Debian based ones;
~$ sudo apt install openjdk-11-jdk # or default-jre
Another option I can suggest here is the libertica jdk versions published by Belsoft. These are opensource and freely distributed java jdk versions. You can download and install jdk with many options such as standard and full package. You can find installation scripts or archives on this page for many operating systems. For KNIME Analytics, standard jdk-11-lts is sufficient. For Linux, we need to download the tar.gz package and extract it to a directory. Then the JAVA_HOME and PATH variables are updated and the java installation is completed.
~$ mkdir -p ~/libertica-jdks
~$ tar xvf /path/to/downloaded-jdk.tar.gz -C ~/libertica-jdks/

~$ export JAVA_HOME=~/libertica-jdks/jdk-11.?.?
~$ export PATH=$PATH:JAVA_HOME/bin
## after this
~$ java -version
JDK is available in this session. If you want to use it in this location all the time, you should add the lines exported for JAVA_HOME and PATH to your .bashrc or .zshrc file if you are using zsh.
After the Java installation, it is sufficient to go to the directory where knime is installed and run the ./knime script. If you have more than one jdk installed on your system, you can specifically give the path to jdk-11 with ./knime -v /path/to/jdk-11/bin.
If you want to create a dektop entry for this;
[Desktop Entry]
Type=Application
Name=KNIME Analytic Platform
Description=Data Science Environment
Exec=/path/to/knime-folder/knime_4.?.?/knime
Icon=/rpath/to/knime-folder/knime_4.?.?/icon.svg
Categories=Development;Science;
terminal=false
You can create a file named ~/.local/share/application/knime.desktop and save the entry to the relevant location.If you have problem with exec command. You can give a shell script that runs the ./knime script as a parameter in the exec command. If you are using wayland as a display server, you may have problems in the application. For this reason, you can add the line export GDK_BACKEND=x11 to your configuration file bashrc or zshrc or whatever shell you are using, or inside your script file that starts KNIME. If you're already using x11 you won't have any problems.For example, the shell script that starts KNIME;
#/bin/bash
export GDK_BACKEND=x11
./knime -v /path/to/java-jdk-11/bin
may form.

Extension installations
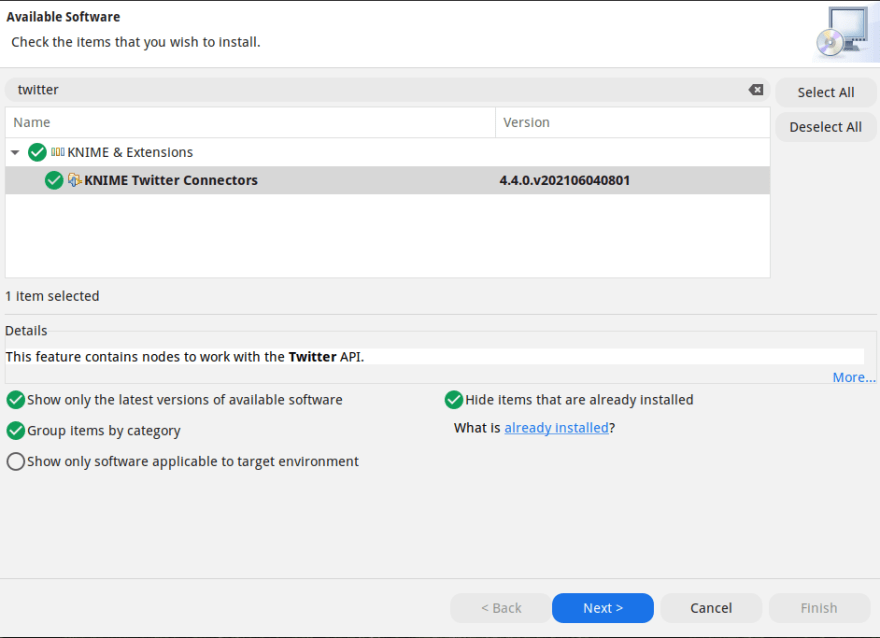
The KNIME application had many extentions. The high number of users and its extensibility are the most important factors that bring it to the top among other data mining applications. You can open the interface by selecting Install KNIME Extensions... from the File menu in the application. You can install it by searching for the add-on you want. For example, you can install the KNIME twitter connector plugin that should be used to connect to the Twitter API and pull data. It will be installed with the necessary dependency packages. The application will need to be restarted before it can read new plugins.
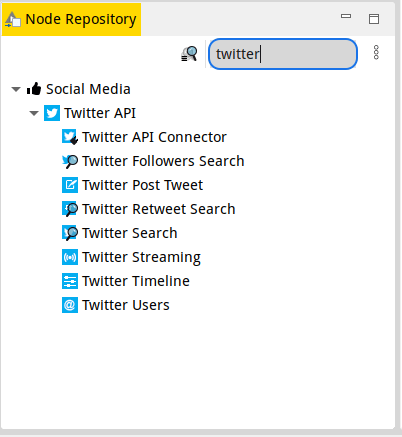
Then you can search for the node you want from the Node Repository section and add it to your project.
Machine Learning Application with KNIME
In this section, a ready-made dataset will be used to prepare a machine learning application. A data mining workflow will be created with KNME nodes by using the dataset named HCV Data Dataset in the UCI Machine Learning Repository. The project is created with new project from the File menu. Node Repository
I add my file to the project by searching file reader or csv reader from the section. Similarly, I search for the transactions I want to do in the Node Repository and add them to my project and run them, and at the end of each operation, I give the output as the input of the next node.
When I right-click on the nodes, I configure the operation and then run it. When I right-click again, I can see the output of the node as a result of the operation under the menu. The Normalize node below outputs the normalized table and model.

The operations performed in this application can be seen as follows.
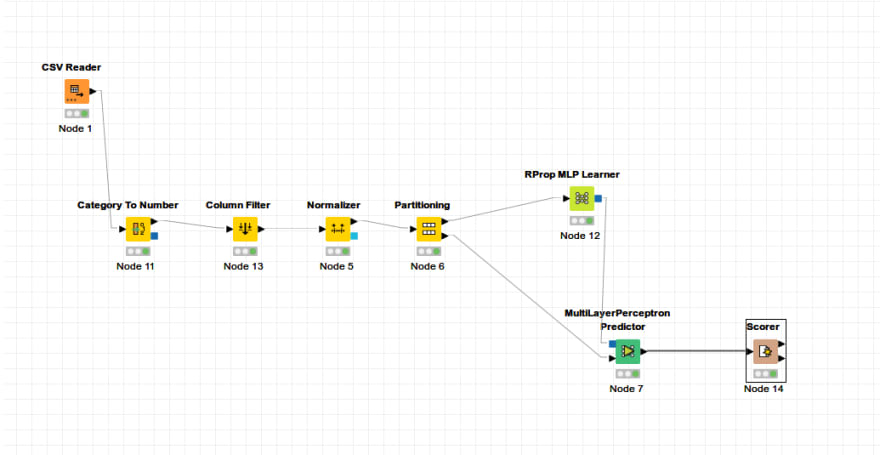
In the application, the data in the csv file was first read with the csv reader node and the categorical values such as sex were given to the category to number node to be converted into numbers. The output of this node is given to the column filter node to extract the Id and categorical gender values. The output dataset is given to the Normalize node. The dataset with 0-1 normalization was given to the Partitioning node to be divided into 70% training and 30% testing. A model was created by giving the training dataset from the parts to the RProp MLP Learner node. This model and test dataset was tested by giving it to the MultiLayerPerceptron Predicter node. And the output of the node has been transformed into a table with the comparison matrix and score values related to the performance in the Scorer node.
When our perceptron model was tested with 1 hidden layer and 10 neurons, it was seen that our comparison matrix and performance values, respectively;


It seems to be a very successful model, here the dataset was not raw data. The performance of the data preprocessing on the data set was 98% accuracy. Preprocessing is definitely a important factor for model performance. If you create a model with the raw data set, you can see that you cannot achieve a high success.
Due to the preprocessing of this dataset;
- reviewed with R
- Sample dataset review with Smote
- Outlier cleaning with R boxplot
- Second time dataset with SMOTE balancing
You can find this project and its dataset in the repo in the link.

Top comments (0)