Automating Machine Learning Workflows Pt2: Amazon SageMaker Processing and AWS Step Functions Data Science SDK

In the previous blogpost, I demonstrated how to automate machine learning workflows with AWS Step Functions from data preparation with PySpark on AWS Glue to Model (Endpoint) Deployment with Amazon SageMaker. In this tutorial, I will repeat almost the same approach, however with a little adjustment in the data preparation phase.
Not all data preparation in machine learning require distributed nature of PySpark. Hence, what happens if you don’t need PySpark? Would you need to run Glue Jobs anyway? You could, but would probably be wasting Glue compute resources. One more thing to consider is the use of external libraries with AWS Glue; you have to package external libraries as zip files and upload to some external location. This process in itself might not be user friendly especially when you want to focus only on building your machine learning pipeline.
Enter Amazon SageMaker Processing, fully managed data processing and model evaluation solution. You can read more about Amazon SageMakerprocessing in this blogpost from AWS. As of the time of this post, Amazon SageMaker Processing is not yet part of AWS Step Functions Service Integrations, however, AWS Step Functions offers the flexibility to orchestrate AWS services with Lambda Functions.
Prepare the workflow
Knowing that Amazon SageMaker Processing is not natively integrated with AWS Step Functions, we will start by creating 2 Amazon Lambda functions that will orchestrate: Amazon SageMaker Processing Job creation and Amazon SageMaker Processing job status checker.
sm_client = boto3.client('sagemaker') | |
from sagemaker.processing import ScriptProcessor, ProcessingInput, ProcessingOutput | |
BASE_PROCESSING_IMAGE = '' | |
INPUT_DATA_DESTINATION = '/opt/ml/processing/input_data' | |
PROCESSED_DATA_PATH = '/opt/ml/processing/processed_data' | |
DEFAULT_VOLUME_SIZE = 100 | |
DEFAULT_INSTANCE_TYPE = 'ml.m5.xlarge' | |
DEFAULT_INSTANCE_COUNT = 1 | |
def lambda_handler(event, context): | |
""" | |
Creates a SageMaker Processing Job | |
:param event: | |
:param context: | |
:return: | |
""" | |
configuration = event['Configuration'] | |
print(configuration) | |
job_name = configuration['JobName'] | |
role = configuration['IAMRole'] | |
instance_type = configuration.get('InstanceType', DEFAULT_INSTANCE_TYPE) | |
instance_count = configuration.get('InstanceCount', DEFAULT_INSTANCE_COUNT) | |
volume_size_in_gb = configuration.get('LocalStorageSizeGB', DEFAULT_VOLUME_SIZE) | |
ecr_container_uri = configuration.get('EcrContainerUri', BASE_PROCESSING_IMAGE) | |
script_processor = ScriptProcessor( | |
command=['python3'], | |
image_uri=ecr_container_uri, | |
role=role, | |
instance_count=instance_count, | |
instance_type=instance_type, | |
volume_size_in_gb=volume_size_in_gb | |
) | |
run_job_config = { | |
'job_name': job_name, | |
's3_script_path': configuration['S3CodePath'], | |
's3_input_data_path': configuration['S3InputDataPath'], | |
's3_output_data_path': configuration['S3OutputDataPath'] | |
} | |
try: | |
run_script_processor_job(script_processor, run_job_config) | |
return { | |
'JobName': job_name | |
} | |
except ClientError as exception: | |
print("Error occurred creating SageMaker Processing Job: {}".format(job_name)) | |
print(exception) | |
raise | |
def run_script_processor_job(script_processor: ScriptProcessor, job_config: dict = None): | |
""" | |
Args: | |
script_processor (sagemaker.processing.ScriptProcessor): | |
job_config (dict): The configuration to run ScriptProcessor job | |
:return: | |
""" | |
script_processor.run( | |
job_name=job_config['job_name'], | |
code=job_config['s3_script_path'], | |
wait=False, | |
inputs=[ | |
ProcessingInput( | |
source=job_config['s3_input_data_path'], | |
destination=INPUT_DATA_DESTINATION, | |
input_name='data' | |
) | |
], | |
outputs=[ | |
ProcessingOutput( | |
source=PROCESSED_DATA_PATH, | |
destination=job_config['s3_output_data_path'], | |
output_name='processed' | |
) | |
] | |
) | |
return None |
import boto3 | |
import json | |
sm_client = boto3.client('sagemaker') | |
def lambda_handler(event, context): | |
""" | |
:param event: | |
:param context: | |
:return: | |
""" | |
job_name = event['JobName'] | |
print(f'Job Name: {job_name}') | |
response = sm_client.describe_processing_job( | |
ProcessingJobName=job_name | |
) | |
job_status = response["ProcessingJobStatus"] | |
print(f'Current Job status: {job_status}') | |
return { | |
'ProcessingJobStatus': job_status, | |
'JobName': job_name, | |
'FailureReason': response.get('FailureReason', None), | |
'ExitMessage': response.get('ExitMessage', None), | |
} |
Once we have both functions in place, we are ready to define our workflow with the AWS Step Functions Data Science SDK. For more details about the AWS Step Functions Data Science SDK, you can read my previous blogpost or visit the project page on GitHub.
Amazon SageMaker Processing Jobs run processing scripts with pre-baked docker containers hosted on AWS ECR. Below, we will create a docker container with the necessary packages required for our processing job.
set -eux | |
echo "Writing to Dockerfile" | |
cat <<EOF > Dockerfile | |
FROM python:3.7-slim-buster | |
RUN pip3 install pandas==0.25.3 scikit-learn==0.21.3 | |
ENV PYTHONUNBUFFERED=TRUE | |
ENTRYPOINT ["python3"] | |
EOF | |
echo "Completed writing to Dockerfile" | |
echo "Create docker image build script" | |
cat <<EOF > build_and_deploy.sh | |
ecr_repository="sagemaker-processing-container" | |
tag="latest" | |
REGION="eu-west-1" | |
processing_repository_uri="${AWS_ACCOUNT_ID}.dkr.ecr.${REGION}.amazonaws.com/${ecr_repository}:${tag}" | |
# If the repository doesn't exist in ECR, create it. | |
aws ecr describe-repositories --repository-names "${ecr_repository}" > /dev/null 2>&1 | |
if [ $? -ne 0 ] | |
then | |
aws ecr create-repository --repository-name "${ecr_repository}" > /dev/null | |
fi | |
docker build -t $ecr_repository docker | |
$(aws ecr get-login --region ${REGION} --registry-ids ${AWS_ACCOUNT_ID} --no-include-email) | |
docker tag "${ecr_repository}:${tag}" $processing_repository_uri | |
docker push $processing_repository_uri | |
EOF | |
echo "Done creating build script" | |
echo "Execute docker build" | |
bash ./build_and_deploy.sh |
Note that you could as well achieve the above operation using AWS Cloudformation.
Workflow Definition
In my previous post, I demonstrated workflow definition steps from data preparation to model deployment. Since I am only replacing the AWS Glue Step, I will not go into the details of the model training and endpoint deployment steps.
Data Preparation with Amazon SageMaker Processing
data_processing_configuration = dict( | |
JobName=execution_input['JobName'], | |
IAMRole=execution_input['IAMRole'], | |
LocalStorageSizeGB=50, | |
S3CodePath=execution_input['S3CodePath'], | |
S3InputDataPath=execution_input['S3InputDataPath'], | |
S3OutputDataPath=execution_input['S3OutputDataPath'], | |
EcrContainerUri=execution_input['EcrContainerUri'] | |
) | |
create_processing_job_step = LambdaStep( | |
state_id="StartDataProcessingJob", | |
parameters={ | |
"FunctionName": "arn:aws:lambda:eu-west-1:1234567890:function:CreateProcessingJob", | |
"Payload": { | |
"Configuration": data_processing_configuration | |
} | |
} | |
) | |
create_processing_job_step.add_retry(Retry( | |
error_equals=["States.TaskFailed"], | |
interval_seconds=15, | |
max_attempts=2, | |
backoff_rate=4.0 | |
)) | |
create_processing_job_step.add_catch(Catch( | |
error_equals=["States.TaskFailed"], | |
next_step=workflow_failure | |
)) |
We created our create-processing-job Lambda function with sensible defaults ensuring that we provide the minimum possible arguments as Amazon SageMaker Processing job configurations. Next we poll for the job status with a Lambda Function step every 60 seconds.
## We poll for the processing Job at intervals | |
get_processing_job_status = LambdaStep( | |
state_id="GetDataProcessingJob", | |
parameters={ | |
"FunctionName": "arn:aws:lambda:eu-west-1:1234567890:function:GetProcessingJobStatus", #replace with the name of the function you created | |
"Payload": { | |
"JobName": create_processing_job_step.output()['Payload']['JobName'] | |
} | |
} | |
) | |
check_job_wait_state = Wait( | |
state_id="Wait", | |
seconds=60 | |
) |
We then need to create the processing script, which will contain our data transformations and will be executed by Amazon SageMaker Processing on our docker container.
import argparse | |
import os | |
import warnings | |
import pandas as pd | |
import numpy as np | |
from sklearn.model_selection import train_test_split | |
from sklearn.exceptions import DataConversionWarning | |
warnings.filterwarnings(action='ignore', category=DataConversionWarning) | |
columns = [] | |
input_data_path = '/opt/ml/processing/input_data' # default input data path in Lambda function | |
output_data_path = '/opt/ml/processing/processed_data' # default output data path in Lambda function | |
if __name__ == '__main__': | |
parser = argparse.ArgumentParser() | |
args, _ = parser.parse_known_args() | |
print('Received arguments {}'.format(args)) | |
print('Reading input data from {}'.format(input_data_path)) | |
all_input_files = os.listdir(input_data_path) | |
print('All input files: ', all_input_files) | |
df = pd.concat([ pd.read_csv(os.path.join(input_data_path, str(input_file))) for input_file in all_input_files ]) | |
df.drop_duplicates(inplace=True) | |
df.dropna(inplace=True) | |
print('Train data shape after preprocessing: {}'.format(df.shape)) | |
df_column_subset = df.iloc[:, 0:16] | |
xTrain, xTest, yTrain, yTest = train_test_split(df_column_subset, df['CLASS_LABEL'], test_size = 0.1, random_state = 0) | |
train_df = pd.concat([yTrain, xTrain], axis=1) | |
validation_df = pd.concat([yTest[int(len(yTest)/2):], xTest[int(len(xTest)/2):]], axis=1) | |
train_df.reset_index(drop=True, inplace=True) | |
validation_df.reset_index(drop=True, inplace=True) | |
train_data_output_path = os.path.join(output_data_path, 'train.csv') | |
validation_data_output_path = os.path.join(output_data_path, 'validation.csv') | |
print('Train Data Output Path: {}'.format(train_data_output_path)) | |
print('Validation Data Output Path: {}'.format(validation_data_output_path)) | |
train_df.to_csv(train_data_output_path, header=False, index=False) | |
validation_df.to_csv(validation_data_output_path, header=False, index=False) | |
print("Completed Data Processing Job Successfully...") |
The above script is an example data preparation logic, depending on your use case and requirements, you might have more complex data transformation logic. Last step is to upload the processing script to an S3 location.
$ aws s3 cp scripts/preprocessing.py s3://my-code-bucket/processing/scripts/preprocessing.py
Having completed the build up to our data preparation steps, we proceed to defining our machine learning steps. For the purpose of brevity, I defined these steps in my previous post, so I will not delve into the details, but show how to chain the respective steps together:
Automating Machine Learning Workflows with AWS Glue, SageMaker and AWS Step Functions Data Science…
ml\_steps\_definition = Chain([
training\_step,
model\_step,
endpoint\_config\_step,
endpoint\_step,
workflow\_success
])
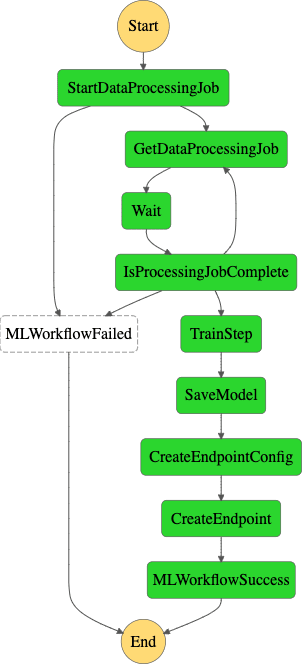
To build the entire workflow graph, we will make use of AWS Step Function Choice States, which adds a branching logic to our workflow. The choice state checks the status of the data processing job, and proceeds to next steps based on the job status:
check\_job\_choice = Choice(
state\_id= **"IsProcessingJobComplete"**
)
check\_job\_choice.add\_choice(
ChoiceRule.StringEquals(variable=get\_processing\_job\_status.output()[**'Payload'**][**'ProcessingJobStatus'**], value= **'InProgress'** ),
next\_step=get\_processing\_job\_status
)
check\_job\_choice.add\_choice(
ChoiceRule.StringEquals(variable=get\_processing\_job\_status.output()[**'Payload'**][**'ProcessingJobStatus'**], value= **'Stopping'** ),
next\_step=get\_processing\_job\_status
)
check\_job\_choice.add\_choice(
ChoiceRule.StringEquals(variable=get\_processing\_job\_status.output()[**'Payload'**][**'ProcessingJobStatus'**], value= **'Failed'** ),
next\_step=workflow\_failure
)
check\_job\_choice.add\_choice(
ChoiceRule.StringEquals(variable=get\_processing\_job\_status.output()[**'Payload'**][**'ProcessingJobStatus'**], value= **'Stopped'** ),
next\_step=workflow\_failure
)
check\_job\_choice.add\_choice(
ChoiceRule.StringEquals(variable=get\_processing\_job\_status.output()[**'Payload'**][**'ProcessingJobStatus'**], value= **'Completed'** ),
next\_step=ml\_steps\_definition
)
The choice state is explained as follows: if the processing job is running, it loops back to check the job status, if the job failed, the entire workflow is terminated and if the job is completed, it proceeds to the model training and endpoint deployment steps.
Our complete machine learning workflow is chained together as the following:
ml\_workflow\_definition = Chain(
[
create\_processing\_job\_step,
get\_processing\_job\_status,
check\_job\_wait\_state,
check\_job\_choice
]
)
ml\_workflow = Workflow(
name= **"MyCompleteMLWorkflow\_v2"** ,
definition=ml\_workflow\_definition,
role=workflow\_execution\_role
)

Create and execute the workflow:
**try** :
workflow\_arn = ml\_workflow.create()
**except** BaseException **as** e:
print( **"Workflow already exists"** )
workflow\_arn = ml\_workflow.update(ml\_workflow\_definition)
# execute workflow
ml\_workflow.execute(
inputs={
**'IAMRole'** : **sagemaker\_execution\_role** ,
**'EcrContainerUri'** : **'1234567890.dkr.ecr.eu-west-1.amazonaws.com/sagemaker-processing-container'** ,
**'S3InputDataPath'** : **f's3://{data\_bucket}/raw-data/'** ,
**'S3OutputDataPath'** : **f's3://{data\_bucket}/{processed\_data\_output\_path}/'** ,
**'S3CodePath'** : **'s3://my-code-bucket/processing/scripts/preprocessing.py'** ,
**'JobName'** : job\_name,
**'ModelName'** : model\_name_,_
**'EndpointName'** : endpoint\_name
}
)

Conclusion
In my previous post, I demonstrated how to create an end-to-end machine learning workflow on AWS using AWS Glue for data preparation. In this post, I swapped the data preparation component with Amazon SageMaker processing. Your choice of AWS Service to execute data processing job on depends on your use case. You can also use with Step Functions service integration with AWS EMR to run your data preparation jobs which is also supported natively by the AWS Step Functions Data Science SDK.
Further Reading
- Part 1: Automating Machine Learning Workflows with AWS Glue, Amazon SageMaker and AWS Step Functions Data Science SDK
- Amazon Step Functions
- Amazon Step Functions Developer Guide
- AWS Step Functions Data Science SDK
- Amazon Glue
Kindly share your thoughts and comments — looking forward to your feedback. You can reach me via email, follow me on Twitter or connect with me on LinkedIn. Can’t wait to hear from you!!
Top comments (0)