
Single sign-on used to be the “Holy Grail” of enterprise size companies and was usually only available to companies that could afford it. Nowadays, we take SSO as a matter of course. For instance, you would think it's completely weird (and unpleasant) if you logged into Gmail and then had to log in again when you went to Google Docs.
But, what about building custom applications for developers? SSO was still in the domain of the enterprise with everything from proprietary solutions to SAML, which usually required complex configuration of on-premises solutions.
Now, with standards like OAuth 2.0 and OpenID Connect and service providers, like Okta, it’s a snap for developers to incorporate SSO into their apps, whether it’s a hobby project or an enterprise grade application.
In this post, I’ll introduce OpenID Connect - the key enabling technology for delegated authentication and SSO - and then jump into a code example with Spring Boot where you can see SSO in action across multiple applications.
Approaches to Single Sign-On with OAuth 2.0 and OpenID Connect
With OIDC, SSO is often accomplished by linking multiple applications through a single defined OpenID Connect application:
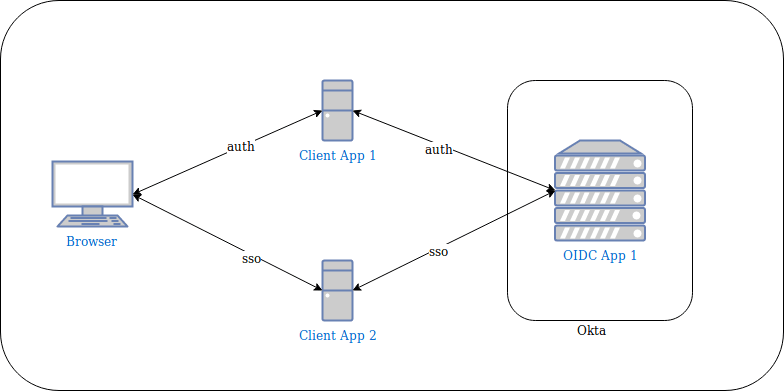
In the diagram above, you can see that you achieve SSO because you authenticate with Client App 1 via OIDC App 1 and Client App 2 is connected to the same OIDC App 1 application.
Let’s call this “Level 1” SSO.
“Level 2” is being able to connect multiple client applications to multiple OIDC applications and still accomplish SSO. Here’s what this looks like:

A successful interaction with OpenID Connect results in an ID Token (identity token) being passed back to the application.
In this case, you may have different requirements for the information included in the ID Token that comes back between OIDC App 1 and OIDC App 2. Each Spring Boot application gets its own ID Token and yet you only have to authenticate once.
Set Up Your App for Next Level Single Sign-On with OAuth and OpenID Connect
Head on over to developer.okta.com to create yourself a free-forever developer account. Look for the email to complete the initialization of your Okta org.
You’ll set up two OpenID Connect applications next.
Navigate to Applications in the admin console and click: Add Application. Choose Web and click Next.
Populate the fields with these values:
| Field Name | Value |
|---|---|
| Name | OIDC App 1 |
| Base URIs | http://localhost:8080 |
| Login redirect URIs | http://localhost:8080/login/oauth2/code/okta |
Click Done.
Scroll down and copy the Client ID and Client Secret. You’ll use those values shortly.
Create a second app in the same way with these values:
| Field Name | Value |
|---|---|
| Name | OIDC App 2 |
| Base URIs | http://localhost:8081 |
| Login redirect URIs | http://localhost:8081/login/oauth2/code/okta |
Copy the Client ID and Client Secret values here as well.
Next, you’ll set up some Authorization Servers with custom claims and access policies. This drives whether or not Okta will issue a token when one is requested.
Navigate to API > Authorization Servers. Click Add Authorization Server. Fill in the values according to this table:
| Field Name | Value |
|---|---|
| Name | OIDC App 1 |
| Audience | api://oidcapp1 |
| Description | OIDC App 1 |
Click Done. Click the Claims tab. Click Add Claim. Fill in the fields with these values (leave those not mentioned as their defaults):
| Field Name | Value |
|---|---|
| Name | appName |
| Include in token type | ID Token Always |
| Value | “OIDC App 1” |
Note the double quotes (“) in the “OIDC App 1”.
Click the Access Policies tab. Click Add Policy. Enter: OIDC App 1, for the Name and Description fields. For the Assign to field, choose The following clients. Start typing: OIDC in the input area and click Add to the right of OIDC App 1. Click Create Policy. This binds the policy to your first OIDC app.
Click Add Rule. Enter: OIDC App 1 for the Name field. Deselect all the grant types except for Authorization Code. Click Create Rule. This ensures that the request must be the Authorization Code flow in order for Okta to create tokens (More on the Authorization Code Flow below).
Click the Settings tab and copy the Issuer URL. You’ll make use of this value shortly.
You’re now going to repeat everything for a second Authorization Server, only this time, it will be bound to your second OIDC App.
Navigate to API > Authorization Servers. Click Add Authorization Server. Fill in the values according to this table:
| Field Name | Value |
|---|---|
| Name | OIDC App 2 |
| Audience | api://oidcapp2 |
| Description | OIDC App 2 |
Click Done. Click the Claims tab. Click Add Claim. Fill in the fields with these values (leave those not mentioned as their defaults):
| Field Name | Value |
|---|---|
| Name | appName |
| Include in token type | ID Token Always |
| Value | “OIDC App 2” |
Note the double quotes (“) in the “OIDC App 2”.
Click the Access Policies tab. Click Add Policy. Enter: OIDC App 2, for the Name and Description fields. For the Assign to field, choose The following clients. Start typing: OIDC in the input area and click Add to the right of OIDC App 2. Click Create Policy. This binds the policy to your second OIDC app.
Click Add Rule. Enter: OIDC App 2 for the Name field. Deselect all the grant types except for Authorization Code. Click Create Rule. This ensures that the request must be the Authorization Code flow in order for Okta to create tokens.
Click the Settings tab and copy the Issuer URL.
Use Spring Boot’s OAuth integration for Single Sign-On
Now that you have all the configuration in place, you can see “next level” single sign-on in action.
The github project includes a shell script to launch the app. This works on Mac and Linux. If you’re on another platform, simply examine the last line of the script to launch the application. Open up two terminal windows. Execute the following in the first:
./run_app.sh \
    --ci <client id, oidc app 1> \
    --cs <client secret, oidc app 1> \
    --is <issuer, oidc app 1> \
    --po 8080
Execute the following in the second terminal window:
./run_app.sh \
    --ci <client id, oidc app 2> \
    --cs <client secret, oidc app 2> \
    --is <issuer, oidc app 2> \
    --po 8081
Launch your browser and navigate to http://localhost:8080. You’ll immediately be redirected to authenticate. After you enter your username and password, you should see your name and the app’s name: OIDC App 1. If you don’t see the app name, then it’s likely you didn’t configure the custom claim correctly. You’ll also see the raw ID Token in JSON Web Token format. You can copy and paste the JWT to jsonwebtoken.io and see its contents, which includes the appName claim.
Open a second tab in your browser and navigate to http://localhost:8081.
You should NOT be required to authenticate again and you should see your name, the app’s name: OIDC App 2, and another JWT.
This is Single Sign-On in action. And, you’re using two separate spring boot apps, connecting to two different Authorization Servers, bound to two different OIDC apps. That’s next level SSO!

Spring Security with OAuth for Easy Java
It’s Okta’s cloud service for OIDC (which rides on top of OAuth) and SSO that makes this all work. Okta’s Spring Boot Starter combined with the latest version of Spring Security makes the code super simple.
There’s only three dependencies in the whole project: spring-boot-starter-web, spring-boot-starter-thymeleaf and okta-spring-boot-starter.
spring-boot-starter-web gives the application a Model-View-Controller framework. spring-boot-starter-thymeleaf is a templating engine that integrates with Spring and is the View part of the MVC framework. okta-spring-boot-starter brings in Spring Security, so you don’t have to define it as another dependency.
With the Okta Spring Boot Starter, you only need three bits of information to integrate with Okta: client id, client secret and issuer.
Spring Security requires authentication by default, so there’s no additional configuration needed in this example.
Take a look at the HomeController:
 @GetMapping("/")
 public ModelAndView home(@AuthenticationPrincipal OidcUser user) {
     ModelAndView mav = new ModelAndView();
     mav.addObject("user", user.getUserInfo());
     mav.addObject("idToken", user.getIdToken().getTokenValue());
     mav.setViewName("home");
     return mav;
 }
By the time this method is entered, Spring Security has already managed authentication via the Authorization Code flow. an OidcUser object is automatically passed into the method, which represents all of the parsed claims from the ID Token as well as the ID Token JWT itself. The user info and raw JWT are retrieved from the OidcUser and added to the model. The method then renders the view: home.html.
Take a look at the heart of home.html:
 <div th:if="${user.claims.containsKey('appName')}"
     class="alert alert-success text-center" role="alert"
 >
     <h2 th:text="${user.claims.appName}"></h2>
 </div>
 <p/>
 <div th:if="${user.claims.containsKey('name')}"
     class="alert alert-primary text-center" role="alert"
 >
     <h3 th:inline="text">Welcome [[${user.claims.name}]]!</h3>
 </div>
 <div class="alert alert-secondary text-center">
     <p th:inline="text" class="text-break" style="overflow-wrap: anywhere">
         [[${idToken}]]
     </p>
 </div>
The th:if in the first div is Thymeleaf templating to guard against you not having set the appName custom claim correctly. Assuming it exists, appName is rendered using user.claims.appName from the model that was passed into this view.
The second div shows the user’s name.
The third div shows the raw JWT that was added to the model in the controller above.
A Five-Minute Overview of OpenID Connect
With a new perspective on single sign-on and a working Spring Boot app under our belts, let’s dig into OIDC a little deeper.
OpenID Connect is an identity and authentication layer that rides on top of OAuth 2.0. In addition to “knowing” who you are, you can use OIDC for Single Sign-On. It’s especially easy with Spring Boot and Okta.
OIDC is built for web applications as well as native and mobile apps. It’s a modern approach to authentication that we developed by Microsoft, Google and others. It supports delegated authentication. This means that I can provide my credentials to my authentication provider of choice (like Okta) and then my custom application (like a Spring Boot app) gets an assertion in the form of an ID Token to prove that I successfully authenticated. The Spring Boot app never sees the username and password. This is a great approach for modern apps where you want to separate concerns, such as authentication, from the business logic of the application.
As a developer, I know that I need authentication. But, I’ve seen enough horror stories from breaches over the years that I am happy to not handle credentials directly.
OpenID Connect uses “flows” to accomplish delegated authentication. This is simply the steps taken to get from an unauthenticated state in the application to an authenticated state.
Let’s walk through a sequence diagram of what an OIDC flow looks like:

This flow is called the Authorization Code Flow and is the most secure flow for end users. It’s the one you’ve been using in the code example that goes along with this post. The goal of the flow is to get tokens over to the Spring Boot app as proof of identity.
You kick off the flow from the application in your browser. It sends a request to the Authorization Server (Okta) which includes a redirect_uri value. This is so that after you’ve authenticated, Okta can send you back to the right spot in your application with an Authorization Code.
The Spring Boot app can now exchange the Authorization Code for tokens from Okta.
Why this dance? Your Spring Boot app never sees the credentials. Notice on step 5, the credentials are submitted directly to Okta. The Authorization code is redirected back through the browser (where the request was initiated). But, we don’t want the browser to get the tokens directly. It’s safer for the application under your control - the Spring Boot application - to get the tokens from Okta. That’s why it’s the Spring Boot application that exchanges the code for the tokens.
To learn more about OAuth 2.0 and OIDC, check out these blog posts
- An OpenID Connect Primer
- A Quick Guide to OAuth 2.0 with Spring Security
- Migrate Your Spring Boot App to the Latest and Greatest Spring Security and OAuth 2.0
Learn More About Secure Single Sign-on, OAuth 2.0, and Spring Boot
The Okta Spring Boot Starter enables you to integrate your Spring Boot apps with Okta with just a few lines of code and three configuration properties.
Along with our Spring Boot Starter, Okta’s OpenID Connect service not only conforms to the standard, but gives you a sophisticated Single Sign-On experience where the same user can access many different OIDC applications, each with their own set of requirements and configuration. Remember: OIDC rides on top of OAuth 2.0 - it’s not standalone. Whereas OAuth focuses exclusively on authorization, OIDC explicitly adds identity and authentication concerns.
If you’d like to learn more about OAuth and Spring Boot you might be interested in these other posts:
- Secure Server-to-Server Communication with Spring Boot and OAuth 2.0
- OAuth 2.0 for Native and Mobile Apps
- Is the OAuth 2.0 Implicit Flow Dead?
Like what you learned today? Follow us on Twitter, and subscribe to our YouTube channel for more awesome content!

Top comments (0)