In the past, we've talked about how to develop remotely with VS Code. Today, I'm going show you how can you use okteto to define and deploy a fully configured remote development environment for your python application, how to integrate it with Jetbrains' PyCharm and how to use it to build a Cloud Native application.
The Okteto Developer platform allows you to spin up an entire development environment in Kubernetes with one click. This can be as simple as a single container or as complex as a microservice-based Cloud Native Application. You deploy your application with one click, select the component you're going to develop on, and you're ready to go in seconds.
Install Okteto
The Okteto CLI is an open source single-binary application that allows you to deploy development environments (among other things) in any Kubernetes cluster. It works with Linux, MacOS and Windows. We'll be using it to create and launch our development environment. Follow the steps below to install it:
MacOS / Linux
$ curl https://get.okteto.com -sSfL | sh
Windows
Download https://downloads.okteto.com/cli/okteto.exe and add it to your `$PATH`.
Configure your Kubernetes Access
Okteto is compatible with any Kubernetes cluster, local or remote. To keep this example simple, we are going to be using Okteto Cloud to deploy the development environment. If you prefer to use your own Kubernetes cluster, you can skip this step.
Run okteto login in your local console to create a free Okteto Cloud account, login, and to download your Kubeconfig. We'll be needing it later in the post.
$ okteto login
Authentication will continue in your default browser
You can also open a browser and navigate to the following address:
...
 ✓  Logged in as rberrelleza
 ✓  Updated context 'cloud_okteto_com' in '/Users/ramiro/.kube/config'
    Run 'okteto namespace' every time you need to activate your Okteto context again
Create a New Python Project
Start by opening PyCharm and creating a new project for your application and development environment. Pick the "Pure Python" template and call it guestbook.
Define your Remote Development Environment
At a high level, a remote development environment is a Docker container that contains everything you need to build and develop your application, such as:
- One or more language runtimes (e.g python, ruby, node)
- SDKs for your language runtime (e.g JDK, python-dev)
- Binary dependencies (e.g. openssl, git)
- Tools to manage and install dependencies (e.g. pip, bundler, yarn)
- Tools to run your tests and analyze your code (e.g nosetest, pylint)
Okteto looks for a special file called okteto.yml to define the development environment for an application.
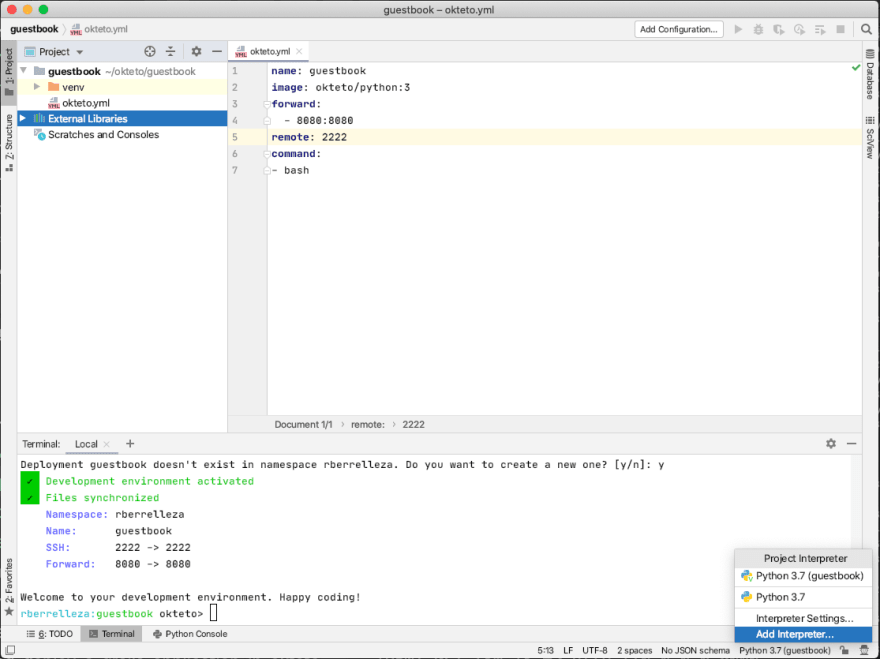
Create a file named okteto.yml in the guestbook project and copy the following content:
name: guestbook
image: okteto/python:3
forward:
  - 8080:8080
remote: 2222
command:
- bash
This file is telling okteto to perform the following:
- Create a development environment named
hello-world - Use the Docker image
okteto/python - Start a remote SSH server on port 2222 (more on this later on)
- Forward port 8080 to the remote environment
- Run the
bashwhen it starts, so we get a remote terminal.
Take a look at the manifest reference to learn the different configuration settings available.
Deploy your Remote Development Environment
Let's deploy the development environment. First, open a local terminal directly in Pycharm. Then, run the okteto up command on it.
Since this is the first time you launch your development environment, you'll be asked to confirm if you want to create it. Type y and press enter to continue.
The okteto up command will perform the following tasks automatically:
- Deploy the development environment as described by
okteto.ymlinto Okteto Cloud (or your personal Kubernetes cluster). - Forward port 8080 to the remote environment.
- Start an SSH server in port 2222.
- Start a file synchronization service to keep your changes up-to-date between your local filesystem and your application pods.
- Launch a remote shell in your remote development environment. Now you can build, test, and run your application as if you were in your local machine.
Use your Remote Environment as an Interpreter
By default, PyCharm will use your local python interpreter for your project. Instead of that, we're going to configure it to directly use our remote development environment as the target. This way, we can guarantee that we always have the right setup, independent of what happens in our local machine. To do this, we are going to take advantage of PyCharm's remote interpreters and Okteto's remote SSH server.
To add a remote interpreter, right click on the status bar in the bottom right of the screen, and click on the Add Interpreter... option in the menu.
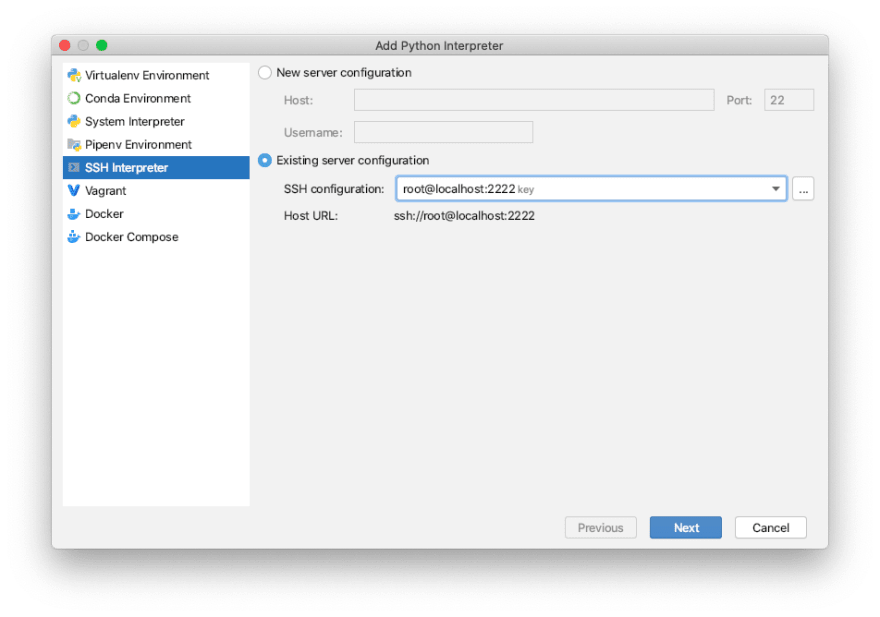
Then, select the SSH Interpreter option on the left, and Existing server configuration on the right.
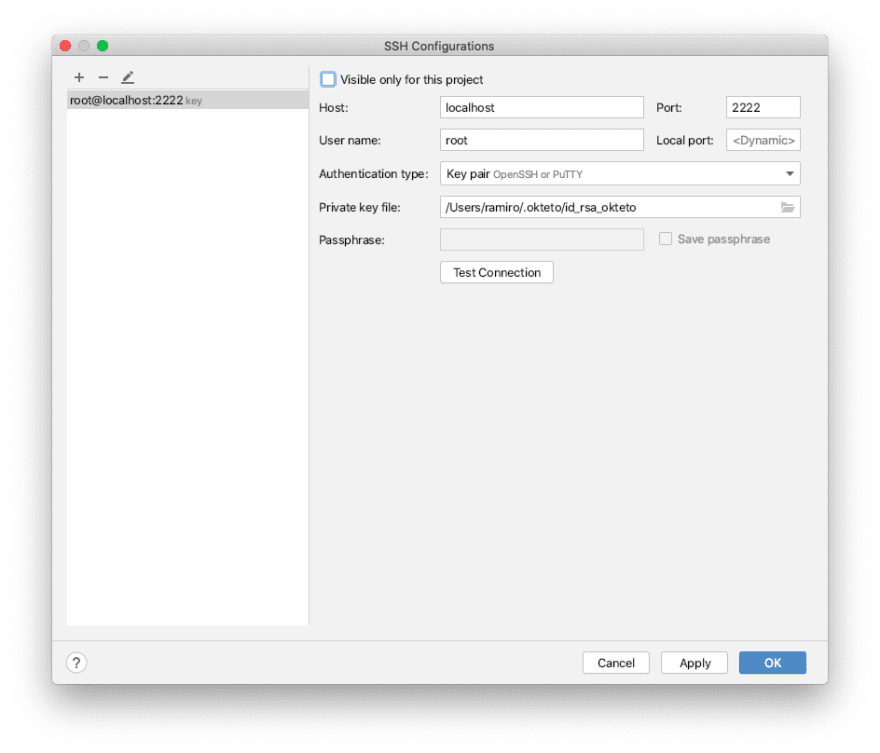
Click on the button with the three dots in the right to launch the SSH Configuration dialog, and add a new configuration with the same values as show below, replacing /Users/ramiro with the path to your $HOME directory.
Press the Test Connection button to validate that everything is configured correctly.
When you run
okteto upthe first time, Okteto will create a SSH key pair for you and save it at $HOME/.okteto/id_rsa_okteto and $HOME/.okteto/id_rsa_okteto.pub. The SSH server launched in your development environment will be automatically configured to use these keys for authentication.
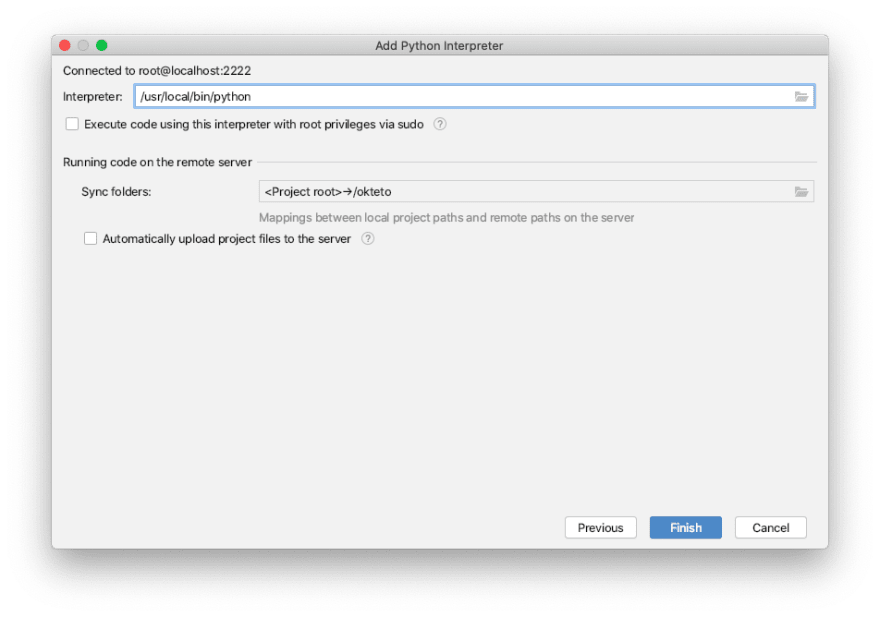
Once the SSH configuration is completed, click on the Next button, to get the to final configuration screen (yay!).
Update the path to the interpreter to match the one in your remote development environment (/usr/local/bin/python), set the folder mapping to /okteto and disable file uploading, since Okteto will automatically take care of this for you.
Click on the Finish button to save your configuration.
The interpreter configuration is saved in the .idea folder. You can include this configuration in your repository so the rest of your team can benefit from it.
From now on, your project will directly use the interpreter in your remote development environment, instead of the local one. Why don't you open PyCharm's python console and try it out?
Develop your Application in your Remote Development Environment
Now that we have our development environment up and running, it's time to build our application. For the purpose of this post, we are going to build a an application that lets users post messages to a public message.
The application will include:
- A flask web server that handles the display and updates to the guestbook.
- A MongoDB instance to store the messages.
Deploy your MongoDB Instance
One of the big advantages of using remote development environments is that we don't have to run anything locally. Since the development environment is running in Kubernetes, it has access to anything available there, such as secrets, other services, databases, etc.
For MongoDB, you can take advantage of Okteto Cloud's Application Catalog and deploy it with one click.
To do this, open your browser, go to Okteto Cloud, click on the Deploy button, select MongoDB from the list of applications, and click on the Deploy button.
Wait for a few seconds for your instance to finish deploying. You'll be able to see the status directly in Okteto Cloud's dashboard.
If you deployed your development environment in your own cluster, you can deploy it using the official Helm Chart.
Developing Directly on Kubernetes
Now that we have our development environment and our MongoDB instance, let's build our application.
First, create a python file called app.py in your project. This is the file that will contain our server's code, so let's start with the basics. Copy the code below in app.py:
from flask import Flask
from flask_pymongo import PyMongo


app = Flask(__name__)
app.config["MONGO_URI"] = "mongodb://okteto:okteto@mongodb:27017/okteto"
mongo = PyMongo(app)


if __name__ == '__main__':
    app.run(host='0.0.0.0', port=8080)
The code above will perform the following:
- Import
flaskandflask_pymongo. - Configure the mongo connection string and data access object.
- Start the webserver.
Note that we are using
mongodb:27107as the name and port of the MongoDB instance, instead of the typicallocalhost. This is because our development environment is running in Kubernetes, just as MongoDB, so we can access it using its DNS name. Just like we would do in production 💫.
As soon as you save the file, errors will appear on the first two lines. This is because our development environment doesn't have them installed yet. To install them, go to the console (the one with the okteto > prompt) and pip install the requirements, just like you would do locally:
rberrelleza:guestbook okteto> pip install flask flask_pymongo
...
Installing collected packages: MarkupSafe, Jinja2, itsdangerous, click, Werkzeug, flask, PyMongo, flask-pymongo
Successfully installed Jinja2-2.11.2 MarkupSafe-1.1.1 PyMongo-3.10.1 Werkzeug-1.0.1 click-7.1.2 flask-1.1.2 flask-pymongo-2.3.0 itsdangerous-1.1.0
When installing dependencies, is a good practice to add them to your requirements.txt file, so it reflects all your runtime dependencies. Run the pip freeze command in the same console:
rberrelleza:guestbook okteto> pip freeze > requirements.txt
If you wait a couple of seconds, you'll see that the requirements.txt file appears in your project automatically. This is the magic of okteto's file synchronization. Any file change in the remote development environment or locally will be automatically synchronized in the other side.
Run python app.py in the console to start the server:
rberrelleza:guestbook okteto> python app.py
 * Serving Flask app "app" (lazy loading)
 * Environment: production
   WARNING: This is a development server. Do not use it in a production deployment.
   Use a production WSGI server instead.
 * Debug mode: on
 * Running on http://0.0.0.0:8080/ (Press CTRL+C to quit)
 * Restarting with stat
 * Debugger is active!
 * Debugger PIN: 160-502-646
Your application is up and running, directly in your remote development environment. To access it, open your browser and go to http://localhost:8080. (this is why we included a forwarding rule for port 8080 in the okteto.yml manifest).
What's cool is that your application is also running on debug mode. This means that flask will automatically reload your application every time the code changes. Let's try that by finishing our application's code.
Update app.py as follows:
from flask import Flask, jsonify, request
from flask_pymongo import PyMongo

app = Flask(__name__)
app.config["MONGO_URI"] = "mongodb://okteto:okteto@mongodb:27017/okteto"
mongo = PyMongo(app)


@app.route("/", methods=["GET"])
def get_messages():
    messages = []
    for m in mongo.db.messages.find():
        messages.append({"message": m["message"], "user": m["user"]})
    return jsonify(messages=messages)


@app.route("/", methods=["POST"])
def post_message():
    content = request.json
    mongo.db.messages.insert_one({"message": content["message"], "user": content["user"]})
    return '', 204


if __name__ == '__main__':
    app.run(host='0.0.0.0', port=8080, debug=True)
With this change, the application will:
- Accept a
POSTrequest on/. It will read themessageanduserfrom the request's content and insert them into the MongoDB database. - Accept a
GETrequest on/. It will get all the available messages from MongoDB, and return them as ajsonarray.
As soon as you save the files, okteto will detect the changes and synchronize them to your remote development environment. Then, flask will automatically reload them.
Try the application by calling the new endpoints. Open a second console in PyCharm, and post a few messages:
➜  guestbook $ curl -XPOST -H "content-type: application/json"  http://localhost:8080 -d '{"message": "hello", "user":"ramiro"}'
➜  guestbook $ curl -XPOST -H "content-type: application/json"  http://localhost:8080 -d '{"message": "how are you?", "user":"cindy"}'
➜  guestbook $ curl -XPOST -H "content-type: application/json"  http://localhost:8080 -d '{"message": "developing directly in my cluster!", "user":"ramiro"}'
And then get them:
➜ guestbook $ curl http://localhost:8080
{
  "messages": [
    {
      "message": "hello",
      "user": "ramiro"
    },
    {
      "message": "how are you?",
      "user": "cindy"
    },
    {
      "message": "developing directly in my cluster!",
      "user": "ramiro"
    }
  ]
}
At this point, our application is feature complete, and we already tested it end to end in a fully integrated remote development environment. All that's left is to package it, send a PR, and ship it!
Conclusions
In this post we learned about the concept of remote development environments, why they are important, and how you can use Okteto and PyCharm to use them to build a Cloud Native application faster than ever.
But this post only covers the surface. Using remote development environments gives you a lot of extra benefits such as:
- Eliminates the need for a local configuration.
- Makes it simple to share the configuration with the rest of your team.
- You don't need to run Docker or Kubernetes locally.
- You don't depend on your workstation's state.
- You can easily share your development environment with your team.
- It gives you the fastest feedback loop.
- You use your favorite IDEs, debuggers, etc...
- You can take advantage of incremental builds and hot reloaders.
- You are developing on an environment as similar as possible to production.
- You don't depend on CI/CD for validating all your changes.
If this problem sounds familiar to you, you should check out what we have built at Okteto. Take a look at our getting started guide and start developing at the speed of the cloud.
Our mission at Okteto is to simplify the development of Cloud Native applications. Do this resonate with you? Do you have ideas, comments or feedback? Join us at the #okteto channel in the Kubernetes community Slack and share your thoughts with the community!


Top comments (0)