Once you start running your own LXC containers inside a Proxmox, you might encounter a use case when you need a writable SMB/CIFS share mounted inside your unprivileged container.
Example use-cases:
- Plex server reading data from NAS
- Photoprism reading multimedia files from NAS
- and many more
There are two possible ways of binding the shares:
- The Secured way via
/etc/fstabfile - The Unsecured Way - A Privileged LXC Container
The Secured way via /etc/fstab file
If you struggle with the nobody file/dir owner/group in the container, then you come to the right place.
This approach does not use the Proxmox dialog for adding SMB/CIFS volumes. The reason is that there is a lack of advanced control when setting the uid and gid for the mounted directory.
The /etc/fstab provides greater control when mounting the SMB/CIFS shares.
The security benefit here is that the LXC container's root user is not mapped directly to the host machine's root user. Therefore the attack vector of escaping the Docker container should not do much harm to the host machine.
- Securely store the SMB/CIFS credentials
- create a credentials file ```bash
$ nano ~/.smbcredentials
  - define username and password
  ```bash


username=me
password=secret
- set R/W access for the owner only ```bash
$ chmod 700 ~/.smbcredentials
2\. Edit the `/etc/fstab` with the SMB/CIFS share mounted with the `uid` and `gid` of the container's `root` user, which is by default `100000`/`100000`
//x.x.x.x/media /mnt/nas/media cifs credentials=/root/.smbcredentials,uid=100000,gid=100000 0 0
  - the part `uid=100000,gid=100000` is essential for proper permission mapping to the containers' `root` user

3\. Bind the new mount into the LXC container
  - via command
```bash


$ pct set <container_id> -mp0 /mnt/nas/media,mp=/mnt/nas/media
- or manually add the following line to the file
etc/pve/lxc/<container_id>.conf```
mp0: /mnt/nas/media,mp=/mnt/nas/media
Now the mount should be mounted successfully with the same `uid` and `gid` as in the host machine.
## The Unsecured Way - A Privileged LXC Container
> **Attention!**
>
> This approach has one big disadvantage. It reduces the security of your host machine.
>
> If your LXC container is under attack which escapes the Docker container, then the attacker has root access to your host machine.
1. Simply uncheck the "Unprivileged container" checkbox when creating a new LXC container
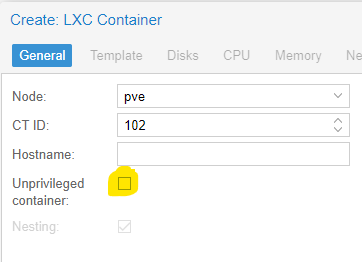
- The privileged container `root` user has `uid` `0` inside the LXC container and he is mapped to the `root` user with `uid` `0` on the host machine.
1. Create an SMB share inside the Proxmox console
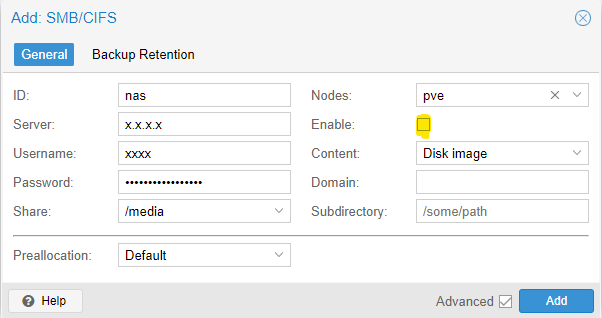
- You can encounter `create storage failed: storage 'nas2' is not online (500)` error.
- In that case, create the share as disabled (uncheck the "Enable" checkbox).
- You can enable it once the share is created via the Edit dialog.
1. Bind the new mount into the LXC container
- via command
```bash
$ pct set <container_id> -mp0 /mnt/pve/nas,mp=/mnt/nas
- or manually add the following line to the file
etc/pve/lxc/<container_id>.conf
mp0: /mnt/pve/nas,mp=/mnt/nas
Now the mount should be mounted successfully with the same uid and gid as in the host machine.
Conclusion
There are several ways of achieving the goal. Using a privileged container is a not the safest approach. Using the /etc/fstab method is much safer while providing greater control on the mount than what the Proxmox console provides.
There is one more alternative - custom user uid/gid mapping. This approach maps container users and the host machine users with different uid/gid. However, the configuration is quite tricky to get right. More can be found in the official guide Unprivileged LXC Containers.

Top comments (7)
This is the most useful article I found on this topic. Thank you !
This works so well and I am so thankful that you took the time to write this.
Thanks; well explained and very helpfull to me
100000 is for root. Is this also possible for non-root-user? And what is that id?
Great guide, the more details you can give us the better!
100033:100033 maps to www-data inside lxc container, if you are saying something like grant permission for php workers to write into smb storage provided by PVE host.
and other user you may look upon
/etc/passwdof your lxc container and turn whatever user into 100000 + xxx,100000 + 33 = 100033for example.thanks a lot!
I have the problem that my smb share doesn't "update" its content. I need to restart the OpenMediaVault everytime to get the newest content of the folders. Maybe the problem is that the ssd is crypted with veracrypt? Hmm...
The first method, everything is done on the pve server, correct, nothing in the container? After I add the NAS to Datacenter|Storage, /etc/fstab only contains:
proc /proc proc defaults 0 0