
2019 Christmas is finally approaching, it's a good time to put on some decoration for your website/web-app to make it more Christmassy look.
The idea
As a frontend developer, one of the cool thing we could do under this topic is Snowflakes.
In this article, I'll explore an implementation of Snowflakes effect(using TypeScript), falling down from the top of the webpage or specific DOM container. We will go through the whole flow from idea, design to code and in the end, publish it on NPM registry.
This will be multi-parts posts.
Design
There are a few options for creating snowflakes design.
It can be a bit cartoonish like the following:

Or it could be more realistic oriented:
For this post, we'll choose the latter.
Requirements
To create snowflakes effect that can be added to any webpage with any type of content and background, we need to make sure 4 things:
- The renderer layer needs to be transparent.
- The renderer layer needs to let mouse cursor interaction pass through without blocking it.
- The snowflakes need to have adjustable colour so we can do further tweaks after integrating it with specific web content.
- Snowflakes need to have exposed interfaces to control when the snowfall starts and stops.
Code
In order to achieve the requirements mentioned above, HTML5 canvas with 2d context is a good option.
A simple piece
Let's start from something simple, we'll create a canvas with a single piece of snowflake on it, just to have a feel how it looks.
const canvas = document.createElement('canvas');
const ctx = canvas.getContext('2d');

// enter canvas path mode
ctx.beginPath();
// start dring arc path (a way to draw circle in canvas)
ctx.arc(100, 100, 3, 0, Math.PI * 2, false);
// close path
ctx.closePath();
// fill snowflake with white
ctx.fillStyle = '#ffffff';
ctx.fill();
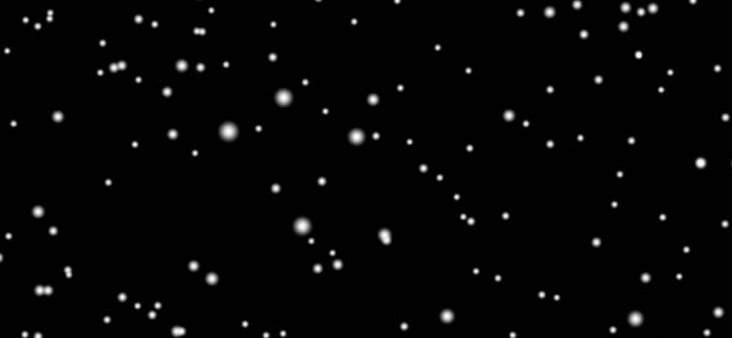
Looking good, but now we need a lot of them and distribute them on the canvas. Let's put 20.
for (let i = 0; i < 20; i++) {
  const x = Math.random() * 300;
  const y = Math.random() * 200;

  // ...

  ctx.arc(x, y, 3, 0, Math.PI * 2, false);

  // ...
}
Now we have a very basic foundation code of statically rendered snowflakes. Next step is to do a bit of OO-style refactor in order to handle all the transitions/interactions we are going to implement soon.
export class Snowflake {
  x: number;
  y: number;
  radius: number;
  alpha: number;

  private canvas: HTMLCanvasElement;
  private ctx: CanvasRenderingContext2D;

  constructor(canvas: HTMLCanvasElement) {
    this.canvas = canvas;
    this.ctx = canvas.getContext('2d');

    this.x = Math.random() * canvas.width;
    this.y = Math.random() * canvas.height;

    this.radius = 1 + Math.random() * 2;
    this.alpha = 0.5 + Math.random() * 0.5;
  }

  draw() {
    ctx.globalAlpha = this.alpha;
    ctx.beginPath();
    ctx.arc(this.x, this.y, this.radius, 0, Math.PI * 2, false);
    ctx.closePath();
    ctx.fillStyle = '#ffffff';
    ctx.fill();
  }
}

// ... (canvas setup)

for (let i = 0; i < 20; i++) {
  const flake = new Snowflake(canvas);
  flake.draw();
}

Snowflake got encapsulated into a TypeScript class with its own drawing logic. Plus randomized opacity support.
Animation
Snowflakes would be meaningless if they can't move, it's time to deal with animations.
Let's add a bit of velocity concept to it.
export class Snowflake {

  // ...

  vx: number;
  vy: number;

  // ...

  constructor(canvas: HTMLCanvasElement) {
    // ...

    // tweak this bit of algorithm as you wish
    this.vy = 1 + Math.random() * 3;
    this.vx = 0.5 - Math.random();

    // ...
  }

  draw() {
    this.y += this.vy;
    this.x += this.vx;

    // ...
  }
}
We have velocity ready in position, next thing is to handle frame rendering logic. In order to do that we need requestAnimationFrame().
// create 20 snowflakes
for (let i = 0; i < 20; i++) {
  const flake = new Snowflake(canvas);
  flakes.push(flake);
}

// rendering frames
function updateFrame() {
  ctx.clearRect(0, 0, canvas.width, canvas.height);
  flakes.forEach(f => {
    f.draw();
  });

  requestAnimationFrame(() => updateFrame());
}

// start play
updateFrame();
Here is how it looks so far:

The real animation is way smoother than this GIF image screenshot.
Snow scene
Time to do a further refactor. Let's add a SnowScene class that encapsulate a collection of snowflakes and put it in charge of how the container and snowflakes behave.
export interface SnowSceneConfig {
  /** Snowflake colour */
  color: string;
  /** Volumn of snowflakes (increase it to make a strom) */
  volumn: number;
}

export class SnowScene {
  snowflakes: Snowflake[] = [];
  config: SnowSceneConfig;

  private container: HTMLElement;
  private canvas: HTMLCanvasElement;
  private ctx: CanvasRenderingContext2D;

  private isPlaying = false;
  private animationId = 0;

  constructor(containerSelector: string = 'body', config?: SnowSceneConfig) {
    this.container = document.querySelector(containerSelector);

    // apply config or fallback to default
    this.config = config || {
      color: '#ffffff',
      volumn: 300
    };

    this.buildScene();
  }

  play(): void {
    this.isPlaying = true;

    // check if there is still animation going on, if there is, do not intialize a new loop
    if (!this.animationId) {
      this.animationId = requestAnimationFrame(() => this.updateFrame());
    }
  }

  pause(): void {
    this.isPlaying = false;
  }

  toggle(): void {
    if (this.isPlaying) {
      this.pause();
    } else {
      this.play();
    }
  }

  private buildScene(): void {
    const canvas = document.createElement('canvas');

    canvas.style.position = 'absolute';
    canvas.style.left = '0';
    canvas.style.top = '0';
    canvas.style.pointerEvents = 'none';
    canvas.width = this.container.clientWidth;
    canvas.height = this.container.clientHeight;

    this.container.appendChild(canvas);

    this.canvas = canvas;
    this.ctx = canvas.getContext('2d');

    // generate snowflakes
    for (let i = 0; i < this.config.volumn; i++) {
      const flake = new Snowflake(this.canvas);
      flake.color = this.config.color;

      this.snowflakes.push(flake);
    }
  }

  private updateFrame(): void {
    if (!this.isPlaying) {
      this.animationId = 0;
      return;
    }

    this.ctx.clearRect(0, 0, this.canvas.width, this.canvas.height);

    this.snowflakes.forEach(flake => {
      flake.draw();
    });

    this.animationId = requestAnimationFrame(() => this.updateFrame());
  }
}
I've also added a button controlling play/pause of the snowfall.
And here is how it looks:

Part 1 Summary
OK, I hope you enjoyed the journey of this simple idea for snowflakes implementation using TypeScript and HTML5 canvas. This package is far from finish yet.
In the next post(s), we will do some further polish focusing on the following things:
- recycle snowflakes when it touched the bottom of our DOM container and make it fall from the top again.
- polish "pause" logic to make it more natural. When snowfall is paused, only it stops generating new snowflakes, but the flakes left in-screen still continue falling down until touch the bottom of the DOM container.
- expose more customisation options.
- compatibility fixes.
- build and publish to NPM as a package.
You can find the current source code from here:

Top comments (1)
Thanks for the post Xinan!