Introduction
I don’t know about you, but for me, oftentimes the hardest part of a new project is getting all the necessary pieces up and running. The databases, the backend servers, and of course, the frontend UI — it’s a lot to keep track of, manage dependencies of, monitor the health of, prevent port collisions of, and make sure each of the components can connect to the others to make the app work from start to finish.
And don’t get me started on if you’re developing with a team of people, and you’re all connected to the same database. Let’s just say, it can be a recipe for a lot of headaches and the oft heard phrase “Did someone blow away the database again? The I was testing with is gone!" It’s not pretty, and it’s definitely not fun when the data gets out of sync or flat out deleted.
Today, I'll show you how containerized development with Docker can make everyone's local development experience better.
The Solution? Containerized Development Environments
I ❤️ the Docker mascot, Moby Dock. He’s just so darn cute.
I’m going to radically improve how you develop — at least locally, and possibly in your lower life cycles and production environments as well. How? With the help of our trusty docker-compose.yml file. If you’re not familiar with Docker, I recommend you check out two of my previous blog posts covering the basics of Docker and one of Docker’s most useful features, Docker Compose.
If you are familiar with Docker already, please read on. You know Docker, you’re aware of the containerized nature of it, and you may even have used the power of containers or whole containerized ecosystems courtesy of Docker Compose.
But have you thought about how it might make your localized application development easier? Think about it: using a docker-compose.yml to control your dev environment solves the problems I mentioned above.
- All the services listed in the
docker-compose.ymlcan be started up together with just one command, - There’s no chance of port collisions (at least in the internal Docker environment) even if applications start up on the same port,
- Each of the services is aware of, and able to connect to, the other services with out issue,
- There’s less of a chance of the “It works on my machine” syndrome, since every container is using the exact same image with the exact same dependencies,
- And best of all each individual Docker environment can have its own databases, that no one else can access (and subsequently ruin the data of).
Plus, it’s super simple to do. Intrigued yet?
How To Dockerize Applications
I’ll be demonstrating the ease of "dockerizing" an application with a full stack JavaScript application. This is a MERN application, except replace the MongoDB with a MySQL database.
If you want to see my full application, the code is available here in Github.
Here’s a high level look at the file structure of this particular application. Since I’m demonstrating with a relatively small user registration app, I’m keeping the server and client in the same repo, but it would be very easy to break them up into multiple separate projects and knit them together with the help of docker-compose.ymls.
Side note: If these were to be two (or more) separate services, I would need to keep a
docker-compose.ymlin both repos so each could be spun up for local development.The service being developed would build a new image each time
docker-compose upis invoked, and it would have access to the necessary other service’s Docker image stored in Docker Hub (or wherever you choose to store images) with the tag of the version I wanted in thedocker-compose.yml.For production, there’d also be a third
docker-compose-prod.ymlwhich would only use images that were tested and approved. But that’s outside the scope of this article.
Back to the project file structure.
App File Structure
root/
├── api/
├── client/
├── docker/
├── docker-compose.yml
├── Dockerfile
Obviously, there’s plenty of files contained within each one of these directories, but for simplicity’s sake I’m just showing the main file structure.
Even though both the client/ and api/ folder are contained within the same repo, I built them with micro services and modularity in mind. If one piece becomes a bottleneck and needs a second instance, or the app grows too large and needs to be split apart, it’s possible to do so without too much refactoring. To achieve this modularity, both my API and client applications have their own package.json files with the dependencies each app needs to run.
The nice thing is, since this is currently one application and both apps are JavaScript, I can have one Dockerfile that works for both.
The Dockerfile
Here’s what the Dockerfile looks like:
// download a base version of node from Docker Hub
FROM node:9

// create the working directory for the application called /app that will be the root
WORKDIR /app

// npm install the dependencies and run the start script from each package.json
CMD ls -ltr && npm install && npm start
That’s all there is to it for this Dockerfile: just those three commands. The docker-compose.yml has a little bit more to it, but it’s still easy to follow, when it’s broken down.
The Docker-Compose.yml
version: '3.1'

services:
  client:
    build: .
    volumes:
      - "./client:/app"
    ports:
      - "3031:3000"
    depends_on:
      - api

  api:
    build: .
    volumes:
      - "./api:/app"
    ports:
      - "3003:3000"
    depends_on:
      - db

  db:
    image: mysql:5.7
    restart: always
    environment:
      MYSQL_ROOT_PASSWORD: example
      MYSQL_DATABASE: users
      MYSQL_USER: test
      MYSQL_PASSWORD: test1234
    ports:
      - "3307:3306"
    volumes:
      - ./docker/data/db:/var/lib/mysql
I would like to note there’s a newer version of MySQL available on Docker Hub, but I couldn’t get it to work properly with Docker Compose, so I would recommend going with the mysql:5.7 version until further notice.
In the code snippet above, you can see my two services: the api and client , as well as the database (the first mention I’ve made of it thus far, and one of my favorite things about Docker Compose).
To explain what’s happening, both the client and API services are using the same Dockerfile, which is located at the root of the project (earning them both the build: . build path. Likewise, each folder is mounted inside of the working directory we specified in the Dockerfile with the volumes: ./<client or api directory>:/app. I exposed a port for each service to make debugging of individual services easier, but it’d be perfectly fine to only expose a port to the application through the UI. And finally, the depends_on makes each piece of the app wait until all the parts have started up.
The client depends on the api starting, the api depends on the database starting, and once all the credentials are supplied to the database and the image is pulled from Docker Hub, it can start up. I opened a port on the database so I could connect Sequel Pro to my database and see the user objects as they’re made and updated, as well. Once again, this makes debugging as I develop the application easier.
The very last line of the database about volumes, is a special line that deserves attention. This is how data is persisted for the application. It’s only persisted locally to the machine the Docker ecosystem is running on, but that’s usually all you need for development. This way, if you’re using Flyway or Liquibase or another SQL runner to create the tables and load data into them and you then change that data, to test the app’s functionality, the changes can be saved so that when you restart the app, the data is the way you left it. It’s really awesome.
Ok, so the Dockerfile has been covered, the docker-compose.yml has been explained, and the database image being pulled from Docker Hub has been noted. We’re about ready to roll.
Start the App With One Line
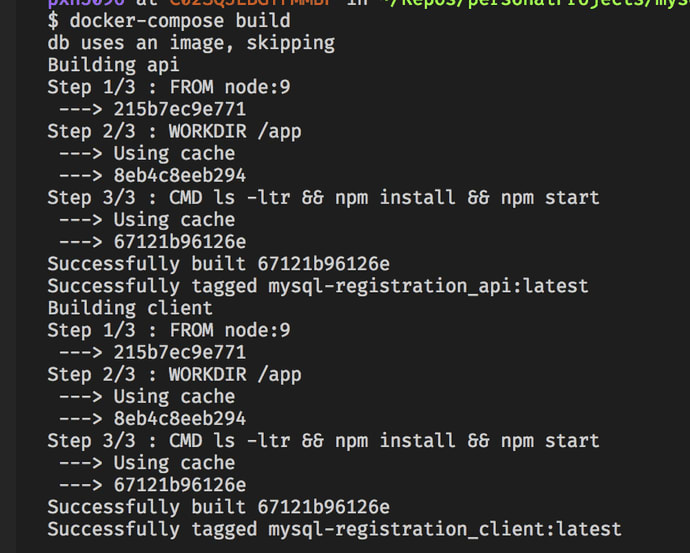
Now it’s time to start this application up. If it’s your first time developing this application locally, type docker-compose build in the command line. This will build your two images for the client and API applications — the MySQL database comes as an image straight from Docker Hub, so there’s no need to build that image locally. Here’s what you’ll see in the terminal.
You can see the db is skipped and the API and the client are both built using the Dockerfile at the project’s root.
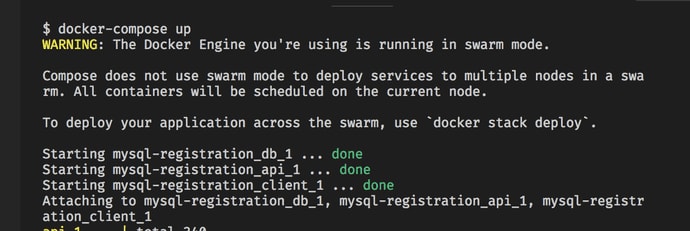
Once the images are done building, type docker-compose up. You should see a message in the terminal of all the services starting up and then lots of code logging as each piece fires itself up and connects. And you should be good to go. That’s it. Up and running. You’re done. Commence development.
This is what you’ll see right after writing docker-compose up. Once all the services register done, they’ll try to start and connect and you should be good to start developing.
Whenever you want to stop your app, you can just type docker-compose down into the terminal, and the services will gracefully shut down. And the data will be persisted locally, so when you type docker-compose up to start the applications back up, your data will still be there.
What you see when you stop the services with docker-compose down.
Conclusion
Docker and Docker Compose can make web development a heck of a lot easier for you. You can create fully functional, isolated development environments complete with their own databases and data with very little effort on your part, speeding up development time and reducing or avoiding the problems that typically arise as projects are configured and built by teams. If you haven’t considered "dockerizing" your development process yet, I’d highly recommend looking into it.
Check back in a few weeks — I’ll be writing more about JavaScript, React, IoT, or something else related to web development.
If you’d like to make sure you never miss an article I write, sign up for my newsletter here: https://paigeniedringhaus.substack.com
Thanks for reading, I hope this proves helpful and makes your own local development easier for everyone on your development team.


Top comments (0)