
Introduction
In this hands-on guide, I will show you how ridiculously easy it can be to set up a react front-end container and an express back-end container in Nomad and get them to speak with each other as two microservices.
Our orchestration will be composed of 1 group where the 2 containers (front-end and back-end microservices) will live. For simplicity, we will run a single Nomad agent in development mode (development mode is explained below do not panic!!!) and statically map all required ports.
DO NOT DESPAIR
A second guide will be coming soon where I go more in-depth and explain how you can scale your application and let Nomad take care of the port forwarding by itself. Right now I just want you to get an easy grip on Nomad and discover by yourself that it is not as complicated as you think.
The WHY
we went through some changes in how we orchestrate and schedule workloads. Previously, we were using Jenkins and the team was unhappy with its high maintenance, flaky plugins, and inefficient machine usage. So… One day we had a meeting where new technologies are discussed like Docker Swarm and Kubernetes that was when our Senior Tech Lead dropped a bomb on me and brought this idea:
Guys, why not Nomad? It takes the Unix approach of doing one thing and doing it really well, and won’t force a huge change on our infrastructure like Kubernetes would. It’s also made by HashiCorp (who we love).
I was completely terrified when I heard this I said to myself:
WTF is Nomad?! If I stay quiet they will not notice that I have absolutely no idea of what they are talking about.
That same afternoon I googled for Nomad documentation and I got even more terrified. They do have a lot of documentation but very few examples, as a very visual guy I struggled in those cases.
So… I started to break it up into small pieces by finishing Hashicorp’s Nomad tutorial amongst other videos which I will share at the end of this guide. While trying to implement basic orchestrations by myself I slowly started to progress and become confident enough to try more and more ambitious orchestrations, until I got where I am now.
So I decided to help all of you guys who are struggling like I did and give you actual visual examples with multiple basic microservices talking to each other. I hope you enjoy 😃. If I can help one of you it will already be worth it.
Requirements:
Any Linux distro (Ubuntu is preferable) as your OS.
NodeJS and npm installed.
GIT installed.
Docker installed.
NodeJS, Docker, GIT basic knowledge.
 on [Unsplash](https://unsplash.com?utm_source=medium&utm_medium=referral)](https://res.cloudinary.com/practicaldev/image/fetch/s--kP1mUBXR--/c_limit%2Cf_auto%2Cfl_progressive%2Cq_auto%2Cw_880/https://cdn-images-1.medium.com/max/7852/0%2A5BH1Rr2Om6Cl-sKG)
What the hell is Nomad anyway?
According to its website Nomad is:
A simple and flexible workload orchestrator to deploy and manage containers and non-containerized applications across on-prem and clouds at scale.
Nomad is a scheduler similar to something like ECS, Kubernetes, Swarm, etc. Your scheduler is going to take information like “I want N copies of image X running” and take care of running and maintaining the availability of these containers on a cluster of different hosts.
If a container crashes, Nomad will detect this and reschedule it. Or say one of your Azure instances crashes and it had 3 different microservices instances running on it. Nomad will reschedule these 3 microservice instances on different machines in your cluster (if capacity is available).
Say you have version A of your app running and you want to deploy version B. If you want to maintain up time you will need either some form of Blue/Green or rolling deployment. Your scheduler defines and executes these types of tasks.
Think of it as a lightweight version of Kubernetes and also much easier to learn.
Nomad architecture
I will try to simplify as much as I can but I strongly advise you to still read this nonetheless https://nomadproject.io/docs/internals/architecture/.
Nomad is composed of two agents: Server and Client.
Server — A Server manages all jobs and clients, runs evaluations and creates task allocations. There is a cluster of servers per region and they manage all jobs and clients, run evaluations, and create task allocations. The servers replicate data between each other and perform leader election to ensure high availability. Servers federate across regions to make Nomad globally aware.
Client — A Client of Nomad is a machine that tasks can be run on. All clients run the Nomad agent. The agent is responsible for registering with the servers, watching for any work to be assigned and executing tasks. The Nomad agent is a long-lived process which interfaces with the servers.
IMPORTANT NOTE: We will be running Nomad in development mode as you will see below, this means that our agent will run as both server and client, data will not be persisted which implicates that every time you close Nomad all the data will be gone.
Single Region Architecture:

Within each region, we have both clients and servers. Servers are responsible for accepting jobs from users, managing clients, and computing task placements. Each region may have clients from multiple datacenters, allowing a small number of servers to handle very large clusters.
In some cases, for either availability or scalability, you may need to run multiple regions. Nomad supports federating multiple regions together into a single cluster. At a high level, this setup looks like this:

Nomad installation
Go to this page.
Check which version of Nomad is suitable for your machine CPU and hit download.
Open your terminal inside the same directory where Nomad was downloaded.
-
Proceed to unzip the file with the unzip command.
unzip <file> # Example: unzip nomad_0.10.2_linux_amd64.zip -
Now we just have to move the binary file to our bin.
mv nomad /usr/local/bin -
Check if Nomad is installed by opening another terminal tab or window and running.
which nomad Should return something like this:

👏Congratulations you’ve just installed Nomad!
Now we will containerize our front-end and back-end.
For the sake of simplicity, I chose to fork a super simple project made by João Henrique. To check the forked version click here.
It is also documented, if you have time please check out the article he made explaining the project:
The repository contains:
A front-end built with ReactJS that runs on http://localhost:3000/.
A back-end build with ExpressJS that run on http://localhost:9000/.
Every time the front-end DOM loads it is going to send a GET request to http://localhost:9000/testAPI (our back-end), that GET request will send us a string back with the sentence ‘API is working properly’, which will be displayed on our front-end as well.

I created two docker images to run each of the microservices:
-
Front-end image link, the Dockerfile for this image is composed of:
FROM node:10 # Create app directory WORKDIR /usr/src/app # Install app dependencies # A wildcard is used to ensure both package.json AND package-lock.json are copied # where available (npm@5+) COPY package*.json ./ RUN npm install # Bundle app source COPY . . EXPOSE 3000 CMD [ "npm", "start" ] -
Back-end image link, the Dockerfile for this image is (it is a very similar configuration, only the port EXPOSE was changed to 9000)composed of:
FROM node:10

# Create app directory

WORKDIR /usr/src/app

# Install app dependencies

# A wildcard is used to ensure both package.json AND package-lock.json are copied

# where available (npm@5+)

COPY package*.json ./

RUN npm install

# Bundle app source

COPY . .

EXPOSE 9000

CMD [ "npm", "start" ]
For more info on how to run a node application in Docker check this guide, it helped me a lot.
SETUP TIME. YAY!!
-
Open your terminal and type:
nomad agent -dev
We are going to run in development mode as I warned you before.
You should see something like this in your terminal:

- Open a browser and use the following address http://127.0.0.1:4646/ which will give you a full-on UI where you can see your Jobs.

As obvious as it is in the image above, we added no Jobs yet. To add a Job press on Run Job .

In the Job Definition text area is where we will set all our Job Specifications.
Keep in mind that Job Specifications can also be added through the terminal, but as I iterated before, we are keeping it simple, stupid.
The Job Specifications follow the HCL (HashiCorp Configuration Language) format, it is a configuration language built by HashiCorp. Think of it as a JSON format with a few added abstractions.
OUR JOB SPECIFICATIONS FILE
 # Name of your job
job "my_job" {
    # Which region are you running your job
    datacenters = ["dc1"]

    /*
    Job type can be "service", "batch" or "system".
    A "service" job is made for long lived services that should never go down,
    Service jobs are made to run until explicitly stopped by the operator.
    A "batch" job is made for short lived operations which can last
    from a couple of minutes to a few days.
    Batch schedulers are very similar to Service schedulers but with a few optimizations,
    for the batch workload.
    Batch jobs are intended to run until the job is successful, if the Batch task
    exits with an error it will be handled according to the job's restart
    and reschedule stanzas.
    A "system" job is made for registering jobs that should be run on every client,
    that has job's constraints.
    The system job is also used when clients join the cluster or transition into the,
    ready state.

    */

    type = "service"
    # Group represents the same of what a pod is in k8s
    group "web" {
        count = 1
        task "frontend" {
            # The driver used to manage the containers
            driver = "docker"
            config {
                # Image we want to pull
                image = "aderito/react-app"
                # Define the mapped port
                port_map = {
                  frontendPort = 3000
                }
            }
            # Set the computing resources for this task
            resources {
                cpu = 500 # MHz
                memory = 128 # MB
                network {
                    mbits = 10
                    port "frontendPort" {
                        # Set the port that will bridge our orchestration with the container port
                        static = "3000"
                    }
                }
            }

        }
        task "backend" {
            # The driver used to manage the containers
            driver = "docker"

            config {
                # Image we want to pull
                image = "aderito/express-app"
                # Define the mapped port
                port_map = {
                  backendPort = 9000
                }
            }
            # Set the computing resources for this task
            resources {
                cpu = 500 # MHz
                memory = 128 # MB
                network {
                    mbits = 10
                    port "backendPort" {
                      # Set the port that will bridge our orchestration with the container port
                      static = "9000"
                    }
                }
            }

        }

    }
}
Link for the gist here
Let us go through each field:
job "my_job" {
...
}
-
Job — It will define the name of your job and inside of it, you will set all the configurations necessary to accomplish your job to run.
datacenters = ["dc1"]
-
Datacenters — Nomad models infrastructure as regions and datacenters. Regions may contain multiple datacenters. Servers are assigned to a specific region, managing state and making scheduling decisions within that region. In our case, we do not have a real region so we just set it as dc1.
type = "service"
Type — Is the scheduler type that can be used in our job, there are 3 types: service, batch and system.
service job is made for long-lived services that should never go down, Service jobs are made to run until explicitly stopped by the operator. Example: Running a website.
batchjob is made for short-lived operations which can last from a couple of minutes to a few days. Batch schedulers are very similar to Service schedulers but with a few optimizations, for the batch workload. Batch jobs are intended to run until the job is successful, if the Batch task exits with an error it will be handled according to the job’s restart and reschedule stanzas. Example: A web crawler (you probably just want it to run until you got the data you wanted).
system job is made for registering jobs that should be run on every client, that has job constraints. The system job is also used when clients join the cluster or transition into the ready state.
group "web" {
...
}
- Group — Defines a series of tasks that should be co-located on the same Nomad Client. Any task within a group will be placed on the same client.
Note: If you worked with Kubernetes before, you can think of a Group the same way as you do with Pod.
count = 1
- Count — Specifies the number of task groups that should be running under this group. This value must be non-negative. In a nutshell, if you were to add count = 2 it would spawn two times each task, so 2 frontend tasks and 2 backend tasks.
Warning: Do not try to amplify the count in this project for more than 1, because the ports are statically set(as told in the Introduction), which will create an overlap and trigger an error for port already in use.
task "frontend" {
...
}
-
Task — Creates an individual unit of work, such as a Docker container, web application, or batch processing.
driver = "docker" -
Driver — Defines the driver used to manage the containers.
config { ... } -
Config — Specifies the driver configuration, which is passed directly to the driver to start the task.
image = "aderito/react-app" -
Image — Image used for our container.
port_map { ... } -
Mapped Ports — Some drivers (such as Docker and QEMU) allow you to map ports. A mapped port means that your application can listen on a fixed port (it does not need to read the environment variable) and the dynamic port will be mapped to the port in your container or virtual machine.
frontendPort = 3000 -
frontendPort — Is the label we are using to map our container port with our orchestration port.
resources { ... } -
Resources — Describes the requirements an task needs to execute. Resource requirements include memory, network, CPU, and more.
cpu = 500 -
CPU — Defines the processor required specifications in MHz to run this task.
memory = 128 -
Memory — Defines the amount of cache memory required in MBs to run this task.
network { ... } -
Network — Specifies the networking requirements for the task, including the minimum bandwidth and port allocations. When scheduling jobs in Nomad they are provisioned across your fleet of machines along with other jobs and services. Because you don’t know in advance what host your job will be provisioned on, Nomad will provide your tasks with network configuration when they startup.
mbits = 10 -
Mbits — Defines the task’s bandwidth for 10mb/s.
port "frontendPort" { ... } -
Port “frontendPort” — Specifies which port to map according to the label.
static = "3000" Static — Describes the port in our orchestration that will speak with the frontend container which is also 3000.
WARNING: I am not going to specify the task for our backend given the outstanding similarities with our frontend task.
MAGIC TIME!
Copy what is inside the gist.
Paste it inside the http://127.0.0.1:4646/ui/jobs/run text area.
You should see a screen like this:
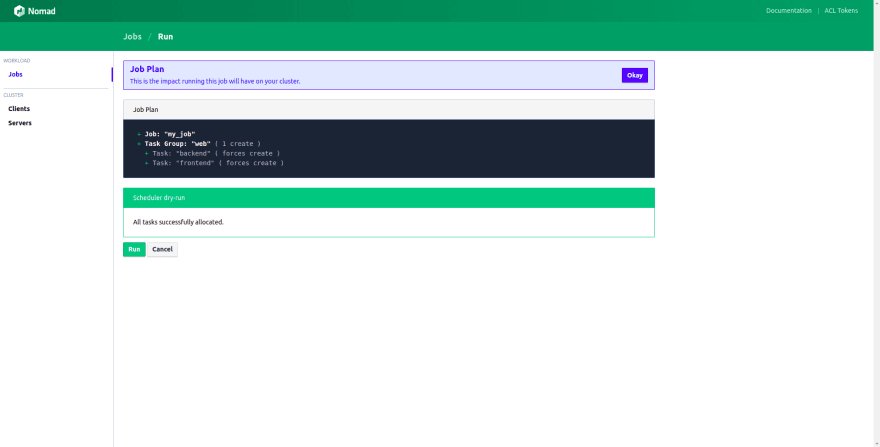
Press Run.
Wait a couple of minutes until the images are completely pulled and the containers are running.
Voila!!

I will not go much further, for now, I want you to explore Nomad’s UI and get acquainted with it.
Sources that helped me in my struggle:
Introduction to HashiCorp Nomad https://www.youtube.com/watch?v=s_Fm9UtL4YU
From Zero to WOW! with Nomad https://www.youtube.com/watch?v=xl58mjMJjrg — This one helped me the most
Easy and Flexible Application Deployment with HashiCorp Nomad https://www.youtube.com/watch?v=A6CuZUoINX0

Top comments (1)
Nomad looks nice, simple and declarative. I'm curious how you deploy a new version of the backend app? Resubmit the job in the ui?