![Cover image for Your own stimulus-like framework in 10 minutes [Part 1]](https://media2.dev.to/dynamic/image/width=1000,height=420,fit=cover,gravity=auto,format=auto/https%3A%2F%2Fdev-to-uploads.s3.amazonaws.com%2Fi%2F831ihzdf5f63c97l4v25.png)
Basecamp introduced very simple and powerful framework to make cool JS stuff. It is awesome to use, especially when you don't need the overwhelming React/Vue/Angular and you don't like jQuery spaghetti code. At first glance it looks like Rails magic, because many things are implemented using convention-over-configuration principle.
Let's call it Stimulator
I want you to build your own Stimulus-like framework right now with me. It's not a replacement of Stimulus, it has a lot of under-the-hood troubles, but we will implement all features of Stimulus and add more (which will be released in Stimulus 2.0). I will try to show you the simplest solution, step by step, so any JS beginner can understand the flow. Each step has a snapshot on github, where you can look it up in case you're lost.
If you are not familiar with Stimulus, please refer to https://stimulusjs.org/ and read small guide. I don't want to overwhelm this article with Stimulus concepts, so I expect that you already know them.
Ok, let's define what we want to implement. I took the very basic example from https://stimulusjs.org/ and adapted it a little bit to the structure that we will implement. Let's name our framework Stimulator!
<div data-controller="Hello">
  <input data-target="Hello.name" type="text">

  <button data-action="click->Hello#greet">
    Greet
  </button>

  <span data-target="Hello.output">
  </span>
</div>
// We will not use modules and import to simplify this tutorial
// import { Controller } from "Stimulus"

class extends Controller {
  // In stimulus you have to define targets like this
  // static targets = [ "name", "output" ]
  // but we will do it automatically

  greet() {
    this.outputTarget.textContent =
      `Hello, ${this.nameTarget.value}!`
  }
}
File structure
Let's start to build gradually. You don't need node_modules, gulp, yarn and all these heretic stuff. Create folder stimulator, and one file in it: index.html. Create html for our controller:
<!-- index.html -->
<!DOCTYPE html>
<html lang="en">
<head>
  <meta charset="UTF-8">
  <title>Stimulator</title>
</head>
<body>
  <!-- Our empty controller -->
  <div data-controller="Hello">

  </div>
</body>
</html>
Register controller
Now we need our Stimulator to find our Contoller. Create three files index.js, Controller.js and HelloController.js in script folder;
// script/Controller.js
// Here we will have all our logic
class Controller {

}

// script/HelloController.js
// Every controller you define in html page
// must have appropriate class.
class HelloController extends Controller {

}

// script/index.js
// We need it now only to initialize HelloController
new HelloController();
Don't forget to include your scripts in index.html. Set attribute defer, it will initialize your scripts after DOM will be ready.
<head>
  <!-- ... -->
  <script src="script/Controller.js" defer></script>
  <script src="script/HelloController.js" defer></script>
  <script src="script/index.js" defer></script>
</head>
Current code snapshot: https://github.com/PavelTkachenko/stimulator-dev-to/tree/file_structure
As you remember we need to find our controller on index.html page.
class Controller {
  constructor() {
    // Set our controller name
    this._setControllerName();
    // Find it (node) on the page
    this._setContainer();
  }

  // We just take our class name (e.g. HelloController) and
  // remove word "Controller" from it.
  // So our this._name is "Hello" now
  _setControllerName() {
    this._name = this.constructor.name.substr(0, this.constructor.name.length - 10);
  }

  // After we obtained name of the controller, we can find it on the page
  _setContainer() {
    this._container = document.querySelector(`[data-controller="${this._name}"]`);
  }
}
As you can see I use lodash(_) before properties and methods. It's a convention of declaring private properties and methods, because JS doesn't have them by design.
Open your index.html in browser, enter the developer console and initialize your HelloController by printing new HelloController();. You can see that controller successfully registered name and container.
Register targets
Next we need to register our targets. Expand your HTML part of controller.
<div data-controller="Hello">
  <input data-target="Hello.name" type="text">

  <button data-action="click->Hello#greet">
    Greet
  </button>

  <span data-target="Hello.output">
  </span>
</div>
Now we have two targets Hello.name and Hello.output. We need targets to easily find them in our Controller class.
Add new method _registerTargets to Controller base class:
  _registerTargets() {
    // Find all nodes with data-target attribute
    const targetElements = this._container.querySelectorAll("[data-target]");

    // Loop over nodes
    Array.from(targetElements).forEach(element => {
      // Get value from data-target and add ability to define
      // more than 1 target separating them with ","
      // e.g. data-target="Hello.name,OtherController.foo"
      const dataTargets = element.getAttribute("data-target").split(",");
      // Loop over such targets
      dataTargets.forEach(dataTarget => {
        // Extract controller and target name
        const [controller, target] = dataTarget.split(".");
        // Assign target to controller if it belongs to it
        if (controller === this._name) {
          // e.g. For hello.name we now have
          // nameTarget property
          this[`${target}Target`] = element;
        }
      })
    });
  }
Don't forget to invoke method in your constructor
constructor() {
  this._setControllerName();
  this._setContainer();
  // Register our targets
  this._registerTargets();
}
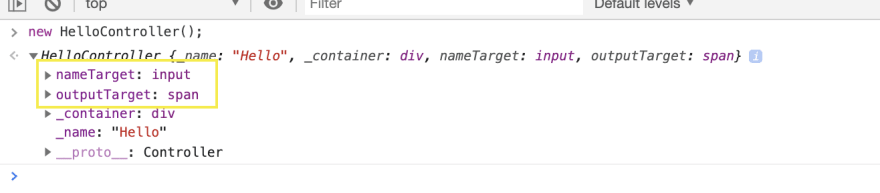
Now check that your Controller can handle targets. Go to browser console, type new HelloController(), and you will see all targets in it.

Current code snapshot: https://github.com/PavelTkachenko/stimulator-dev-to/tree/register_targets
Register actions
Almost done. Finally we need to register our actions. Add method _registerActions to Controller.js. It is very similar to _registerTargets:
_registerActions() {
  // Very similar to _registerTargets, but
  // we also need to extract trigger to create
  // appropriate event listener
  const actionElements = this._container.querySelectorAll("[data-action]");
  Array.from(actionElements).forEach(element => {
    const dataActions = element.getAttribute("data-action").split(",");
    dataActions.forEach(action => {
      const trigger = action.split("->")[0];
      const funcName = action.split("#")[1];
      element.addEventListener(trigger, (e) => {
        // If function is defined in your Controller
        // it will be called after event triggered
        if (this[funcName] !== undefined) {
          this[funcName](e);
        }
      });
    })
  });
}
Don't forget to invoke method in constructor:
  constructor() {
    this._setControllerName();
    this._setContainer();
    this._registerTargets();
    // Register our actions
    this._registerActions();
  }
Now our framework is ready. Let's test it with our HelloController. Add method greet to it:
class HelloController extends Controller {
  greet() {
    this.outputTarget.textContent =
      `Hello, ${this.nameTarget.value}!`
  }
}
Current code snapshot: https://github.com/PavelTkachenko/stimulator-dev-to/tree/register_actions
Go to browser and check how it works!

Color mixer
Let's test our framework with a more difficult task. It will be color mixer, which produces color from Red, Green and Blue inputs. Also it has "Random" button to generate random color.
Let's start with our layout.
<!DOCTYPE html>
<html lang="en">
<head>
  <meta charset="UTF-8">
  <title>Stimulator</title>
  <script src="script/Controller.js" defer></script>
  <script src="script/ColorController.js" defer></script>
  <script src="script/index.js" defer></script>
  <style>
    .field {
      width: 200px;
      text-align: right;
    }

    .result {
      height: 200px;
      width: 200px;
    }
  </style>
</head>
<body>
  <div data-controller="Color">
    <div class="field">
      <label for="red">Red</label>
      <input name="red" type="number" min="0" max="255" data-target="Color.red">
    </div>
    <div class="field">
      <label for="green">Green</label>
      <input name="green" type="number" min="0" max="255" data-target="Color.green" >
    </div>
    <div class="field">
      <label for="blue">Blue</label>
      <input name="blue" type="number" min="0" max="255" data-target="Color.blue">
    </div>
    <div class="field">
      <button data-action="click->Color#mix">Mix colors</button>
      <button data-action="click->Color#random">Random</button>
    </div>
    <div class="result" data-target="Color.result"></div>
  </div>
</body>
</html>
Add our controller with logic.
class ColorController extends Controller {
  mix() {
    const r = this.redTarget.value;
    const g = this.greenTarget.value;
    const b = this.blueTarget.value;

    this.resultTarget.style.background = `rgb(${r},${g}, ${b})`;
  }

  random() {
    this.redTarget.value = this.randomInt(0, 255);
    this.greenTarget.value = this.randomInt(0, 255);
    this.blueTarget.value = this.randomInt(0, 255);

    this.mix();
  }

  randomInt(min, max) {
    return Math.floor(Math.random() * (max - min + 1)) + min;
  }
}
Look! Works like a charm:

Current code snapshot: https://github.com/PavelTkachenko/stimulator-dev-to/tree/color_mixer
That's all for today folks. Next time we will add storage using data attributes (props), add auto-detect changing for our props, lifecycles and even more. As you can see implementation is very simple, it is not suitable for production of course. Main point here is that you can easily experiment and prototype different cool things. Maybe some day you will create a next-gen JS framework, which will be used by developers in every part of planet Earth and beyond.

Top comments (4)
Amazing job!
Would you please write a tutorial how to bind a var from controller to html using double curly brackets like in angular.
Look forward to hearing from you!
Sorry for such delay. I will include it in part 2.
Very good article. When comes the second part ? 😉
Sorry for not posting part 2. I have a busy days right now. I hope I will have time to continue in January 2020.