
Time for another important release to the Busywork platform. This year has already brought some great improvements to the platform with cloneable workflows, an improved database view, and new integrations.
This release solves two important problems:
- Easily securing data
- Less work when building workflows
Roles
This one has been on the top of the list for some time and now it’s here. We’ve added Roles to the system, allowing you to define data access permissions for tables in your database on CRUD-level.
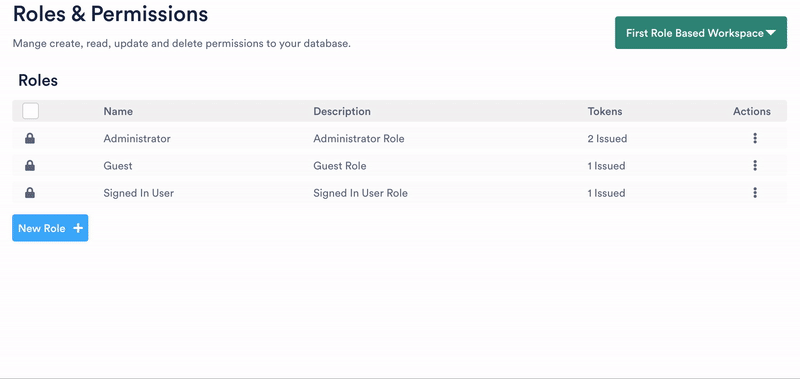
With this feature, we’ve predefined some workspace roles (that you can’t delete, but you can edit) that could come in handy. This also simplifies the workflow with Busywork. The roles that we’ve defined are:
Administrator
This role has full access to all operations on all tables, by default. Administrator access is granted by an API token. You’re allowed to restrict the permissions for the administrator as you like.
Guest
Is the default role, if no access token is passed to the Busywork API. This role can be used for publically readable data if you use parts of Busywork for e.g. CMS.
Signed in User
The “Signed In User” is a role that’s coupled with the user management system of your workspace (if you’re using one). Any query that creates a new database object is contributed to the authorized user, that has made the API call.
Now when that user needs to read objects from the database, and the design states that a user can only access their own objects, giving this role read access will ensure that no other user is able to read that user’s data.
Permissions
This release of roles and permissions is just a start. On our roadmap, we are already planning on supporting more complex types of roles. For now, role permissions are specified for create, read, update and delete operations.

The next release of enhancements to our role and permissions module will allow for more fine-grained control of resource permissions, allowing you to define CRUD access down to the table field.
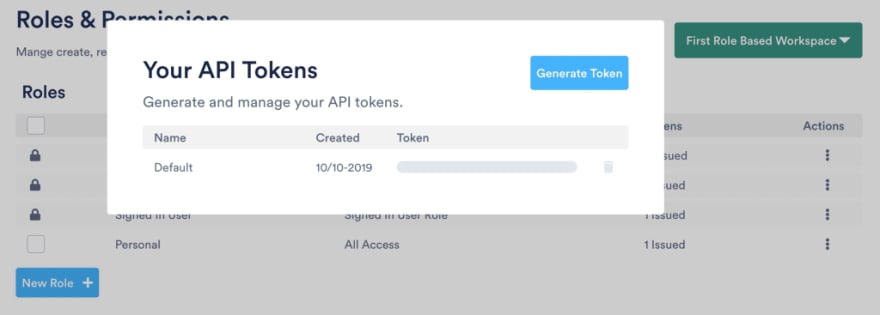
Tokens
For each role, it’s possible to generate multiple access tokens. You can, for instance, generate an administrator token for each member of your team, to have a finer-grained view of who’s editing what.
Examples
This example assumes you already have set up user authentication and authorization in your workspace. Authentication and authorization are cloned to your first workspace: Your Workspace.
In this example, we’ll show how to create the backend of a web app where a user can create and manage e.g. projects. First, we’ll create a table for storing all user’s projects and then use the roles and permissions feature to manage read and write permissions.
Projects Table
First, we create a new table in the table database view. The table will contain the following fields:

Creating a User
Now we need to create a new user in order to add projects for this user. In the workflow called Sample Sign Up we copy the workflow webhook that allows us to execute the workflow.

Running the following curl in your command line will create a user with username yourusername and password astrongpassword.
fetch("https://gracious-lamport-58c4db.busywork.ai/sample-sign-up",
  {
    method: "POST",
    headers: {
      "Content-Type": "application/json"
    },
    body: JSON.stringify(
      {
        username: "yourusername",
        password: "astrongpassword"
      }
    )
  }
)
.then(
  userSignUpSuccess
)
.catch(
  userSignUpFailure
);
This will sign up a new user if the username is available.
Sign In
In order to create a user project we first need an authorized user. This means we have to sign in. Now copy the workflow webhook from the Sample Sign In workflow.
fetch("https://gracious-lamport-58c4db.busywork.ai/sample-sign-in",
  {
    method: "POST",
    headers: {
      "Content-Type": "application/json"
    },
    body: JSON.stringify(
      {
        username: "yourusername",
        password: "astrongpassword"
      }
    )
  }
)
.then(
  userSignInSuccess
)
.catch(
  userSignInFailure
);
The above script will return a response similar to this:
{
    "status": "success",
    "data": {
        "access_token": "eyJ0eXAiOiAiSldUIiwgImFsZyI6ICJIUzI1NiJ9.eyJyb2xlIjogIkNSRUFUT1IiLCAidXNlcl9pZCI6ICI1ZTVmYjkxOWFhZmViNWE5YzE2YzNhOGMiLCAiZXhwIjogMTU4MzM0MDk0My41ODk5NTZ9.WzwIEQ0eNLZgJIlLUjq2ZITzH\_dfWN\_MFlSRY1CvzkU"
    },
    "status_code": "200",
    "message": "user signed in"
}
Save the access_token from the server response.
Creating Projects
From the database table view, click the API button.

This will show you the generated documentation for the tables CRUD operations.

In the Roles & Permissions section, you can see that the signed-in user has full privileges.
Now you want to copy the code snippet for the POST method of the API, the one that creates a new project.
fetch("https://musing-lumiere-9f4d9f.busywork.ai/db/Projects/" + id, {
method: "POST",
    headers: {
"Authorization": "Bearer eyJ0eXAiOiAiSldUIiwgImFsZyI6ICJIUzI1NiJ9.eyJyb2xlIjogIkNSRUFUT1IiLCAidXNlcl9pZCI6ICI1ZTVmYjkxOWFhZmViNWE5YzE2YzNhOGMiLCAiZXhwIjogMTU4MzM0MDk0My41ODk5NTZ9.WzwIEQ0eNLZgJIlLUjq2ZITzH\_dfWN\_MFlSRY1CvzkU",
    "Content-Type": "application/json"
    },
    body: JSON.stringify(
{
    "name": "Client Project 1",
    "shipped": true,
    "owner": "CRM Systems Inc.",
    "lines of code": 4400
}
    )
}).then(response => response.json())
We need to add some headers to the request because we want to make an authorized request. Add a Authorization header to the request and the access_token as the value. This means the request is performed by the signed-in user.
Getting Projects
By default signed in users can read objects they’ve created. If we copy the snippet from the API for reading all projects, we should get the projects created by the current user.
fetch("https://musing-lumiere-9f4d9f.busywork.ai/db/Projects?offset=0&limit=100", {
method: "GET",
    headers: {
"Authorization": "Bearer eyJ0eXAiOiAiSldUIiwgImFsZyI6ICJIUzI1NiJ9.eyJyb2xlIjogIkNSRUFUT1IiLCAidXNlcl9pZCI6ICI1ZTVmYjkxOWFhZmViNWE5YzE2YzNhOGMiLCAiZXhwIjogMTU4MzM0MDk0My41ODk5NTZ9.WzwIEQ0eNLZgJIlLUjq2ZITzH\_dfWN\_MFlSRY1CvzkU",
    "Content-Type": "application/json"
    },
body: {}
}).then(response => response.json())
Again we perform the request as an authorized user and get the following data back:
{
    "results": [
        {
            "id": "5e68966f26d01e5bd059f494",
            "name": "Client Project 1",
            "shipped": true,
            "owner": "CRM Systems Inc.",
            "lines of code": 4400
        }
    ]
}
If you try to perform the same request without being authorized, you get the following response:
{
    "status_code": 403,
    "status_descr": "caller is not allowed to read"
}
In this way, we’ve restricted user-created resources to only be readable by the user that has created the record.
What’s next?
The next set of features that we plan on releasing will allow you to visually create validators for fields in your database. This will allow you to set up rules, such as minimum length and the maximum length of a string. While completing this next set of features we’ll be releasing a tutorial series on building a complete web app using Busywork.
Originally published at https://blog.busywork.co.

Top comments (0)