TL;DR
- Basic Troubleshooting Steps: ต้องไล่จากจุดที่เห็นชัดที่สุด ที่เล็กที่สุด แล้วจึงค่อยๆ ขยาย scope ขึ้นไปเรื่อยๆ
- Ephemeral Containers: เป็นวิธีที่จะช่วยให้เรา debug ปัญหาที่ยากต่อการ reproduce ได้สะดวกยิ่งขึ้น โดยการเพิ่ม container เข้าไปยัง Pod ที่ run อยู่ feature นี้ยังเป็น alpha อยู่ อาจเปลี่ยนแปลงได้ตลอดเวลา และ มัน disable โดย default ถ้าจะใช้ต้องไปเปิด feature gates ที่ api-server ก่อน
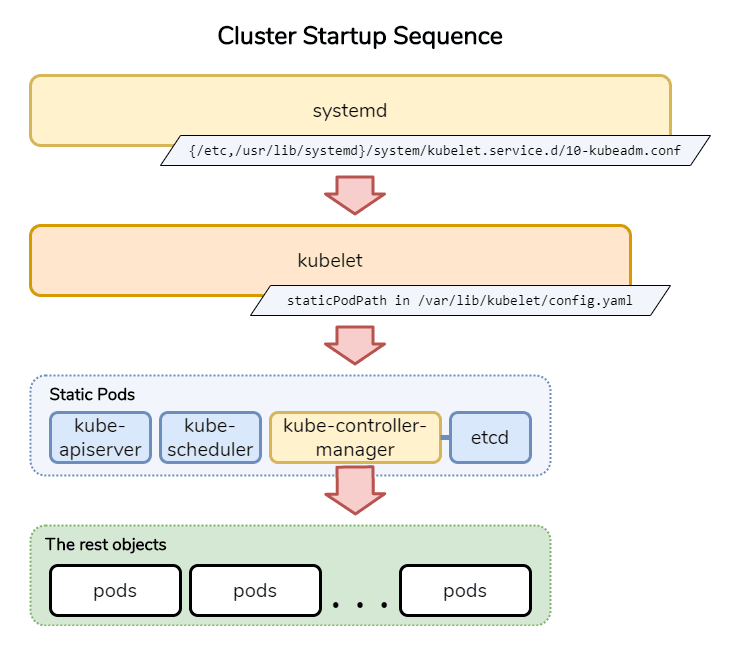
- Cluster Start Sequence: เริ่มจาก systemd ไป start kubelet และ container engine จากนั้น kubelet start static pod ที่เป็น control plane จากนั้น kube-controller-manager ซึ่งเป็น 1 ใน static pods ทำการอ่านค่าจาก etcd แล้ว create resource ต่างๆ ที่เหลือทั้งหมด
- Monitoring: ตอนนี้ใช้ Metric Server เป็นตัวรวบรวม metric ต่างๆ และ provide standard API ให้คนอื่นเรียกใช้ผ่านมัน
- Plugins: ถ้า command ของ kubectl ไม่เพียงพอกับความต้องการของเรา เราสามารถเขียนเพิ่มเองได้ในรูปของ plugins
- Managing Plugins: มี project ชื่อ krew เป็น plugin ของ kubelet ที่ทำหน้าที่เป็น plugin manager คอยจัดการ plugin ต่างๆ ให้ ทั้ง install, upgrade และ uninstall
- Sniffling Traffic With Wireshark: ใช้ plugin หนึ่งของ krew ชื่อ sniff โดยมันจะไป start docker container ที่มี tcpdump มา dump network ของ container เรา
- Logging Tools: kuebernetes ใช้ fluentd เป็น unified logging layer เพื่อรวบรวม log แล้ว ship ไป ยัง logging backend ต่างๆ
- More Resources
Basic Troubleshooting Steps
ในการ troubleshoot ปัญหาที่เกิดขึ้นใน kubernetes cluster ของเราควรเริ่มต้นจากอะไรที่เห็นชัดเจนและเล็กที่สุดก่อน จากนั้นค่อยๆ ขยายขึ้นมาในระดับ cluster โดย steps ทำงานเป็นได้ดังนี้
- Error ที่เกิดขึ้นจาก command line
- Log และ สถานะของ Pods
- ใช้ shell เพื่อเข้าไป troubleshoot ใน pods หรือ container
- ตรวจสอบสถานะ และ resources ของ Node
- RBAC, SELinux หรือ AppArmor สำหรับ security settings
- ตรวจสอบ API calls ของ kube-apiserver
- Enable auditing
- ตรวจสอบ network ระหว่าง node รวมทั้ง DNS และ firewall
- ตรวจสอบ master server controller ว่า run ครบหรื่อมี error อะไรเกิดขึ้นหรือไม่
Ephemeral Containers
ตั้งแต่ v1.16 เป็นต้นมา เราสามารถเพิ่ม container เข้าไปยัง Pod ที่ run อยู่ได้ โดยที่ไม่ต้อง re-create pod ใหม่ ด้วยความสามารถนี้ช่วยให้ investigate ปัญหาที่ยากต่อการ reproduce ได้สะดวกยิ่งขึ้น container ทีเพิ่มเข้าไปใน Pods ที่ run อยู่เรียกว่า "ephemeral containers"
feature นี้ยังคงเป็น alpha อยู่ อาจเปลี่ยนแปลงได้
ด้วยความที่มันถูกเพิ่มเข้าไปใน Pod run อยู่แล้ว ทำให้มันไม่มีความสามารถบางเหมือน container ทั่วไป เช่น
- ไม่มี ports ดังนั้นจึงระบุ
ports,livenessProbeและreadinessProbeไม่ได้ - เนื่องจาก Pod resource มีคุณสมบัติ immutable (เปลี่ยนแปลงไม่ได้) ดังนั้น ephemeral containers ใช้
resourcesไม่ได้
สามารถดูคุณสมบัติเพิ่มเติมได้จาก EphemeralContainer reference documentation
การเพิ่ม ephemeral containers ไม่สามารถทำผ่าน pod.spec โดยใช้ kubectl edit ได้
ephemeral containers ถูก disable โดย default ดังนั้นต้องทำการ enable ก่อนโดยเพิ่ม
--feature-gates=EphemeralContainers=trueใน options ของ api-server ใน/etc/kubernetes/manifests/ kube-apiserver.yaml
การใช้งาน Ephemeral Container ก่อน v1.18 ต้องสั่งงานผ่าน API ดังนี้
# สร้าง pod ตัวอย่างที่ไม่มี shell

$ kubectl run ephemeral-demo --image=k8s.gcr.io/pause:3.1 --restart=Never
pod/ephemeral-demo created

# เพิ่ม ephemeral container เข้าไปใน pod

$ cat > ec.json << EOF
{
    "apiVersion": "v1",
    "kind": "EphemeralContainers",
    "metadata": {
            "name": "ephemeral-demo"
    },
    "ephemeralContainers": [{
        "command": [
            "sh"
        ],
        "image": "busybox",
        "imagePullPolicy": "IfNotPresent",
        "name": "debugger",
        "stdin": true,
        "tty": true,
        "terminationMessagePolicy": "File"
    }]
}
EOF

$ kubectl replace --raw /api/v1/namespaces/default/pods/ephemeral-demo/ephemeralcontainers -f ec.json
$ kubectl describe pod ephemeral-demo
(...)
Ephemeral Containers:
debugger:
    Image:      busybox
    Port:       <none>
    Host Port:  <none>
    Command:
    sh
    Environment:  <none>
    Mounts:       <none>
(...)

# Attach ไปยัง ephemeral container เพื่อทำการ debug

$ kubectl attach -it example-pod -c debugger
ถ้าใน v1.18 สามารถ run kubectl alpha debug -it ... ได้เลย
# สร้าง pod ตัวอย่างที่ไม่มี shell

$ kubectl run ephemeral-demo --image=k8s.gcr.io/pause:3.1 --restart=Never
pod/ephemeral-demo created

# เพิ่ม ephemeral container เข้าไปใน pod เพื่อทำการ debug

$ kubectl alpha debug -it ephemeral-demo --image=busybox --target=ephemeral-demo
Cluster Start Sequence
ถ้าเรา setup cluster ของเราด้วย kubeadm หรือ tool automation อื่นๆ ที่ใช้ kubeadm ลำดับการ startup ของ cluster เราจะเริ่มต้นดังนี้
-
systemdของแต่ละเครื่องใน cluster จะทำการ start kubelet ขึ้นมาก่อน ซึ่งเราสามารถตรวจสอบ parameter ต่างๆ ในการ startkubeletได้จาก configuration file ของมันที่{/etc,/usr/lib/systemd}/system/kubelet.service.d/10-kubeadm.conf -
kubeletจะทำการ start Static Pod โดยเข้าไปอ่าน file ที่ระบุมาใน parameter--config=ซึ่ง default จะเป็น/var/lib/kubelet/config.yamlจากนั้น หาตัวแปรstaticPodPathซึ่งเป็นตัวที่ระบุ path ที่เก็บ configuration file ของแต่ละ static pod ซึ่ง โดย default จะชี้ไปที่/etc/kubernetes/manifests/จากนั้นจึงทำการ start static pod ตาม configuration file โดยปกติจะมี 4 control plane pods นี้etcdkube-controller-managerkube-schedulerkube-apiserver
-
kube-controller-managerที่ทำหน้าที่เป็น watch loop และ controllers จะอ่าน data จากetcdเพื่อทำการสร้าง resources ที่เหลือทั้งหมด
Monitoring
การ monitoring ทุกคนคงรู้จักกันดีอยู่แล้วว่ามันคือการไปเอาค่า (metric) ต่างๆ จาก infrastructure และ application เพื่อนำมาตรวจวัดและวิเตราะห์ เพื่อต่อยอดในการทำงานอื่นๆ ต่อไป
ใน kubernetes เมื่อก่อนจะใช้ Heapster ในการรวบรวม metrics ตาม components ต่างๆ ใน cluster แต่ตอนนี้ Heapster ได้ deplicated ไปแล้ว และมีสิ่งที่มาแทนเรียกว่า Metrics Server โดย Metric Server ทำหน้าที่ตัวรวบรวม metrics เช่นเดิม เพิ่มเติมคือมี standard API ซึ่งจะให้ agent ต่างๆ เข้ามาดึงข้อมูลไปทำงานต่อ เช่น การทำ autocalers (เพิ่มจำนวน replica ตาม workload) เป็นต้น
ในส่วนของ data store และ visualization ของที่คู่กับ Heapster ก็คือ cAdvisor เมื่อ Heapster ไม่อยู่แล้วจึงมี tool ตัวอื่นขึ้นมมาแทนนั่นคือ Prometheus ซึ่งเป็น application ที่อยู่ใน CNCF เช่นเดียวกับ Kubernetes โดย Prometheus ทำหน้าที่เป็น plugin ของ kubernetes ที่ใช้ในการดึงค่าของ resources ต่างๆ ใน cluster ผ่าน Metric Server นอกจากนั้นมันยังมี library ในภาษาต่างๆ เพื่อ integrate และ ดึง metric ในระดับ application ด้วย
Plugins
ถ้า kubectl ไม่พอความต้องการของเรา เราสามารถเขียน sub-command เพิ่มได้เอง เพียงแค่ตั้งชื่อให้ขึ้นต้นว่า kubectl- เช่น kubectl-sniff แล้ววางไว้ใน directory ไหนก็ได้ที่ระบุไว้ใน environment variable ชื่อ PATH จากนั้นเปลี่ยน mode ให้ execute ได้ เราก้ได้ sub-comand ใหม่ขึ้นมาแล้ว
ตัวอย่างการสร้าง plugin ขึ้นมาใช้เอง
# สร้าง plugin และ register ให้ kubectl เรียกได้

$ cat > kubectl-foo << EOF
#!/bin/bash

# optional argument handling
if [[ "\$1" == "version" ]]
then
    echo "1.0.0"
    exit 0
fi

# optional argument handling
if [[ "\$1" == "config" ]]
then
    echo "\$KUBECONFIG"
    exit 0
fi

echo "I am a plugin named kubectl-foo"
EOF
$ chmod +x ./kubectl-foo
$ echo $PATH
/usr/local/bin:/usr/bin:/usr/local/sbin:/usr/sbin:/home/admin/.local/bin:/home/admin/bin
$ sudo mv ./kubectl-foo /usr/local/bin

# List plugins

$ kubectl plugin list
The following compatible plugins are available:

/usr/local/bin/kubectl-foo

# ทดลองใช้งาน

$ kubectl foo
I am a plugin named kubectl-foo
$ kubectl foo version
1.0.0

# จะเห็นว่า kubectl pass environment variables ทุกอย่างมาให้ script เราด้วย

$ export KUBECONFIG=~/.kube/config
$ kubectl foo config
/home/admin/.kube/config
$ KUBECONFIG=/etc/kube/config kubectl foo config
/etc/kube/config
ข้อควรรู้
-
ถ้าเราตั้งชื่อ plugin เป็น
kubectl-foo-bar-bazเราจะใช้ได้แบบkubectl foo bar baz
$ echo -e '#!/bin/bash\n\necho "My first command-line argument was $1"' > kubectl-foo-bar-baz $ sudo chmod +x ./kubectl-foo-bar-baz $ sudo mv ./kubectl-foo-bar-baz /usr/local/bin $ kubectl plugin list The following compatible plugins are available: /usr/local/bin/kubectl-foo /usr/local/bin/kubectl-foo-bar-baz $ kubectl foo bar baz arg1 --meaningless-flag=true My first command-line argument was arg1 -
ในการเรียกใช้ plugin จะใช้ concept best match
$ echo -e '#!/bin/bash\n\necho "My fizz buzz command-line argument was $1"' > kubectl-fizz-buzz $ echo -e '#!/bin/bash\n\necho "My fizz command-line argument was $1"' > kubectl-fizz $ sudo chmod +x ./kubectl-fizz-buzz $ sudo chmod +x ./kubectl-fizz $ sudo mv ./kubectl-fizz-buzz /usr/local/bin $ sudo mv ./kubectl-fizz /usr/local/bin $ kubectl plugin list The following compatible plugins are available: /usr/local/bin/kubectl-fizz /usr/local/bin/kubectl-fizz-buzz $ kubectl fizz buzz arg1 My fizz buzz command-line argument was arg1 $ kubectl fizz arg1 My fizz command-line argument was arg1 -
ถ้าตั้งชื่อมี
underscore (_)เวลาเรียกใช้สามารถใช้ได้ทั้งunderscore (_)และdash(-)
$ echo -e '#!/bin/bash\n\necho "I am a plugin with a dash in my name"' > ./kubectl-foo_bar $ sudo chmod +x ./kubectl-foo_bar $ sudo mv ./kubectl-foo_bar /usr/local/bin $ kubectl plugin list The following compatible plugins are available: /usr/local/bin/kubectl-foo_bar $ kubectl foo_bar I am a plugin with a dash in my name $ kubectl foo-bar I am a plugin with a dash in my name -
ถ้ามี file ชื่อซ้ำกันในแต่ละ directory ของ
PATHfile ที่อยู่ใน directory แรกจะถูกเรียกใช้งาน (overshadow)
$ echo $PATH /usr/local/bin:/usr/bin:/usr/local/sbin:/usr/sbin $ echo -e '#!/bin/bash\n\necho "My first command-line argument was $1"' | sudo tee /usr/local/bin/kubectl-overshadow $ echo -e '#!/bin/bash\n\necho "My second command-line argument was $1"' | sudo tee /usr/sbin/kubectl-overshadow $ sudo chmod +x /usr/local/bin/kubectl-overshadow $ sudo chmod +x /usr/sbin/kubectl-overshadow $ kubectl plugin list The following compatible plugins are available: /usr/local/bin/kubectl-overshadow /usr/sbin/kubectl-overshadow - warning: /usr/sbin/kubectl-overshadow is overshadowed by a similarly named plugin: /usr/local/bin/kubectl-overshadow error: one plugin warning was found $ kubectl overshadow 1234 My first command-line argument was 1234 -
ไม่สามารถ override built-in sub-command ของ kubelet ได้
$ echo -e '#!/bin/bash\n\necho "My version is 1.0.0"' | sudo tee /usr/local/bin/kubectl-version
$ sudo chmod +x /usr/local/bin/kubectl-version

$ kubectl plugin list
The following compatible plugins are available:

/usr/local/bin/kubectl-version
- warning: kubectl-version overwrites existing command: "kubectl version"

error: one plugin warning was found

$ kubectl version
Client Version: version.Info{Major:"1", Minor:"18", GitVersion:"v1.18.2", GitCommit:"52c56ce7a8272c798dbc29846288d7cd9fbae032", GitTreeState:"clean", BuildDate:"2020-04-16T11:56:40Z", GoVersion:"go1.13.9", Compiler:"gc", Platform:"linux/amd64"}
Server Version: version.Info{Major:"1", Minor:"18", GitVersion:"v1.18.2", GitCommit:"52c56ce7a8272c798dbc29846288d7cd9fbae032", GitTreeState:"clean", BuildDate:"2020-04-16T11:48:36Z", GoVersion:"go1.13.9", Compiler:"gc", Platform:"linux/amd64"}
Managing Plugins
ถ้าหากคุณ develop plugin ออกมาได้ดี และ อยากจะ distribute ให้คนอื่นใช้ด้วย มี project ที่ชื่อว่า krew ซึ่งทำหน้าที่เป็น plugin manager ของ kubectl อ่านเพิ่มเติมการ upload plugin ของตัวเองได้จาก Developer Guide
ในส่วนนี้จะขอแสดงเพียงติดตั้งและใช้งานบน CentOS
-
# Installation $ sudo yum install git $ ( set -x; cd "$(mktemp -d)" && curl -fsSLO "https://github.com/kubernetes-sigs/krew/releases/latest/download/krew.{tar.gz,yaml}" && tar zxvf krew.tar.gz && KREW=./krew-"$(uname | tr '[:upper:]' '[:lower:]')_amd64" && "$KREW" install --manifest=krew.yaml --archive=krew.tar.gz && "$KREW" update ) $ cat >> ~/.bashrc << EOF export PATH="\${KREW_ROOT:-\$HOME/.krew}/bin:\$PATH" EOF $ source ~/.bashrc # Verification $ kubectl krew version OPTION VALUE GitTag v0.3.4 GitCommit 324f5ed IndexURI https://github.com/kubernetes-sigs/krew-index.git BasePath /home/admin/.krew IndexPath /home/admin/.krew/index InstallPath /home/admin/.krew/store BinPath /home/admin/.krew/bin DetectedPlatform linux/amd64 -
# Download the plugin list
$ kubectl krew update
Updated the local copy of plugin index.

# Discover plugins available on Krew
$ kubectl krew search
NAME                            DESCRIPTION                                         INSTALLED
access-matrix                   Show an RBAC access matrix for server resources     no
advise-psp                      Suggests PodSecurityPolicies for cluster.           no
apparmor-manager                Manage AppArmor profiles for cluster.               no
auth-proxy                      Authentication proxy to a pod or service            no
bulk-action                     Do bulk actions on Kubernetes resources.            no
(...)

# Choose a plugin from the list and install it
$ kubectl krew install whoami
Updated the local copy of plugin index.
Installing plugin: whoami
Installed plugin: whoami
(...)

# Use the installed plugin
$ kubectl whoami
kubecfg:certauth:admin

# List existing plugins
$ kubectl plugin list
The following compatible plugins are available:

/home/admin/.krew/bin/kubectl-krew
/home/admin/.krew/bin/kubectl-whoami

# Keep your plugins up-to-date
$ kubectl krew upgrade
Updated the local copy of plugin index.
Upgrading plugin: krew
Skipping plugin krew, it is already on the newest version
Upgrading plugin: whoami
Skipping plugin whoami, it is already on the newest version

# Uninstall a plugin you no longer use
$ kubectl krew uninstall whoami
Uninstalled plugin whoami
Sniffling Traffic With Wireshark
จากหัวข้อที่แล้วเรารู้จัก knew กันไปแล้ว คราวนี้เรามาใช้ plugin ของมันที่ชื่อว่า sniff เพื่อทำการ tcpdump network ภายใน container ของเรากัน โดยสามารถอ่านรายละเอียดได้จาก github ของ eldadru
$ sudo yum install wireshark
$ kubectl krew install sniff
Updated the local copy of plugin index.
Installing plugin: sniff
Installed plugin: sniff
(...)

$ kubectl run demo --image=nginx  --restart=Never
pod/demo created

$ kubectl sniff -p demo -c demo -o - | tshark -r -
INFO[0000] sniffing method: privileged pod
INFO[0000] using tcpdump path at: '/home/admin/.krew/store/sniff/v1.4.1/static-tcpdump'
INFO[0000] sniffing on pod: 'demo' [namespace: 'default', container: 'demo', filter: '', interface: 'any']
INFO[0000] creating privileged pod on node: 'kube-0002.novalocal'
INFO[0000] pod created: &Pod{ObjectMeta:{ksniff-k9vxv ksniff- default
(...)
 45         37 192.168.93.128 -> 192.168.52.75 TCP 76 40910 > http [SYN] Seq=0 Win=28000 Len=0 MSS=1400 SACK_PERM=1 TSval=3831288949 TSecr=0 WS=128
 46         37 192.168.52.75 -> 192.168.93.128 TCP 76 http > 40910 [SYN, ACK] Seq=0 Ack=1 Win=27760 Len=0 MSS=1400 SACK_PERM=1 TSval=3831285944 TSecr=3831288949 WS=128
 47         37 192.168.93.128 -> 192.168.52.75 TCP 68 40910 > http [ACK] Seq=1 Ack=1 Win=28032 Len=0 TSval=3831288949 TSecr=3831285944
 48         37 192.168.93.128 -> 192.168.52.75 HTTP 145 GET / HTTP/1.1
 49         37 192.168.52.75 -> 192.168.93.128 TCP 68 http > 40910 [ACK] Seq=1 Ack=78 Win=27776 Len=0 TSval=3831285945 TSecr=3831288950
 50         37 192.168.52.75 -> 192.168.93.128 TCP 307 [TCP segment of a reassembled PDU]
 51         37 192.168.52.75 -> 192.168.93.128 HTTP 680 HTTP/1.1 200 OK  (text/html)
(...)
จะเห็นว่า หลักการของมันคือการ ไปสร้าง docker container corfr/tcpdump ที่ attach เข้า network เดียวกับ pod เรา แล้วทำการ tcpdump
Logging Tools
เรื่อง Log ถือเป็นเรื่องใหญ่มากในวงการ IT หลักการโดยทั่วไปของคือ ทำการ ingest log เข้ามาเก็บไว้ที่ seach engine แล้วทำการ query ด้วย search syntax เพื่อแสดงผลผ่าน dashboard ซึ่ง application ที่ได้รับความนิยมคงหนีไม่พ้น Elastic Stack ซึ่งประกอบไปด้วย Elasticsearch, Logstash และ Kibana
ใน kubernetes, kubelet จะทำการ write container log ลง local file ผ่าน Docker logging driver จึงมักใช้ Fluentd หรือ Fluent Bit ในการ รวม log แล้วจึงส่งออกไปยัง log server ไม่ว่าจะเป็น Elasticsearch หรือ Prometheus
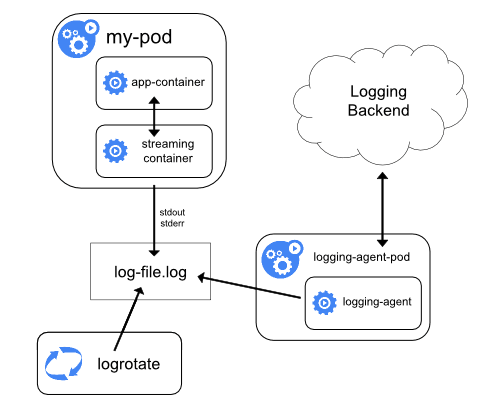
Logging Architecture ของ kubernetes มีดังนี้
-
Logging at the node level
ไม่มีการ ship ออกไปยัง logging backend ทุกอย่างอยู่บนเครื่องใช้ log rotate engine ของ OS นั้นๆ ในการ rotate log ถ้าใน linux ก็จะเป็น logrotate
-
Cluster-level logging architectures
2.1 Using a node logging agent
container ทำการเขียน log ออกทาง
stdoutและstderrจากนั้น log driver ของ container runtime จะทำการ write log ลง local file จากนั้น เราจึงใช้ logging agent เช่นfluentdในการ ship log ออกไปยัง logging backend อย่างเช่น Elasticsearch หรือ Stackdriver Logging2.2 Using a sidecar container with the logging agent
Streaming sidecar container
ในกรณีที่ application container ไม่สามารถ write log ไปยัง
stdoutและstderrได้ จึงต้องมี sidecar ซึ่งเป็น container ที่อยู่ใน Pod เดียวกับ application container เพื่อทำการอ่าน file, socket หรือ journald เพื่อ redirect มายังstdoutและstderrเพื่อให้ log driver ของ container runtime จะทำการ write log ลง local file และ logging agent ทำการอ่าน file นั้นแล้ว ship ไปยัง logging backend ต่อไปSidecar container with a logging agent
ถ้าคุณไม่สะดวกใช้ node-level logging agent ในการ ship log คุณสามารถ install sidecar ที่ทำหน้าที่เป็น logging agent คู่กับ application container เพื่อ ship log ตรงไปยัง logging backend เลยก็ได้
Exposing logs directly from the application
วิธีสุดท้ายถ้าคุณสามารถปรับ application ให้ ship log ไปยัง logging agent เองได้เลย วิธีนี้ก็สามารถทำได้เช่นกัน

![Cover image for LFS258 [11/15]: Logging and Troubleshooting](https://media.dev.to/cdn-cgi/image/width=1000,height=420,fit=cover,gravity=auto,format=auto/https%3A%2F%2Fdev-to-uploads.s3.amazonaws.com%2Fi%2F8h49ew12xxslscib51d4.png)


Latest comments (4)
ยังรอตอนที่ 12 อยู่นะครับ เป็น content ที่ดีมาก
ขอบคุณครับ เดี๋ยวรีบเขียนเลยครับ
This is unreadable
Sorry, I wrote it in Thai. 🙏