
In early 2020 the PlaceExchange SRE team was challenged to build support for the company's first gRPC application that would run on Amazon's Elastic Kubernetes Service (EKS). Our usage of third-party geocoding APIs was beginning to exceed the cost of implementing our own service, and so we decided to build one with a gRPC interface. We had already operated EKS for several months with RESTful services and felt confident in our ability to deliver a platform capable of hosting multiple instances of the API for our developers to work concurrently. Given our extensive use of per-developer environments (namespaces) and adherence to the infrastructure as code model, it seemed natural to extend this pattern to support gRPC services.
As we began to evaluate options for a fully programmatic edge the Ambassador Edge Stack caught our eye for two reasons; it supported Kubernetes Custom Resource Definitions (CRDs) for defining complex routing rules and it was built on the battle tested Envoy proxy. Naturally we had a lot of questions, namely how to support TLS termination and HTTP/2 without burdening the dev team with undue complexity. Thankfully Ambassador has support for both, and armed with that knowledge we set out to extend our EKS PaaS to support Day 1 secure gRPC services.
We put together a hands on tutorial to demonstrate our topology, noting our learnings along the way. We hope this article is helpful to all teams looking to adopt gRPC and that this will take some of the mystery out of operating these types of services.
Architecture
In this exercise you will create one Ambassador deployment on a single k8s cluster and use multiple Host CRDs to request certificates and enable TLS termination for specific domains. You will then deploy two identical gRPC applications and map them to each Host using two distinct Mappings. At the end you will be able to query each service via its respective hostname.
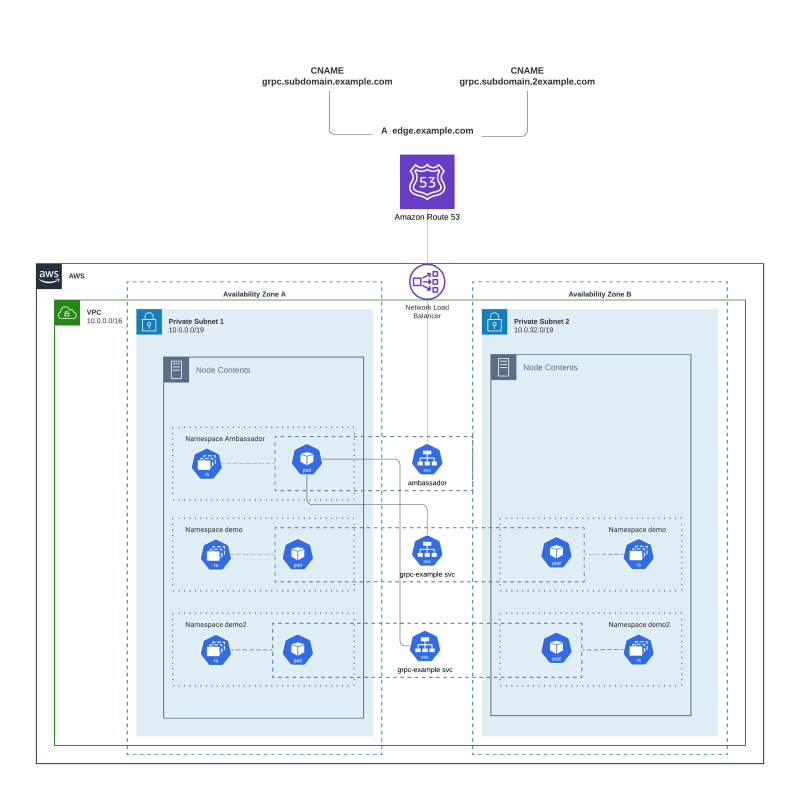
This pattern can be used to give each developer their own "stage" to work in. To enable your team to work concurrently, you can assign one namespace and subdomain to each developer as described in this tutorial.
Mapping objects are simply Ambassador's take on "virtualhost" functionality that exists in all reverse proxy tools. The key difference here is that Ambassador stores this routing relationship as a Kubernetes native CRD, which extends the usefulness of deployment tools like kubectl and Helm.
Objectives
- Deploy your own Ambassador cluster
- Ensure HTTP/2 and TLS support at all levels of the stack
- Build and deploy gRPC application with TLS termination and HTTP/2 support
- Deploy a second instance of the same gRPC application on a different domain
Prerequisites
First things first, clone the example repository from GitHub, you'll need the included docker and k8s manifests complete the steps below.
 placeexchange
/
grpc-example
placeexchange
/
grpc-example
Workshop files for deploying multi-tenant gRPC services with Ambassador
If you're just starting out with Ambassador and gRPC, check out their documentation for a basic primer on how to host a single gRPC service over insecure or secure channels.
Requirements
- A Kubernetes cluster in AWS (EKS recommended)
- Cluster privileges to apply CRDs, namespaces, and deployments
- external-dns OR ability to create hosted DNS records
- Three subdomains, one for ambassador, and one for each developer
- i.e edge.example.com, grpc.subdomain.example.com, grpc.subdomain2.example.com
- Optional: docker registry if you dont want to use the built image
Note: while this tutorial makes use of subdomains it should work with any type of domain name. There is also no requirement that all records use the same root domain.
1. Installing Ambassador
If you have not installed Ambassador you will need to deploy it to your cluster before getting started. If you already have an existing deployment of Ambassador, the "Quick Start method" describes how to edit an existing deployment.
While not included by default, Ambassador documentation recommends using NLBs when terminating TLS within Ambassador. From the docs:
When terminating TLS at Ambassador, you should deploy a L4 Network Load Balancer (NLB) with the proxy protocol enabled to get the best performance out of your load balancer while still preserving the client IP address.
Either installation method describes how to deploy Ambassador with a NLB.
1a Quick Start method
To install Ambassador, follow the quick start instructions. For the purposes of this tutorial, we highly recommend using the YAML method so you can see the modifications required to enable automatic DNS and HTTP/2 support.
After installing Ambassador using any quick start method, you will need to annotate the ambassador service to use the NLB load balancer type and add your preferred DNS name for AES.
$ kubectl edit service -n ambassador ambassador
Here you can use the editor to add the following annotation, replacing "edge.example.com" with your preferred domain:
metadata:
  annotations:
    external-dns.alpha.kubernetes.io/hostname: edge.example.com
    service.beta.kubernetes.io/aws-load-balancer-type: nlb
This will instruct your external-dns deployment to create an A record pointing to the NLB. It will also create a new Network Load Balancer for this service.
1b Manifest method
Alternatively, you can use the packaged manifests located in the kube/ambassador directory. This directory contains the original aes-crds.yaml from Ambassador with a modified aes.yaml (source version 1.4.3). This modified manifest includes an annotation on the service to create an A record for the load balancer (NLB).
aes.yaml
...
---
apiVersion: v1
kind: Service
metadata:
  name: ambassador
  namespace: ambassador
  labels:
    product: aes
    app.kubernetes.io/component: ambassador-service
  annotations:
    service.beta.kubernetes.io/aws-load-balancer-type: "nlb"
    external-dns.alpha.kubernetes.io/hostname: edge.example.com
...
Use Find / Replace in your editor of choice to replace edge.example.com with your preferred DNS name for the API gateway. This will be used by any service that does not provide a host: or :authority: key in its Mapping. Once this is complete you can deploy the aes-crds.yaml and aes.yaml manifests
$ kubectl apply -f kube/ambassador/aes-crds.yaml
$ kubectl apply -f kube/ambassador/aes.yaml
2. Configuring the default host
Edit the aes-host.yaml manifest and use Find / Replace to swap edge.example.com with your preferred DNS name for the API gateway. This should be the same hostname you just provided in the aes.yaml Service annotation. This hostname will be used to access any service that does not provide a host: or :authority: key in its Mapping, which is not used in this tutorial but is useful for troubleshooting Ambassador.
You should also take a moment to Find / Replace registration@example.com with a valid email for your organization.
It may take a few minutes for the NLB spin up and for external-dns to create a new A record pointing to it. Once your domain resolves, you can deploy the aes-host.yaml to create a new Host and TLSContext for Ambassador. This will request a certificate from LetsEncrypt and enable TLS termination for this domain for any service without a host: or :authority: key in its Mapping.
NOTE: if you don't have external-dns deployed in your cluster you can create an A record pointing to your NLB manually, it'll still work. Just remember that you will need to update the record if you delete or recreate the service / NLB for any reason.
$ kubectl apply -f kube/ambassador/aes-host.yaml
You can check the status of the ACME request at any time:
$ kubectl get host -n ambassador
You should see that the certificate is issued and the Host CRD is ready.
NAME   HOSTNAME                    STATE   PHASE COMPLETED   PHASE PENDING   AGE
edge   edge.example.com            Ready                                     11d
If the STATE is not ready, you can use kubectl describe host -n ambassador to see recent events and troubleshoot. Common problems include DNS propagation delays and LetsEncrypt rate limiting.
OPTIONAL: Build the image
If you do not want to use the pre-built image hosted on dockerhub you can build and push to your own registry.
$ docker build ./docker -t <docker_reg>/grpc-demo
$ docker push <docker_reg>/grpc-demo
Be sure to update the Image: value in grpc-demo.yaml and grpc2-demo.yaml to prepare for deployment.
3. Create CNAMEs for service subdomains
In order to route external traffic for each service to Ambassador's NLB, you will need to create CNAMEs for each subdomain that resolve to Ambassador's A record. After creating the records your environment should look something like this.
CNAME grpc.subdomain.example.com -> A edge.example.com
CNAME grpc.subdomain2.example.com -> A edge.example.com
Once this is done, Find All / Replace All grpc.subdomain.example.com with your first service subdomain, and grpc.subdomain2.example.com with your second subdomain.
external-dns is not useful in this scenario as the only Service of type LoadBalancer is managed by Ambassador. You could append multiple domains to the Service's external-dns.alpha.kubernetes.io/hostname annotation, but this becomes unwieldy in actual just in time environment provisioning as your deployment tooling needs to support string parsing / appending.
At this time it is probably easiest to have your infrastructure tooling interact directly with your DNS provider as part of your deployment process.
4. Check TLS termination
At this point, Ambassador is configured and you're ready to deploy a RESTful service to double check everything is working with TLS. Debugging TLS with a gRPC service is tricky so this service will help iron out any problems with certificate requests and DNS.
Deploy the demo and demo2 namespaces
$ kubectl apply -f kube/grpc-example/namespace.yaml
Now deploy the "quote" application
$ kubectl apply -f kube/grpc-example/quote.yaml
The quote.yaml manifest will deploy a RESTful service accessible from https://grpc.subdomain.example.com/backend/. You may need to wait a few moments for Ambassador to request and receive a certificate from LetsEncrypt.
This manifest contains Service, Deployment, Host, Mapping, and TLSContext objects. The Host and TLSContext will allow Ambassador to terminate TLS for grpc.subdomain.example.com.
The included Mapping will route requests to /backend/ to the quote service, hosted on Pod port 8080.
quote.yaml
...
---
apiVersion: getambassador.io/v2
kind: Mapping
metadata:
  name: quote-backend
  namespace: demo
spec:
  host: grpc.subdomain.example.com
  prefix: /quote/
  service: personal:8080
...
If you navigate to this endpoint in the browser you should see some quotes from the Datawire team. If you get a timeout or SSL warning, check the Host record in the demo namespace and make sure your Pods are healthy.
5. Deploy the first gRPC service
Once TLS termination is confirmed, you can deploy the first gRPC service:
$ kubectl apply -f kube/grpc-example/grpc-demo.yaml
This manifest contains Service, Deployment, Mapping objects. Since you have already deployed a Host and TLSContext for the service that you wish to host on the host grpc.subdomain.example.com as part of the quote.yaml there is no need to deploy them as part of this manifest.
You can see that gRPC Mappings use a slightly different syntax
grpc-demo.yaml
...
---
apiVersion: getambassador.io/v2
kind: Mapping
metadata:
  name: grpc-mapping
  namespace: demo
spec:
  headers:
    :authority: grpc.subdomain.example.com
  grpc: True
  prefix: /helloworld.Greeter/
  rewrite: /helloworld.Greeter/
  service: grpc-example:50051
Now its time to test your service. The docker image includes a client that communicates over TLS only:
$ docker run --rm -it -e BACKEND=grpc.subdomain.example.com placeexchange/grpc-demo python greeter_client.py
Greeter client received: Hello, you!
6. Deploy the second gRPC service
Now that you have deployed the first service and confirmed it's working, you can deploy the second service. This service uses the same image with a different Host, TLSContext and Mapping in the demo2 namespace.
grpc2-demo.yaml
...
---
apiVersion: getambassador.io/v2
kind: Mapping
metadata:
  name: grpc-mapping
  namespace: demo2
spec:
  headers:
    :authority: grpc.subdomain2.example.com
  grpc: True
  prefix: /helloworld.Greeter/
  rewrite: /helloworld.Greeter/
  service: grpc-example:50051
This is to demonstrate that you could have n number of subdomains / namespaces, one for each developer on your team.
Now you can test the second deployment:
$ docker run --rm -it -e BACKEND=grpc.subdomain2.example.com placeexchange/grpc-demo python greeter_client.py
Greeter client received: Hello, you!
You now have two development namespaces that allow individual experimentation and deployment with full TLS termination.
Parting Words
We hope that you have found this demonstration of a multiple namespace deployment relevant and useful. Ambassador has made hosting our geocoding application simple, and we look forward to onboarding additional gRPC and RESTful services to our platform in the near future. Here are several resources we found useful as we experimented and deployed Ambassador.
Until next time!

Top comments (0)