
Datadog is a powerful monitoring and security platform that gives you visibility into end-to-end traces, application metrics, logs, and infrastructure. While Datadog has great documentation on their Kubernetes integration, we've observed that there's some missed nuance that leads to common pitfalls.
This blog post will guide you through how to install the Datadog agent on Kubernetes and enable additional features such as DogStatsD and APM via Helm and Porter while avoiding these common pitfalls:
- Not running the Datadog Daemonset on all nodes
- Not adding admission label to your application pods you'd like to use DogStatsD and APM with.
- Overriding environment variables that have been injected by the agent
- Not setting resource limits on the agent to avoid crashing the node/kubelet
Basic Installation
We will use Helm to install the Datadog agent with the default set of values. The default values in Datadog's helm chart, along with Datadog's Autodiscovery feature, is sufficient to give visibility into all cluster level metrics.
These are the commands to install the Datadog agent in your cluster using Helm v3 with the default values. Make sure to copy your API key from Datadog dashboard in the install command.
helm repo add datadog https://helm.datadoghq.com
helm repo update
helm install <RELEASE_NAME> --set datadog.apiKey=<DATADOG_API_KEY> datadog/datadog
Common Pitfall #1: Daemonset not running on all nodes
The Datadog agent is installed as a Daemonset. This means that the agent is designed to run on every node of your Kubernetes cluster. By default, the Datadog agent will assume that none of your nodes has a taint. If you've added taints to some of your nodes, the agent will run and ingest data only on the nodes that do not have taints.
To ensure that the agent runs on every node, you must modify the value agents.tolerations to accommodate all your nodes. You can check the taints on your nodes by running the following command.
kubectl describe node <NODE_NAME>
For example, Kubernetes does not run daemonsets on the master node by default. If there is a master node in your cluster and application pods can be scheduled on it, you need to add the following toleration in the agents.tolerations value of the Datadog Helm chart to retrieve metrics from those pods. Make sure to add the appropriate tolerations based on your node taints.
agents:
    tolerations:
    - key: node-role.kubernetes.io/master
      operator: Exists
      effect: NoSchedule
Enabling DogStatsD and APM
The default installation above exports all cluster level metrics, but you might want to use DogStatsD to track custom application metrics and APM to collect application traces. If you've used DogStatsD or APM before without Kubernetes, you are probably used to manually injecting environment variables like DD_AGENT_HOST for your application code to consume.
On Kubernetes, the Datadog agent automatically injects DD_AGENT_HOST as an environment variable into all your containers so you don't have to make additional configuration to export custom metrics. Ensuring that the agent is running on every single node of your cluster is essential to make this work, because the IP address of the pod's host node will be injected.
To automatically inject these environment variables into your pods, you need to enable the Datadog admission controller. You can do this by modifying these values on the Datadog Helm chart.
clusterAgent:
   admissionController:
      enabled: true
      mutateUnlabelled: false
Common Pitfall #2: Not adding the admission label to your pods
For the admission controller to inject environment variables into your pod, you must add the following label to the pods you'd like to use DogStatsD in: admission.datadoghq.com/enabled: "true". If you'd rather inject the environment variables to all pods running on your cluster, you can also just set the admissionController.mutateUnlabelled value to true.
You can verify that the environment variable has been injected to the pod by running the following command:
kubectl exec -it <POD_NAME> -- printenv | grep "DD_AGENT_HOST"
If the admission controller is working as expected, you'll see the IP address of the node that the pod is running on. You can confirm this by running:
kubectl describe pod <POD_NAME>
The Node field should match the IP address printed above.
Common Pitfall #3: Overriding the injected environment variable
The environment variables injected by the admission controller do not take precedence over the environment variables set on the pod. If you already have DD_AGENT_HOST defined on the pod, that value will override what's automatically set by the Datadog agent. Make sure to remove both DD_AGENT_HOST and DD_ENTITY_ID from your pod configuration for the agent to work as expected.
Now that you have the admission controller working, modify the following values on the Helm chart to enable DogStatsD and APM:
dogstatsd:
   port: 8125
   useHostPort: true
   nonLocalTraffic: true
datadog:
   apm:
     enabled: true
Common Pitfall #4: Not setting resource limits on the agent
The default set of values on Datadog do not have any limits set on the resources it can consume. This may result in a node or kubelet crash if the agent consumes more resources than what its host node can accommodate. The resource limit you should set depends on the size of your nodes and the operations you are performing on the agent. There are many places that these resource limits can be set, but we've found that in most cases the agent pod itself is the primary consumer of resources. You can set the limits on the agents with the following values:
agents:
   containers:
      agent:
         resources:
            limits:
               cpu: 200m
               memory: 256Mi
            requests:
               cpu: 200m
               memory: 256Mi
Then run the install command again with the values above. You can check from your Datadog dashboard whether custom metrics and application traces are being received properly.
Summary
We went over how to install the Datadog agent via Helm and configure additional features like DogStatsD and APM while avoiding common pitfalls. This is the annotated values.yaml file that you can use as reference:
agents:
   containers:
      agent:
         resources:
            limits:  # <-- set limits on the agent as necessary
            requests:
    tolerations:
    - key: node-role.kubernetes.io/master # <-- Add if nodes have taints
      operator: Exists
      effect: NoSchedule
clusterAgent:
   admissionController:
      enabled: true
      mutateUnlabelled: false # <-- `true` if you want to inject env vars to all pods
datadog:
   apiKey: <API_KEY> # <-- Your api key, can be found in Datadog Dashboard
   apm:
      enabled: true
   logs:
      enabled: true
      containerCollectAll: false # <-- `true` if you want to collect logs from all containers
dogstatsd:
   port: 8125
   useHostPort: true
   nonLocalTraffic: true
Installing via Porter
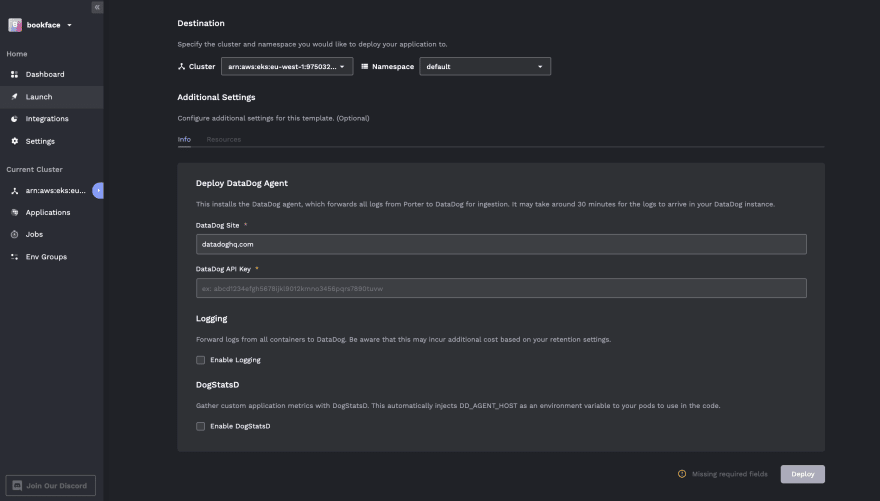
Porter is a platform as a service (PaaS) that runs in your own cloud, specifically in your own Kubernetes cluster. On Porter, you can install the Datadog agent as a one click add-on and enable DogStatsD, APM, and logging by a simple toggle.
1.Navigate to the launch tab and select the Datadog add-on.

2.Put in your ingestion key, toggle the features you'd like to use, then hit deploy!

Top comments (1)
This is a good point, thanks 👀