
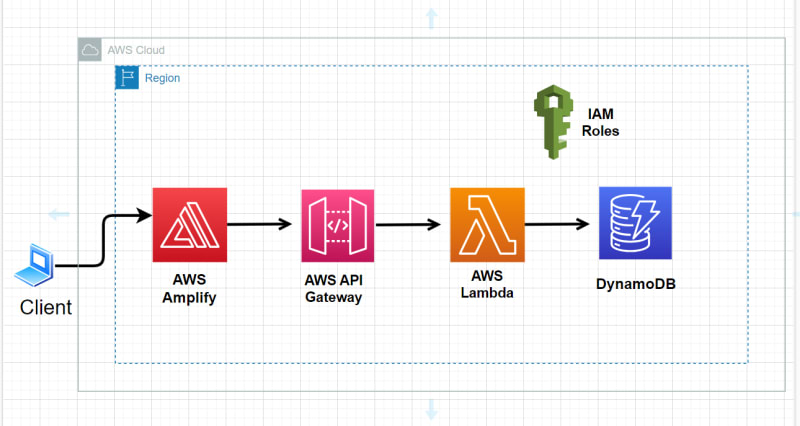
Use Case: This small project lets you use AWS services such as AWS Amplify, API gateway, Lambda, IAM service and DynamoDB to host a small web application. Users will be able to access the web app using an URl and they can fill the details such as name, weight, height. Based on the information, the BMI will be calculated and the details will be stored in Dynamo DB.
1)AWS Aplify: AWS Amplify is a complete solution that lets frontend web and mobile developers easily build, ship, and host full-stack(Dynamic-interactive) applications on AWS, with the flexibility to leverage the breadth of AWS services as use cases evolve. No cloud expertise needed.
2)AWS API Gateway: Using API Gateway, you can create RESTful APIs and WebSocket APIs that enable real-time two-way communication applications. API Gateway supports containerized and serverless workloads, as well as web applications.
3)AWS Lambda: AWS Lambda is a serverless, event-driven compute service that lets you run code for virtually any type of application or backend service without provisioning or managing servers. Here we are triggering lambda functions using API calls.
4)Dynamo DB: fully managed, serverless, key-value NoSQL database designed to run high-performance applications at any scale.
Lets Deep dive into the steps now.
Step 1: Set Up database
Create Dynamo Db table: Search for Dynamo Db and create table

Enter the name of table, partition key and sort key.

Keep other things default and hit on create table.
Our table is created. Now go to the table and find out its ARN. We need this ARN while giving permissions to Lambda to access this table.

Under general information, additional info you will find the ARN. Copy it and store in notepad.

Step 2: Create an IAM role for AWS Lambda function.
Go To IAM service.
Hit on Roles and then Create role.

Select AWS Service and Lambda and hit Next.

Now we have to create a policy to atach to the Role we created.

Cleck on JSON. (We will create a policy using JSON)

Remove the default JSON code. Paste the code from the link and in the last modify the DynamoDb table ARN(We noted down):
https://github.com/pramodbs543/AWS-API-Lambda-DB/blob/main/Lambda-Role-policy
Hit Next and give the policy a name. Hit on create policy bottom right corner.

Goto Roles again. Create Role. Select AWS service, Lambda and hit next. Now select the policy we have created.

Click on the next botton at the right bottom corner. Give name to the role. Lastly hit the Create role on right bottom. Our role is created successfully.

Note: You can attach cloudwatch logs policy also to your lambda role in order to debug the issue with lamda function.
Step 3: Create Lambda Function.
Search for lambda. Create a function.

Select Python as our Run time.

In the same window, under change default execution role select the role we created for lambda. Hit on create function.

Now we will paste our code here.

Copy the code from https://github.com/pramodbs543/AWS-API-Lambda-DB/blob/main/lambda-function And paste in the function box above. You have to change the DynamoDb table name at line 14.
Then Hit on the Deploy button.

Now lets test weather the code works fine or not. Click on the Test on the same window.


In Event JSON We have to enter in correct format(as our code is configured)
This is sample Json.

Click on the Test button. the code will execute with the input provided in JSON format. Now coma back to code tab. You will see the output returned by our lambda function.

Lets go to our Dynamo Db table and explore table items. We will check the entries in the table.

Select Scan and hit on Run button. You will see the entries in the table.

Now lets set up our APIs.
Step 4: Create AWS API:
Go to AWS API service. Select Rest API and click on Build.
Create New API. Give API a name.

Click on Actions, create a method with POST. Select integration type as Lambda function(Default it is). Enter our lambda function name(Drop down, you just start typing the name). Click on save.

Enable CORS for cross domain access. (Our APIs will be access by AWS Amplify which has a different domain). After enabling CORS, *Deploy the API *.

You can test the API by clicking the Test button. But don't forget to provide the JSON input.

Click on Action, Deploy API. Enter Deployment stage as New stage. Stage name. Hit the Deploy.

You will get one URL. This is our end API end point. Note it down because we need this to be added on out front end web app.

Step 5:: Create index.html file using the code from https://github.com/pramodbs543/AWS-API-Lambda-DB/blob/main/index.html
Don't forget to modify the API end pint at line number 61.
Create a zip folder of index.html file.
Step 6: Deploy the front end web application on AWS amplify.
Search AWS amplify. Click on get started.


Deploy without git provider.


Drag and deploy the zip folder here. Save and deploy.

Our application is successfully deployed. We are ready to go. Open the domain url. You will see the efforts paid off....
The Window is as shown below.

As soon as you hit the calculate and record button, you will get response in alert format as shown on the screen. Parallely the records will be stored in DynamoDB table as shown below.


Top comments (0)