
Disclaimer: The title is blatant clickbait :p
5 minutes is definitely not enough to learn git in its entirety.
However while I can't promise that you'll become a git expert at the end of the blog, I can promise 5 minutes are more than enough to nail down the basics of this magical tool.
With that being said, let's dive in!
📌 First Of All, What Even Is Git?
It's a time machine!
Well...at least sort of...
Technically, git is called a "distributed version control system" which in non-nerd terms means that it allows you to keep track of changes in your code over time by creating versions and, going back to a particular version if you somehow mess up (accidentally deleting stuff you didn't want to, encountering some bug that exists in the current version of the code but didn't in the previous version).
It also allows you to maintain separate versions of the code base that can be worked on independently as well as collaborate with other developers on the same project.
📌 Git Terminology
Let's go over some of the basic keywords you'll hear a lot when using Git:
Repository/Repo: The repository contains all your project's files and folders that you mean to track over time.
Commit: A commit is a snapshot of the changes you've made to your code at a specific point in time.
Branch: A branch is like a "parallel-universe" equivalent of your code. It's a separate version of your project that you can work on without affecting other branches. Branches are really useful when you want to experiment without messing up your current codebase.
Merge: Merging is the process of combining changes from two or more branches into a single branch. Git allows you to merge branches easily with a single command, even if there are conflicts between the changes.
Push/Pull: Pushing changes means sending your changes from your local repository to a remote repository (hosted on a different server such as GitHub/GitLab) so that others can access them. Pulling changes means fetching changes from a remote repository and merging them into your local repository.
Remote: A remote refers to a version of a repository hosted on a different server or location. Whenever we clone, push, or pull a repo we do so from the remote, updating the local repository with reference to the remote. A hosted remote allows us to easily collaborate with other people on the same project.
📌 Commonly Used Git Commands
Some of the most commonly used Git commands include:
git init: Initializes a new Git repositorygit clone: Creates a local copy of an existing Git repositorygit add: Adds changes to the staging areagit commit: Creates a new commit with the changes in the staging areagit status: Displays the status of the repository, including changes that have been made and the current branchgit push: Pushes changes to a remote repositorygit pull: Pulls changes from a remote repository to a local repositorygit branch: Lists all branches in the repository or creates a new branchgit checkout: Switches between different branches or commitsgit merge: Merges changes from one branch into another branch
📌 Time to Git It Done!
Let's try using git ourselves this time!
This would require you to install git and set it up first, which can be done from this website right here: https://git-scm.com/downloads
You could also just look up the platform-specific steps on YouTube or Google!
Step 1: Initializing The Repository
Start by going into a folder where you wish to create the project and open a terminal (for Linux and Mac) or Command Prompt / PowerShell (for Windows).
Now type in the following command:
git init
This step initializes your git repository.
Step 2: Setting Up The Remote
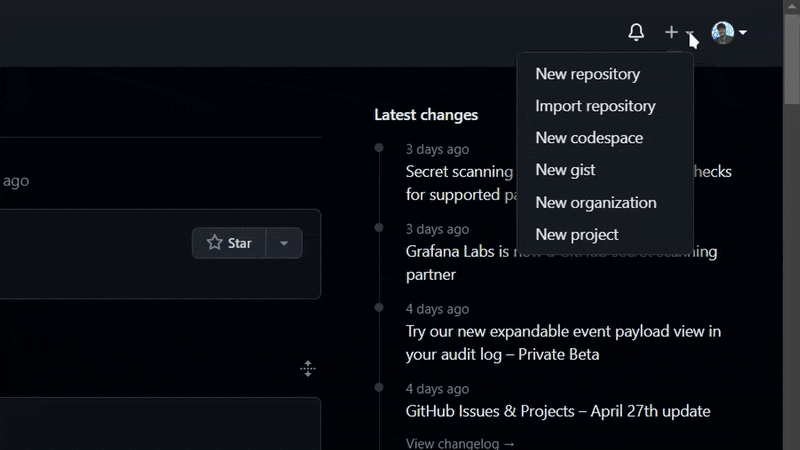
Before we proceed, let's create the remote i.e. the place where our code will be stored over at GitHub.
Start by creating a new repo on GitHub like so,
Note: Make sure you copy the link to the remote 👇
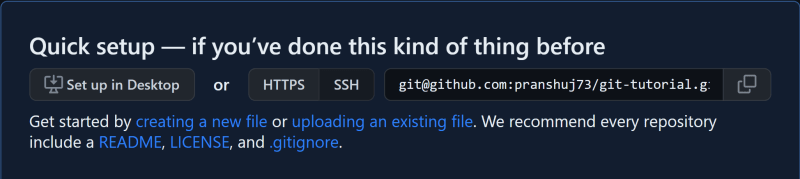
Step 3: Setting Up The Remote
Now we run the following commands to set our GitHub repo as our remote.
git remote add origin <link to your remote>
which in my case would be git remote add origin git@github.com:pranshuj73/git-tutorial.git
Now we got our repo all set up! We can start adding our files now. For this tutorial, I'll just be adding a simple README file but you're free to add whatever you want!
Once you're done adding your files, time to become hackerman again.
Open the terminal and add the following commands (dw I'll explain everything in a bit):
git add .
git commit -m "a commit message"
git push origin main
Now let's see what each line does here.
-
git add .The
git addcommand stages the modified files for commit. Think of an item being packed before being put into a box and shipped out. So we just bubble-wrapping our code here.In case you make further changes to your code before you have committed, you need to run the
git addcommand again. -
git commit -m "hello there"The git commit command creates a commit (duh!). This commit is a snapshot in time, very much like a save point in a video game. You can choose to revert your codebase to this save point any time you wish or see the files at the time of commit.
An important thing to note, you need to specify a message for each commit. This allows you as well as the collaborators to easily identify a commit. It is good practice to include what you did (refactoring, debugging, or adding a feature, etc.) as well as the component affected.
For example, "made navbar responsive" is a much better commit message than "peepee poopoo"
-
git push origin mainNow finally, we just upload our commit to our remote called "origin" to a branch called "main". Now you can go over to GitHub and see your commits and files!

Yay! You have got the basics of git now. Hopefully. Maybe.
This tutorial only covers the most basic commands (emphasis on "most") that you'll be using often when working on projects.
I'll probably make a part two of this blog post for concepts like branches, merging, cherry-picking, stashing, etc.
Meanwhile, feel free to refer to Google or check out the videos I've linked below to learn more about git!
Happy Hacking 🙌
📌 Bonus Stuff
Here are tutorials you can refer to learn further in-depth about git and git commands:
Also, a really useful site that I have bookmarked in case I mess up using git: Oh Shit Git
Thank you for making it to the end!
If you liked the article share it with your friends, maybe share it on Twitter and tag me!
This article is brought to you by...
Me!
Hey, I'm Pranshu and I like writing about my developer journey and sharing resources, tips, and tutorials just like this one.
Feel free to reach out to me at Twitter or Discord (Pranshu#7926)

Top comments (2)
Thx, that's very helpful
I'm glad you found it helpful!!