Two new directives - Intersection and Mutation and the long-awaited global dark mode.
This is the first of hopefully many future "Have You Seen" (HYS) articles, which will bring you updates about upcoming yet unreleased features of Quasar Framework keeping you, our beloved community, apace to the development of Quasar.
As Quasar evolves, the aim of the team is to offer the tools and utilities you need the most as front-end/ user interface/ clientside application developers. And, while doing so, Quasar's breadth and depth in components, directives, it's internal plugins and it's CLI increases.
We like to think of Quasar as not just a framework, but rather a great front-end developer experience.
So, enough plugging of Quasar. Let's get into what's coming up next in Quasar 1.3.
The Intersection Directive
The new Intersection directive solves the problem of firing events when certain elements of the UI enters or exits the viewable screen (viewport) or when a target element "intersects" with an ancestor element. It uses the relatively new Intersection Observer API built into most browsers. For those using IE 11, there is a polyfill available.
From the MDN docs, we can read some examples of why this new Quasar directive and it's use of the Intersection Observer API might be good for you:
- Lazy-loading of images or other content as a page is scrolled.
- Implementing "infinite scrolling" web sites, where more and more content is loaded and rendered as you scroll, so that the user doesn't have to flip through pages.
- Reporting of visibility of advertisements in order to calculate ad revenues.
- Deciding whether or not to perform tasks or animation processes based on whether or not the user will see the result.
Here are a couple of other use cases:
- Auto-pause a video, when it's scrolled out of view.
- Checking to see how much content is read on a page.
- Tracking how much time a user has an ad in view.
You'll probably agree, those are a good number of situations you might want to be in control of within your application at some point.
Using the Intersection Directive
So, hopefully by now, you are wondering how to use this new directive in Quasar. The directive's API has two elements, a handler and one modifier. And, it is called like any other Vue directive.
<div v-intersection="onIntersection" class="example-observed text-center rounded-borders">
  Observed Element
</div>
The Handler Function/ Object
The directive's parameter can either be a handler function with a parameter of the Intersection Observer Object or a config object which would also contain the handler function and some config properties. We'll go over the handler function first.
The handler function's entry object parameter has a good number of properties.
The Entry Object
| Property Name | Type | Sub-Properties | Type |
|---|---|---|---|
| boundingClientRect | Object | ||
| bottom | Number | ||
| height | Number | ||
| left | Number | ||
| right | Number | ||
| top | Number | ||
| width | Number | ||
| x | Number | ||
| y | Number | ||
| intersectionRatio | Number | ||
| intersectionRect | Object | ||
| bottom | Number | ||
| height | Number | ||
| left | Number | ||
| right | Number | ||
| top | Number | ||
| width | Number | ||
| x | Number | ||
| y | Number | ||
| isIntersecting | Boolean | ||
| rootBounds | Object | ||
| bottom | Number | ||
| height | Number | ||
| left | Number | ||
| right | Number | ||
| top | Number | ||
| width | Number | ||
| x | Number | ||
| y | Number | ||
| time | Number |
As you can see, the entry object holds a lot of possible information.
For brevity's sake of this article, if you want to learn more about each of the advanced properties' purposes, you can refer to the docs of MDN.
To use the entry function, it's just like using any other directive in Vue needing a handler.
<template>
  <div class="relative-position">
    <div class="example-area q-pa-lg scroll">
      <div class="example-filler" />

      <div v-intersection="onIntersection" class="example-observed text-center rounded-borders">
        Observed Element
      </div>

      <div class="example-filler" />
    </div>

    <div
      class="example-state rounded-borders text-center absolute-top q-mt-md q-ml-md q-mr-lg text-white"
      :class="visibleClass"
    >
      {{ visible === true ? 'Visible' : 'Hidden' }}
    </div>
  </div>
</template>
And the handler code:
<script>
export default {
  data () {
    return {
      visible: false
    }
  },

  computed: {
    visibleClass () {
      return `bg-${this.visible ? 'positive' : 'negative'}`
    }
  },

  methods: {
    onIntersection (entry) {
      this.visible = entry.isIntersecting
    }
  }
}
</script>
This is a simple example of changing CSS due to the intersection happening between the viewport and a div using the entry.isIntersecting property. (again, for brevity of the article, we've left out the CSS of the component)
Here is what it looks like in action.

The once Modifier
There may be situations, where you only need the intersection observer to fire an event once. This is possible with the once modifier.
      <div v-intersection:once="onIntersection" class="example-observed text-center rounded-borders">
        Observed Element
      </div>
This will stop the observer after it has fired it's event a single time.
There will be a few other more complex examples in the docs with the upcoming release, including how to use a config object instead of just the handler function.
The Mutation Directive
Much like the Intersection Directive is based on the Intersection Observer API, the Mutation Directive is based on the Mutation Observer API.
The main goal of adding this API to browsers was to give web page/ application developers the ability to observe and fire off a callback, if and when an element in the DOM has changed. Before this API, developers used Mutation Events, which are now deprecated because they were inherently flawed. So, the Mutation Observer is the newer better API to detect and react to DOM changes. For those using IE 11, there is a polyfill available.
The use cases for the Mutation Directive are limitless, but here are a few neat ones to think about.
- Enhancing Drag and Drop functionality
- Creating an Undo and Redo feature for text field input
- Reacting to changes from third-party libraries not directly under your control
The Mutation directive requires a handler callback function, which will be fired when the conditions given are met. The callback function should return a boolean once it's finished.
In general, there can be three different types of changes you can observe.
- Attribute changes
- Character data changes
- Child list changes
These changes are options given in the type property of the mutationList object offered as an argument to your callback function.
For attribute changes, you can see if, for instance, a style or a class is updated. For character data changes, you can follow when input fields are updated by the user. For Child list changes, you can observe when child elements are added or removed from the target element's DOM tree.
As you can imagine, this opens up a large window of possibilities.
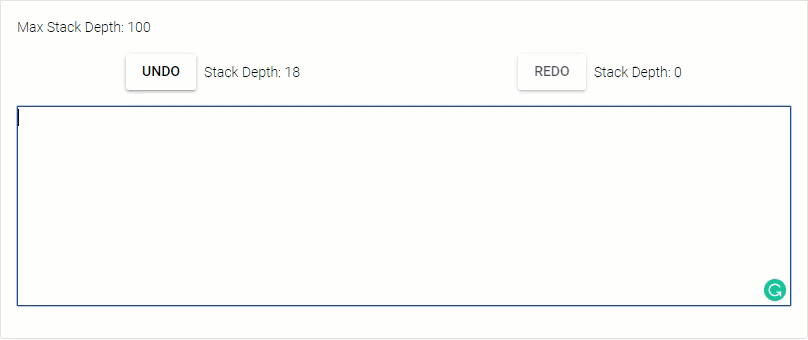
Here is an example of character data observance.
<template>
  <div class="q-pa-md">
    <div class="row justify-start items-center q-pb-md">
      Max Stack Depth: {{ maxStack }}
    </div>
    <div class="row justify-around items-center q-pb-md">
      <div class="row items-center q-px-md q-gutter-sm">
        <q-btn label="Undo" :disable="undoStack.length === 0" @click="undo"></q-btn>
        <div>Stack Depth: {{ undoStack.length }}</div>
      </div>
      <div class="row items-center q-px-md q-gutter-sm">
        <q-btn label="Redo" :disable="redoStack.length === 0" @click="redo"></q-btn>
        <div>Stack Depth: {{ redoStack.length }}</div>
      </div>
    </div>
    <div class="row justify-around items-center q-pb-md">
      <div ref='editor' v-mutation="handler" contentEditable='true' class="editable"></div>
    </div>
  </div>
</template>
And the script code:
<script>
// maximum depth of a stack
const MAX_STACK = 100

export default {
  data () {
    return {
      maxStack: MAX_STACK,
      undoStack: [],
      redoStack: [],
      undoBlocked: false
    }
  },

  methods: {
    undo () {
      // shift the stack
      const data = this.undoStack.shift()
      if (data !== void 0) {
        // block undo from receiving its own data
        this.undoBlocked = true

        this.$refs.editor.innerText = data
      }
    },
    redo () {
      // shift the stack
      const data = this.redoStack.shift()
      if (data !== void 0) {
        // unblock undo from receiving redo data
        this.undoBlocked = false

        this.$refs.editor.innerText = data
      }
    },
    handler (mutationRecords) {
      mutationRecords.forEach(record => {
        if (record.type === 'characterData') {
          this.undoStack.unshift(record.oldValue)
          this.checkStack(this.undoStack)
          this.clearStack(this.redoStack)
        }
        else if (record.type === 'childList') {
          record.removedNodes.forEach(node => {
            if (this.undoBlocked === false) {
              // comes from redo
              this.undoStack.unshift(node.textContent)
            }
            else {
              // comes from undo
              this.redoStack.unshift(node.textContent)
            }
          })
          // check stacks
          this.checkStack(this.undoStack)
          this.checkStack(this.redoStack)
          this.undoBlocked = false
        }
      })
    },

    checkStack (stack) {
      if (stack.length > this.maxStack) {
        stack.splice(this.maxStack)
      }
    },

    clearStack (stack) {
      stack.splice(0)
    }
  }
}
</script>
And this is what it looks like in action.
Again, we'll have more examples in the docs, coming soon! But, to whet your whistle, check out this drag and drop example....

The Modifiers
The Mutation Directive also has a total of 7 possible modifiers. Here they are with a short description of what they are used for:
once - Call the handler callback only once, when the first DOM change was registered. Once fired, the observation of changes will stop.
childList- Observe the target node (and, if the 'subtree' modifier is also set, its descendants) for the addition of new child nodes or removal of existing child nodes.
subtree - Extend the observation of changes to the entire subtree of nodes rooted at the target.
attributes - Watch for changes to the value of attributes on the node or nodes being observed.
characterData - Observe the specified target node or subtree for changes to the character data contained within the node or nodes.
attributeOldValue - Record the previous value of any attribute that changes when observing the node or nodes for attribute changes.
characterDataOldValue - Record the previous value of a node's text whenever the text changes on nodes being observed.
You will see more examples of the Mutation directive in the docs, once 1.3.0 is released.
Going to the "Dark" Side
Yes! Due to popular demand, Quasar will now offer a global dark mode. Turning the dark mode on will be really easy. Anywhere in your app, just do
this.$q.dark.set(true)
You can also set the dark mode within quasar.conf.js as follows....
framework: {
  config: {
    dark: true
  }
}
...or external to components, just do this.
import { Dark } from 'quasar'

// set status
Dark.set(true) // or "false" or "auto"
You can also check for the state of dark mode easily too.
Inside a Vue component...
console.log(this.$q.dark.isActive) // true, false
...or outside of components with the Dark object.
import { Dark } from 'quasar'

// get status
console.log(Dark.isActive) // true, false
The "auto-dark" Mode
Something smartly added to the dark mode is the "auto-dark mode". This can be advantageous, especially for mobile apps, as the darker screen will allow modern smart phones (those with OLED or AMOLED screens) to save power, extending battery life.
The auto-detection works by looking at prefers-color-scheme: dark media query and is dynamic. If the client browser/platform switches to/from Dark mode while your app is running, it will also update Quasar's Dark mode (if Dark mode is set to auto).
Conclusion
So there you have it. Three new great features coming up in Quasar's next minor release 1.3.0. What do you think of the new features? Let us know in the comments below.
Interested in Quasar? Here are some more tips and information:
More info: https://quasar.dev
GitHub: https://github.com/quasarframework/quasar
Getting Started: https://quasar.dev/start
Chat Server: https://chat.quasar.dev/
Forum: https://forum.quasar.dev/
Twitter: https://twitter.com/quasarframework
Donate: https://donate.quasar.dev

Oldest comments (8)
Great article! So much love for Quasar ❤️
Great Article, thanks for this pre-information and mouth-watering :-)
Cant wait ... Many thanks to all Team-Members!!
Quasar ftw!!! I'm using that auto dark mode ASAP.
Wow, really impressive! Looking forward to the drag-drop thingie.
Great stuff - Quasar once again giving Devs what they need!
Quasar <3
Hey Scott,
Great article!
One correction from me:
config: {
dark: true
}
true must be Boolean, not String
Keep up the good work :)
Good catch Jesse! Corrected in the article.
And thanks!
Scott