
Hi friends 👋
Today, let's look at how to write a KILLER GitHub README file.

The README is the first touch point with anyone new to your repo.
A well-developed README can inform, engage, and invite participation.
This is particularly useful when you’re launching a new project or at times where it is critical that developers engage with your repo.
A good example of this is when you submit a repo to Quine's Creator Quests, which is a new type of open source “bounty” that rewards developers for creating cool new repos that the community loves.
In a Creator Quest, having a well-written README could literally help you take a prize home. 💸
If you want to participate, sign up for free at Quine and head to Quests.
1️⃣ README... What is it? 🔮
The README file, usually a .txt or .md file, is the most important file in the project. It is the landing page of your open-source project and is the most visible piece of documentation.
Here's an example of a README from the Hoppscotch project.

Your README is where you set the tone for your project.
This is why there are a couple of elements that should be included. ⬇️
2️⃣ The 10 Building Blocks 🧱
READMEs can be written in various ways; some better than others.
Below are the main types of sections you should be able to find in a professional README.
If the below buckets are relevant to your project, I recommend you try to add these into your README. 👇
1. Coming up with a name
A significant amount of repos don't have good names. Spending a bit of time thinking of a memorable name is always a good startegy.
2. Write an introduction
A summary explaining the purpose and target audience of your project.
3. Table of Contents
Many repos fail to add this section. A well-organised table of contents helps make your repo clear and understandable.
4. Prerequisites & Installation Instructions
List out the various step-by-step installation instructions.
Clarity here is essential. ✨
5. User Guide / Demo
This section focuses on how to use your project with examples and optional commands. One method I like is adding a screen recording of how to run the project and how any user could use it.
6. Documentation / Help Center
If you wrote a documentation, an FAQ or a space that can act as a Help Center, write about it or add the link to it here.
7. Contribute
Explain briefly how to Contribute to your file and add a link to your CONTRIBUTING.md file. Here or in a separate section, you can also take the opportunity to list your contributors and thank them.
8. Acknowledgements
Use or help obtain external resources. This section is needed only if it is relevant to your repo.
9. Contact information
If you are trying to grow your project and build collaboration, this section is very useful.
10. Permission Information
This refers to the type of License you have picked for your project. It is essential to clarify how others can use your content. 👍
3️⃣ Beautify it 💄
READMEs can be written in various text formats, with Markdown being the most common one.
Markdown allows you to use simple, plain-text syntax, enabling the creation of headers, lists, links, and other elements to make the document more readable and organised.
Markdown also supports HTML code, which widens the spectrum of things you can do. 👇
Logo
If you have built a logo for your project, adding it at the start of your README is standard practice.
To do this, add and modify the below code in your README:
<p align="center">
    <!--     You can add your logo in the _src_ below -->
    <img src="https://www.amug.com/wp-content/uploads/2016/09/you-logo-here-300x106.png" />
</p>
Badges
You often find good READMEs to provide badges in their introductory section.
These can look like this:
As you can see, these highlight some areas the maintainer(s) want to shed light on.
Here's how you add static badges to your README:
<p align="center">
  <!-- You can add your badges here -->
  <!-- If you have never added badges, head over to https://img.shields.io/badges/static-badge, follow the instructions and generate URL links to add below -->
  <img src="https://img.shields.io/badge/STARS-20K-green"  />
  <img src="https://img.shields.io/badge/FORKS-15K-blue"  />
  <img src="https://img.shields.io/badge/npm-v.0.21.0-red"  />
  <img src="https://img.shields.io/badge/LICENSE-MIT-green"  />
</p>
Note: There are advanced dynamic options we won't get into here.
Icons
Icons have grown quite prominent in recent years.
You can add them to your Contact Information or in your Tech Stack section. You can find an example of the icon for X (formerly Twitter) and Linkedin.
To build your own:
1️⃣ Head over to this repo here
2️⃣ Find the Socials and/or Tech Stack you Copy its link
3️⃣ Paste the link into the href shown below
<p align="left">
<!--     Add your own socials inside "href" -->
<a href="https://twitter.com/fernandezbap" target="blank"><img align="center" src="https://img.shields.io/badge/X-000000?style=for-the-badge&logo=x&logoColor=white" alt="fernandezbap" /></a>
</p>
<p align="left">
<a href="https://www.linkedin.com/in/baptiste-fernandez-%E5%B0%8F%E7%99%BD-0a958630/" target="blank"><img src="https://img.shields.io/badge/LinkedIn-0077B5?style=for-the-badge&logo=linkedin&logoColor=white" alt="https://img.shields.io/badge/LinkedIn-0077B5?style=for-the-badge&logo=linkedin&logoColor=white"  /></a>
</p>
4️⃣ Advanced Tips 🛠️
Interactive content 🎥
You can consider embedded videos or widgets for interactive content.
In the Demo section of your README, you can embed a video.
⭐️ TIP: Sometimes, videos' sizes are too large, and it makes more sense to upload the video on YouTube and then link things out.
If you want to make it more visual, here's the code to add a picture/video thumbnail that redirects to your Youtube video once you click on it.
<p align="center">
    <a href="THE LINK TO YOUR YOUTUBE VIDEO HERE">
        <img src="YOUR IMAGE/VIDEO THUMBNAIL SOURCE HERE"/>
    </a>
</p>
Markdown Mastery ✨
There are many advanced Markdown features to make your README look good.
You can check out this cool repo that lists some of these features.
A particular one I like is the toggle list or more commonly known as the collapsible section.
They can be particularly useful to keep your README looking concise and slick. Here's an example:

Here's the MARKDOWN template to build your own toggle list:
    <details>
       <summary>Toggle List Example</summary>

        ### Heading
        1. ABC
        2. DEF
           * Hello
    </details>
Bonus Tip 🎖️
If you want to give recognition to your contributors in the Contributors section, you should check out AllContributors.
You can leverage its bot to automatically add all your latest contributors to your README.
Here's an example of what you can get:
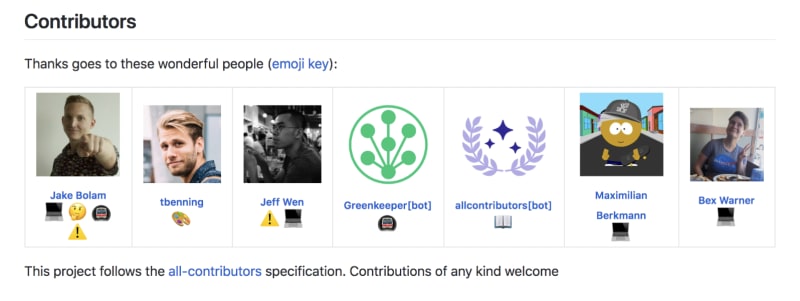
You should also check the Emoji Key Documentation, which enables you to categorise different types of contributions. ⚡️
5️⃣ Leverage Pre-Made Templates 📝
Are there websites that build READMEs for you? 🤔
Absolutely!
You can find a plethora of README generators out there.
I have scanned and picked out my favourite three for you:
1️⃣ README templates
2️⃣ Readme.so
3️⃣ ReadME Generator by Vercel
My advice with these would be to use them as a foundation and then customise them. ⭐️
Do you have a README template for me? 👀
I got you friend. 🫶
You can find my ready-made template here.

To start using it:
1️⃣ Fork the repo
2️⃣ Hover to the Edit section of the README
3️⃣ Begin filling in your information ✍️
If you find this template useful, I'd be grateful if you could give it some love by starring it. 🌟
Creating a good README file is an important skill. 🛠️
How you build it can be a determining factor in your repo's success.
Make sure to share your project and its polished new README in the comments section!
You can also leverage this new skill to build cool coding projects and compete to get paid. 🙌
If that's of interest, log into Quine and discover Quests, a place to code, have fun and bag some awesome rewards! 💰

See you next week.
Your Dev.to buddy,
Bap 💚


Top comments (27)
Very much agree.
My partcular current favourite is:
I've been handling readmes en masse for my current pet project
Use your GitHub stars for great good!
Starpilot is like copilot, but for GitHub stars.
I've been starring repos for years thinking "This will definitely be useful later".
However I never really went back to them.
Starpilot is a retrival augmented generation CLI tool for rediscovering your GitHub stars.
Starpilot helps this problem by allowing you to rediscover GitHub repos you had previously starred that are relevant to your current project.
Here's some more details about the motivation for and state of the project.
Installation
cd starpilotpoetry installYou will also need to have downloaded
models/mistral-7b-openorca.Q4_0.gguffrom GPT4All, or an alternative supported by theModelclass and included it in themodelsdirectory.You will also potentially need Pandoc installed on your computer if your starred repos contain a
rstformatted Readme that you want to load…I've noticed 2 things about
README.*which has been particuarly irritating for the project:Mhmm super interesting insight. True, many developers look at it too much as "how to set things up". The point number 2 is one I was not aware of these "exotic" standards lol - thanks so much for sharing it here 🙏
Good stuff!
I'd also add that you can add responsive images based on user preference in MD as well.
Pretty cool 👀
Thanks for sharing!
You're welcome!
great read, @fernandezbaptiste!
FWIW I recently stumbled upon Repobeat by Axiom, an elegant dashboard that shows your open-source project’s health.
if you value open metrics and transparency, you HAVE to add it to your README file.
That looks really cool flo! Thanks for sharing that with me :)
Thanks for sharing. Great tips. Now, as an add-on, this tool here makes creating README files super simple. Hope devs here find it useful!
Ouhhh always love checking these out, thanks a lot Hossein! 🦾
You're welcome Bap! Happy to have shared it! 😊
Nice and comprehensive guide! Do you have some favorite Readmes you can share?
Thanks for this! I don't think I have a favourite per se but I do think the ones from Novu (github.com/novuhq/novu) or Hoppscotch (github.com/hoppscotch/hoppscotch) are really nice.
Great article! If anyone is into creating more custom badges can check out my article about that; dev.to/mlkrsrc/how-to-make-custom-...
Thanks Mustafa, I just liked your article 🙂
Cool summary thanks, great ideas for us to improve our README!
Thanks for the kind comment! Glad it helped 🤓
Nice tips!! Thanks for this
You are very welcome! Glad you enjoyed it :)
Yes, my readme after this post:
LOL
Great tips for improving READMEs :)
Thanks a lot Nevo - always means a lot coming from you 💛
Super comprehensive and very helpful!
Happy it helped!
Great tips ! Tried to apply them on my open-source project metric observability project 🤗
I really like it, looks super neat 👌
Ah yes, shields.io for the badges! :D