Radix achieves a record-breaking 1.4 million financial transactions per second using just $700 of Google Cloud infrastructure. The test, which replayed 10 years of Bitcoin transactions history in less than an hour, was done on 1,187 Google servers, spread across 17 countries.
To put this result into context, it’s almost 17x greater than the maximum transactional throughput of the entire Visa network, over 4x greater than Alipay’s highest throughput ever, and more than 2x WhatsApp’s average number of messages sent per second.
This post outlines how we achieved this result, a description of Radix’s underlying technology, how we conducted the test, and how we used Google Cloud Platform (GCP).
If you would like to re-create the test or use any of the tooling, all the relevant code is available here:
https://github.com/radixdlt/mtps
What was the purpose of this test?
The birth of the internet required creating a set of protocols (TCP, UDP, etc.) that allowed computers to be networked together to make a public, permissionless commons for businesses and individuals to connect from anywhere in the world.
The recent explosion of public, permissionless Decentralised Ledger Technologies (e.g. Bitcoin and Facebook Libra) represent the next phase of digitising the global economy: a public infrastructure that can hold, transfer and program money, assets and rights.
However, the internet’s protocols only carry information; they do not store the information once transmitted. Additionally, the protocol doesn’t care if that information is duplicated and sent to thousands, millions or billions of people.
To create digital money however, you must be able to guarantee that the funds cannot be copied — e.g. you’re prohibited from sending the same digital dollar to two different people. To prevent this from happening, the system must have a constantly updated record of who owns what.
Using a centralised service to host such a record is not too tricky. However, making public, permissionless money without using a central server is considerably more challenging. And making this money simultaneously usable for the entire world is an even greater challenge.
The biggest problem that Radix set out to solve: how do you build a protocol for the creation of digital money that could work for over 7.5 billion people and 500 billion devices simultaneously? This test was the first step on the journey to validating that our technology can scale.
What is DLT (Distributed Ledger Technology)?
DLT is a general term that covers blockchain technologies including Bitcoin and Ethereum, DAG (directed acyclic graph) technologies including IOTA and Hashgraph, and new architectures such as Tempo. Tempo is the architecture that Radix developed specifically to achieve the massive scalability and throughput needed for a DLT to be used for mainstream applications.
A DLT network is characterised by a shared record system that can be updated by all the computers in the network without causing conflicting entries in a shared ledger. This is often used for transactional systems, since it’s well-suited for stopping the same funds from being spent twice and it can also enforce more complex systems of rules, often referred to as “smart contracts.”
How is the Radix DLT architecture different?
To build a linearly scalable transactional system, it was first necessary to think carefully about how to shard the Radix ledger. It is often not a good idea to dynamically shard data in distributed, decentralised systems due to the coordination overhead.A neater solution is to create a static shard range and then have a deterministic map of the data to the available shards.
On Radix, your wallet address deterministically maps you to the shard that your funds and transaction information lives on. As a result, there is no need for a global state —just shard level state.
Any computer may join the network and become a “Node.” These Nodes may service as many or as few shards as their local resources (CPU/RAM/Storage) allow. While a Node may vary the number of shards that it serves, the total number of shards in a Radix network is always 18.4 quintillion shards (2^64).
Nodes operating the same shards are redundant to each other, meaning that they validate the same set of transactions and are in consensus with each other. A transaction is typically validated in at least two different shards: the shard of the source address (a.k.a. Sending wallet) and the shard range of the destination address (e.g. receiving wallet).
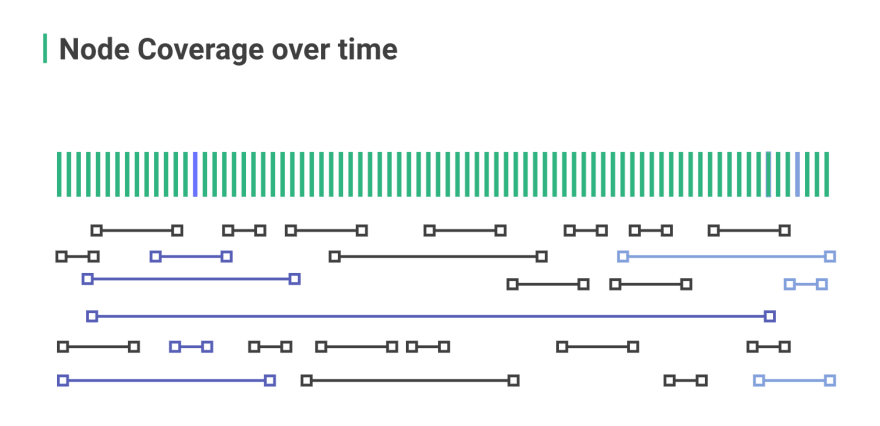
This illustration above exemplifies the shard range configuration on Radix, with the green vertical lines indicating the static shard space, and the horizontal lines representing the Nodes and the amount of the shard space each is servicing.
To learn more about how this works in practice, please see this short video on sharding on Radix.
How was Radix DLT deployed on Google Cloud?
The Test Scenario
1187 Nodes (VMs running the Radix ledger) are split up over 17 Google Cloud zones (data centers).
During the test, each Node was configured to have a low amount of shard overlap with each other. We did this by cutting the available shards (2^64) into chunks of 2^44 shards. We then allocated Nodes evenly across these chunks. Shards serviced by a Node are called the Node’s “Shard Range.” During the test, each Node Shard Range had approximately 10% overlap with the Node Shard Range of its neighbouring Nodes.

This test scenario was tailored to achieve maximum network throughput as cost-effectively as possible. In a production network, we would expect each shard to be covered by at least 100 different nodes. This would make little difference to the throughput, but would substantially increase testing costs.
During the test, the Nodes ‘gossip’ with each other to exchange transactional information and metadata (over UDP). In a Radix network, each Node is Gossiping (on average) to eight random peers; the dissemination complexity is thus O(8n) as explained here.
Notes on Network Conditions
Where feasible, we wanted to create a test scenario that models a public network. This includes:
-Using only public IP addresses
-Having a geographically distribution of Nodes
The fundamental bottleneck between continents is still the speed-of-light, making packet latencies moderately representative. However, it should also be noted that during the test, the Gossipped transactions never left Google’s high-performance network, and this reduces packet latencies between Nodes.
Under normal operations there is no packet loss within Google’s networks. It is estimated that normal packet loss on the internet is below 3%; which will reduce the efficiency of the Radix main network by about the same amount compared to these tests.
The Explorer Node
The Explorer Node scrapes and aggregates metrics and data from all other Nodes. The most significant service hosted on the Explorer Node is the Explorer Service, which serves the UI and provides a metrics API. Radix maintains a public version of Explorer at: https://test.radixdlt.com/.
The Dataset Preparator Node
The Dataset Preparator Node converts Bitcoin’s transactional data into Radix compatible transactional data so that it can be replayed across the Radix network. The process is very CPU and I/O intensive which is why we chose to host it separately.
This function is made up of two services we built for this purpose:
-bitcoind
-millionaire-dataset-preparator
Tooling
Each optimised test run costs around $700. In order to cut down the run-time of the VMs, we decided to create a custom Ubuntu 16.04 image, with the Radix Core dependencies installed (Docker). We used packer for this, which worked well in GCE.
The remaining provisioning of the Core VMs was done during initial boot through cloudinit. This tool may be less well known to the everyday (Google) Cloud user, but we love it because it enables us to use the same provisioning script for any cloud provider that supports it (which they almost all do).
We used the configuration management tool libcloud in this project. It provides python APIs and is a direct alternative to the Google Cloud SDK (aka “gcloud”). We switched to libcloud when our shell-scripts (using gcloud) became too complex for us to maintain. An additional advantage of using libcloud over gcloud is that we could opt-in the python paramiko SSH client, which —unlike gcloud — supports (indirectly) SSH keys authentication using Yubikeys.
How Google Cloud helped Radix DLT to reach 1M TPS?
To make things simple, we built a custom mtps.py python script that does all the node setup in a single invocation. This is the flowchart of the mtps.py tool. This script is idempotent, meaning that it will skip through the already created components.
The “Boot Node” is an ordinary Core Node. It’s started first, so that it can provide a concrete IP address for the other Nodes to connect to.

Pre-requisites
1.You need to have a Google Cloud account
2.Configure libcloud to use your Google Cloud account
3.Install libcloud and paramiko with:
pip3 install —user apache-libcloud paramiko cryptography
4.Start an interactive python terminal:
python3
>>> gce = ComputeEngine(
"libcloud@m-tps-test.iam.gserviceaccount.com",
"~/m-tps-test.json",
project="m-tps-test"
)
The Explorer Node and Core Nodes need to be reachable from the internet, which is why we need to punch through the firewall:
>>> explorer_ports = [
{"IPProtocol": "tcp", "ports": ["22", "443"]},
{"IPProtocol": "udp", "ports": ["20000"]}
]
>>> core_ports = [
{"IPProtocol": "tcp", "ports": ["22", "443", "20000"]},
{"IPProtocol": "udp", "ports": ["20000"]}
]
>>> gce.ex_create_firewall(
name='explorer-ingress-rules',
allowed=explorer_ports,
description='explorer-ingress-rules')
>>> gce.ex_create_firewall(
name='core-ingress-rules',
allowed=core_ports,
description='core-ingress-rules')
Create Explorer Node
The next step is to create the Explorer node, which hosts the Explorer Service.
NOTE: This command needs a valid explorer_cloud_init configuration (string), which is based on this template. It’s quite hard to generate this template by hand, hence the following code block is not executable as is:
>>> node = gce.create_node(
name = "explorer",
image = "https://www.googleapis.com/compute/v1/projects/ubuntu-os-cloud/global/images/ubuntu-1604-xenial-v20190530c",
size = "n1-standard-8",
location = "europe-west3-a",
ex_metadata = {"user-data": explorer_cloud_init},
ex_disks_gce_struct = [
{
'autoDelete': True,
'boot': True,
'type': 'PERSISTENT',
'mode': 'READ_WRITE',
'deviceName': "explorer",
'initializeParams': {
'diskName': "explorer",
'sourceImage': "https://www.googleapis.com/compute/v1/projects/ubuntu-os-cloud/global/images/ubuntu-1604-xenial-v20190530c"
}
},
]
)
Create Boot Node / Create Core Nodes
Now this is where things get really complicated as we used 17 different Google Cloud Engine (GCE) Regions.
The Boot node is launched first and the remaining core nodes do not get created until the Boot node is serving on HTTPS port 443 and listening on Gossip (UDP) port 20000.
Creating 1187 Core nodes one-by-one with gce.create_node (as we did with the Explorer node above) is theoretically possible, but very inefficient. That’s why we instead created Instance groups — one in each GCE Region.
NOTE: Similarly to creating the Explorer node, a concrete cloudinit config needs to be generated for the Core nodes (same config used for the Boot node) from this template, which is out-of-scope for this blog.
A Google Cloud Region is a geographical location (City) with multiple data centers (Zones). Typically Google has three Zones in every region. In the Google Cloud Console, it’s possible to create an Instance group in a Region without limiting it to a particular Zone. However, libcloud 2.5.0 only supports the creation of instance groups per Zone. The solution is the following monkey patch, whichwill work until libcloud catches up:
def create_core_group(gce, region, size, template, prefix="cores"):
try:
region = region or gce.region
if not hasattr(region, 'name'):
region = gce.ex_get_region(region)
request = '/regions/%s/instanceGroupManagers' % (region.name)
manager_data = {}

#If the user gave us a name, we fetch the GCEInstanceTemplate for it.
if not hasattr(template, 'name'):
template = gce.ex_get_instancetemplate(template)
manager_data['instanceTemplate'] = template.extra['selfLink']

# If base_instance_name is not set, we use name.
manager_data['name'] = manager_data['baseInstanceName'] = "{0}-{1}".format(prefix, region.name)
manager_data['distributionPolicy'] = dict(
zones = [{"zone": "zones/" + z.name} for z in gce.ex_list_zones() if z.status == "UP" and z.name.startswith(region.name)]
)
manager_data['targetSize'] = size
manager_data['description'] = None

gce.connection.request(request, method='POST', data=manager_data)
except ResourceExistsError:
pass
[ source ]
Final Words
It took our team of five people approximately two months to develop a stable solution for instantiating and running 1M TPS tests in GCE. Overall, our experience with the platform is very positive. However, some features stand out and are worth mentioning in more detail (below).
What we loved about the Google Cloud Platform
Reliability and Performance Consistency
It’s hard to develop, debug and productify a traditional web service. It is even harder for Highly-Available Applications, where a global state needs to be synchronised between a quorum (typically 3 or 5) Nodes. The challenge grows even bigger if you decide to host each Node on the opposite side of the world, as then latency also becomes a significant issue. Our test scenario with 1187 Nodes spread over the majority of the Google Cloud Regions made this even more complex.
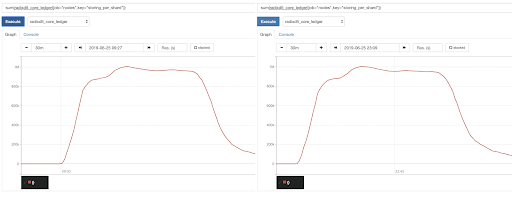
Despite this complexity and global spread, the Google Cloud Platform has been rock-solid for us and was one of the few components we did not have problems with. In particular, when analysing performance changes between test runs, GCE was very consistent, allowing us to focus on tweaking RadixCore. To demonstrate this, please see the following two graphs of transactions per second performance over time. Notice it’s the same software, same config, same number of GCE Regions, same amount of nodes/Region (1187); the only difference is that one was run 13.5 hours later than the other:
Stable API and Tooling
Initially we used gcloud. We decided to punt it only at the end of the project when our shell script (using the gcloud CLI) became too big and too complex for us to maintain. Overall we found gcloud to be mature and stable with no timing issues. The only missing feature is the ability to bind it to our YubiKey (SSH Key).
Project based Security
We like how the GCPsecurity boundaries are organised: on the top level you have your Organisation, and within your Organisation you create Projects. In our case, we have business critical services running in one project and the 1M TPS tests running in another. This allowed us to have different levels of access control for our business critical services compared to the 1M TPS tests.
The Google Identity Access Management (IAM) solution is also pretty intuitive. We managed to figure out what occasional permissions we were missing by quick trial and error in the Cloud Console application. Most of the time the tooling actually tells you what permission is missing.
Support is Good and Responsive
We did not need Google Cloud support for anything other than getting quotas raised, but for that we used it a lot.
We got confirmation and response within 24 hours at all times, except the time the Google Cloud Platform went down. The help was substantial, although getting quotas was a very painful and time consuming process.
Areas for Improvement
Quota Process
The wonderful world of GCP quotas! When you are using multiple data centre locations and all of them have different sets of quotas, this process can become frustrating — especially if it’s blocking you from getting what you want: more VMs!
Once you figure out the first quota you need, you can easily request it to be increased through a form in Google Cloud Console. In fact, it’s so easy that it is tempting to fire off individual quota requests as soon as you realise you are missing something. It was later explained to us that some quotas take time, especially when you want to go from eight CPUs to 800 CPUs in one Zone. Google keeps some spare capacity, but a substantial increase is typically a carefully planned process that needs to be approved on many levels of their organisation.
Unfortunately, quotas requests cannot be tracked in the Console – you can only respond to an e-mail if you want to follow up on it. This meant we could not see what quota request our colleagues had already created, which ended up with multiple people creating the same quota request at slightly different times.
Higher Level Quotas
We increase quotas in order to instantiate more VMs. Depending on the VM configuration, we typically need to request more than one quota all at once. For example, the following set of quotas need to be increased together in our test scenario:
-CPUs
-In-use IP Addresses
-Persistent Disk SSD (GB)
As a suggested improvement, instead of exposing each quota to the user, a better UX would allow the user to request quotas from the options menu of a running VM. — e.g. a new quota form would ideally be started from this menu:
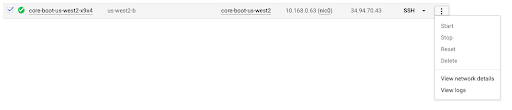
In the new quota form the user would have high-level options to:
-Get x more like this in current Zone
-Get x more like this in current Region
-Get x more like this in any Region
-Custom (would take you to the legacy quota form)
This would result in more accurate and complete quota requests, which would both decrease the load on Google Cloud Support and get the end-user unblocked faster.
Conclusion
We are very proud to have gone from an immature idea to a stable product in eight weeks. Without going into detail, there are lots of small decision points during the project that have made these eight weeks very stressful for the team involved, which we could have done better.
One of the bigger decisions we made early in the project was to build our project on Google Cloud Platform. This decision was based on our previous experience with GCP; in fact we had (and still have) substantial amounts of our production infrastructure on GCP at the time this project was kicked off. I’m happy to say that partnering with Google Cloud was the right call for this project as well. Google’s infrastructure is solid, and its support organization can handle unconventional use-cases (1187 ephemeral nodes) like ours and respond within a reasonable amount of time.
Join The Radix Community
Telegram for general chat
Discord for developers chat
Reddit for general discussion
Forum for technical discussion
Twitter for announcements
Email newsletter for weekly updates
Mail to hello@radixdlt.com for general enquiries

Top comments (0)