
This is a tutorial on creating an AI webapp(I like to call it HomeDec :)) to enhance room designs.
The app would have the following functionalities:
- It would let the user login using passkey or password. It has been done using Hanko.
- Then display the dashboard page.
- The dashboard contains a form to upload images to render the designs and display the previously rendered designs.
- And then options for profile management and logout, implemented using Hanko.
Let's Begin...
First let's begin with the stack used for the app.
NextJS
I've got really comfortable with this framework and like the support from Vercel. Do check this out
NextJS is a React framework for fullstack application built by Vercel:
Used by some of the world's largest companies, Next.js enables you to create full-stack Web applications by extending the latest React features, and integrating powerful Rust-based JavaScript tooling for the fastest builds.
TailwindCSS
Tailwind CSS helps you minimize the use of CSS stylesheets. You can use Tailwind classes to style various components
MaterialUI
It's a React component library, developed by Google. It would help you build your UI faster.
Prisma
The application doesn't require a complicated DB. So, Prisma is perfect for that.
Supabase
Supabase has been used for PostgreSQL hosting which could be directly accessed by Figma. Further, Supabase storage has been used to store the images.
Replicate
Replicate allows you to run machine learning models in the cloud.
Vercel
Vercel lets you deploy webpages easily.
Build Start...
Hanko has already provided a NextJS starter pack. We'll start with that to save us time and reduce the chance of getting any error.
Open your terminal and run the following:
git clone https://github.com/teamhanko/hanko-nextjs-starter.git
This repository comes with a pnpm-lock.yaml file. So we are going to install the required dependencies using pnpm. Check this.
Then run the following commands on your terminal
cd hanko-nextjs-starter
pnpm install
pnpm run dev
This would start the project on localhost://3000
You should get a screen like this:

On clicking Login you will be directed to a login page. However, it would display an error. This is because we haven't set up Hanko url yet.

Authentication By Hanko
It's necessary to setup Hanko to be able to use the application
Hanko Cloud Setup
Visit Hanko Cloud and create an account
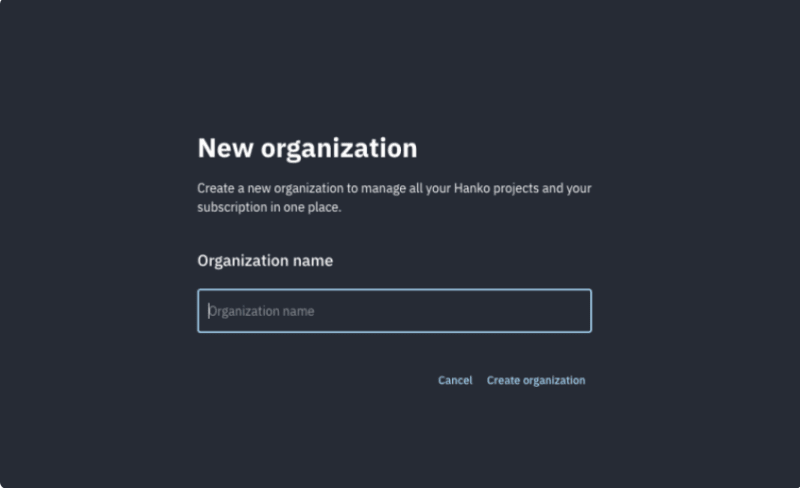
First create a new organization
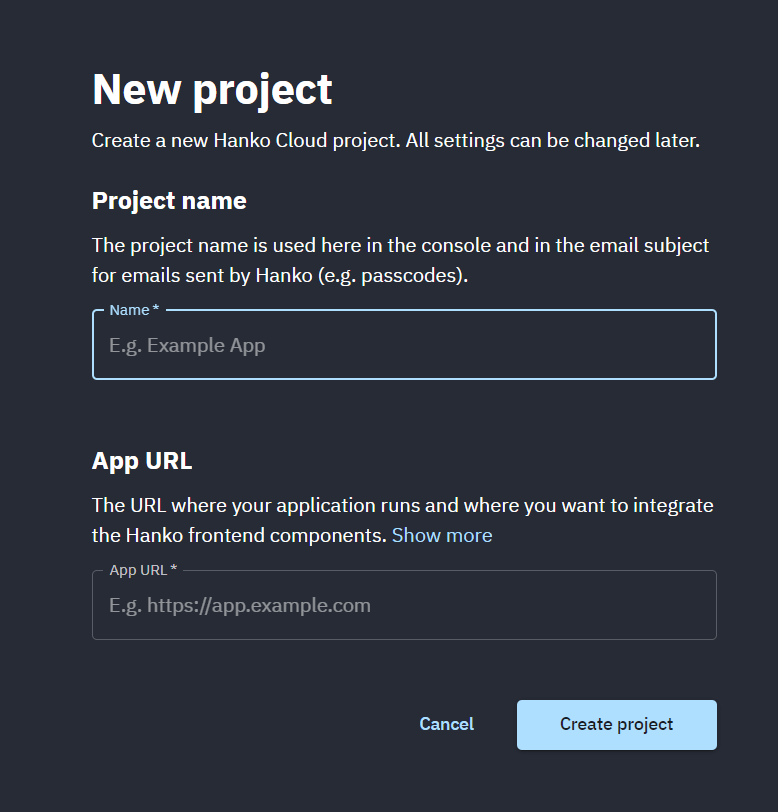
And then create a new project. In the app URL add your development URL(could be http://localhost:3000)
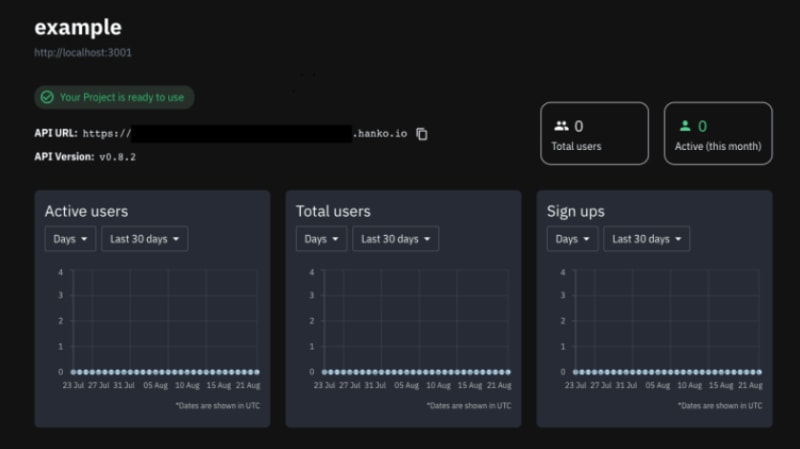
You'll get your dashboard. You will also get your API URL to be used in your project.
Understanding the structure of NextJS Starter Pack
The starter pack is the usual NextJS project structure. It has got app directory, component directory and public directory. Also, we need to change the .env.example to .env.local. And then paste the Hanko API url obtained from the dashboard
We'll mainly need to understand the components/ and app/ in order to customise it for our application.
app directory

The app directory contains the page.jsx and dashboard and login directories. The page.jsx is the homepage of the application. The login page contains the Hanko login component:
On successful login, the web app redirects to dashboard page. The dashboard page is rendered by the page.tsx file in the dashboard/ directory. Currently, it contains just the HankoProfile component and Logout component.

Checkout this link to the hanko-nextjs-starter app.
component directory

This is an overview of the component directory. As we go on customizing the UI, we'll understand it even better.
Further, guys at Hanko have already setup Tailwind for us and have reduced a lot of our work.
Building the UI
As mentioned before we are going to use MaterialUI to speed up our development. We'll also use Materical Icons.
Run the following command:
npm install @mui/icons-material @mui/material @emotion/styled @emotion/react
Lets begin with app/page.tsx.
"use client";
import Button from "@mui/material/Button";
import ArrowForwardIosIcon from "@mui/icons-material/ArrowForwardIos";
export default function Login() {
  return (
    <div className="flex flex-col min-h-screen justify-center items-center bg-black">
      <div>
        <div className="sm:text-9xl text-6xl text-white">HOMEDEC</div>
        <div className="sm:text-5xl text-white">
          AI HOME DECORATOR FOR ALL YOUR NEEDS
        </div>
      </div>
      <Button
        variant="contained"
        href="/login  "
        className="text-4xl flex mt-20"
      >
        GET STARTED
        <ArrowForwardIosIcon />
      </Button>
    </div>
  );
}
This should turn the homepage into something like this:

The UI is pretty basic. But, the purpose of this project was to understand how Hanko and Supabase work.
Next, we'll work on the login page. But, before that lets check the HankoAuth component.
"use client";
import { useEffect, useCallback, useState } from "react";
import { useRouter } from "next/navigation";
import { register, Hanko } from "@teamhanko/hanko-elements";

const hankoApi = process.env.NEXT_PUBLIC_HANKO_API_KEY || "";

export default function HankoAuth() {
  const router = useRouter();

  const [hanko, setHanko] = useState<Hanko>();

  useEffect(() => {
    import("@teamhanko/hanko-elements").then(({ Hanko }) =>
      setHanko(new Hanko(hankoApi))
    );
  }, []);

  const redirectAfterLogin = useCallback(() => {
    // successfully logged in, redirect to a page in your application
    router.replace("/dashboard");
  }, [router]);

  useEffect(
    () =>
      hanko?.onAuthFlowCompleted(() => {
        redirectAfterLogin();
      }),
    [hanko, redirectAfterLogin]
  );

  useEffect(() => {
    register(hankoApi).catch((error) => {
      // handle error
    });
  }, []);

  return <hanko-auth />;
}
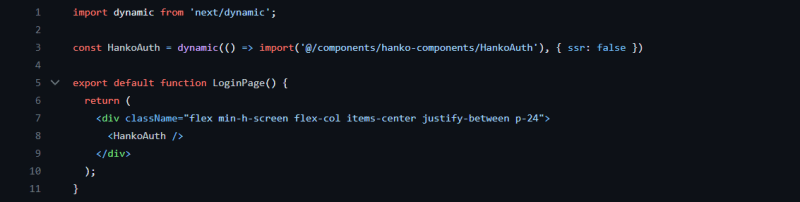
The HankoAuth component is perfectly ready for us to use in our project. So, lets focus on customizing the /login/page.tsx page:
"use client";
import dynamic from "next/dynamic";
const HankoAuth = dynamic(
  () => import("@/components/hanko-components/HankoAuth"),
  { ssr: false }
);

export default function Login() {

  return (
    <div className="flex min-h-screen justify-center items-center bg-black">
      <div className="bg-white sm:p-5 rounded-2xl shadow-md">
        <HankoAuth />
      </div>
    </div>
  );
}
We'll also customize the styling a bit for the login component. Add the following to the app/globals.css file:
:root {
  --border-radius: 20px;
  --brand-color: #1976d2;
  --brand-color-shade-1: #042c55;
  --brand-color-shade-2: #88bff7;
}
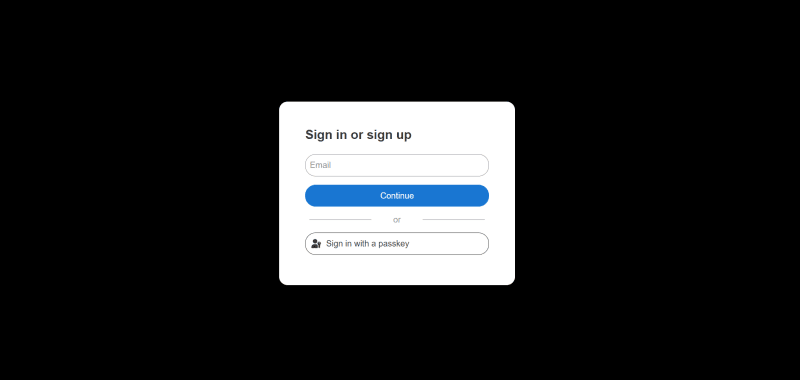
You should get this page on clicking the GET STARTED button.
On successful login, you should be directed to /dashboard page. We'll first create components for the dashboard page.
The first component will be components/Form.tsx
"use client";
import Button from "@mui/material/Button";
import CloudUploadIcon from "@mui/icons-material/CloudUpload";
import { styled } from "@mui/material/styles";
import * as React from "react";
import TextField from "@mui/material/TextField";
import MenuItem from "@mui/material/MenuItem";
import { useRouter } from "next/navigation"; //this for use later


const VisuallyHiddenInput = styled("input")({
  clip: "rect(0 0 0 0)",
  clipPath: "inset(50%)",
  height: 1,
  overflow: "hidden",
  position: "absolute",
  bottom: 0,
  left: 0,
  whiteSpace: "nowrap",
  width: 1,
});
const currencies = [
  {
    value: "Living Room",
    label: "Living Room",
  },
  {
    value: "Store",
    label: "Store",
  },
  {
    value: "Bedroom",
    label: "Bedroom",
  },
  {
    value: "Bathroom",
    label: "Bathroom",
  },
  {
    value: "Office",
    label: "Office",
  },
  {
    value: "Kitchen",
    label: "Kitchen",
  },

  {
    value: "Balcony",
    label: "Balcony",
  },
];

export const Form = () => {
  const [loading, setLoading] = React.useState(false);
  const [file, setFile] = React.useState<File>();
  const [name, setName] = React.useState("Nothing");
  const [uploadUrl, setUploadUrl] = React.useState("");
  const [valuee, setValuee] = React.useState("Living Room");
  const [value, setValue] = React.useState("");
  return (
    <div className=" space-y-12 ">
      <div className="text-lg font-medium">
        Upload an image and tell us what you want for your room.
      </div>
      <div>
        <div className="space-y-4">
          <Button
            component="label"
            variant="contained"
            startIcon={<CloudUploadIcon />}
          >
            <div className="font-bold text-xl">Upload file</div>
            <VisuallyHiddenInput
              type="file"
              accept=".png"
              onChange={(e) => {
                setName(e.target.files![0].name);
                setFile(e.target.files![0]);
              }}
            />
          </Button>
          <br></br>
          <div>{name} uploaded!</div>
        </div>
      </div>
      <div>
        <div className="text-white">
          <TextField
            id="outlined-basic"
            label={<div style={{ color: "#1976D2" }}>Tell us more</div>}
            variant="outlined"
            maxRows="3"
            multiline
            value={value}
            onChange={(e) => {
              setValue(e.target.value);
            }}
            sx={{ width: "80%" }}
            inputProps={{ style: { color: "white" } }}
            focused
          />
        </div>
      </div>
      <div>
        <div style={{ width: "100%" }}>
          <TextField
            id="outlined-select-currency"
            select
            label="Select Room Type"
            defaultValue="Living Room"
            value={valuee}
            helperText="Please select your currency"
            sx={{ width: "80%" }}
            focused
            SelectProps={{ style: { color: "white" } }}
            onChange={(e) => {
              setValuee(e.target.value);
            }}
          >
            {currencies.map((option) => (
              <MenuItem key={option.value} value={option.value}>
                {option.label}
              </MenuItem>
            ))}
          </TextField>
        </div>
      </div>
      <div>
        <Button
          variant="contained"
          onClick={(e) => {
            if (file != null) {
              {

              }
            } else {
              window.alert("You need to upload an image");
            }
          }}
        >
          {!loading ? (
            <div className="font-bold text-xl">RENDER DESIGNS</div>
          ) : (
            <div className="font-bold text-xl">PLEASE WAIT..</div>
          )}
        </Button>
      </div>
    </div>
  );
};
Then, we'll create the Profile component components/Form.tsx. Try to figure out how the profile modal would close XD.
"use client";
import { useEffect, useState } from "react";
import { register } from "@teamhanko/hanko-elements";
import ManageAccountsIcon from "@mui/icons-material/ManageAccounts";
const hankoApi = process.env.NEXT_PUBLIC_HANKO_API_KEY;

export const Profile = () => {
  const [openState, setOpenState] = useState(false);

  useEffect(() => {
    register(hankoApi ?? "").catch((error) => {
      console.log(error);
    });
  }, []);

  const openProfile = () => {
    setOpenState(!openState);
  };

  return (
    <>
      <button
        type="button"
        onClick={openProfile}
        className="font-bold text-2xl"
      >
        <ManageAccountsIcon fontSize="large" />
        PROFILE
      </button>
      {openState && (
        <div className=" absolute top-14 ">
          <section className=" w-[450px] h-auto rounded-2xl bg-white p-5">
            <hanko-profile />
          </section>
        </div>
      )}
    </>
  );
};
Then finally the components/Logout.tsx:
"use client";
import { useState, useEffect, useCallback } from "react";
import { useRouter } from "next/navigation";
import { Hanko } from "@teamhanko/hanko-elements";
import LogoutIcon from "@mui/icons-material/Logout";

const hankoApi = process.env.NEXT_PUBLIC_HANKO_API_KEY;

export const Logout = () => {
  const router = useRouter();
  const [hanko, setHanko] = useState<Hanko>();

  useEffect(() => {
    import("@teamhanko/hanko-elements").then(({ Hanko }) =>
      setHanko(new Hanko(hankoApi ?? ""))
    );
  }, []);

  const logout = () => {
    hanko?.user
      .logout()
      .then(() => {})
      .catch((error) => {
        console.log(error);
      });
    router.push("/");
    router.refresh();
  };
  return (
    <>
      <button type="button" onClick={logout} className="font-bold text-2xl">
        <LogoutIcon fontSize="large" />
        LOGOUT
      </button>
    </>
  );
};
Finally, we combine everything into pages/dashboard.tsx:
import { Logout } from "@/components/Logout";
import { Profile } from "@/components/Profile";
import { Form } from "@/components/Form";
import Card from "@mui/material/Card";
import CardActions from "@mui/material/CardActions";
import CardMedia from "@mui/material/CardMedia";

export default async function Todo() {
  return (
    <main className="bg-black text-white">
      <div className="w-full flex py-8 px-12 space-x-6 justify-around">
        <Profile />
        <div className="font-bold sm:text-4xl text-2xl">
          <a href="/">HOMEDEC</a>
        </div>
        <Logout />
      </div>
      {/* <div className="bg-slate-300 rounded-3xl py-6  h-[400px] w-[450px] flex flex-col text-slate-800">
        <h1 className="text-3xl text-center">My to dos</h1>
        <NewTodo />
        <ul className="px-6">
          <TodoItem todos={todos} />
        </ul>
      </div> */}
      <div className="sm:grid grid-cols-3 gap-x-4 px-16 py-20">
        <div className="col-span-1 pr-6 text-center">
          <Form />
        </div>

        <div className="col-span-2 space-y-4">
          <div className="text-3xl p-4 font-bold">YOUR DESIGNS</div>
          <div className="sm:grid grid-cols-2 space-y-4">
          </div>
        </div>
      </div>
    </main>
  );
}
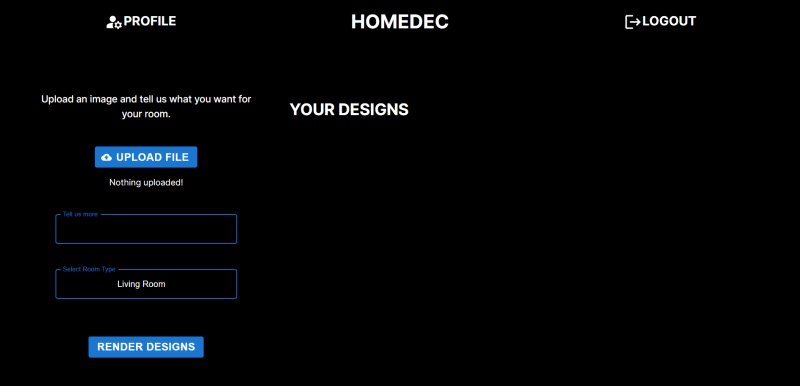
This should render a UI like this:
Now, we are done setting up the basic UI. Time to move to the next parts.
Setting Up Prisma and Supabase
First thing, install Prisma:
pnpm install prisma
Set up prisma with the following:
pnpm prisma init --datasource-provider postgresql
This will generate a prisma directory. In that directory, customise the schema.prisma file as follows:
// This is your Prisma schema file,
// learn more about it in the docs: https://pris.ly/d/prisma-schema

generator client {
  provider = "prisma-client-js"
}

datasource db {
  provider = "postgresql"
  url      = env("DATABASE_URL")
}

model Item {
  userId String
  id String @id @default(uuid())
  title String
  src String @unique
  createdAt DateTime @default(now())
  updatedAt DateTime @updatedAt
}
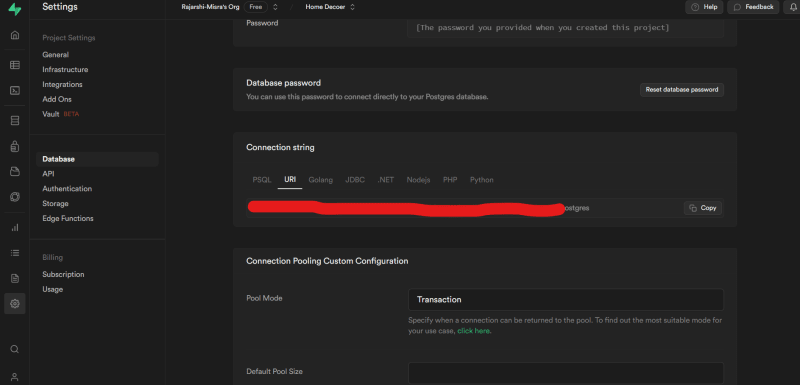
Now, it's time to setup Supabase to host our database. Go to Supabase and click on Start your project. Then sign into it and create a new organization and then a new project. Go into the Supabase project settings and head over to Database. Then copy the URI.
Paste the URI into .env file as:
DATABASE_URL=<Don't put quotes for this one>
After that run the following commands:
pnpm prisma migrate dev --name init
pnpm prisma db push
pnpm prisma generate
We'll soon be able to upload data into the database. But, we'll first need to copy the Anon Key in the API tab into our .env file:
NEXT_PUBLIC_SUPABASE_ANON="Put this inside quotes :)"
Also, create db.ts in the root directory. This is to prevents problems when instantiating Prisma client.
Setting Up Replicate
In order to generate images using AI, we'll need to setup Replicate. Head over to Replicate, sign up ad get API tokens. Copy the token and paste it into your env file:
NEXT_PUBLIC_REPLICATE_API_KEY="Your API Key"
Generating Images
To be able to generate images we'll set up api routes in the app directory. Create the following in the app/api/generate/route.ts:
import { NextResponse } from "next/server";
import { headers } from "next/headers";

// Create a new ratelimiter, that allows 5 requests per 24 hours

export async function POST(request: Request) {
  // Rate Limiter Code

  const { imageUrl, theme, room } = await request.json();

  // POST request to Replicate to start the image restoration generation process
  let startResponse = await fetch("https://api.replicate.com/v1/predictions", {
    method: "POST",
    headers: {
      "Content-Type": "application/json",
      Authorization: "Token " + process.env.REPLICATE_API_KEY,
    },
    body: JSON.stringify({
      version:
        "854e8727697a057c525cdb45ab037f64ecca770a1769cc52287c2e56472a247b",
      input: {
        image: imageUrl,
        prompt:
          "Make a " + room + ".The person want this in that room: " + theme,
        a_prompt:
          "best quality, extremely detailed, photo from Pinterest, interior, cinematic photo, ultra-detailed, ultra-realistic, award-winning, Room",
        n_prompt:
          "longbody, lowres, bad anatomy, bad hands, missing fingers, extra digit, fewer digits, cropped, worst quality, low quality",
      },
    }),
  });

  let jsonStartResponse = await startResponse.json();

  let endpointUrl = jsonStartResponse.urls.get;

  // GET request to get the status of the image restoration process & return the result when it's ready
  let restoredImage: string | null = null;
  while (!restoredImage) {
    // Loop in 1s intervals until the alt text is ready
    console.log("Please wait...");
    let finalResponse = await fetch(endpointUrl, {
      method: "GET",
      headers: {
        "Content-Type": "application/json",
        Authorization: "Token " + process.env.REPLICATE_API_KEY,
      },
    });
    let jsonFinalResponse = await finalResponse.json();

    if (jsonFinalResponse.status === "succeeded") {
      restoredImage = jsonFinalResponse.output;
    } else if (jsonFinalResponse.status === "failed") {
      break;
    } else {
      await new Promise((resolve) => setTimeout(resolve, 1000));
    }
  }

  return NextResponse.json(
    restoredImage ? restoredImage : "Failed to restore image"
  );
}
The above api will be called from the Form component, which will make a call to the Replicate API and get back a url containing AI generated image. Now, we need to make an API route to send the data to the Prisma database. We create app/api/todo/route.ts
import { NextResponse } from "next/server";
import { cookies } from "next/headers";
import * as jose from "jose";
import { prisma } from "@/db";

export async function userId() {
  const token = cookies().get("hanko")?.value;
  const payload = jose.decodeJwt(token ?? "");
  return payload.sub;
}

export async function POST(req: Request) {
  const userID = await userId();
  const { src } = await req.json();
  const title = "abc";

  if (userID) {
    if (typeof title !== "string" || title.length === 0) {
      throw new Error("That can't be a title");
    }
    await prisma.item.create({
      data: { title, src, userId: userID ?? "" },
    });

    return NextResponse.json({ message: "Created Todo" }, { status: 200 });
  } else {
    return NextResponse.json({ error: "Not Found" }, { status: 404 });
  }
}
We're done with the backend. Now, our job is to make calls from the Form to store generate AI images and store them into the database. Modify the components/Form.tsx
"use client";
import Button from "@mui/material/Button";
import CloudUploadIcon from "@mui/icons-material/CloudUpload";
import { styled } from "@mui/material/styles";
import * as React from "react";
import TextField from "@mui/material/TextField";
import MenuItem from "@mui/material/MenuItem";
import { useRouter } from "next/navigation";
import { createClient } from "@supabase/supabase-js";
const VisuallyHiddenInput = styled("input")({
  clip: "rect(0 0 0 0)",
  clipPath: "inset(50%)",
  height: 1,
  overflow: "hidden",
  position: "absolute",
  bottom: 0,
  left: 0,
  whiteSpace: "nowrap",
  width: 1,
});
const currencies = [
  {
    value: "Living Room",
    label: "Living Room",
  },
  {
    value: "Store",
    label: "Store",
  },
  {
    value: "Bedroom",
    label: "Bedroom",
  },
  {
    value: "Bathroom",
    label: "Bathroom",
  },
  {
    value: "Office",
    label: "Office",
  },
  {
    value: "Kitchen",
    label: "Kitchen",
  },

  {
    value: "Balcony",
    label: "Balcony",
  },
];
export const Form = () => {
  const supabase = createClient(
    "https://dgahpknmwckcozpfuyrp.supabase.co",
    process.env.NEXT_PUBLIC_SUPABASE_ANON!
  );
  const router = useRouter();
  const [loading, setLoading] = React.useState(false);
  const handleSubmit = async (
    file: File,
    name: string,
    value: string,
    valuee: string
  ) => {
    setLoading(true);
    const { data, error } = await supabase.storage
      .from("Images")
      .upload("/" + file.name, file, { upsert: true });
    const publicUrl = supabase.storage
      .from("Images")
      .getPublicUrl("/" + data!.path);
    if (data) {
      console.log(publicUrl.data.publicUrl);
    } else {
      console.log(error);
    }
    const res = await fetch("/api/generate", {
      method: "POST",
      headers: {
        "Content-Type": "application/json",
      },
      body: JSON.stringify({
        imageUrl: publicUrl.data.publicUrl,
        value,
        valuee,
      }),
    });

    let newPhoto = await res.json();
    if (res.status !== 200) {
      console.log(res);
    } else {
      console.log(newPhoto[1]);
    }
    setTimeout(() => {
    }, 1300);
    await fetch(`/api/todo`, {
      method: "POST",
      credentials: "include",
      headers: {
        "Content-Type": "application/json",
      },
      body: JSON.stringify({
        src: newPhoto[1],
      }),
    });
    router.refresh();
    setLoading(false);
  };
  const [file, setFile] = React.useState<File>();
  const [name, setName] = React.useState("Nothing");
  const [uploadUrl, setUploadUrl] = React.useState("");
  const [valuee, setValuee] = React.useState("Living Room");
  const [value, setValue] = React.useState("");
  return (
    <div className=" space-y-12 ">
      <div className="text-lg font-medium">
        Upload an image and tell us what you want for your room.
      </div>
      <div>
        <div className="space-y-4">
          <Button
            component="label"
            variant="contained"
            startIcon={<CloudUploadIcon />}
          >
            <div className="font-bold text-xl">Upload file</div>
            <VisuallyHiddenInput
              type="file"
              accept=".png"
              onChange={(e) => {
                setName(e.target.files![0].name);
                setFile(e.target.files![0]);
              }}
            />
          </Button>
          <br></br>
          <div>{name} uploaded!</div>
        </div>
      </div>
      <div>
        <div className="text-white">
          <TextField
            id="outlined-basic"
            label={<div style={{ color: "#1976D2" }}>Tell us more</div>}
            variant="outlined"
            maxRows="3"
            multiline
            value={value}
            onChange={(e) => {
              setValue(e.target.value);
            }}
            sx={{ width: "80%" }}
            inputProps={{ style: { color: "white" } }}
            focused
          />
        </div>
      </div>
      <div>
        <div style={{ width: "100%" }}>
          <TextField
            id="outlined-select-currency"
            select
            label="Select Room Type"
            defaultValue="Living Room"
            value={valuee}
            helperText="Please select your currency"
            sx={{ width: "80%" }}
            focused
            SelectProps={{ style: { color: "white" } }}
            onChange={(e) => {
              setValuee(e.target.value);
            }}
          >
            {currencies.map((option) => (
              <MenuItem key={option.value} value={option.value}>
                {option.label}
              </MenuItem>
            ))}
          </TextField>
        </div>
      </div>
      <div>
        <Button
          variant="contained"
          onClick={(e) => {
            if (file != null) {
              {
                handleSubmit(file, name, value, valuee);
              }
            } else {
              window.alert("You need to upload an image");
            }
          }}
        >
          {!loading ? (
            <div className="font-bold text-xl">RENDER DESIGNS</div>
          ) : (
            <div className="font-bold text-xl">PLEASE WAIT..</div>
          )}
        </Button>
      </div>
    </div>
  );
};
We would also like to see the designs generated by the AI. We'll do it by modifying the app/dashboard/page.tsx.
import { Logout } from "@/components/Logout";
import { Profile } from "@/components/Profile";
import { prisma } from "@/db";
import { userId } from "../api/todo/route";
import { Form } from "@/components/Form";
import Card from "@mui/material/Card";
import CardActions from "@mui/material/CardActions";
import CardMedia from "@mui/material/CardMedia";

export default async function Todo() {
  const userID = await userId();

  const items = await prisma.item.findMany({
    where: {
      userId: { equals: userID },
    },
  });
  return (
    <main className="bg-black text-white">
      <div className="w-full flex py-8 px-12 space-x-6 justify-around">
        <Profile />
        <div className="font-bold sm:text-4xl text-2xl">
          <a href="/">HOMEDEC</a>
        </div>
        <Logout />
      </div>

      <div className="sm:grid grid-cols-3 gap-x-4 px-16 py-20">
        <div className="col-span-1 pr-6 text-center">
          <Form />
        </div>

        <div className="col-span-2 space-y-4">
          <div className="text-3xl p-4 font-bold">YOUR DESIGNS</div>
          <div className="sm:grid grid-cols-2 space-y-4">
            {items
              .slice(0)
              .reverse()
              .map((item) => {
                return (
                  <div key={item.id}>
                    <Card sx={{ maxWidth: 345 }}>
                      <CardMedia
                        component="img"
                        alt={item.src}
                        image={item.src}
                      />
                      <CardActions>
                        <a
                          href={item.src}
                          target="_blank"
                          className="text-green-600 font-semibold"
                        >
                          DOWNLOAD
                        </a>
                      </CardActions>
                    </Card>
                  </div>
                );
              })}
          </div>
        </div>
      </div>
    </main>
  );
}
You might wonder why we've named one api route as todo. This project was built after understanding this Todo app.
Update1:Enhancment Of The UI
After checking the response of the users, I could identify a few ways to enhance the UI.
Adding an alert to let the user upload only an image.
If you go to the Form.tsx file under components directory, you'll find a Button MUI element. We are going to modify it.
<Button
          variant="contained"
          onClick={(e) => {
            if (file != null && file!.type.match("image.*")) {
//Handle submit is called only when the user uploads image
              {
                handleSubmit(file!, name, value, valuee);
              }
            } else {
//Else the user gets a window alert
              window.alert("You need to upload an image");
            }
          }}
        >
          {!loading ? (
            <div className="font-bold text-xl">RENDER DESIGNS</div>
          ) : (
            <div className="font-bold text-xl">PLEASE WAIT..</div>
          )}
</Button>
Add a circular animation after the user clicks on Render Design
This is just to make the UI look better. We'll finally end up with the following for the Button in the Form.tsx file.
<Button
          variant="contained"
          onClick={(e) => {
            if (file != null && file!.type.match("image.*")) {
              {
                handleSubmit(file!, name, value, valuee);
              }
            } else {
              window.alert("You need to upload an image");
            }
          }}
        >
          {!loading ? (
            <div className="font-bold text-xl">RENDER DESIGNS</div>
          ) : (
            <div className="font-bold text-xl flex justify-items-center">
              PLEASE WAIT
              <CircularProgress color="secondary" />
            </div>
          )}
        </Button>
Remember to import the CircularProgress element from MUI
import CircularProgress from "@mui/material/CircularProgress";
Alerting the user if there is no response from the API
Currently, the project has been hosted for free on Replicate. So, due to resource limitations there could be no response from it. Hence, we are going to keep an alert for the same.
In the Form.tsx file, we'll modify the handleSubmit function.
const handleSubmit = async (
    file: File,
    name: string,
    value: string,
    valuee: string
  ) => {
    setLoading(true);
    const { data, error } = await supabase.storage
      .from("Images")
      .upload("/" + file.name, file, { upsert: true });
    const publicUrl = supabase.storage
      .from("Images")
      .getPublicUrl("/" + data!.path);
    const res = await fetch("/api/generate", {
      method: "POST",
      headers: {
        "Content-Type": "application/json",
      },
      body: JSON.stringify({
        imageUrl: publicUrl.data.publicUrl,
        value,
        valuee,
      }),
    });

    if (res.status !== 200) {
      setLoading(false);
      window.alert(
        "Sorry, our resources are busy currently. If the issue persists, please contact the owner"
      );
    }//This is the function to alert the user
    let newPhoto = await res.json();
    setTimeout(() => {}, 1300);
    await fetch(`/api/todo`, {
      method: "POST",
      credentials: "include",
      headers: {
        "Content-Type": "application/json",
      },
      body: JSON.stringify({
        src: newPhoto[1],
      }),
    });
    router.refresh();
    setLoading(false);
  };
Congratulations!!!
The end result should look something like this one:
https://hanko-ai-app.vercel.app/
Refer to this GitHub repo to understand the working of this project.
Do leave a feedback. And, I'd be happy to colab for further projects.
Thanks!

Top comments (2)
This is an amazing work @rajarshimisra
I specially like the step by step approach you used. Please keep it up
Thank you for taking your time to read this