What is the Home Assistant MCP server?
The MCP server (Model Context Protocol) is an interface that lets AIs like Claude, ChatGPT, or Gemini talk directly to your Home Assistant. Instead of writing YAML yourself, you give the AI access to entities, automations, and dashboards - it handles the code. Runs as a free app/add-on on Home Assistant OS, community project (homeassistant-ai/ha-mcp).
Inhaltsverzeichnis
- What you need
- Official vs. unofficial MCP server
- Step 1: Install the MCP server as an app/add-on
- Step 2: Set up remote access
- Step 3: Connect the MCP server to your AI
- Best-practice guidance for the AI
- Security: MCP access alongside a hardened Cloudflare setup
- Optional and potentially dangerous: letting the AI edit YAML configuration
- What you can actually build with this
- Troubleshooting
Home Assistant can do almost anything - which is exactly why so many beginners struggle to build their own automations, design dashboards, or debug errors. Until now, you were entirely on your own: learning YAML, understanding templates, digging through forums. Anyone who wants to set up a Home Assistant MCP server instead hands that work off to an AI.
An MCP server changes that fundamentally. You connect Home Assistant directly to an AI of your choice - Claude, ChatGPT, or Gemini - and simply describe in plain language what you need: "Build me a sensor that shows today's rainfall" or "Fix the automation in the kids' room, the lights aren't dimming correctly anymore." The AI finds the right entities itself, writes the code, and sets it up in Home Assistant.
In this article I'll show you how to set up the MCP server on your Raspberry Pi, connect it to Claude, ChatGPT, and Gemini - including desktop and smartphone access - and how to secure the whole thing properly, even if your Home Assistant already runs behind Cloudflare Access with a client certificate.
What you need
- Home Assistant OS or Supervised on a Raspberry Pi (apps/add-ons require the Supervisor - installation doesn't work on Home Assistant Container/Core)
- Access to the App Store (Settings → Apps - since Home Assistant 2026.2 the former "Add-ons" are called this; on older versions it's still Settings → Add-ons → Add-on Store)
- For access from cloud AIs (Claude, ChatGPT): a way out to the internet - Nabu Casa, an existing reverse proxy, or your own Cloudflare Tunnel
- At least one account with Claude, ChatGPT, or Google Gemini
If you haven't set up remote access yet, I cover that step by step in my article Set Up Cloudflare Tunnel on the Raspberry Pi - no port forwarding needed, including mTLS hardening.
Official vs. unofficial MCP server
Home Assistant has shipped its own official MCP server since version 2025.2. It's quick to set up, but can do far less than the community solution ha-mcp, which this article is about. Before you install anything, you should know the difference:
| Feature | Official MCP server | Unofficial (ha-mcp) |
|---|---|---|
| Entity access | Only Assist-exposed entities | Every entity in the system |
| Create/edit automations, scripts, scenes | No | Yes |
| Build/edit dashboards | No | Yes |
| Debug automations from traces, read history/logs | No | Yes |
| Manage helpers, areas, zones, labels, groups | No | Yes |
| Backups, apps/add-ons, HACS, device/entity registry | No | Yes |
| Setup effort | Low | Medium |
Just want to use your AI as a somewhat better voice assistant ("turn on the living room light")? The official server is enough. But if you want an AI to build automations, dashboards, or sensors for you, there's no way around the unofficial solution - only that one gives you full access.
Step 1: Install the MCP server as an app/add-on
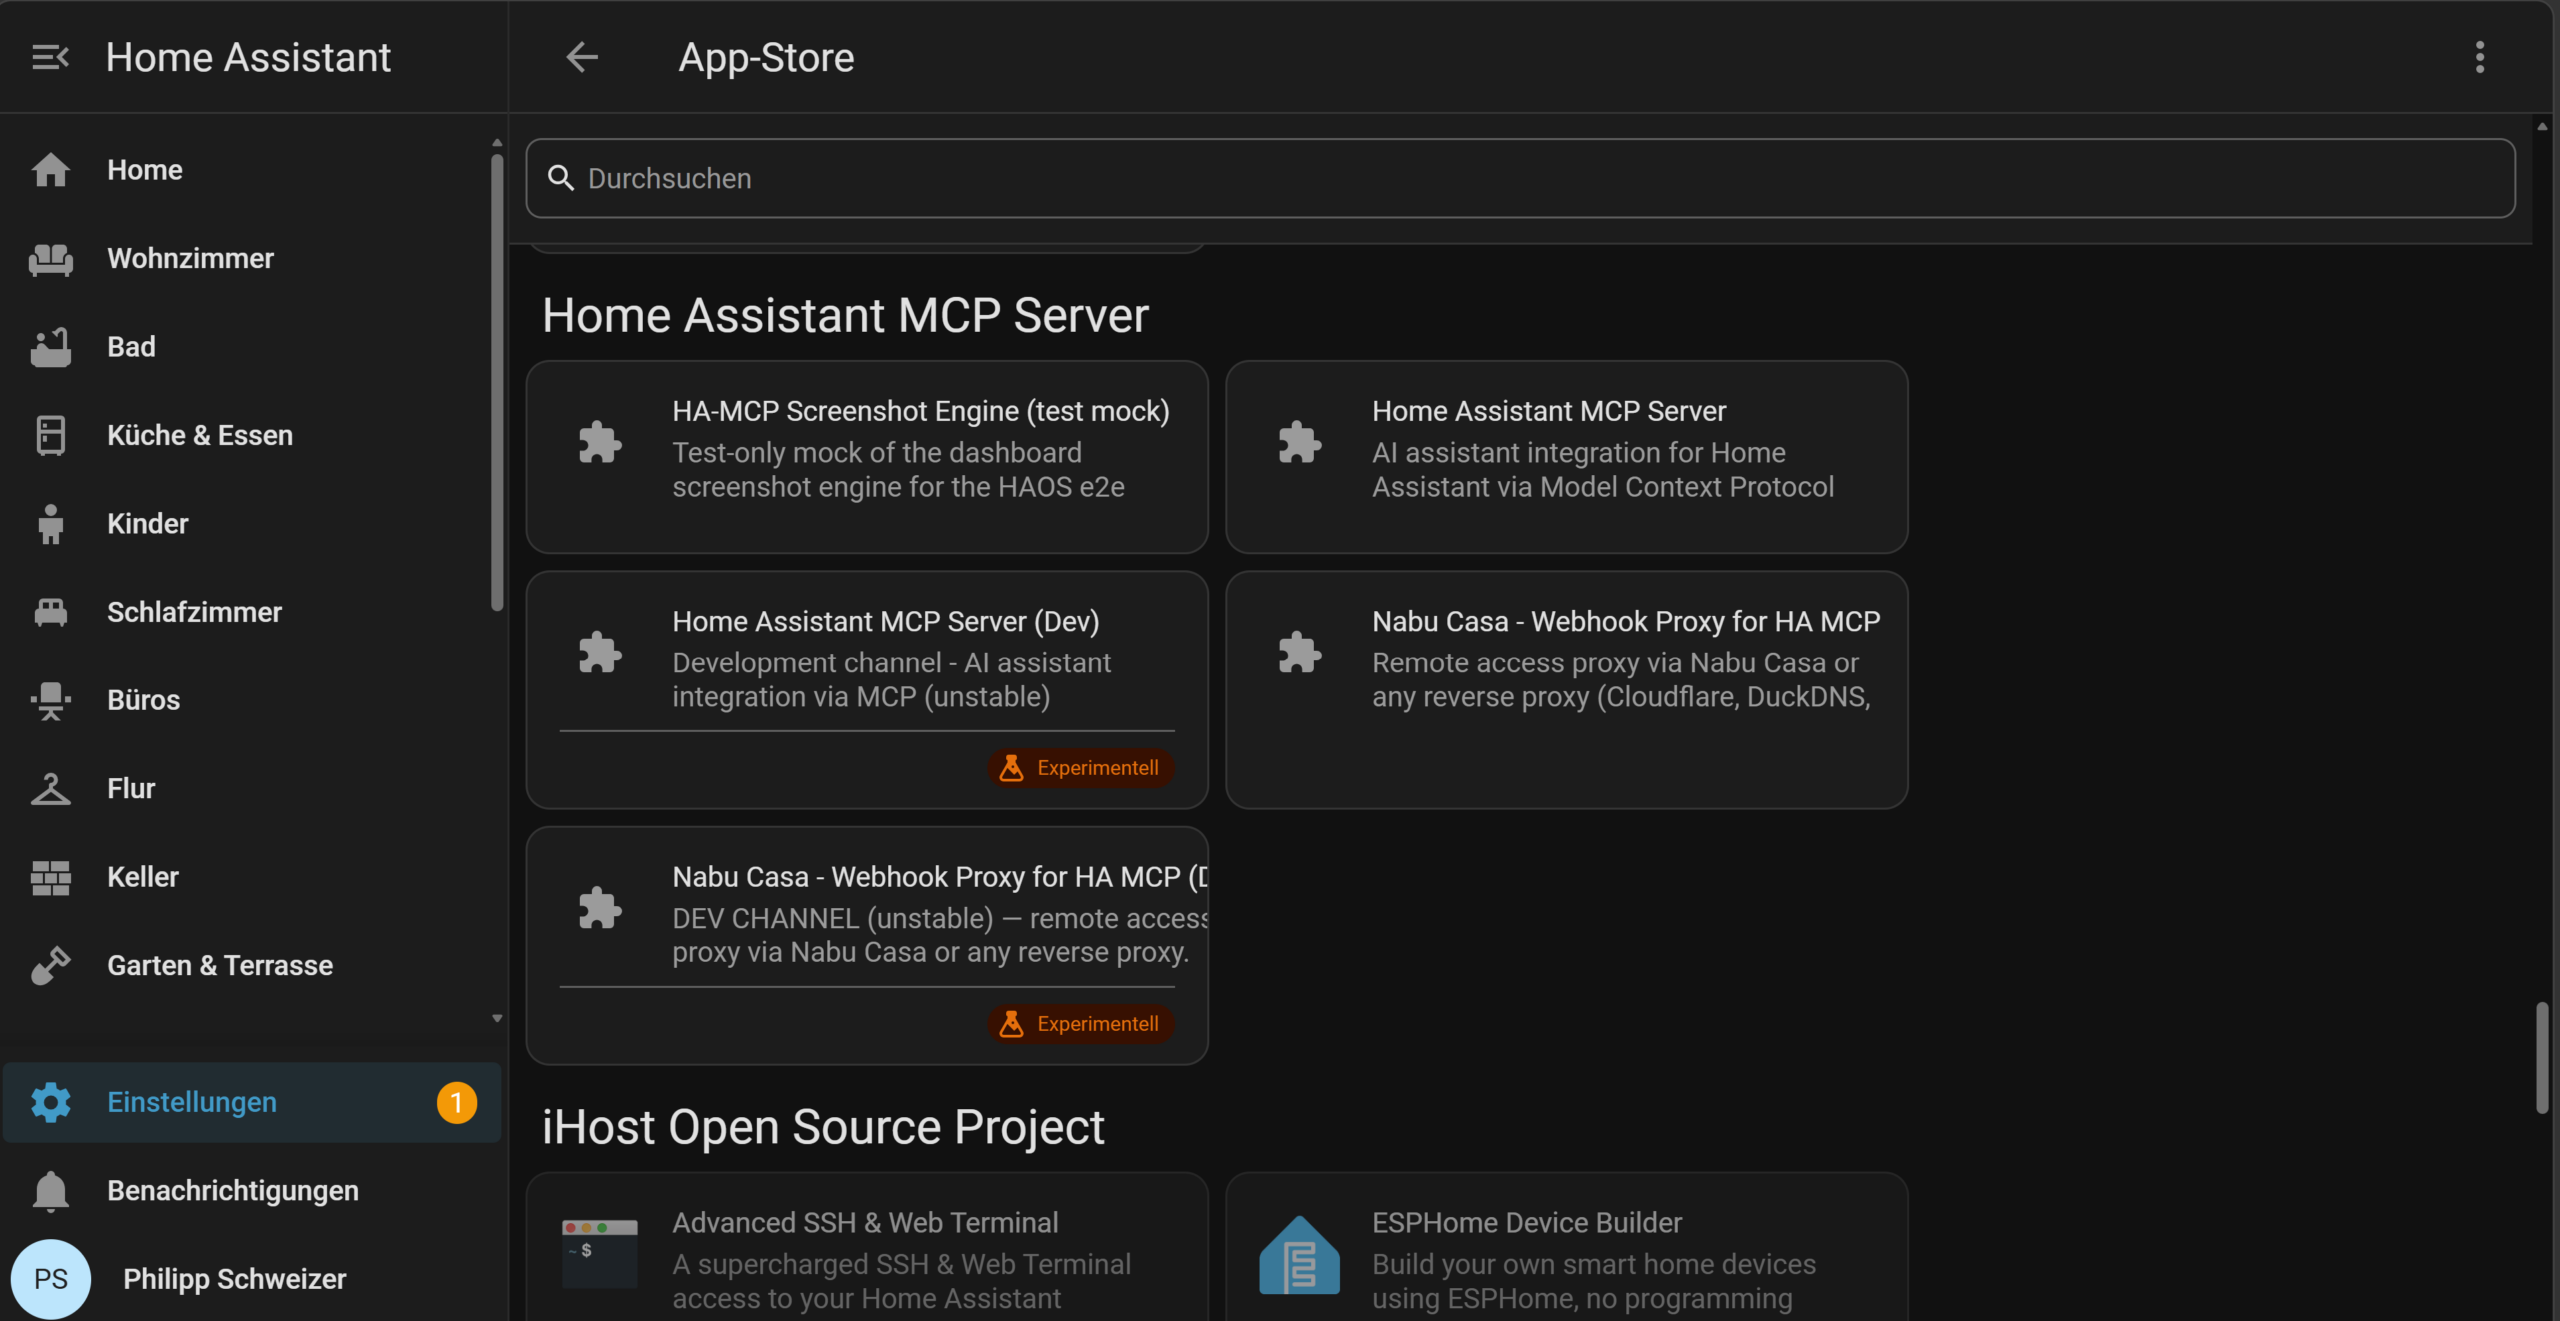
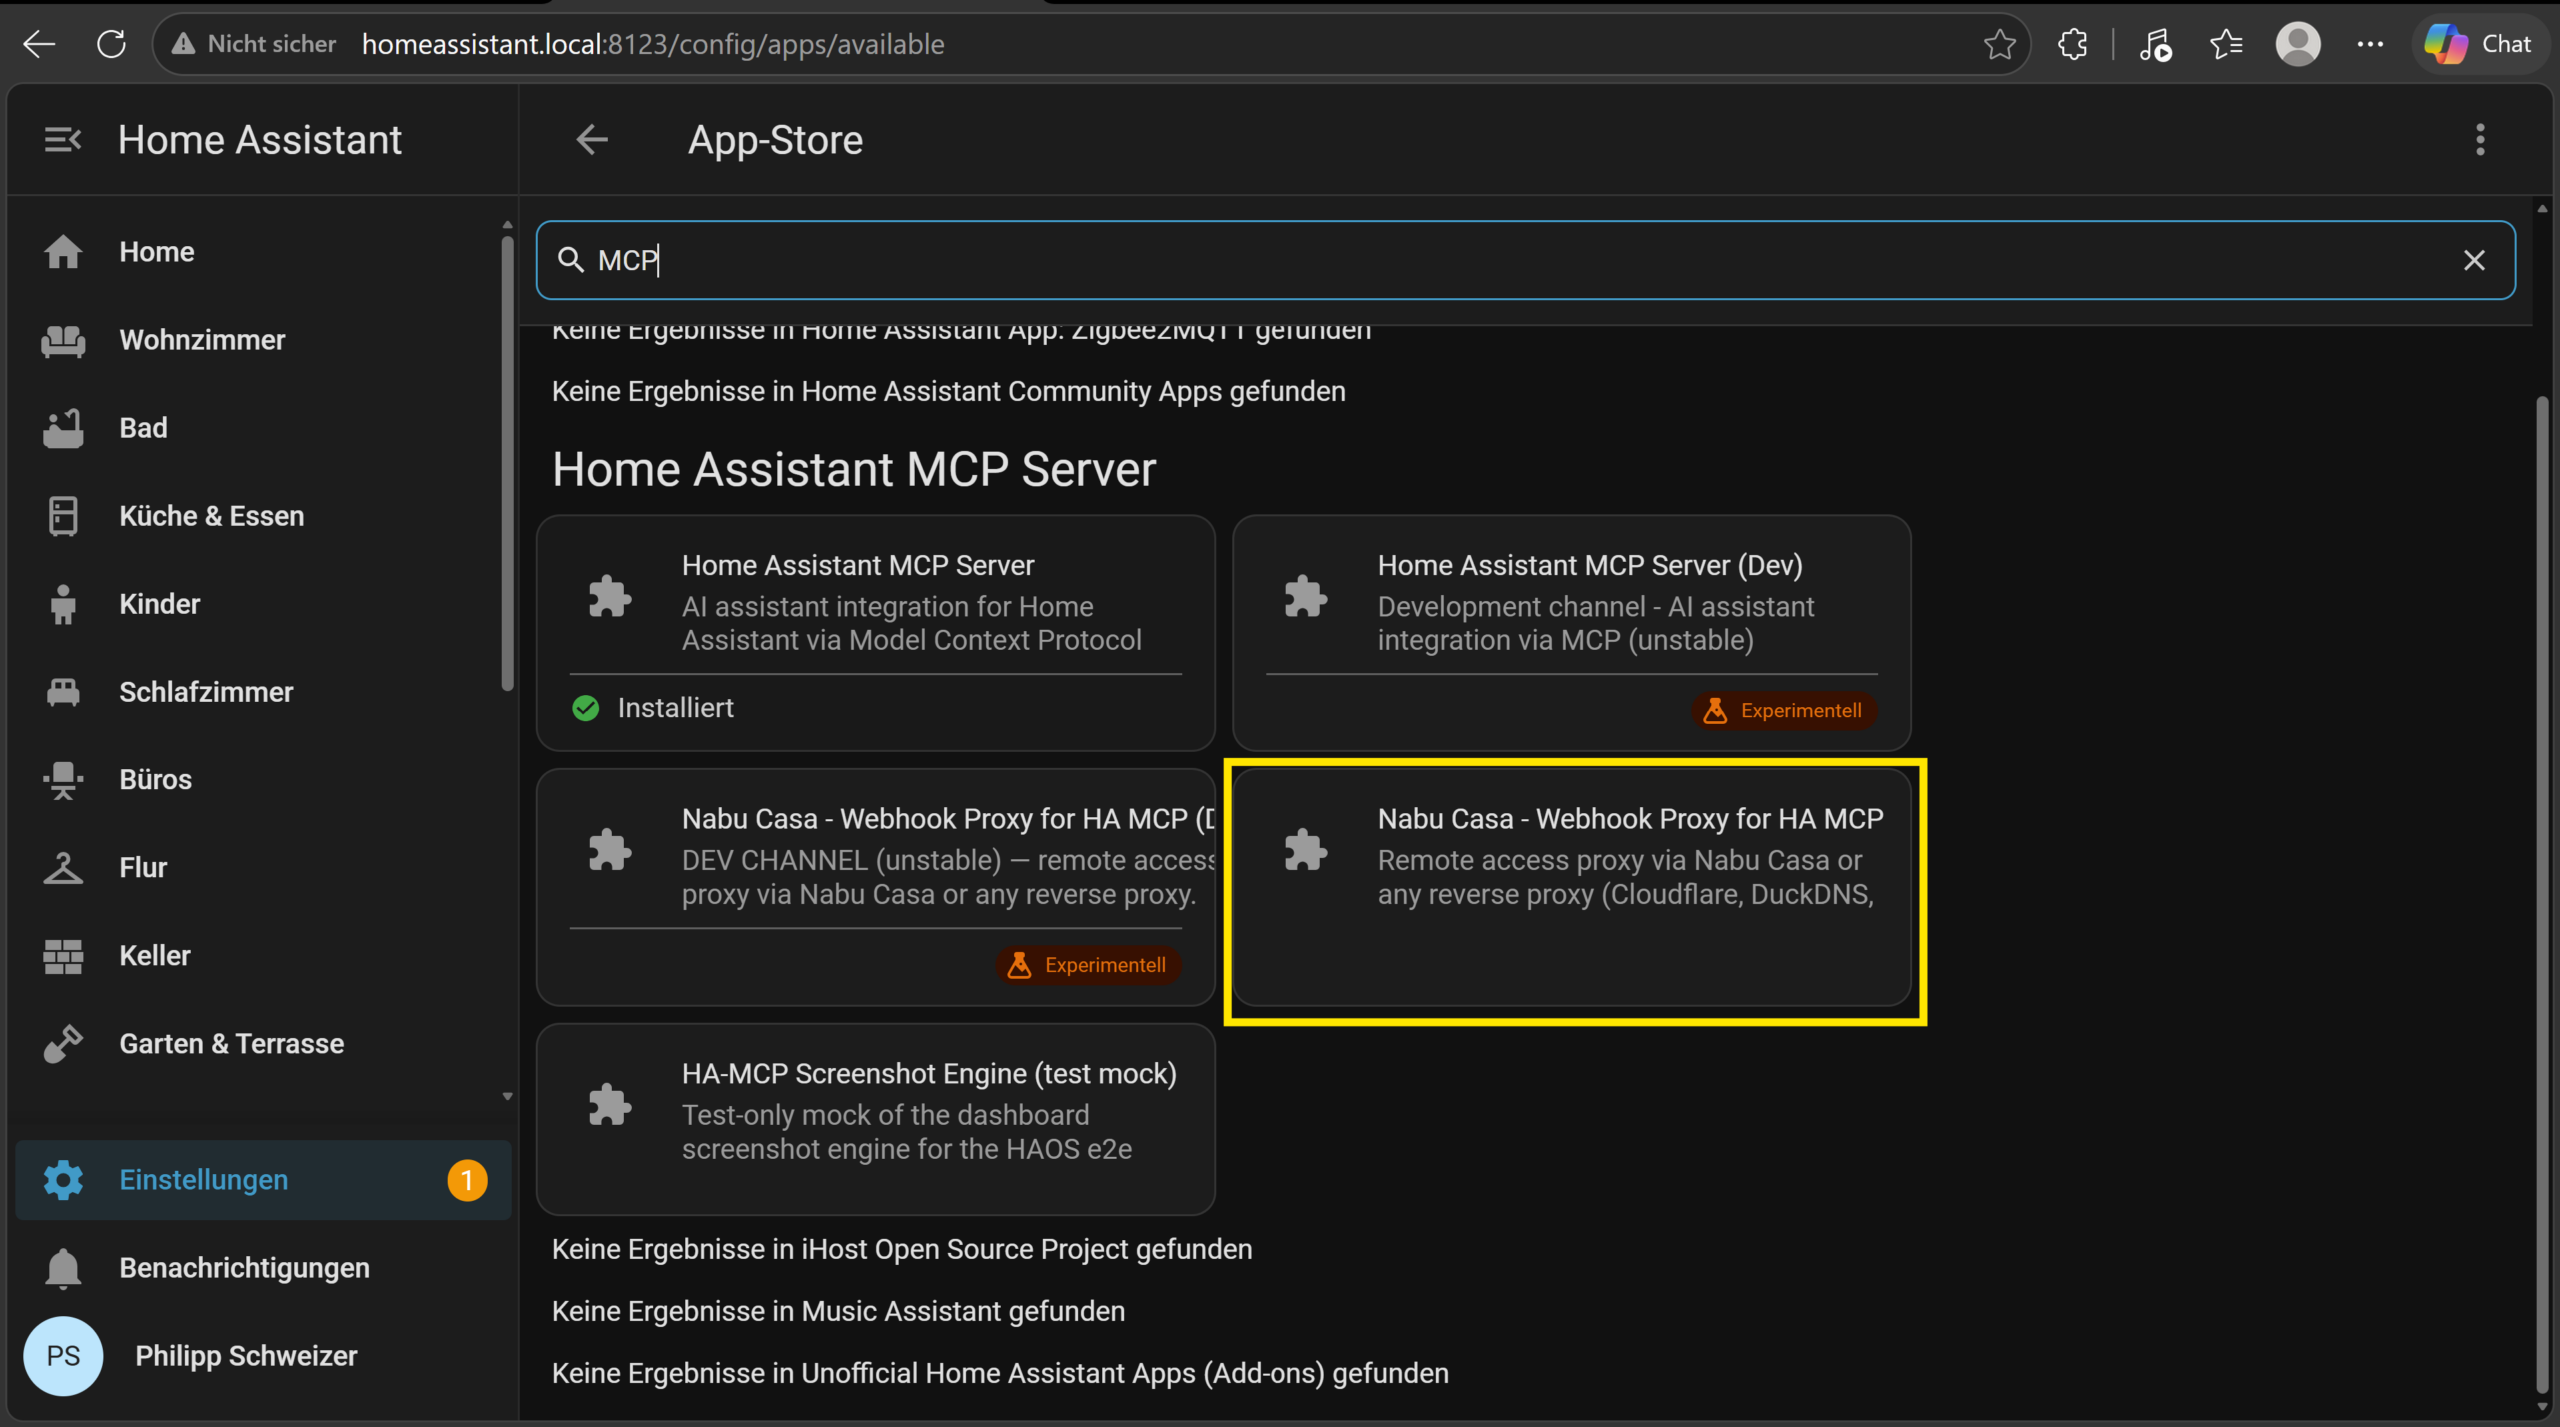
The project is called "Home Assistant MCP Server" (repository homeassistant-ai/ha-mcp, officially "The Unofficial and Awesome Home Assistant MCP Server"):
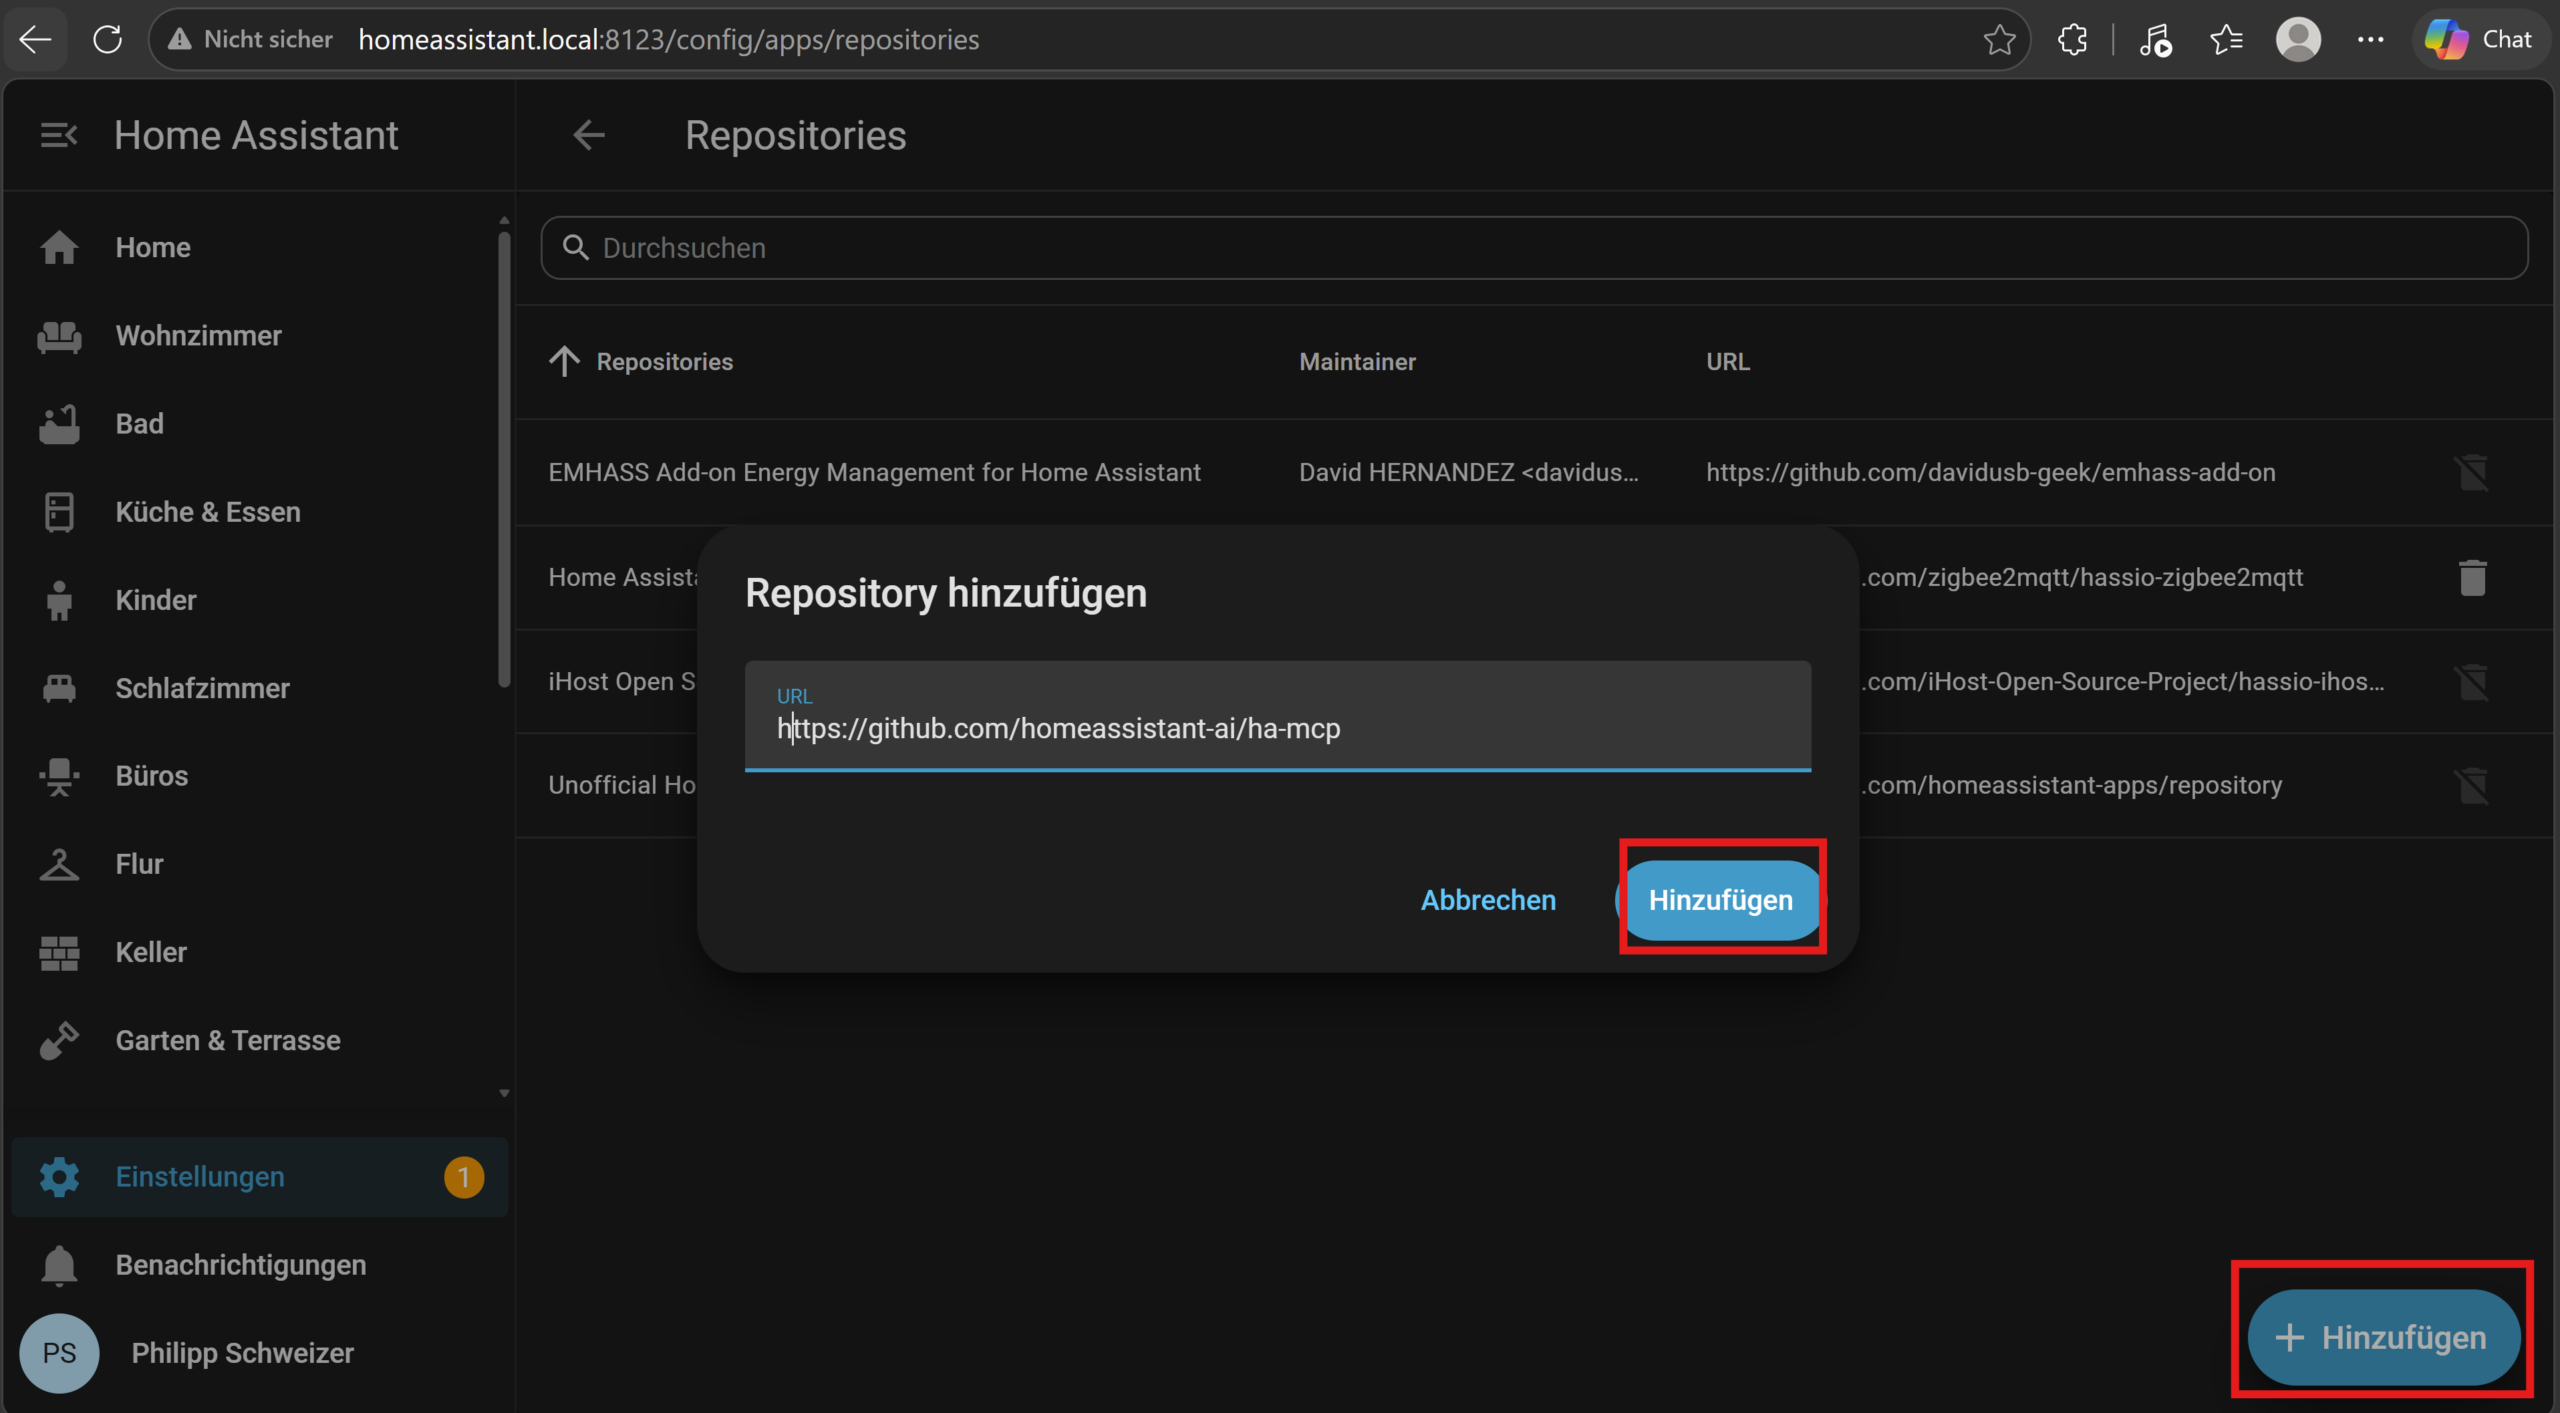
- Go to Settings → Apps → App Store (or Add-ons → Add-on Store on older HA versions)
- Via the three dots in the top right → Repositories, add the URL
https://github.com/homeassistant-ai/ha-mcp - Reload the page, install "Home Assistant MCP Server", and start it
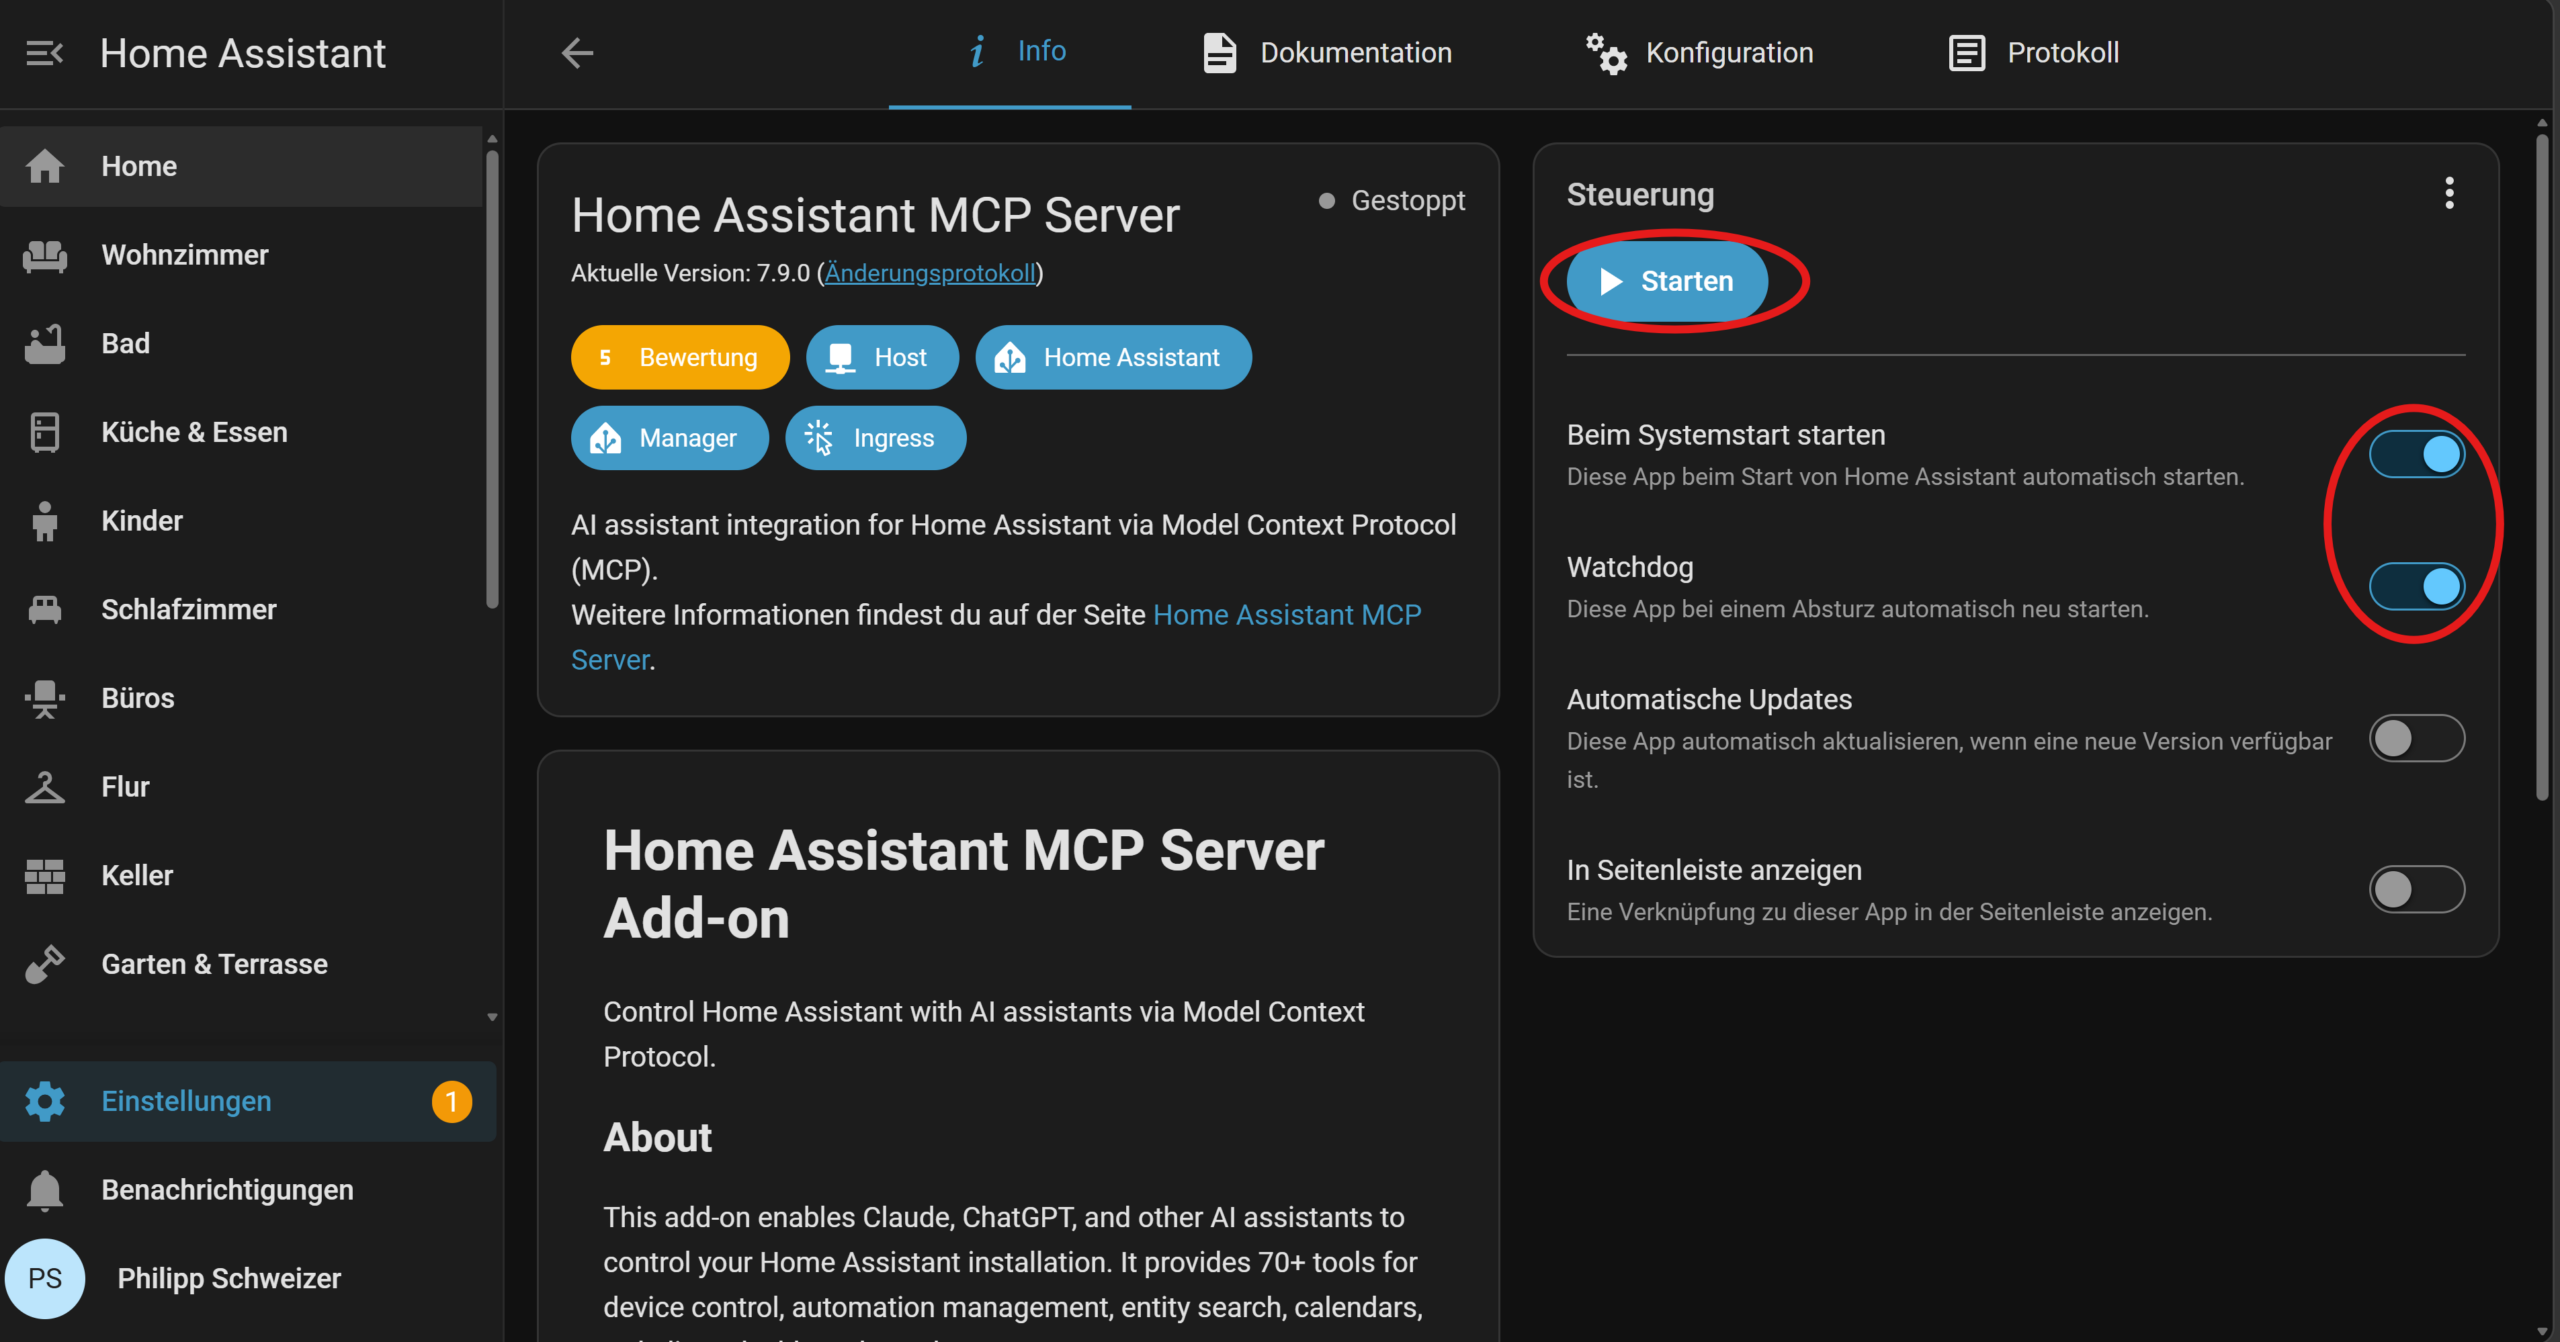
Then open the app's Logs tab. It shows your ready-to-use MCP server URL, already secured with a 128-bit random path, for example:
🔐 MCP Server URL: http://<ha-ip>:9583/private_zctpwlX7ZkIAr7oqdfLPxw
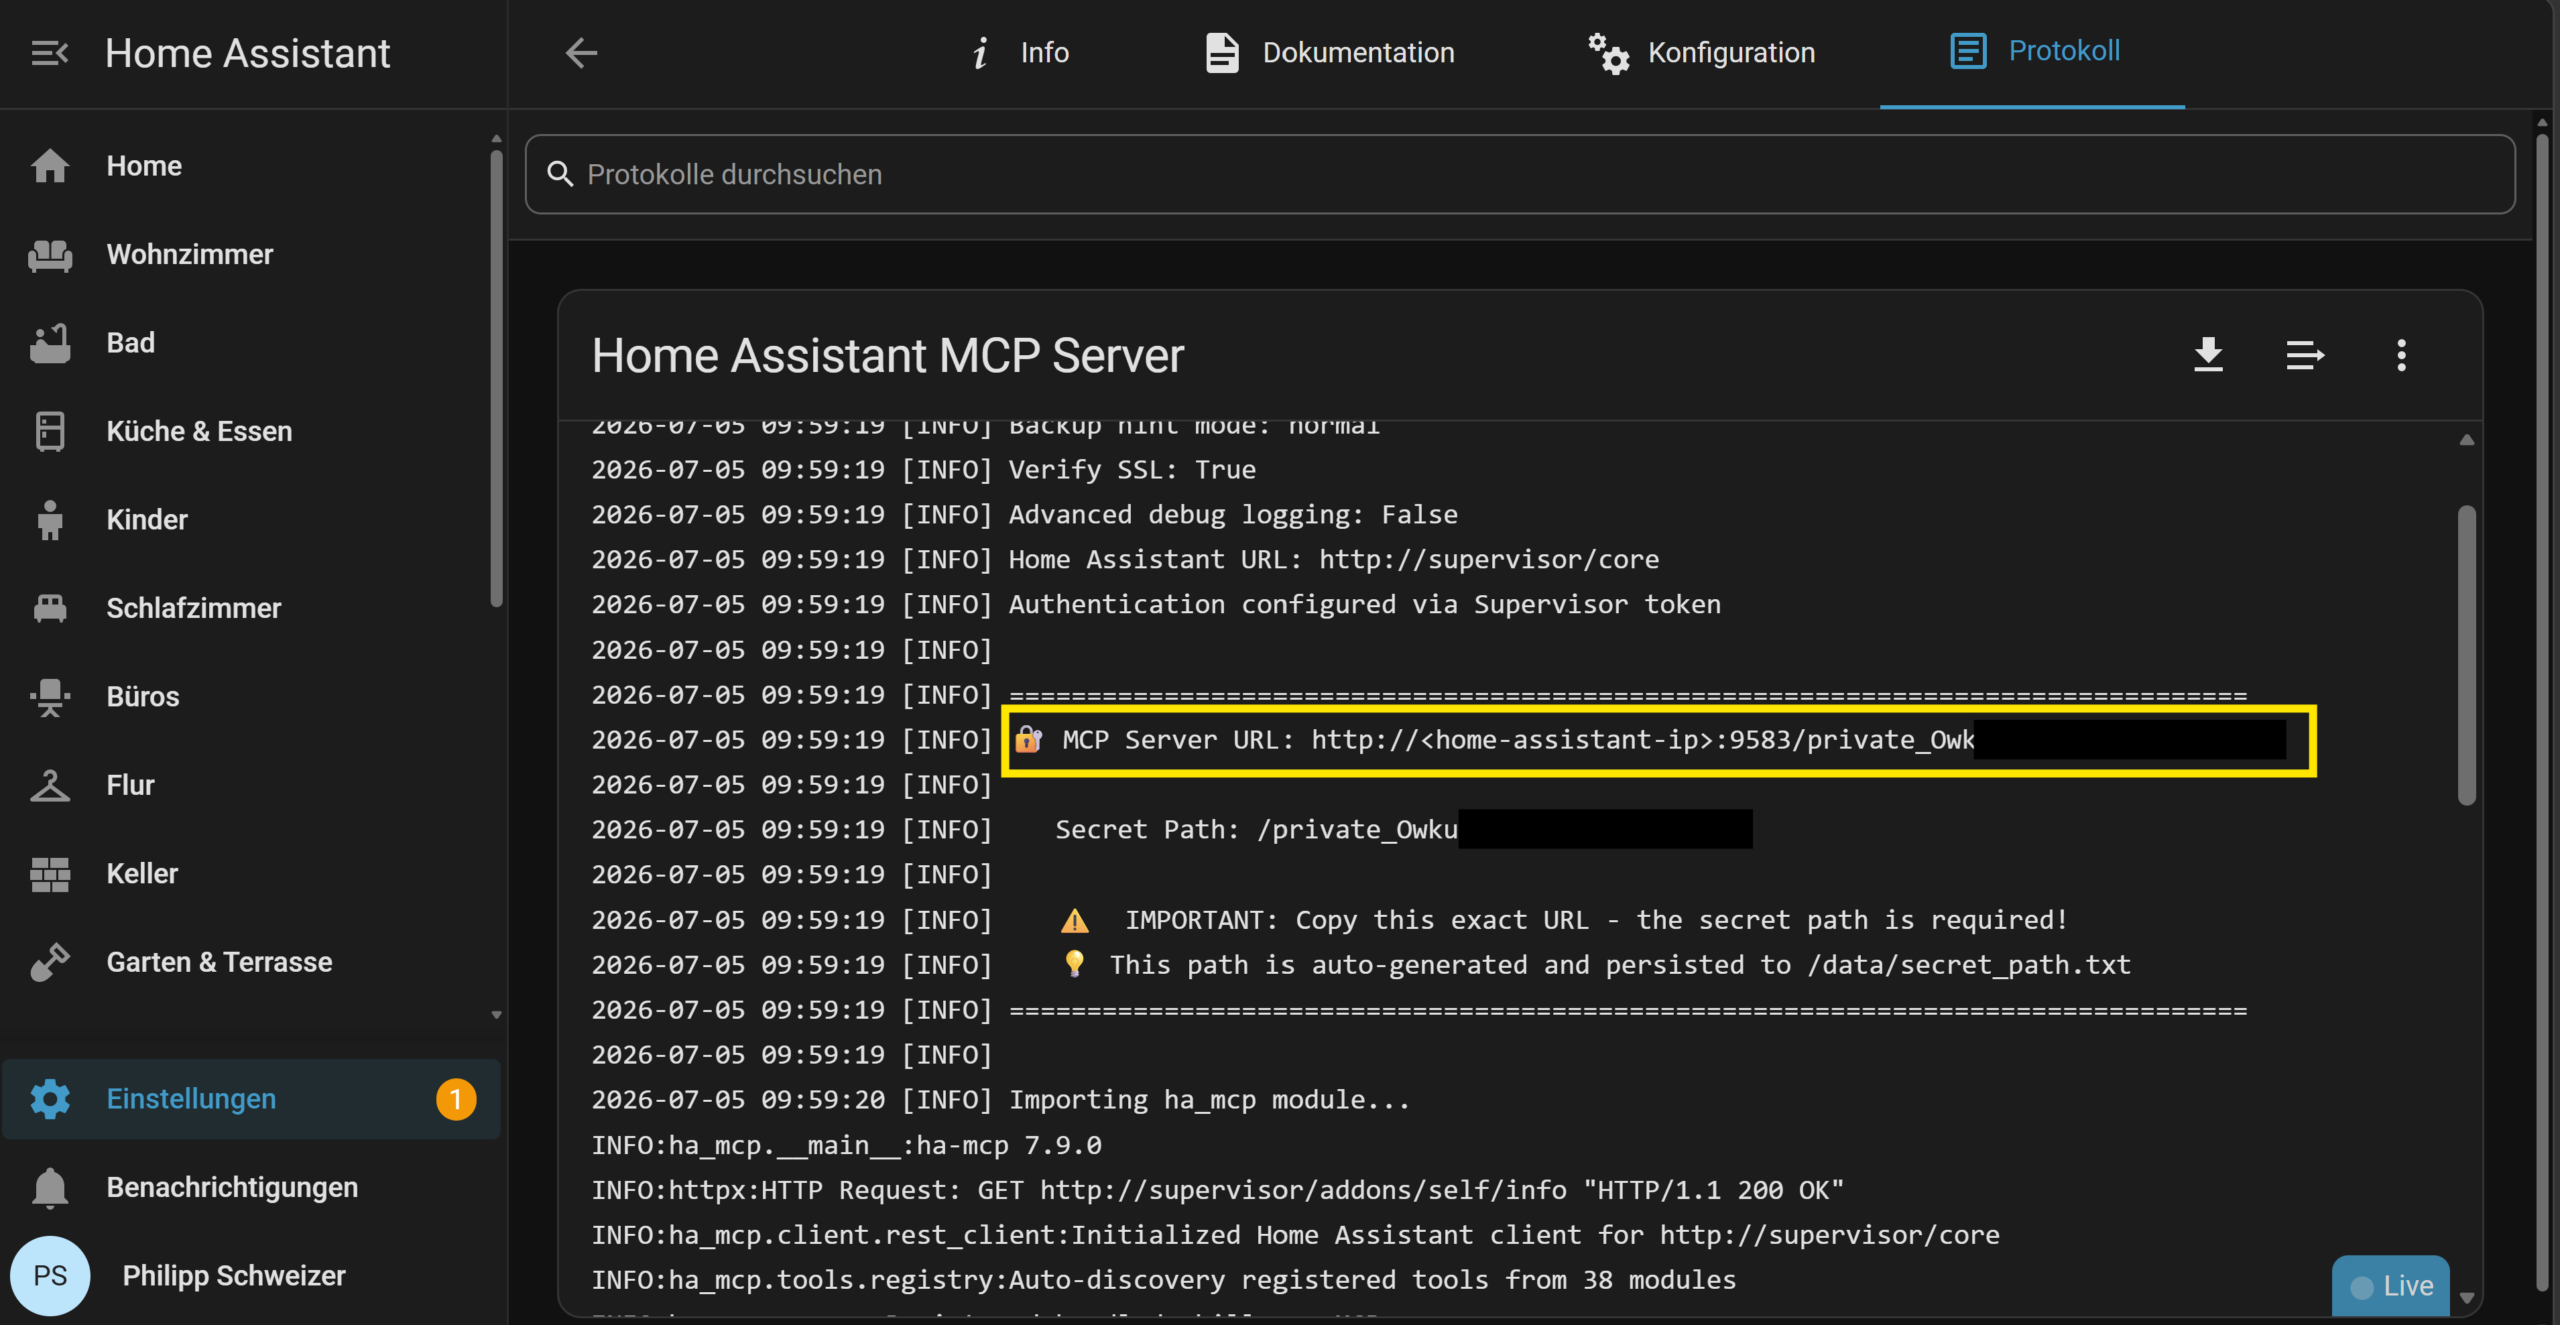
You'll need this URL for step 3. You don't need to create a token or password yourself - the app authenticates automatically via the Home Assistant Supervisor, and the random path in the URL is the actual security measure.
In the app's settings (config tab, or its own Tool Settings web UI via "Open Web UI"), I recommend:
-
Tool Search (
enable_tool_search): Disabled by default - leave it that way. For Claude in Sonnet or Opus mode, definitely leave it disabled, because its built-in tool search otherwise conflicts with ha-mcp's. Only worth enabling for Claude Haiku or other models without their own tool search, or if your client caps the number of tools (e.g. at 100). -
Tool Security Policies (
enable_tool_security_policies): Optionally enable this if you want manual approval via the app's web UI for critical actions (locks, alarm systems, writing automations). -
Read Only Mode (
read_only_mode): Handy for the first test run or shared installations - switches off every write-capable tool completely. -
Backup Hint (
backup_hint): Leave it atnormal- the AI will then automatically suggest a backup before irreversible changes. - You can disable or pin individual tools in the web UI if you don't need them or consider them too dangerous.
Part 1 is done - on your home network you can already talk to the app directly via the local URL (e.g. with VS Code, Cursor, or other HTTP-capable MCP clients).
Step 2: Set up remote access
For cloud AIs like Claude or ChatGPT to reach your MCP server, you need a publicly reachable, HTTPS-secured URL. There are two ways to get there:
Option A: Webhook Proxy app (easiest if you already use Nabu Casa or a reverse proxy)
The "Webhook Proxy for HA MCP" app (same repository) routes MCP traffic through your existing Home Assistant access - Nabu Casa, Cloudflare Tunnel, DuckDNS, or any other reverse proxy that already points at port 8123. You don't need an additional hostname or a second tunnel for this:
- The MCP Server app from step 1 must already be running
- Install and start "Webhook Proxy for HA MCP" from the same App Store
- If you don't use Nabu Casa (e.g. with your own Cloudflare Tunnel), your public Home Assistant URL needs to be entered explicitly in the Webhook Proxy app's settings - with Nabu Casa, the app detects this automatically

- Restart Home Assistant (do a full restart in the settings, top right)
- Copy the finished remote URL from the Webhook Proxy app's Logs tab, e.g.:
MCP Server URL (remote): https://<your-external-url>/api/webhook/mcp_7eacf143b0f5d31269417ae3304ee534
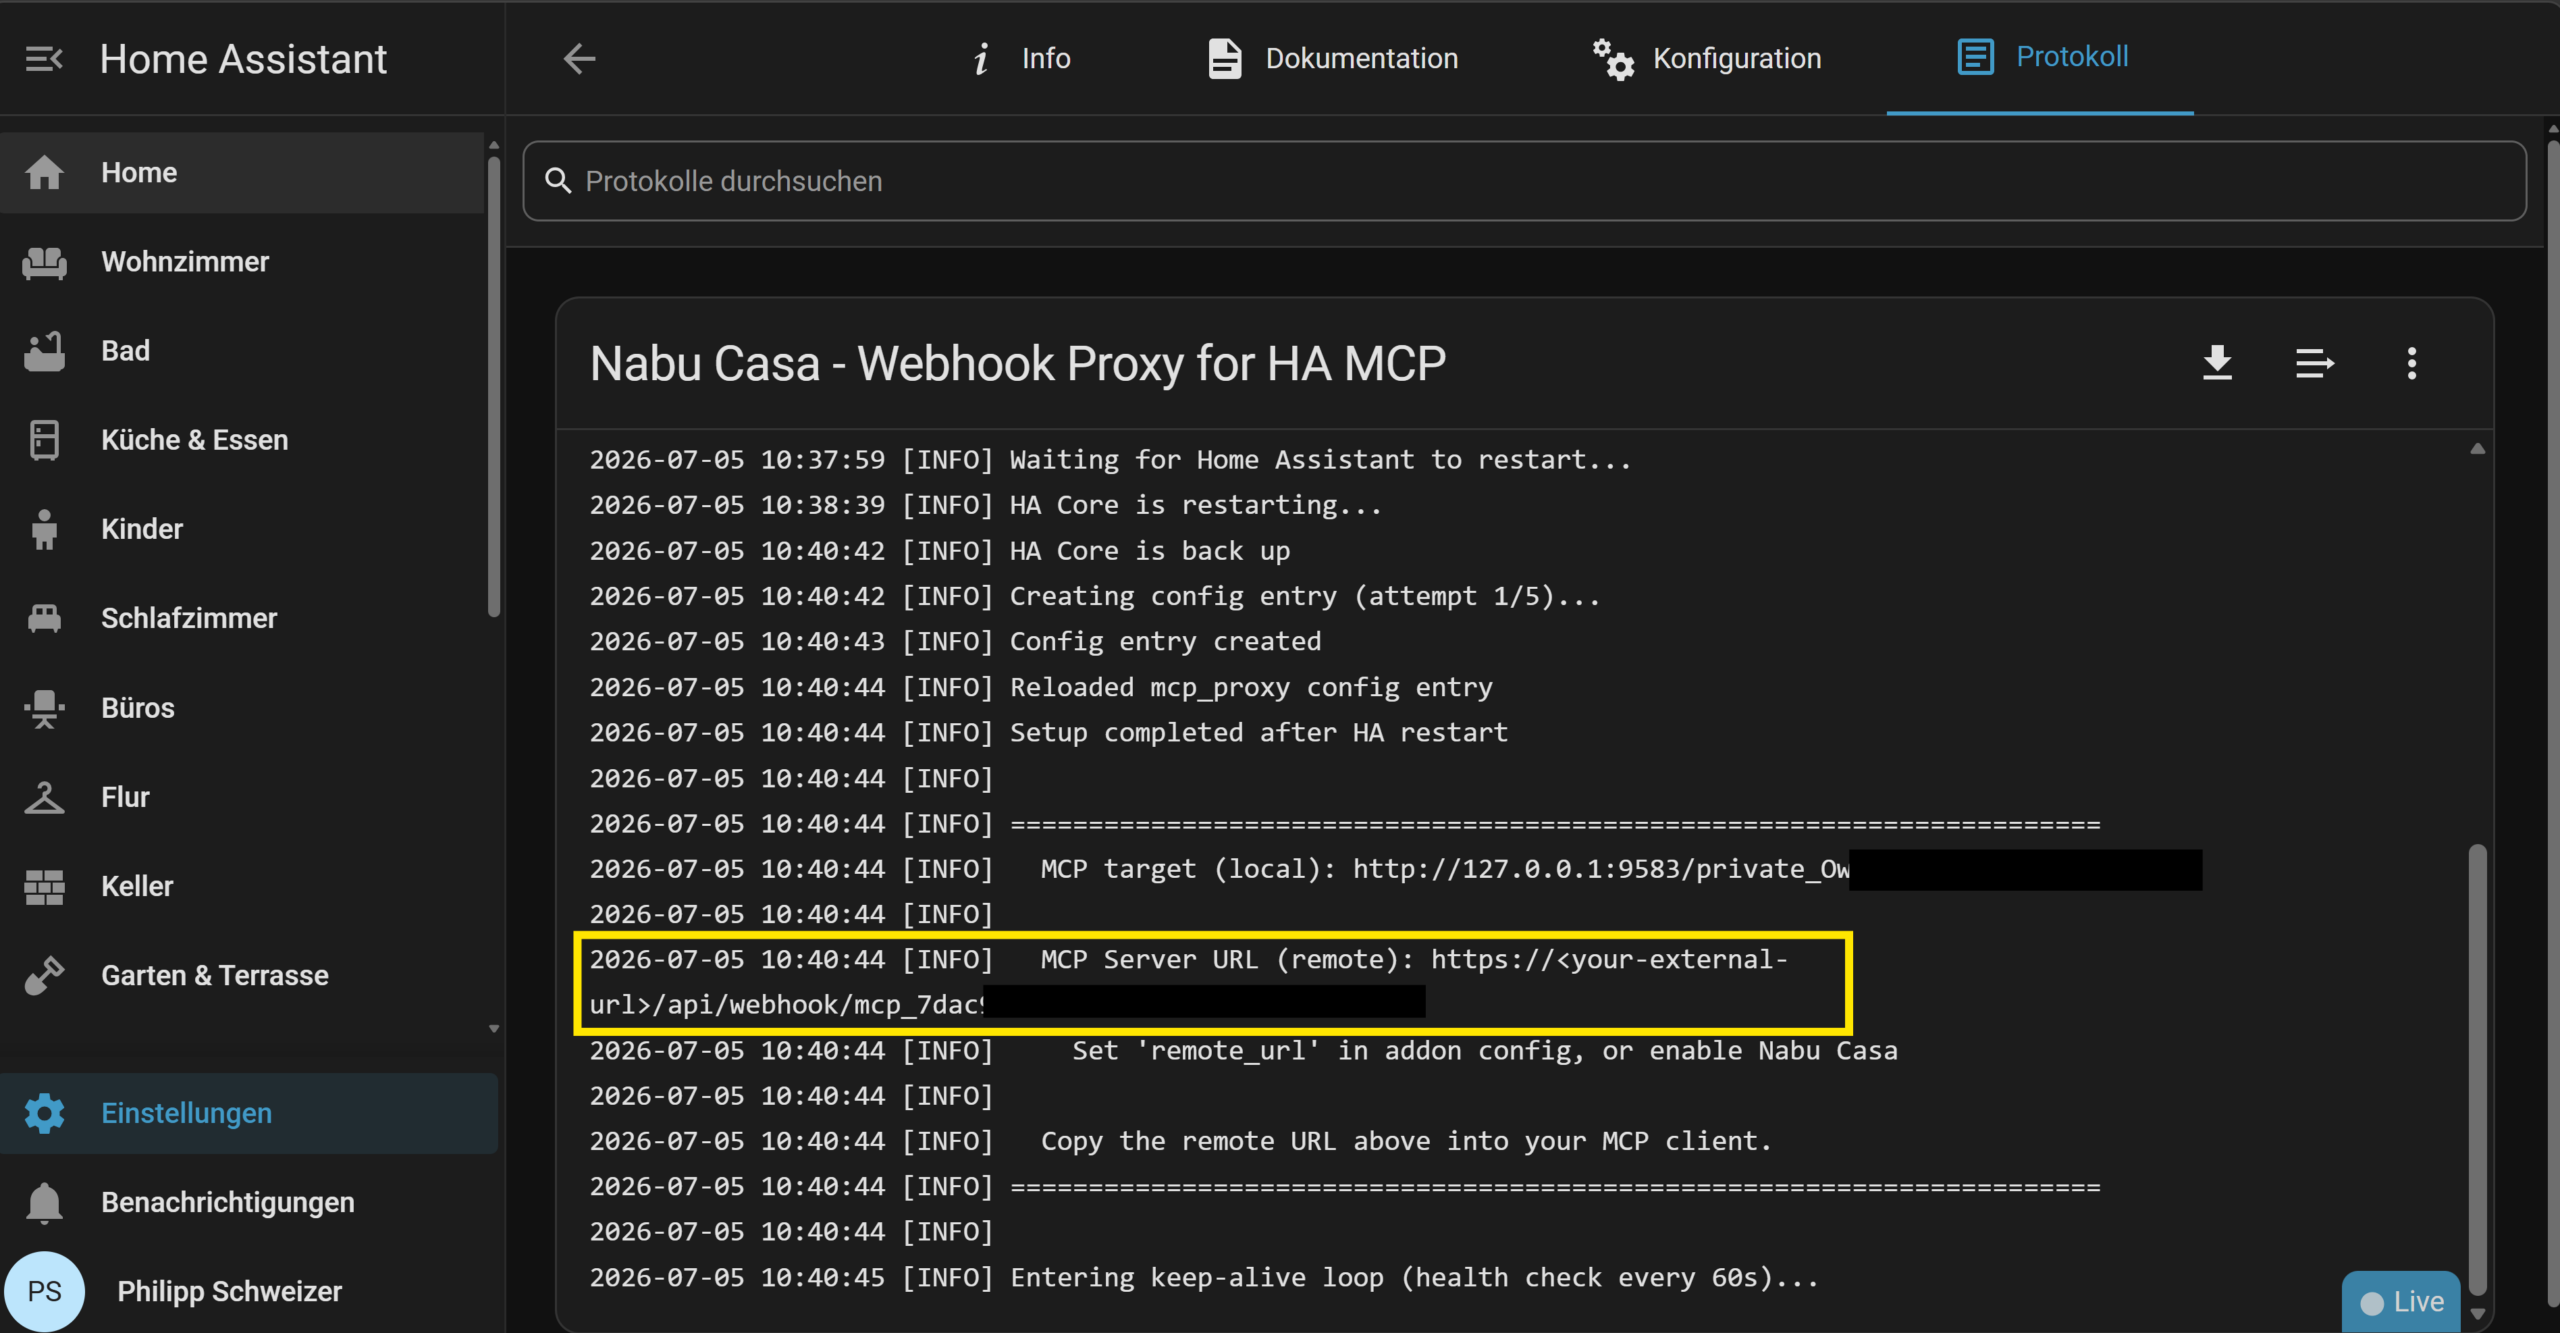
The app finds your MCP Server app automatically. If you use Nabu Casa, your external URL is also detected automatically; without Nabu Casa, you enter it manually as shown in step 3. Either way, the webhook path (/api/webhook/mcp_...) stays stable across restarts, because the ID is stored locally.
Option B: Your own Cloudflared tunnel (if you don't have remote access yet)
Alternatively, use a dedicated tunnel just for the MCP server, as described in our Cloudflare Tunnel article (Part A). In the Cloudflared app configuration:
additional_hosts:
  - hostname: ha-mcp.yourdomain.com
    service: http://localhost:9583
If localhost doesn't work from inside the Cloudflared container (its own Docker container), use the MCP Server app's container hostname instead, which you'll find on its Info page (e.g. b37de126-ha-mcp).
⚠️ Important Cloudflare trap: Cloudflare's "Block AI Training Bots" feature blocks AI clients by default - even when browser access to the same URL works fine. Under Security → Bots, set the "Block AI training bots" option to "do not block", or you won't be able to connect with any AI at all.
Did you set up the country restriction (DE/AT/CH) from the Cloudflare Tunnel article? That same rule blocks Claude and ChatGPT too - both connect from the US. Either add Anthropic's stable IP range 160.79.104.0/21 as an exception to the rule, or scope the country rule to your main hostname only and leave the MCP hostname untouched.
Step 3: Connect the MCP server to your AI
Now for the actual connection. How easy this is - and how far you'll get - differs quite a bit between Claude, ChatGPT, and Gemini:
| AI | Minimum plan | Setup location | Desktop/Mobile |
|---|---|---|---|
| Claude | Free (1 connector), otherwise Pro/Max | claude.ai (web), Custom Connector | Syncs automatically to the desktop app and iOS/Android |
| ChatGPT | Plus | Settings → Connectors → Developer Mode | Manual, no known auto-sync |
| Gemini | Free (CLI) | Gemini CLI only, settings.json | No path via the regular Gemini app |
Connecting Claude Desktop
Route 1 - Web Connector (recommended, web + desktop + smartphone in one step):
- Log in at claude.ai, go to Customize → Connectors (Customize - Claude)
- Add a custom connector using the plus icon (+), and name it, e.g., "Home Assistant"
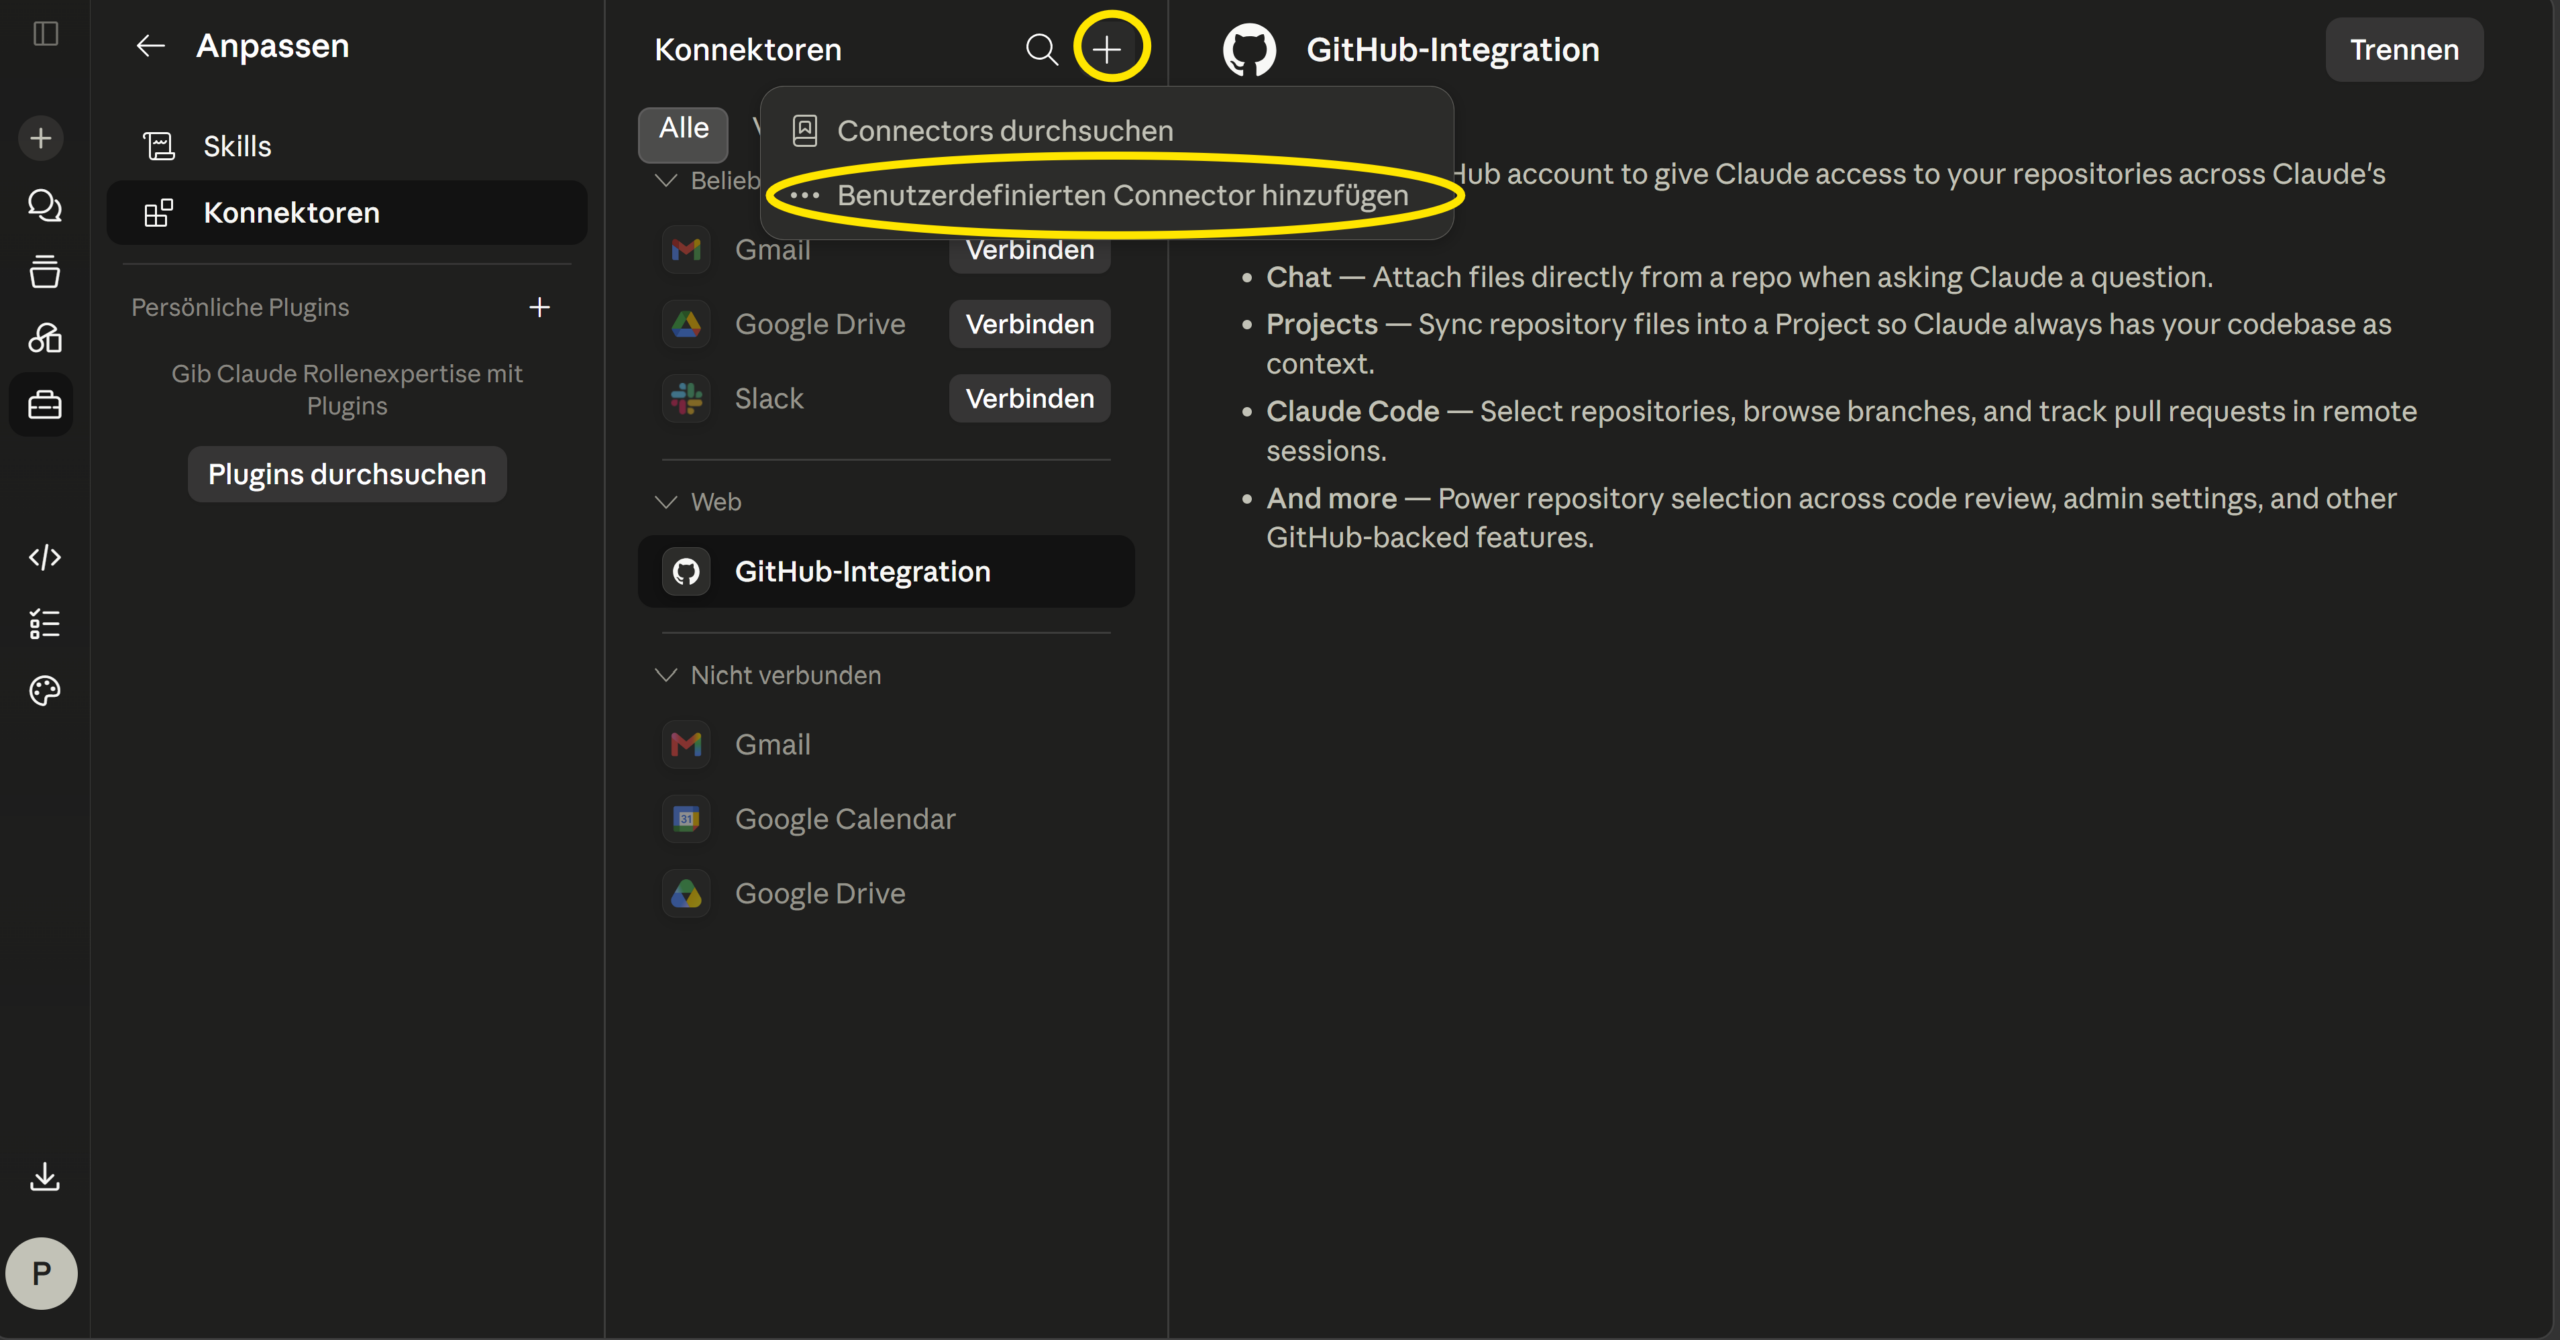
- Enter your remote URL from step 2 and save
- For read-only tools you can set "always allow"; for write/delete tools I'd leave confirmation prompts on
The convenient part: once the connector is set up on claude.ai, it's automatically available in the Claude Desktop app and the Claude apps for iOS and Android too - no extra configuration needed.
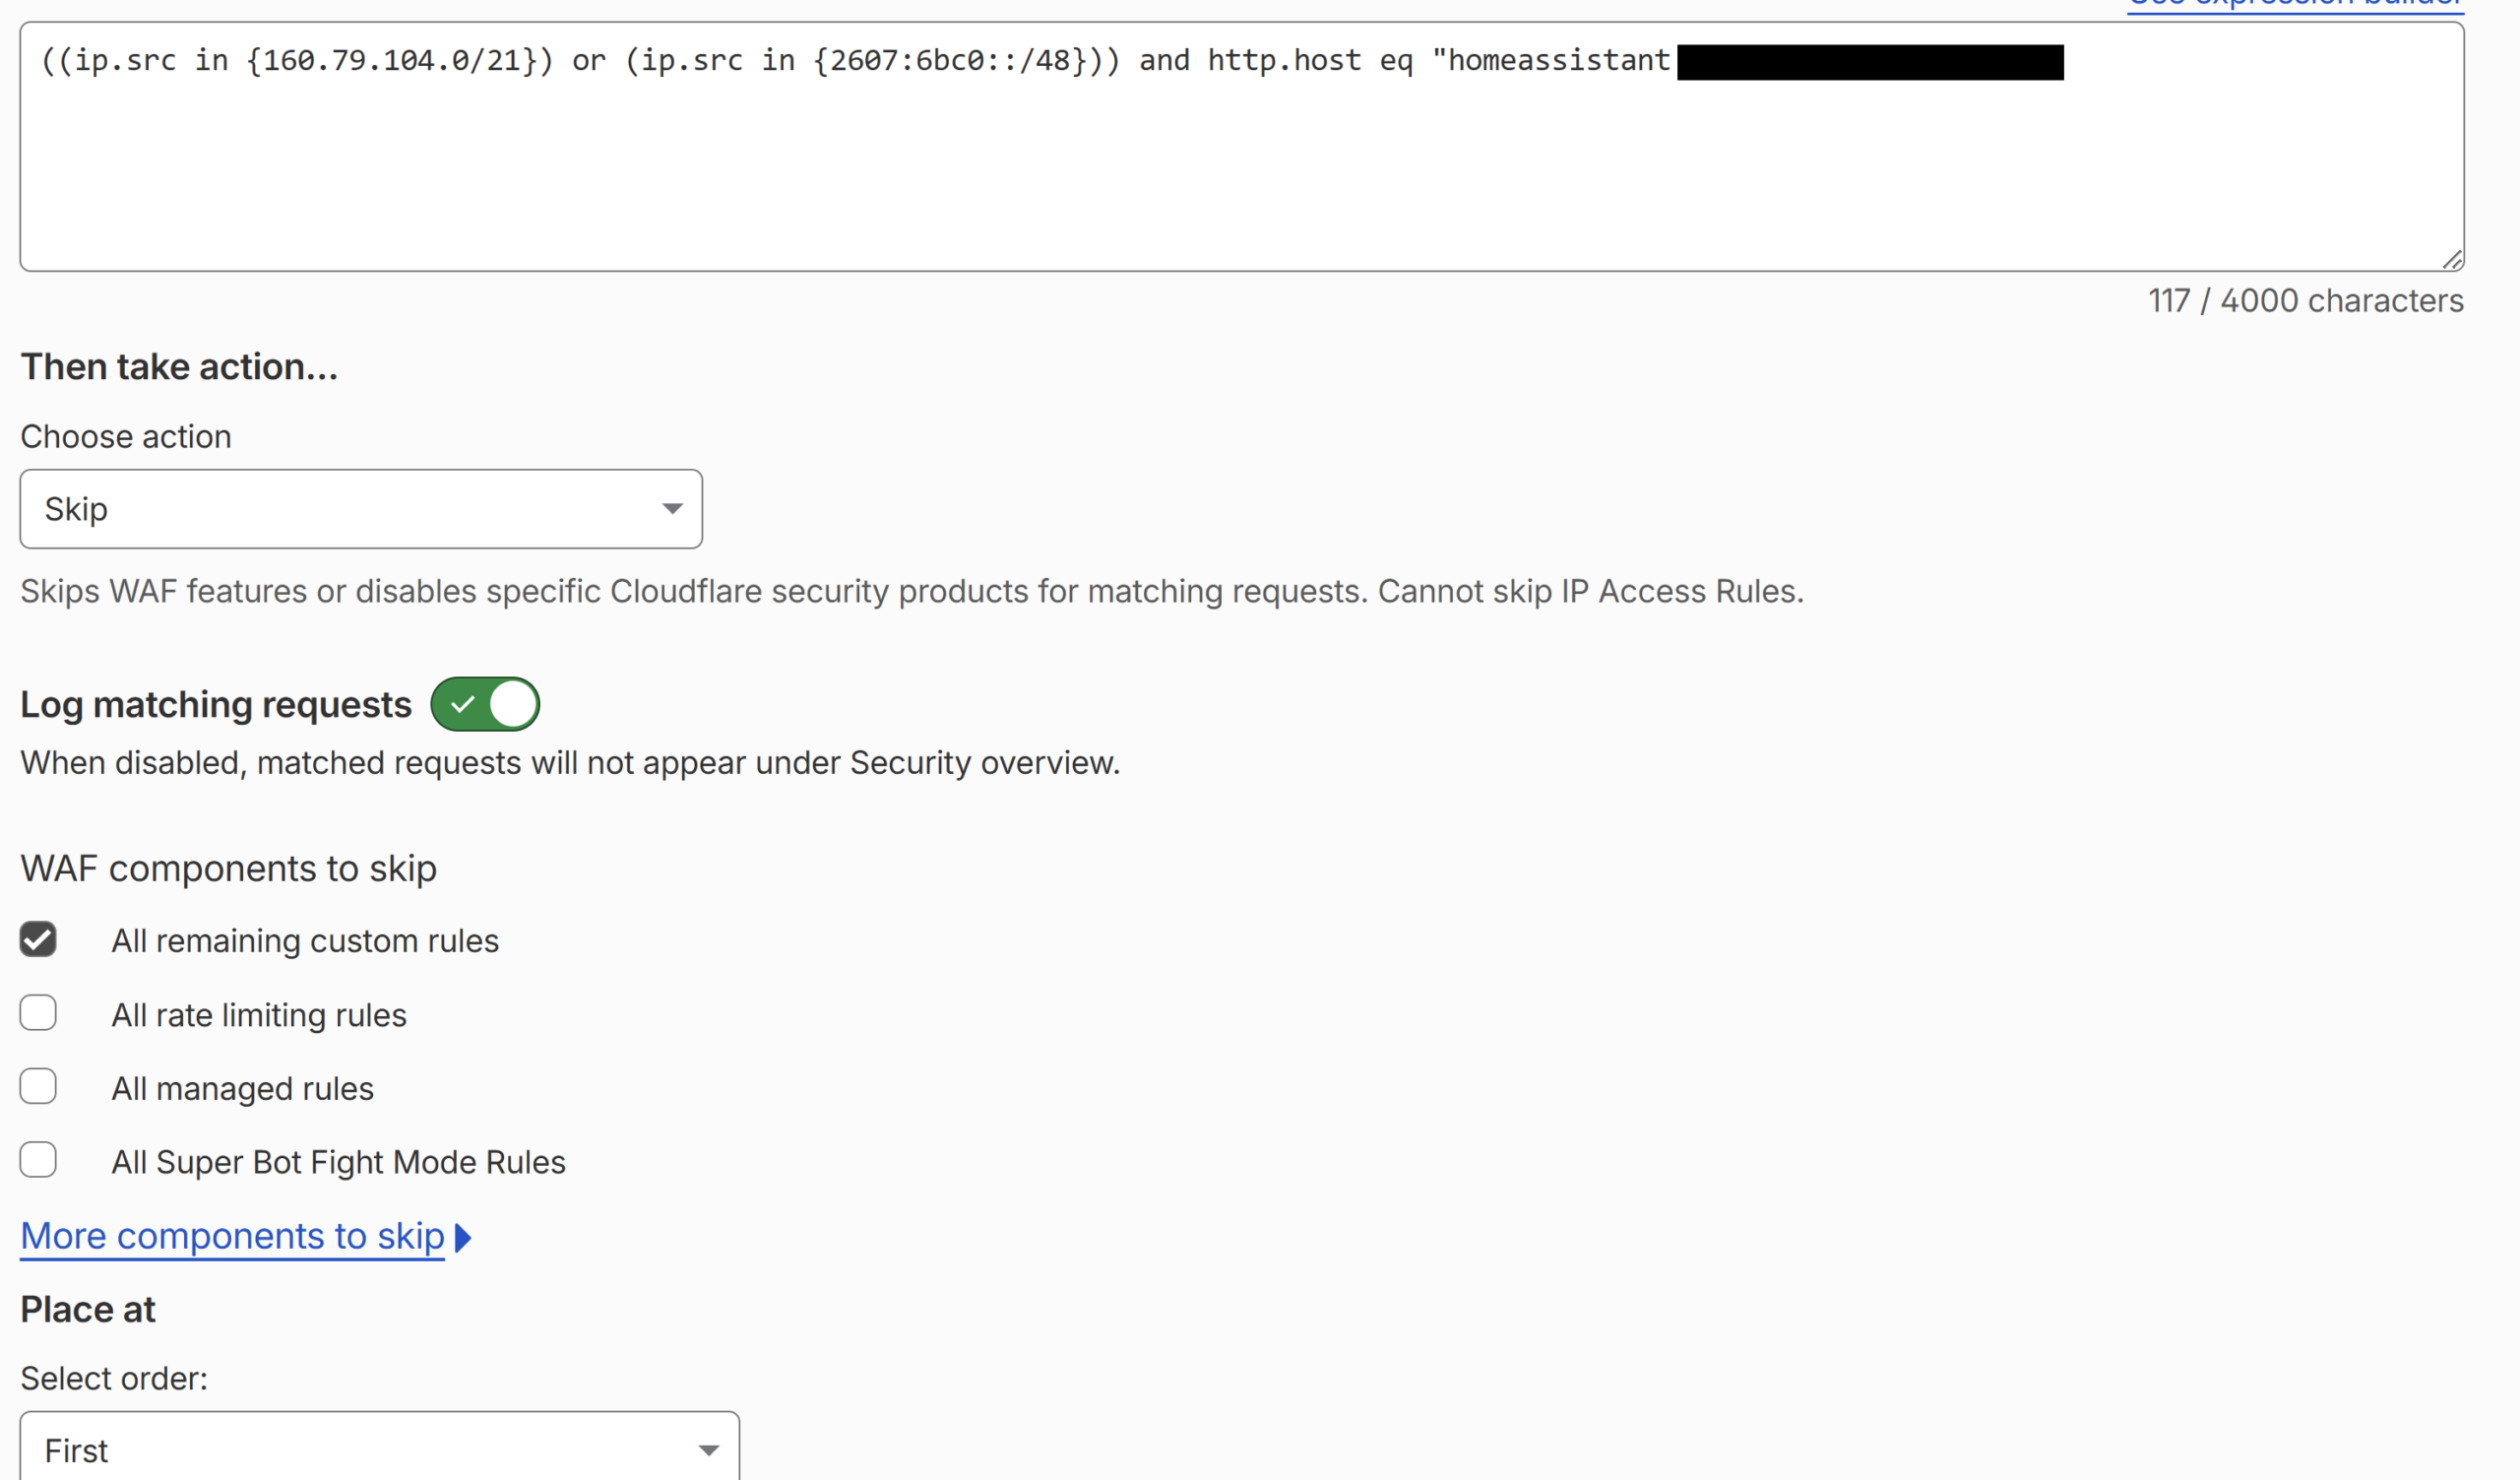
Watch out: if you've set up block rules in Cloudflare (I've blocked a lot of countries, for example), you naturally need to allow Claude's IP addresses. I've put a skip rule for Claude at position 1, which causes all other block rules to be skipped:
((ip.src in {160.79.104.0/21}) or (ip.src in {2607:6bc0::/48})) and http.host eq "homeassistant.your-domain.com"
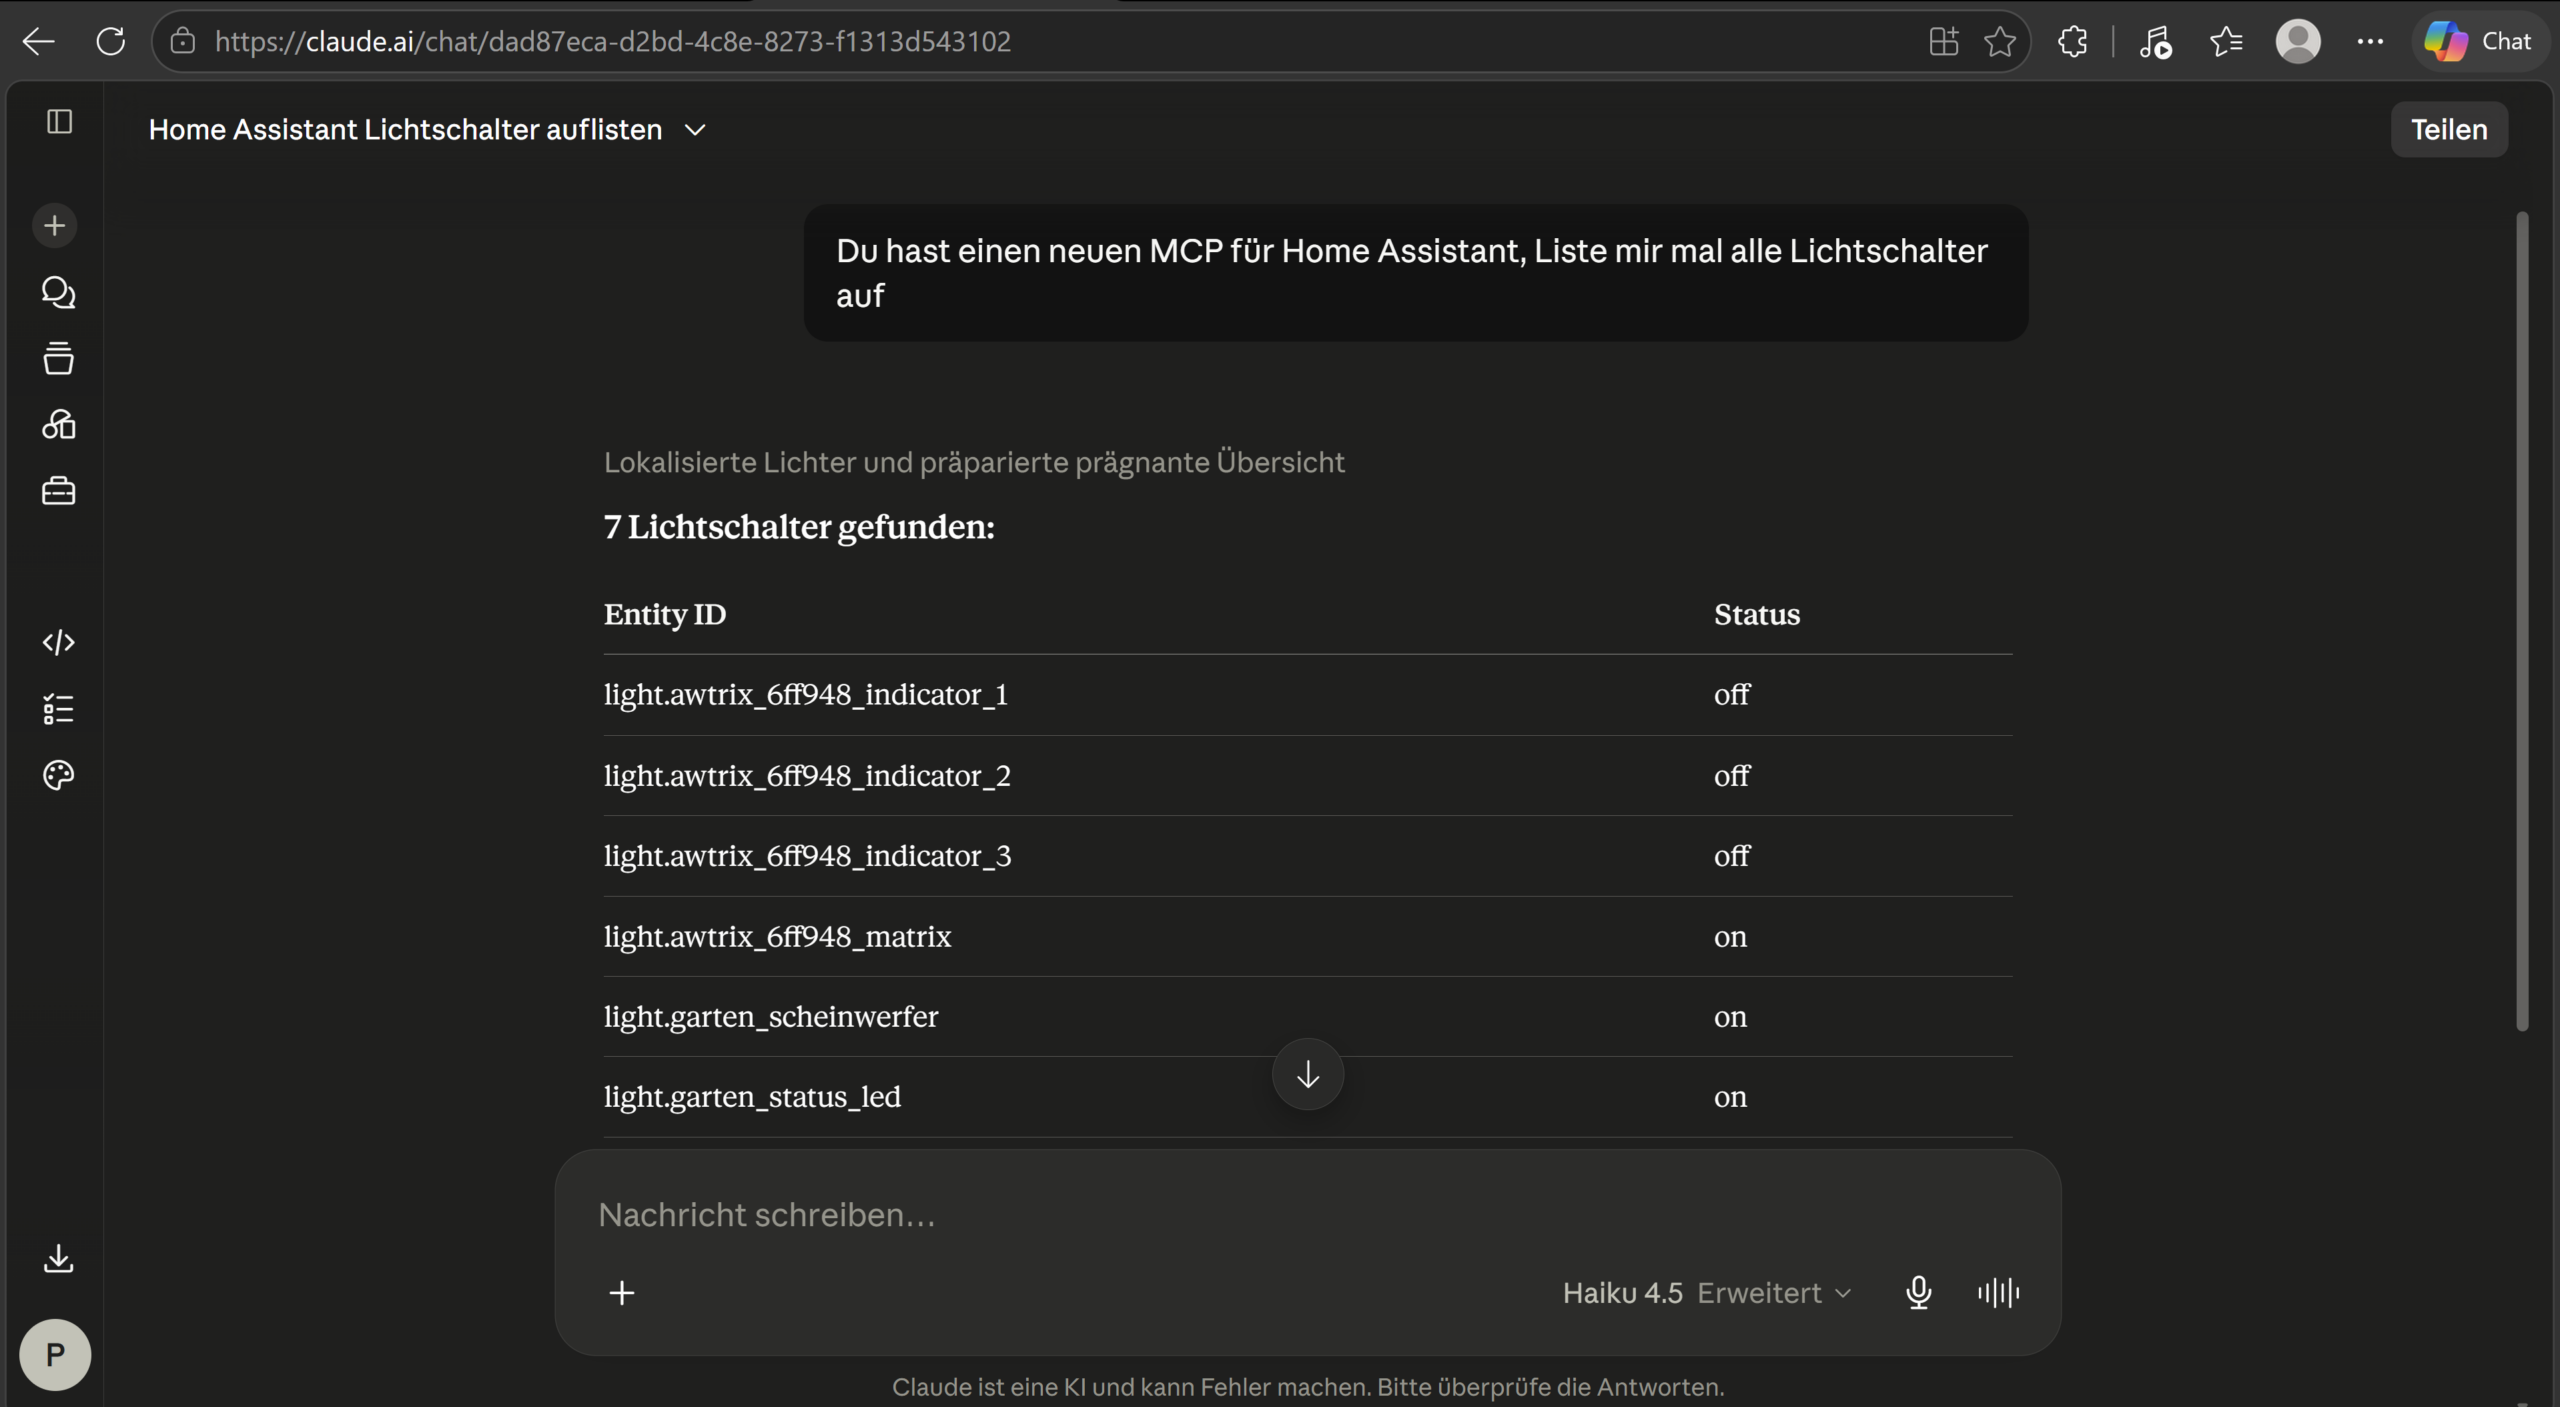
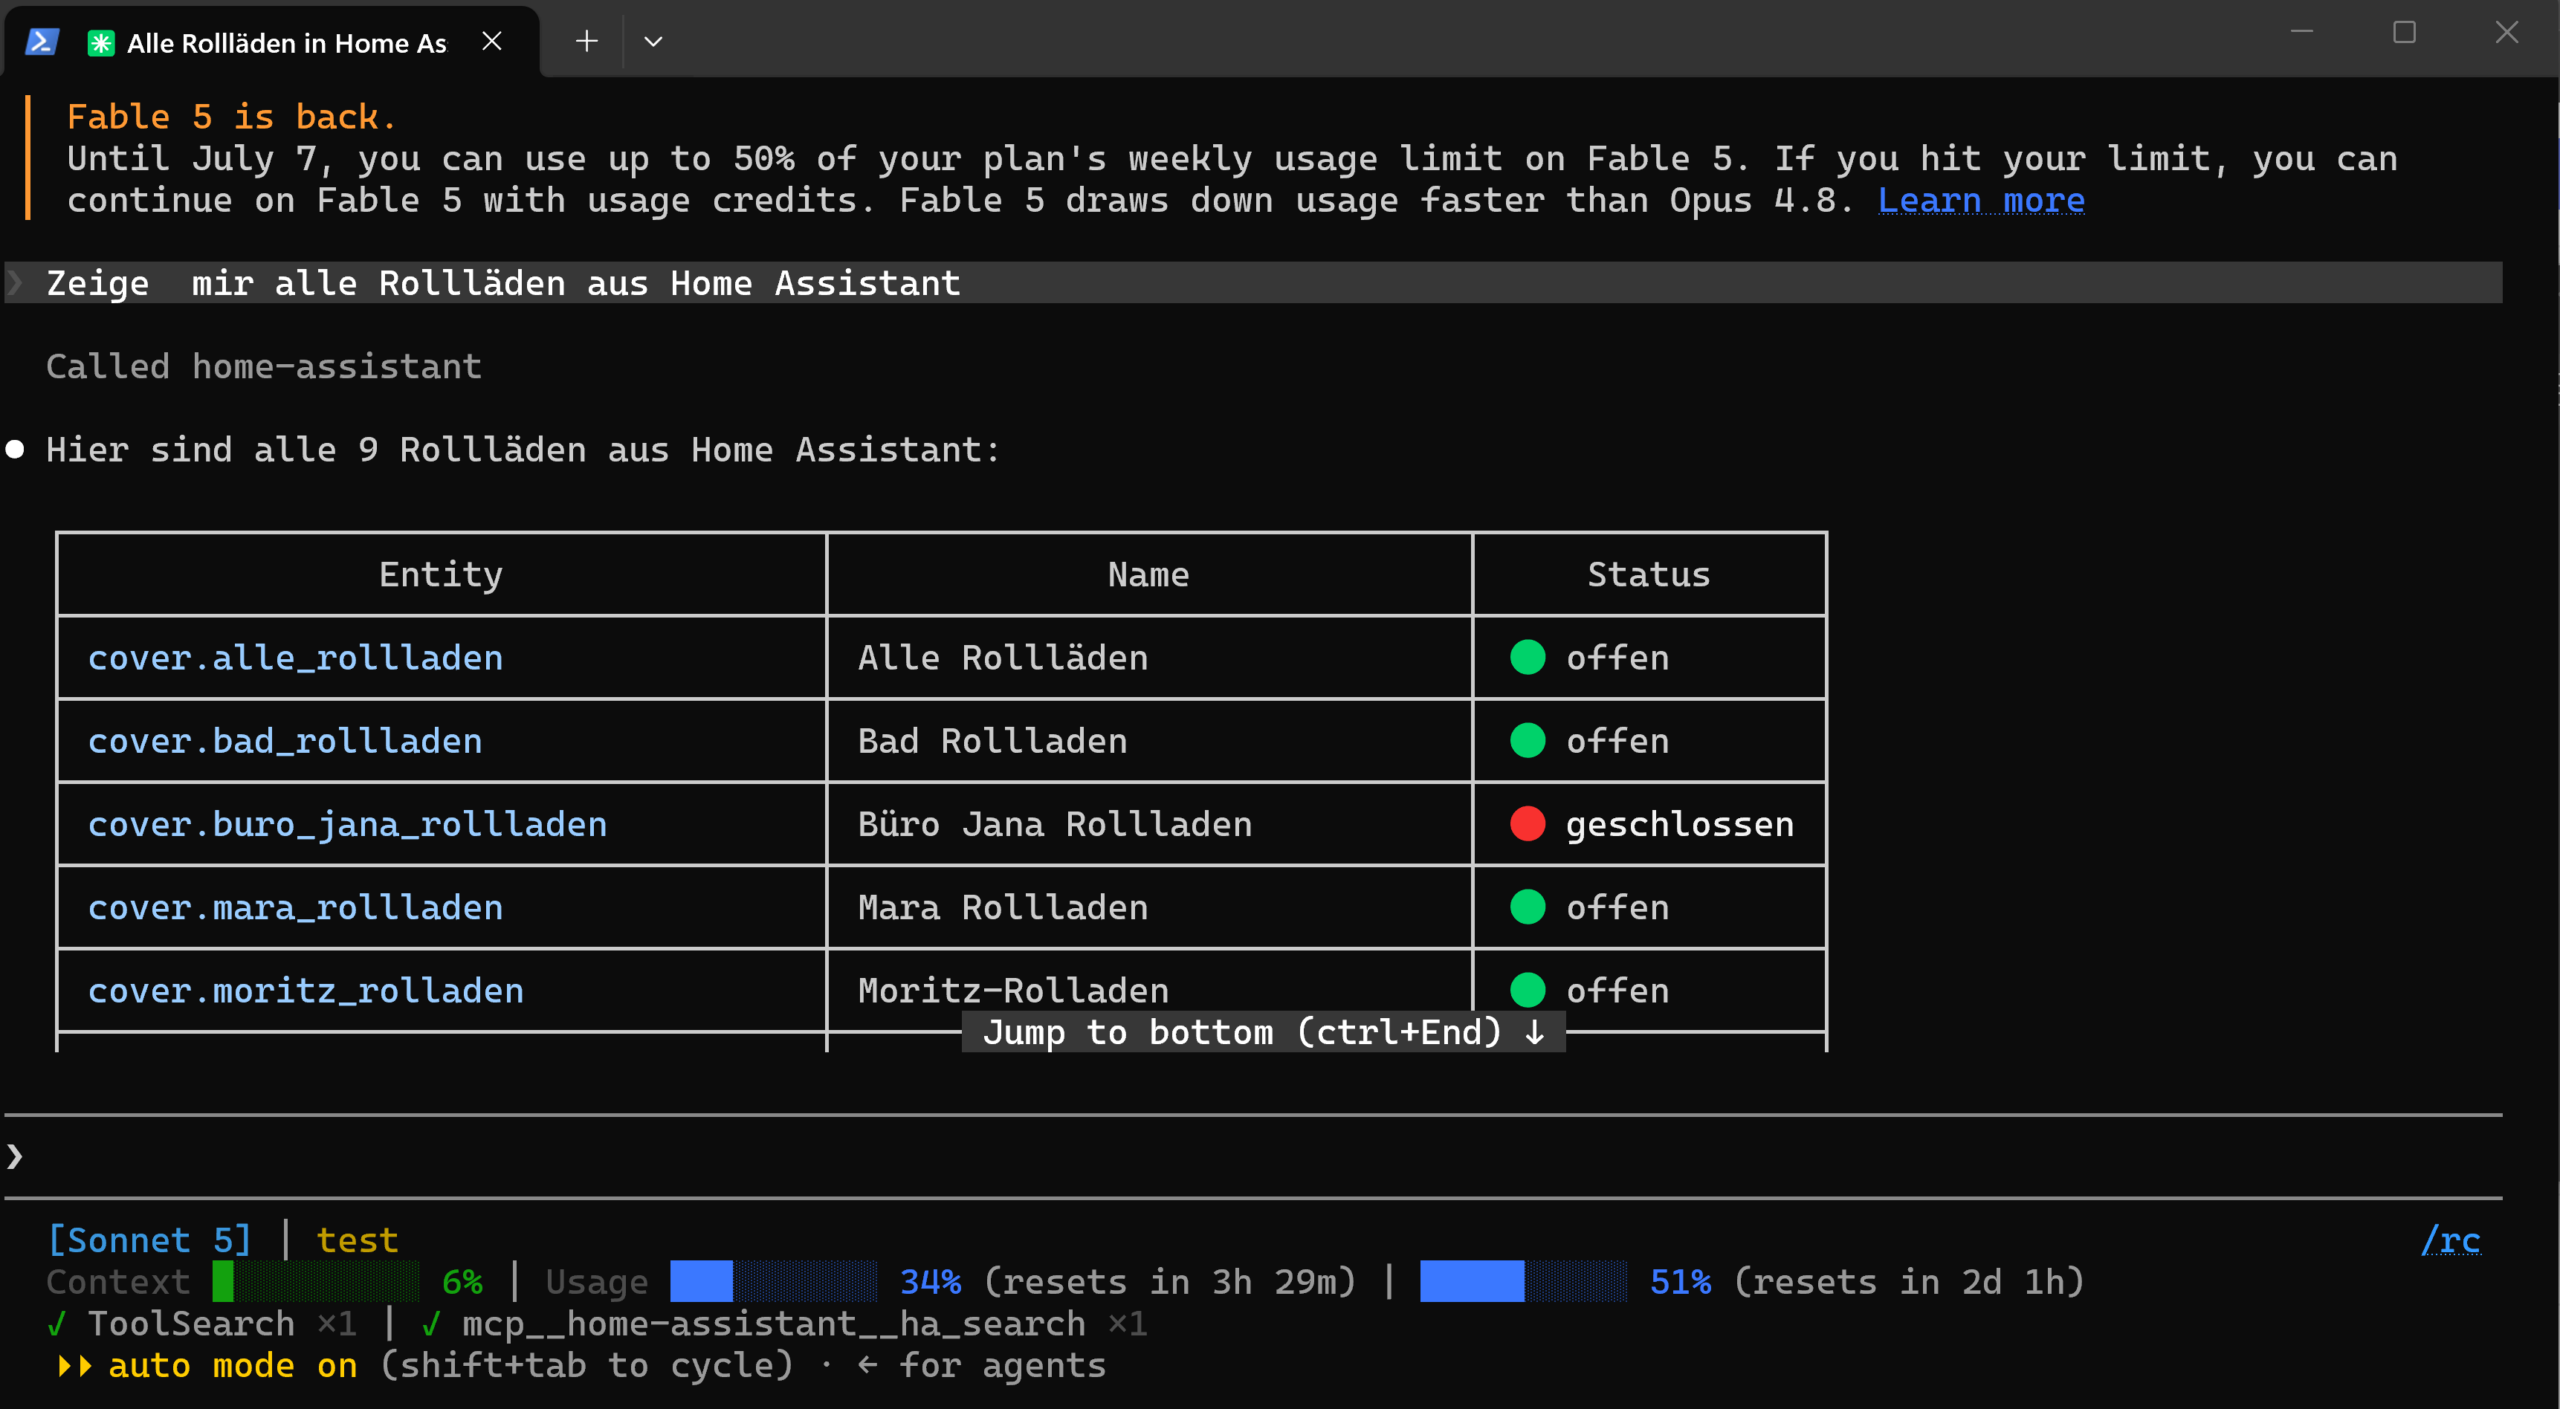
That's it: once the MCP connection via the Claude connector is up, you can interact with your Home Assistant through Claude from anywhere in the world:
Route 2 - Claude Desktop only, purely local (no remote access needed): Claude Desktop only talks to local MCP servers over stdio, not via a URL. Using the small helper program mcp-proxy (via uvx, which only needs the uv tool), you build the bridge yourself.
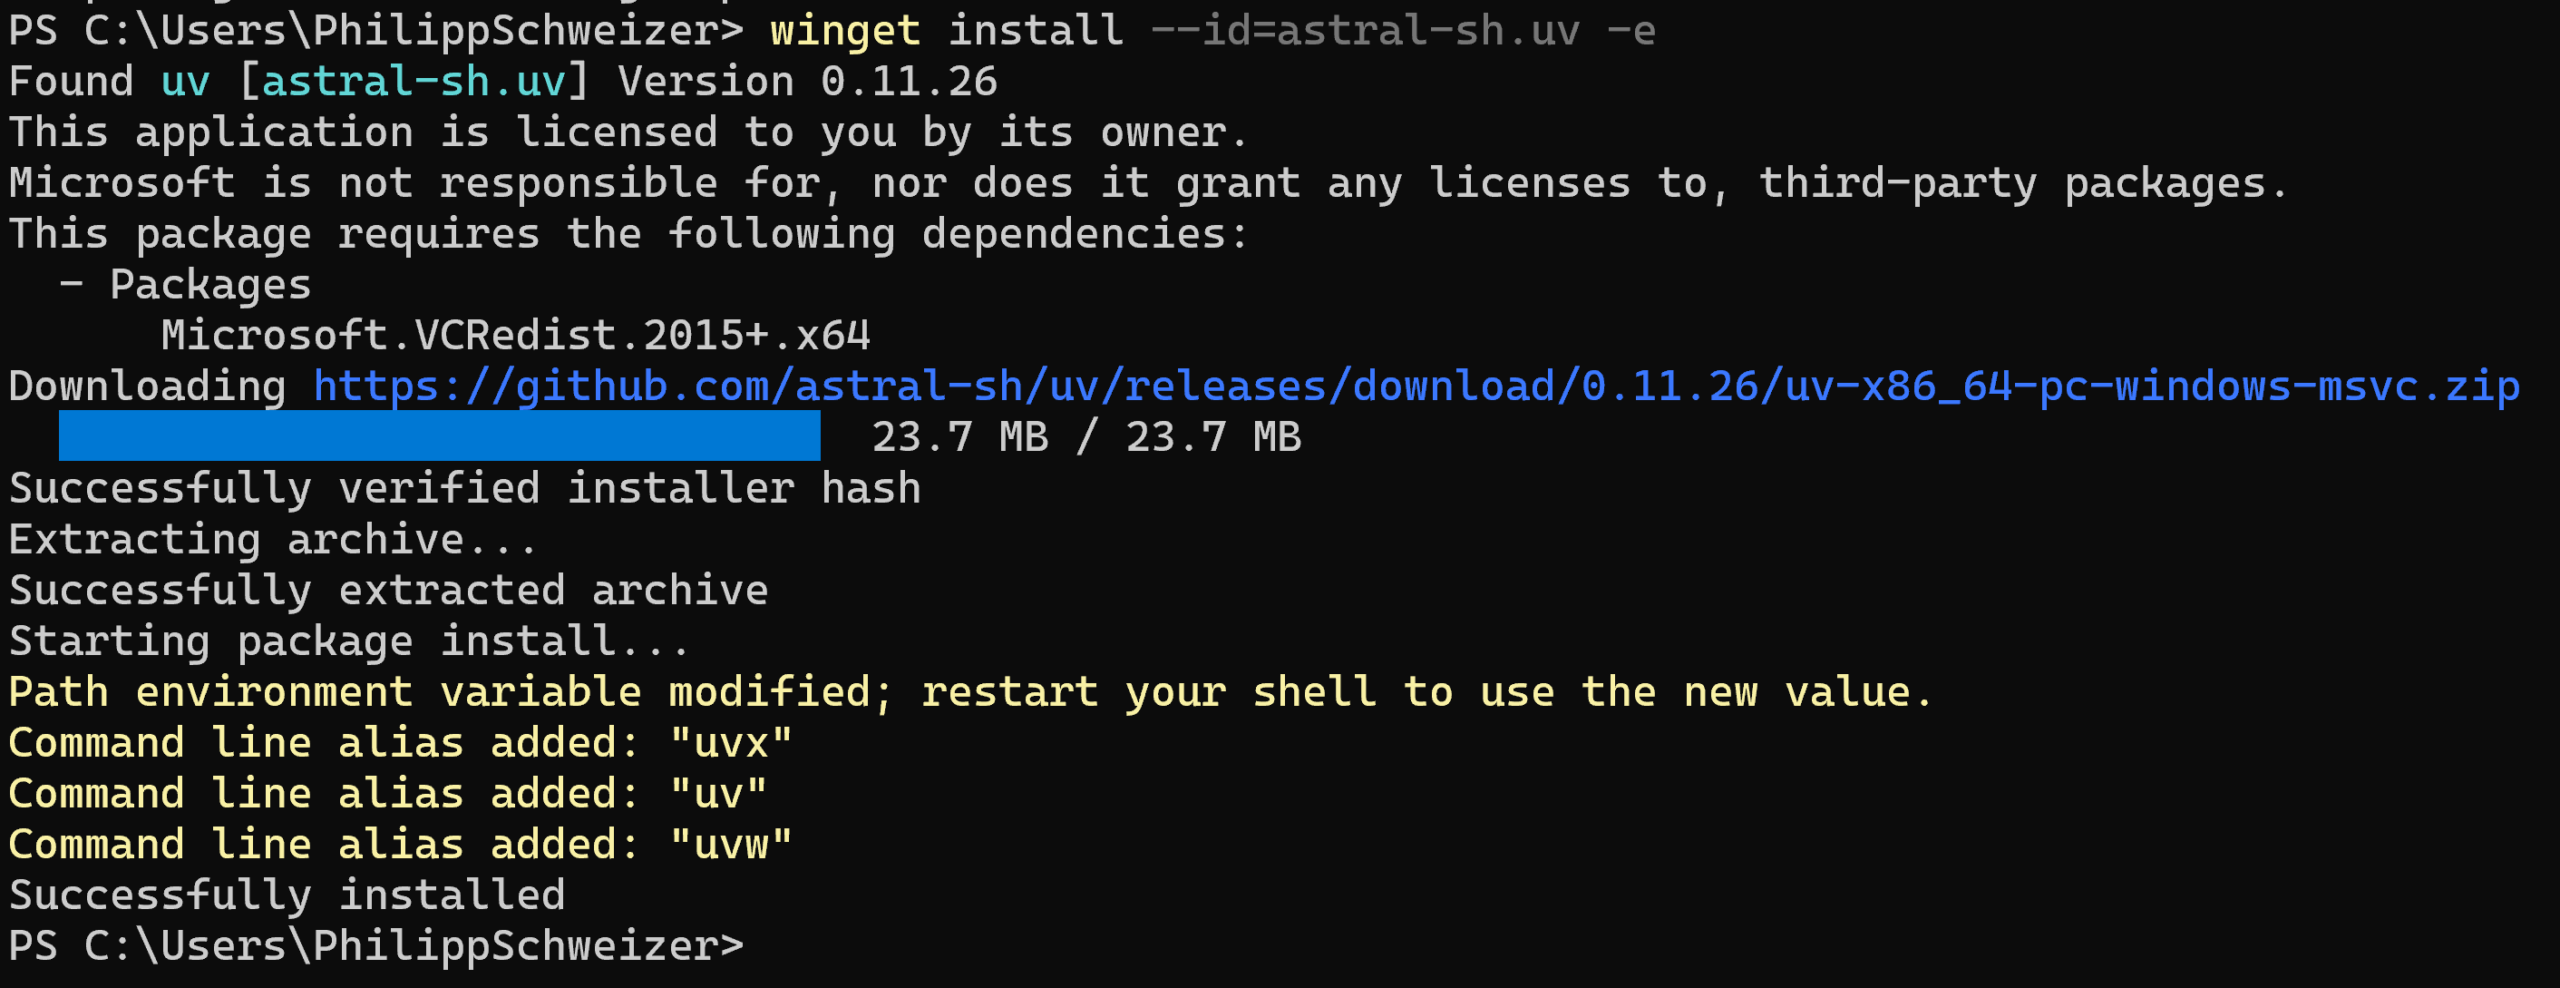
uv/uvx needs to be installed on the machine running Claude Desktop. Do that in a terminal with:
winget install --id=astral-sh.uv -e
Your Claude Desktop config needs to be extended with the following. Depending on what's already in your config, the JSON needs to be merged in accordingly - feel free to ask your AI assistant for help if you're unsure. As the streamablehttp target, enter the URL from step 1. Important: Claude should be fully quit first (also close its icon in the system tray):
{
  "mcpServers": {
    "home-assistant": {
      "command": "uvx",
      "args": ["mcp-proxy", "--transport", "streamablehttp", "http://homeassistant.local:9583/private_Odhrwersdgh234"]
    }
  }
}
This goes into claude_desktop_config.json. Advantage: works entirely on your home network, no remote access from step 2 needed - but only on that one computer, without mobile sync. You'll find the file under "%APPDATA%\Claude" (Windows). Claude Desktop needs to be fully restarted once.

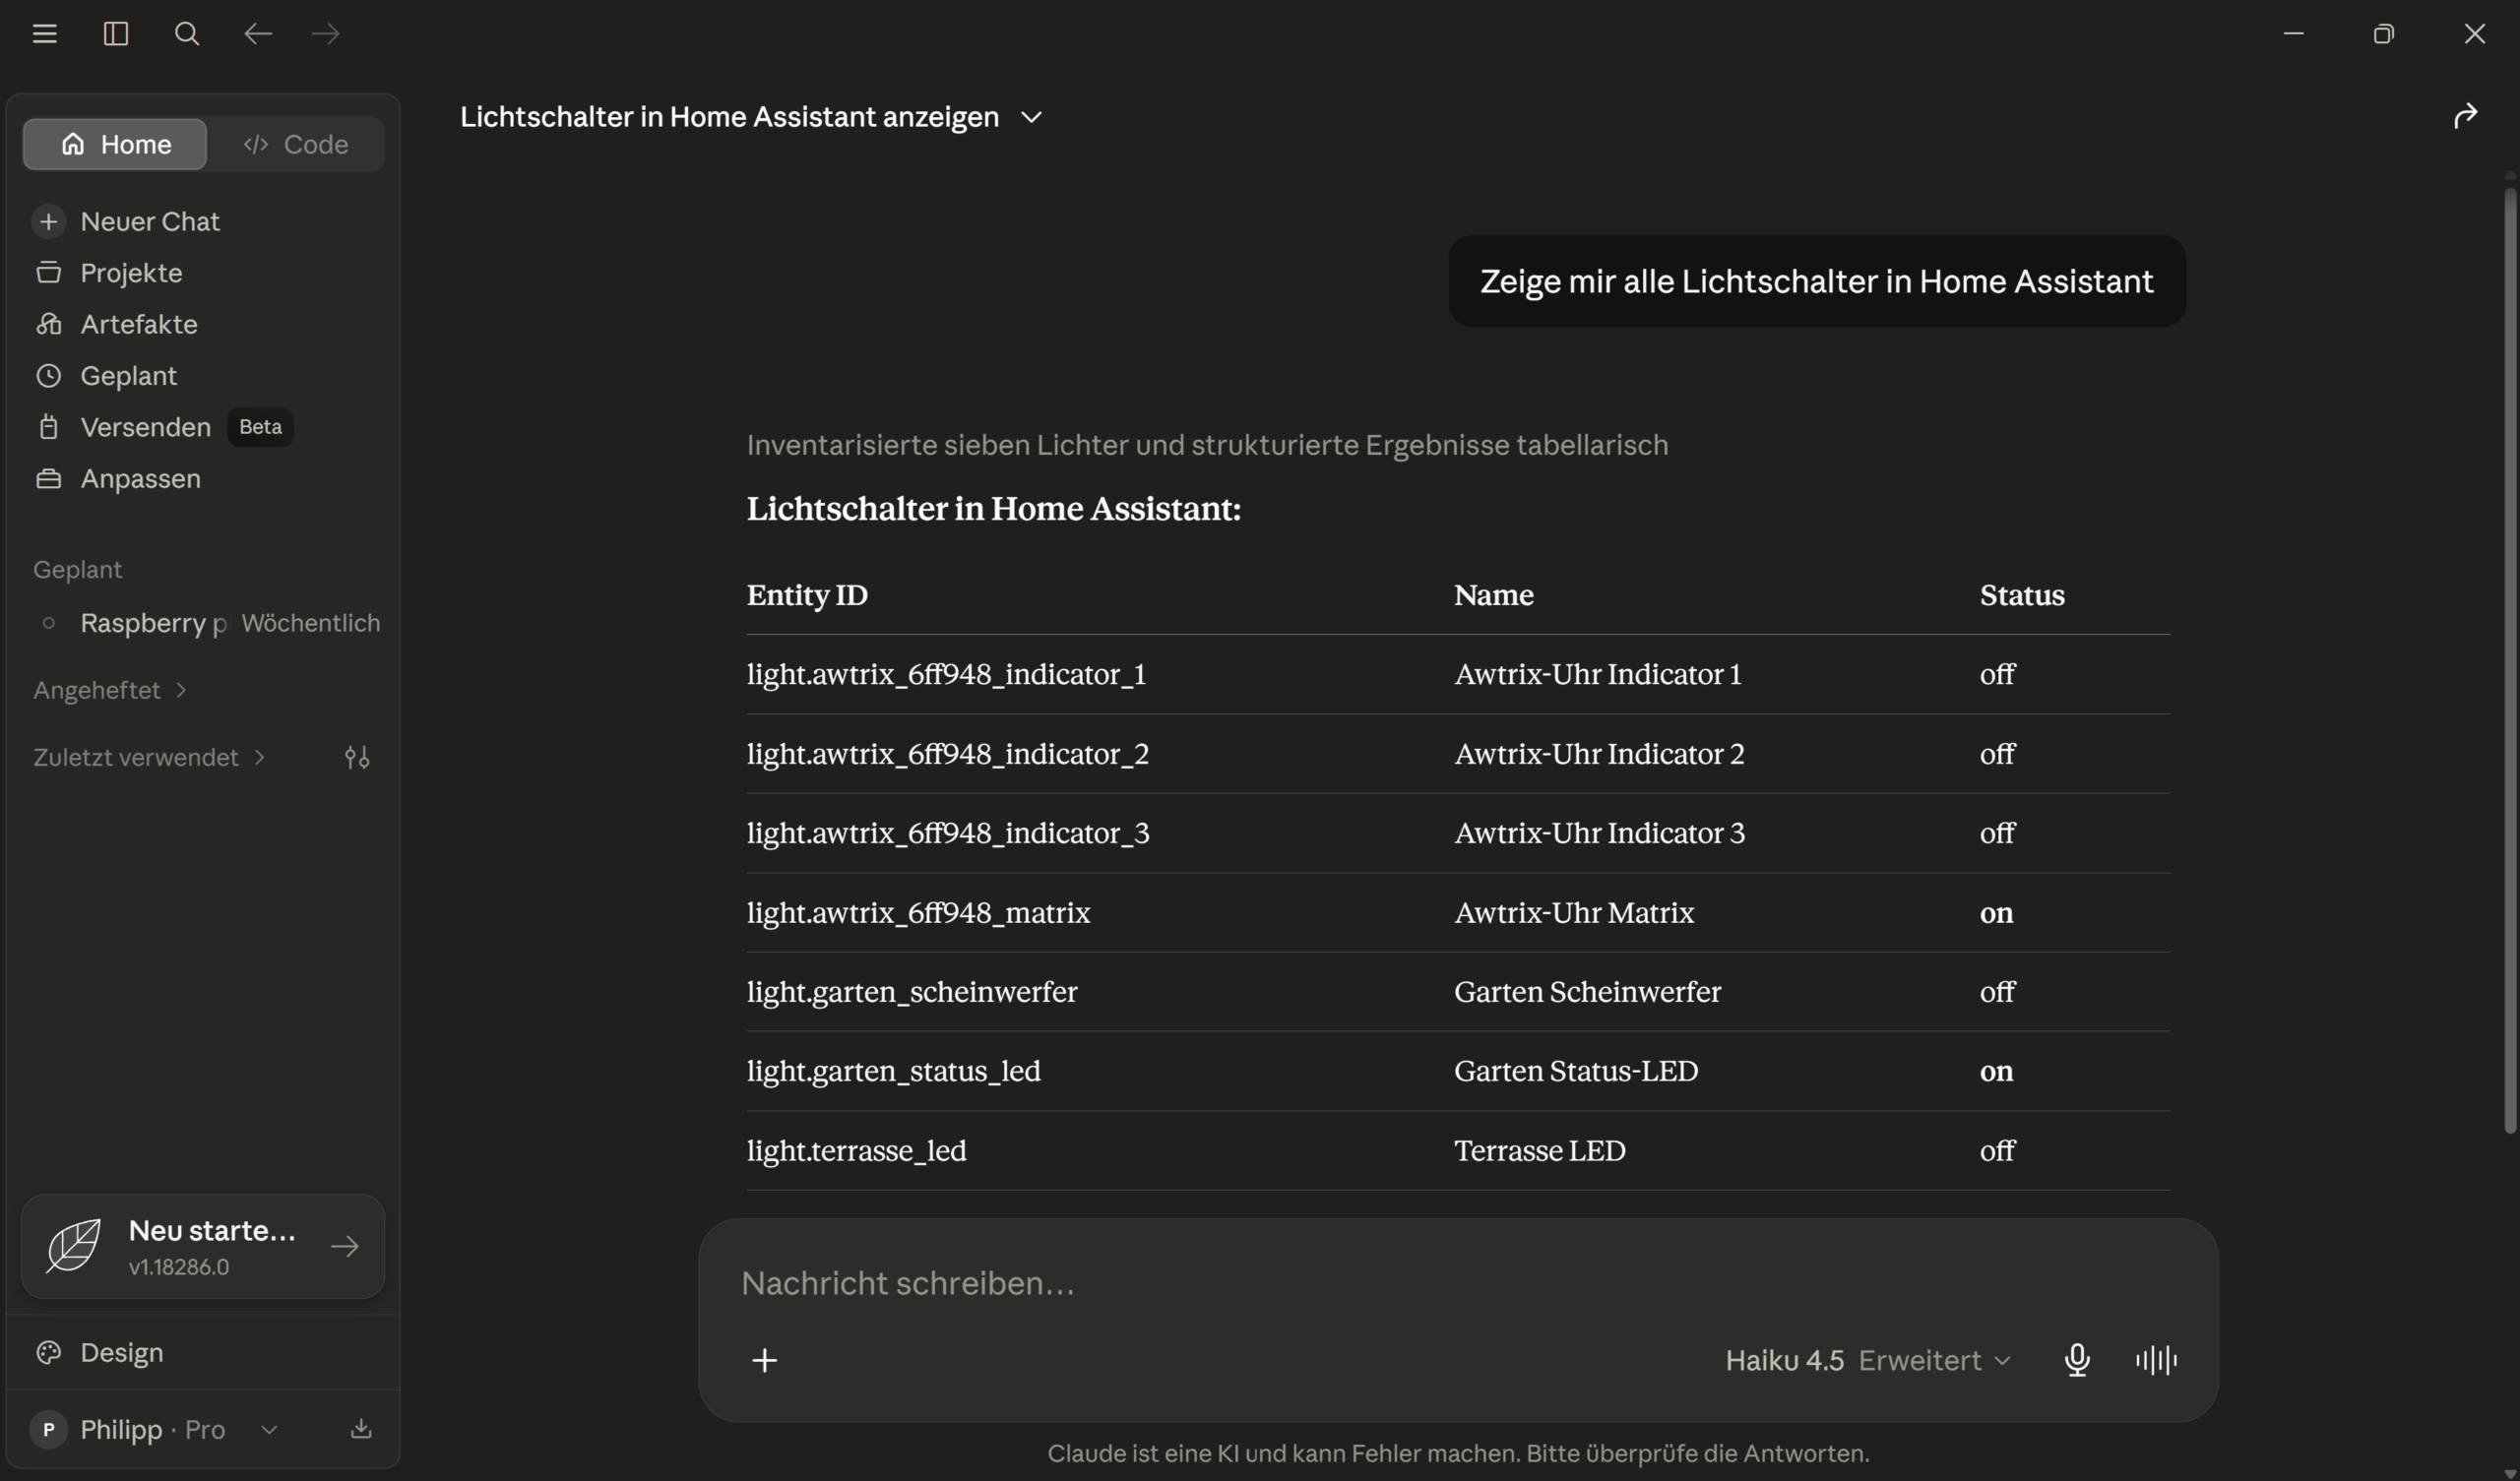
Then the connection is ready to go in Claude Desktop too:
Connecting Claude Code to Home Assistant
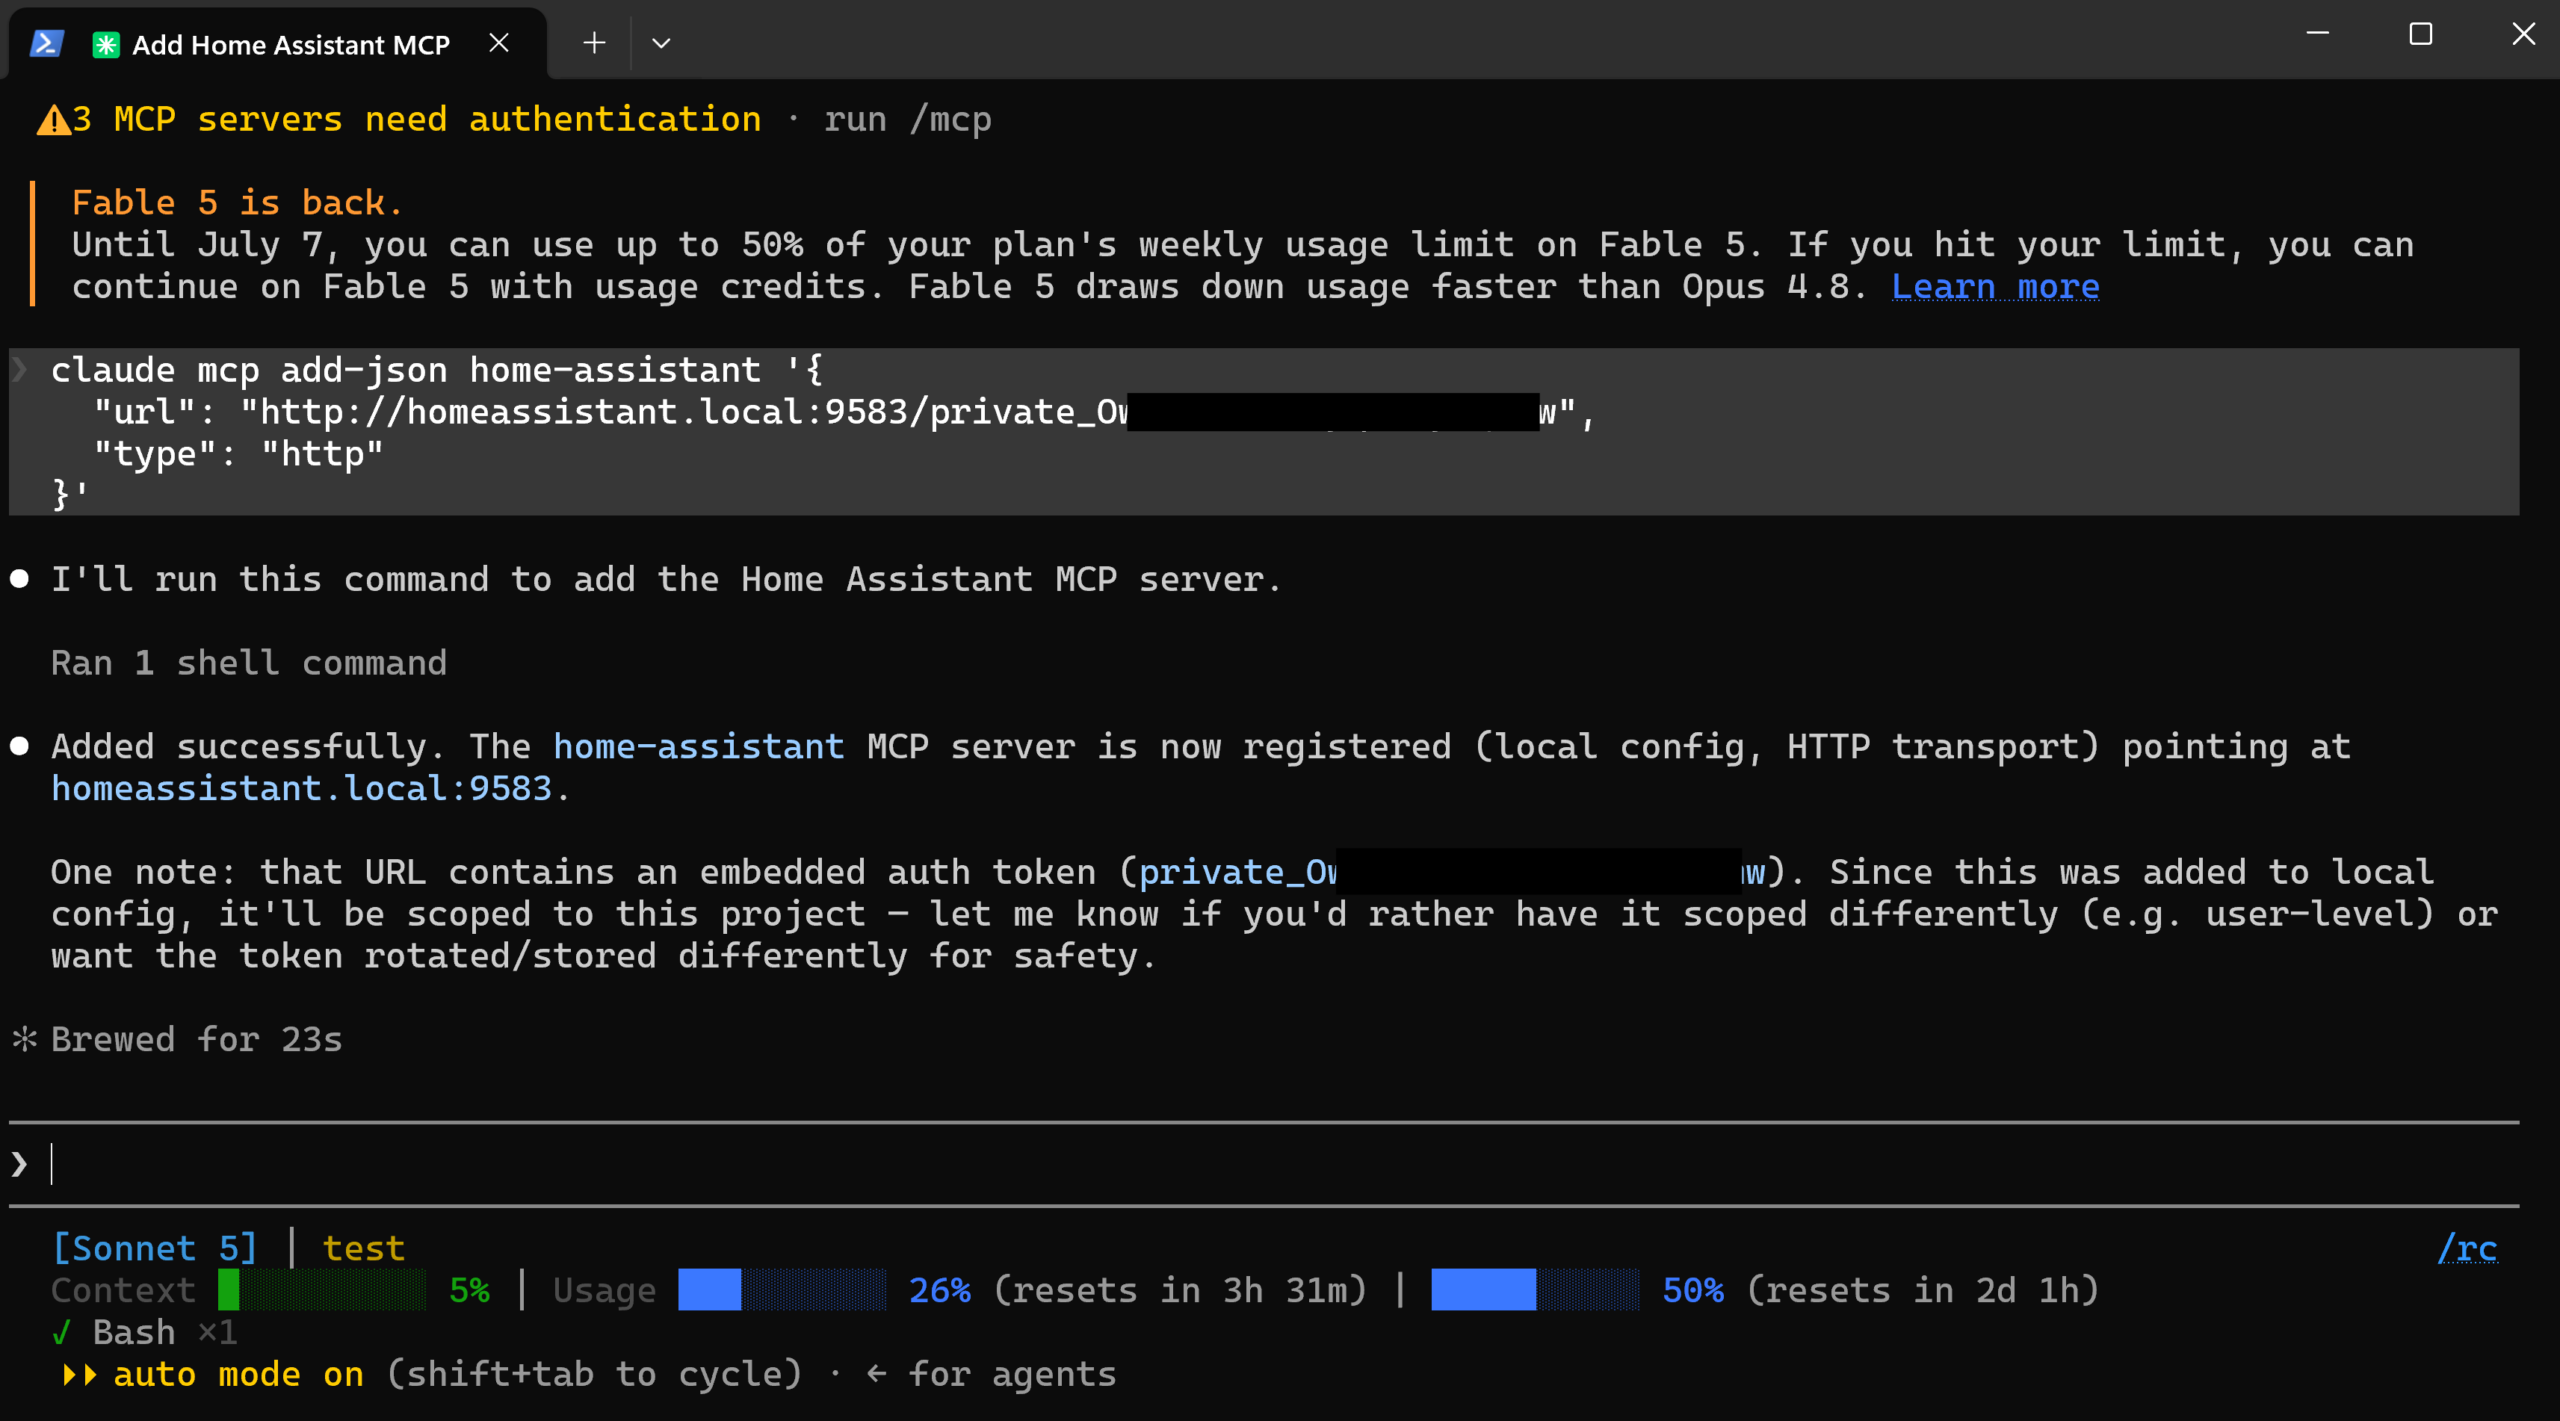
For Claude Code, one command within a session is enough. Insert the URL from step 1:
claude mcp add-json home-assistant '{
  "url": "your-mcp-server-url",
  "type": "http"
}'
Claude Code needs to be restarted once.
Connecting ChatGPT
- In ChatGPT, go to Settings → Connectors → Advanced and enable Developer Mode (available from the Plus plan)
- Under Connectors, click Create and enter your remote URL from step 2
- ChatGPT then walks you through an OAuth authorization flow
The difference to Claude: ChatGPT requires a genuine OAuth 2.1 flow for authorization - it doesn't accept simple bearer tokens or API keys for connectors. That makes setup a bit more involved, but it's also the more robust security model overall.
Connecting Gemini (CLI only)
Here's the honest limitation: there's currently no way to connect an MCP server through the regular Gemini app or web interface. It only works via the Gemini CLI, a command-line tool for developers:
{
  "mcpServers": {
    "home-assistant": {
      "url": "your-mcp-server-url"
    }
  }
}
This configuration goes into the Gemini CLI's settings.json. You don't need to add a bearer token separately here - the random path in the URL itself is the authentication. For the mass market, this is currently the least practical of the three routes - but if you already work with the CLI, you get the same full tool access.
Best-practice guidance for the AI
Earlier versions of ha-mcp required a separate download of an "Agent Skills" package that you had to upload manually as a ZIP into Claude. Current versions ship this best-practice guidance directly through a built-in, always-active tool called ha_get_skill_guide - the AI calls it itself whenever needed to learn how to correctly set up helpers, utility meters, or template sensors, for example. A manual skills import is generally no longer necessary; still, check the project's current documentation if your client shows different instructions.
Security: MCP access alongside a hardened Cloudflare setup
Many of you already protect Home Assistant with Cloudflare Access and a client certificate (mTLS) - rightly so, it's one of the most secure ways to make a smart home reachable on the internet. There's a catch here, though, that none of the existing guides on this topic address:
Cloud AI connectors cannot present client certificates. Both Claude and ChatGPT call your server not from your device, but from the provider's own cloud infrastructure. A client certificate is tied to a private key that only your device holds - the AI providers logically can't send it along. OpenAI confirms this for ChatGPT explicitly in its own documentation: custom connectors can present neither their own API keys nor customer-provided mTLS certificates.
The simple fix if you use the Webhook Proxy app (Option A)
If you use the Webhook Proxy app from step 2 (Option A) for remote access, MCP traffic runs over /api/webhook/... on the same hostname as your Home Assistant interface - so you don't need a second hostname at all. Instead, it's enough to exempt this one path from the mTLS requirement. If you copied the WAF rule from our Cloudflare Tunnel article, just extend it with this exception:
(http.host eq "homeassistant.your-domain.com" and not cf.tls_client_auth.cert_verified and not starts_with(http.request.uri.path, "/api/webhook/"))
The /api/webhook/ path itself stays secure regardless, because the webhook carries its own random ID in the path - that ID is the authentication for this one endpoint, with no certificate needed. Your Home Assistant interface stays fully mTLS-protected, while the AI still gets in through the same hostname. No second hostname, no extra IP allowlisting required.
Alternative if you use a dedicated MCP hostname (Option B)
If you instead run a separate Cloudflared tunnel just for the MCP server (step 2, Option B) with its own hostname like ha-mcp.yourdomain.com, there's no shared hostname you could relieve via a path exception. Here, the separate security layers still make sense - the random path in the URL (see step 1) is the first line of defense, and you can additionally restrict via a Cloudflare firewall rule to Anthropic's stable outbound IP range, as shown in the "Connecting Claude Desktop" section above. IP allowlisting is less worthwhile for ChatGPT, since OpenAI changes its egress ranges more frequently - but ChatGPT requires that mandatory OAuth 2.1 flow mentioned earlier anyway, which inherently offers stronger security than a plain URL with a secret.
Outlook: official tunnel solutions with no public exposure at all
Both Anthropic ("MCP Tunnels", currently a research preview with a waitlist) and OpenAI ("Secure MCP Tunnel", an open tunnel-client on GitHub) are working on a mechanism where a small agent at your home establishes an outbound connection to the AI cloud - your MCP server would then no longer need any public port at all. For security-conscious users, that's the cleanest solution in the medium term, though it's currently either still gated (Claude) or geared more toward business use (OpenAI).
Optional and potentially dangerous: letting the AI edit YAML configuration
This step is completely optional. Some Home Assistant features - REST template sensors, for instance - can only be set up via configuration.yaml, not through the UI. The tools for this (ha_config_set_yaml, file read/write access) are marked as beta features and require an additional companion component. Enable it via the "Advanced settings" of the Tool Settings web UI (a beta master toggle plus individual sub-toggles) - check the project's current documentation for details, since these beta features can still change.
Before you enable this: make a backup. Then make another one. An AI that edits your configuration.yaml and accidentally discards half its content can take down your entire system. Only enable this feature if you understand what you're granting access to, and if you already run regular backups anyway.
What you can actually build with this
- New sensors: "Create a sensor that shows today's rainfall from my weather station" - the AI finds the right source entity, sets up a utility meter helper, and configures it correctly.
- Dashboard elements: new badges, cards, or entire dashboard sections on request, without writing a single line of card YAML yourself.
- Fixing/adjusting automations: "The automation in the kids' room stops dimming correctly after 9pm" - the AI finds the right automation, analyzes traces, explains the proposed fix, and applies it once you confirm. If you'd rather understand the basics of triggers, conditions, and actions yourself first, our Home Assistant automations beginner's guide covers that.
Keep in mind: the AI can also suggest broken or nonsensical code. Especially for automations with real-world consequences (heating, safety functions), review the suggested code before letting it run permanently.
Troubleshooting
| Problem | Solution |
|---|---|
| AI client can't connect via Cloudflare, but browser access works fine | Check this first, before you lose yourself in WAF rules: it's almost always "Block AI Training Bots" in Cloudflare (Security → Bots). Set it to "do not block". Also check whether a country WAF rule is blocking US traffic. |
| "Apps" or "Add-ons" missing from the menu | Only available with Home Assistant OS (not on Core/Container without the Supervisor). Since 2026.2 the menu item is called "Apps" instead of "Add-ons". |
| Tool is known, but the call fails with "Unknown tool" | After changing tool settings (Tool Search, Read Only Mode, enabled/disabled tools), your AI client keeps caching the old tool list. Restarting the app/Home Assistant isn't enough - disconnect and reconnect the connector in the client (e.g. re-add the connector in ChatGPT, fully close and reopen Claude Desktop). |
| Connector can't find the MCP server | With the Webhook Proxy app: did you restart Home Assistant after installing it? Without a restart, the connection stays inactive. |
| Can't create the ChatGPT connector | Check whether Developer Mode is enabled and your plan (Plus or higher) supports it. |
| MCP connection over the mTLS hostname fails | Expected behavior with client certificate enforcement. Use the Webhook Proxy app with the /api/webhook/ exception in the WAF rule (see the security section) or a separate hostname without mTLS. |
Do I need HACS for the Home Assistant MCP server?
No, you install the base app/add-on directly through the App Store via the repository URL (github.com/homeassistant-ai/ha-mcp). An additional companion component is only needed if you want to use the optional, beta-labeled YAML/file-access tools.
Does the MCP server also work entirely locally, without a cloud AI?
Yes. With a local AI like Ollama or LM Studio, or with Claude Desktop via the local stdio bridge (mcp-proxy), all processing stays on your own network - with no remote access from step 2 needed at all.
Is it safe to give an AI full access to Home Assistant?
With some precautions, yes. Disable dangerous individual tools via the Tool Settings web UI, use Read Only Mode or Tool Security Policies for approvals where needed, and never share your MCP server URL with anyone - the random path inside it acts like a password.
Which AI works best for Home Assistant MCP?
Claude currently offers the simplest setup, since a connector configured once syncs automatically to the desktop and smartphone apps. ChatGPT works well too, but requires a manual OAuth flow and at least the Plus plan. Gemini is currently only usable via the CLI.
Dieser Artikel erschien zuerst auf raspberry.tips.

Top comments (0)